Leaderboard

Popular Content
Showing content with the highest reputation on 04/18/2021 in all areas
-
It's been a while hasn't it! Fishing season kicked off for me with a mid-week hooky session at my favorite lake. So much fun! I ended up with 61 largemouth bass topped by a 5.75 pound kicker... With the fishing stuff at the forefront, the modeling stuff kept percolating in the back of my mind. I finally pushed myself to sit at the model bench and get started on some spraying. The D-13 is sitting in a post-factory state and the task before me now is to put on the field-applied mottle of dark greens, which I've chosen to be RLM 82 and 83. I thought a good way to re-introduce myself back into the game was to try my hand at applying these greens onto the horizontal stabilizers, which are still removable. Here are the stabilizers, with a base coat of RLM 74 and 75. Using the color profiles found in Crandall's Dora Volume 2 as a rough guide, I sprayed some random patches of the lighter RLM 82 (Mr Hobby Aqueous). After that, the darker RLM 83 green was sprayed on. I gave the stabs a light coat of clear gloss (Alclad Aqua Gloss) to even out the paint job for the photos. Not much but it is a start, right? I'm going to use the leftover masks to cover the markings that I've already sprayed to protect them from inadvertent overspray. I think I'll be tackling the wings next since the painting should be very similar to the stabilizers.12 points
-

HH-60G Pavehawk
Aluxe and 10 others reacted to Pete Fleischmann for a topic
Hey all- Here are a few shots of the completed Pavehawk. Link to build is here: Build link to the figures is here: Figures I started the figures before I had the kit. The first post about the figures was 25 April 2019- a two year project from start to finish. Following photos were shot by Rick Ciaburri: thanks for looking! cheers Pete11 points -
This is what I managed to build from the huge box almost 2 years ago. Gotha G.I 42/15 Feodora. Not an easy build at all, especially when one faces the unusual for WNW faults in manufacture - misaligned mould halves leading to some severe sanding work - all the bits required a lot of treatment. Especially thin lines/cables/pipes... Anyway, still, when the parts are cleaned what remains is a set of quite finely fitting elements - quite a bonus when one takes into account the unorthodox form of this aircraft. All in all, I am very happy to have this weird bird in my cabinet.11 points
-
ello, ello, thanks my friends for stopping by so, I have finally settled on a scheme - it's K2902 of No.1 Squadron Tangmere. It belongs to B Flight with it's fin, wheels and spinner painted in blue. It's individual letter 'A' can be seen on the cowling painted in red. Tragically, it was lost in a mid-air collision with K2901 on 17th December 1937 near Rowlands Castle, Hampshire. Both pilots, Flying Off (Acting Flight Lt) Harry Hamilton Peck (aged 26) and Sgt Robert Edmund Patten (aged 26) were killed, so this is in their memory. ..there are fancier schemes out there, and it might not be as shiny as the model, but I like the understated look and want to honour those airmen.. I am still trying to do things in some sort of order so I don't get construction clashes and am sort of looking at getting the tailfeathers & lower wings on so I can get the upper wing (just the mini midlle bit) & cabane struts properly oriented.. ..so with that, it was time to get the tail components sorted - lots of strip decal for the rib tapes & strengthening patches where there are rigging attatchments - plus these two round 'polo mint' things.. ..these were then primed with Mr surfacer & painted with alclad.. ..there are four rigging attatchments on the tailplane upper, and strut attatchments lower.. these had little leather boots added.. ..I have no idea what blue to use, so I went with the same as my Spitfire Race #80 so they look cool in my cabinet together ..the fabric effect I think works & I have wire wooled the paint to scuff it up a bit.. ..the bits don't really dry fit together very easily, but it's something like this.. ..I have to say i am really enjoying making this one - I guess that will last until I have to get the geometry right for all the struts & wings also the rigging I have no idea about - i need stiff, very thin piano wire I think and no idea how I will do the turnbuckles - I wonder if Gaspatch will scale me up a set or two TTFN Peter11 points
-
MH-6M Little Bird
Marcel111 and 10 others reacted to Pete Fleischmann for a topic
Hey all, test fitting here... The Black Ops bulkhead, seats, and instrument console look like they’ll work with some adjustments. I was also concerned that the pilots outboard feet might interfere with the windscreen, but I think I’m ok. I’m trying to identify any fit issues now and address them before I start doing any detail work. I wasn’t sure if the instrument console would interfere with the windscreen- looks like I’m good there too. you can see the Blu Tak holding the instrument console in place. The base of that is a little short- it should come all the way back to the seat bulkhead-I’ll address that too- pressing on- the pilots feet are separate parts. I may turn their outboard feet in just a smidge to be sure- cheers Pete11 points -

Bf 109G-6 JG 53, Attenbaum 1945
Nikola Topalov and 8 others reacted to Miloslav1956 for a topic
Another Bf 106 finished. Project 12. 1/32 Hasegawa model, Aires cockpit, exhaust & wheels HGW wet transfers Painting mask Propeller 77 & Homemade All colours MRP9 points -
Bf 109G-6/R-6 9.JG3 Alfred Surau, Bad Worishofen 1943
coogrfan and 8 others reacted to Miloslav1956 for a topic
Project 13. 1/32 Hasegawa model, Aires cockpit, wheels $ exhaust, Eduard Look. Panting mask homemade & Propeller 77. EagleCals #42. All colours MRP9 points -

1/32 Hasegawa Fw190D-13 Yellow 10
themongoose and 8 others reacted to Thunnus for a topic
FYI... all of the fish were released! I usually don't keep any freshwater fish for eating. Saltwater fish like tuna... that's another story. Just another lifelong passion that I happen to have. Thanks for the comment! Thanks Jim! Honestly, my time on the bench in these summer months will probably be a bit spotty but hopefully I'll get a few projects done. Good luck fishing in Goergia, Troy! Just being outside in the sunshine is a blessing in and of itself! As I mentioned before, I've kept the leftover markings masks to protect the markings as I apply the green mottle. I've placed the narrow white cross masks to the upper wings and applied the lighter RLM 82 mottle patterns. The dark green RLM 83 is then applied. I'll do a bit of touch-up work and then move on to the fuselage after masking the fuselage markings and tail band.9 points -
Thanks Matt, and yes, just looking to finish this one up with dignity at this point. The trip we are taking in about a week and a half has me pressing to fix mechanical issues with our tow vehicle, on top of seasonal prep work to get our trailer ready for the off-road season ahead. All of this has kept me busy on all of my days off, but I did manage to sneak at least a few nights work in on the little tripe. Nearly the entire thing is completed save adding the lower aileron braces, landing gear rigging, prop and aileron control lines as well as final assembly. I figure about 1 more good nights session and it should be finished. I was trying to get the little tripe finished up while enjoying some British telly with the wife but my 19 lber and my 26lber decided to pull a Ying & Yang right where I was trying to build on the coffee table, so had to pack up and head back to the main bench (nothing but terrestrial radio down there atm) After heading back to the bench, I got the rudder added as well as the OOB machine guns that I had built previously. After annealing, and painting, these really didnt turn out too bad. The lower wing spare and lower panel were attached and all the weathering that Im going to do to the model is now done. I would have to have supposed that Voss's machine lived a fairly short life and wouldnt have had anything too severe, so I didnt want to go overboard. Besides, heavy weathering or damage didnt match any photos I have of Voss's kite. Anywho on with the pics: Engine complete and ready to be attached to that tiny fuselage: (crappily aligned pic sorry bout that) Engine is setting in place atm: Painting, let alone weathering prior to assembly is super foreign to me, and WWI stuff is always an exercise to some degree, out of my comfort zone. I really do like the look of the shiny oil and leak weathering over the flat fabric. The contrast always to me gives more realism My cell camera is old now, and starting to do funny things. I guess the angels approve of the fit of the top wing as much as I do.....just looks like some odd "heavenly" type light treatment. That could also be used to describe the actual fit of the entire kit honestly. People are going to have to give me some definitive proof that this isn't WnW engineering with fit like this. All 3 wings fit basically perfectly in place, and perfectly in relation to each other. The top wing is just set on yet still fits and aligns perfectly with the fuselage and the other two wings: Even with all the silvering (which is much less evident with the whole model together, as it really takes attention to the overall look) I must admit that it still turned out to be a very attractive, if all be it not super well done model. This is the last installment prior to finishing this little guy up. It was fun! Id HIGHLY recommend this kit to anyone who wants a tripe, and is willing to put in about 20 min worth of hot water correcting. Thanks lads, and will hopefully have this one finished off long before we leave on our trip on the 29th of this month. Cheers!8 points
-
HH-60G Pavehawk Kitty Hawk 1/35 DONE!!
F`s are my favs and 5 others reacted to Pete Fleischmann for a topic
Now it’s done! cheers Pete6 points -

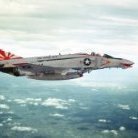
1/32 A-6 Intruder
Chris Wimmer and 4 others reacted to miketippingmodels for a topic
This is the 1/32 A-6 intruder with a lighting chip, allowing all lights to function out side and in the cockpit. Along with Reedoak figures I also used and the verlinden mule, and the Eduard mer pods ,this is all then painted with Tamiya acrylics. Its a good kit overall, it has its dowe points, but mainly a lot of up points, I have another one to build later in the year so I am already looking forward to this any way enjoy The Grumman A-6 Intruder is an American twinjet all-weather attack aircraft developed and manufactured by American aircraft company Grumman Aerospace that was operated by the U.S. Navy. It was designed in response to a 1957 requirement issued by the Bureau of Aeronautics for an all-weather attack aircraft for Navy long-range interdiction missions and with STOL capability for Marine close air support. It was to replace the piston-engined Douglas A-1 Skyraider. The requirement allowed one or two engines, either turbojet or turboprop. The winning proposal from Grumman used two Pratt & Whitney J52 turbojet engines. The Intruder was the first Navy aircraft with an integrated airframe and weapons system. Operated by a crew of two in a side-by-side seating configuration, the workload was divided between the pilot and weapons officer (bombardier/navigator (BN)). In addition to conventional munitions, it could also carry nuclear weapons, which would be delivered using toss bombing techniques. On 19 April 1960, the first prototype made its maiden flight.5 points -

Gordon Bennett! RNAS 1214
themongoose and 4 others reacted to RLWP for a topic
And the chassis is attached: Chassis isn't the word I would have associated with this area, except I found a contemporary article calling it just that I must find something to go in that big space under the cowling... Richard5 points -
Of course I had to make life harder by not mask enough and now I have to paint bottom side of upper wing again...I have to blame my laziness. I leave upper wing for tommorow. With watercolor pencils I've painted propeller. Now I'll overspray it with clear orange and I hope it do the trick.4 points
-

Fuji FA-200, 1/20 Nichimo
Alain Gadbois and 3 others reacted to mgbooyv8 for a topic
Thanks Mike! Work started on the fuel and oil hoses on the engine, using the information from Thor: And using this picture I took during the pre flight of the Fuji I made some flights in: This is the result so far: The nose wheel leg was also glued to the firewall. The exhaust pipes and all the other lines and hoses will be added after the engine is glued to the firewall. Cheers, Peter4 points -

1:32nd scale Hansa-Brandenburg W.20
Rockie Yarwood and 3 others reacted to sandbagger for a topic
Hi all, The kit supplied lower wing needed some major changes. I used the few photographs available for this aircraft and the drawings in the ‘Windsock’ World War Centenary (Spring 2015, Vol.31, No.1). Basically the kit wing needed to be modified for the following reasons: The wing leading edge had more of a swept angle than that moulded on the kit wing. The centre section of the leading edge had a recess, to allow the forward wing struts and engine support frame to be fitted to the fuselage. The lower wing and the upper wing had 'stacking' pads fitted into the wing leading edges (2 upper and four lower wing). The centre cut-out in the trailing edge of the lower wing did not have square corners, but was fitted with quadrant fillet panels. The upper surface of the lower wing had walk boards fitted at the wing roots. The rear of the centre section of the lower wing had two slots through the wing to allow fitting of the wing rear struts into the fuselage. Mike4 points -

Birdcage Corsair - Finished
Greg W and 3 others reacted to Dpgsbody55 for a topic
I don't like leaving it this long between updates, but after the last part installing the engine accessories bay, I took a few days off while I scratched my head as to how to attach spark plug wires. Then late last week, I took a dash over to Sydney to look at a prospective car purchase. But that's another story. My first problem with the spark plug wires was how to attach them to the HT lead ring. I quickly decided that it was impossible for me to drill the holes needed to attach the wires, so after a little thought, I decided to file down the detail on the front of this ring then drill the holes. The plug wires once attached would return the detail provided in the kit, especially after a little paint. So the HT ring was filed then glued into place. Then I set about attaching the front spark plug wires for the front row only. One down, eight more to go. Front nine plug wires in place, and oil pipes added to the cylinder heads. Shoulda done that earlier... The next issue was how to get the other twenty seven wires into place, around both the inlet and exhaust pipes that attach to the back of the front row of cylinders, then through the cooling tins that attach to the heads. So I attached the rear plug wires to the front row, then attached the inlet and exhaust pipes to that front row, then lead them through the gap to the top of each head. The rear inlet pipes and rear cylinder row were held in place without glue to verify alignment of the pipes that pass between the rows with the rear front row plug leads lead through. Next, I attached the front plug wires to the rear row of cylinders, and glued both rows together. The plug wires on the rear row had to be dead straight to pass between the cylinders of the front row. The next step was to add the cooling tins. Glue was placed on the engine and the cooling tins were added, threading the front row rear plug wires through holes drilled into the tins.Then those plug wires were glued into place as above. Eighteen plug wires done, only another eighteen to go... So the next job was to add the rear row rear plug wires, then lead them through more holes in the cooling tins. These and the front plug wires of the rear row were then glued into the holes in the HT ring. Now the front and back of the engine can be added, but before I did that, I gave all the wires a coat of flat varnish to help reduce the copper wire look. The front of the engine was built up and wires added, then this was glued on, as was the in take manifold to the back of the engine. After a little touching up, it looks like this. The bottoms of each plug wire were painted too, to replace the detail of the kit HT ring and generally look "proper". The next step was to add the exhaust pipes to the wall at the back of the engine bay. These were aligned while drying using the engine. Cowling rings were added to the engine and at last the engine could be added to the rest of the model. Here's where the model is now. Now it's really beginning to look recognisable. I still have some finishing to do around the engine, with the cooling gills to be added as well as the front of the cowling. That's next then I can get all the cowlings to fit, which may take some time. The cowlings for the engine accessories bay may be a pfaff due to the thickness of the parts, but time and patience will sort them out, I hope. Up to this point, I've darted about the instruction sequence, and I'm fairly certain I've not missed anything important for the future of the model. So I expect the next report will be back to the usual sequence. Cheers, Michael4 points -
Your “pretty close” is the best I have ever seen! In any scale!4 points
-
Ok, made a new part from thin sheet. The actual armor plate will follow. Bye for now!4 points
-
Good Morning all. I would like to introduce myself. I tried once before on these forms, but the project stalled indefinitely, and I'm not much for posting WIP threads. I have been following along builds here for many years, and I think LSP is my favorite modeling forum by far. You folks are some of the kindest and most talented modelers out there. A little about me, I grew up in my dads local hobby store and have been building for most of my life. I have always done 1/48 scale models, and felt it was time to jump into something a little bigger. I bought this kit when it fist came out and started assy, but frankly I got intimidated by it and it sat on the SOD for years. I decided this year to finish up any SOD kits and this was the last one. So here it is. Now that summer is coming quickly my building will slow considerably, but I'm thinking for the fall/winter season a trumpeter avenger in the FAA livery would be a very nice compliment to this kit. All in all, I found it to be a bit of a difficult build. However, it put me out of my comfort level in a wonderful way and am quite pleased with the result. I chose the FAA scheme simply because I haven't seen it done anywhere on this kit before. I used mostly vallejo air and tamiya colors. The build is strictly out of the box. Hope you all enjoy it. Thanks for looking. PS, please excuse my photos. I'm far from a pro photographer.3 points
-
Thanks guys! The edges of the control surfaces were sawn-in to make them visually separATE. Now Meindert mentioned it, I couldn't let it pass. There was a minor misalignment of the edges at the unnderside of the ailerons. The recessed lines were easily filled with Mr. Surfacer. Then a bit of shading was executed on the white area's with light grey, followed by a second coat of white: Faded Intermediate Blue will be sprayed next. To be continued. Cheers, Peter3 points
-

Kitty Hawk 1/32 F-5E/F Tiger II / Special Interest Group (SIG) !
scvrobeson and 2 others reacted to scjh for a topic
SC3 points -

Kitty Hawk 1/32 F-5E/F Tiger II / Special Interest Group (SIG) !
scvrobeson and 2 others reacted to Kagemusha for a topic
3 points -
Kitty Hawk 1/32 F-5E/F Tiger II / Special Interest Group (SIG) !
scvrobeson and 2 others reacted to Kagemusha for a topic
3 points -
Well I'm back after a longer-than-intended break to let the oils dry; I picked up a Revell 109 in the meantime and I have the cockpit painted and fuselage assembled. No excuse other than I - oh look, a butterfly - get distracted sometimes. Anyway, with a coat of Tamiya X22 on the wood, I decided to get the wings painted. The scheme is white on top and CDL underneath, all with black chordwise stripes. First off I sprayed the CDL using my trusted Mr Hobby "Radome" (H318). You might think uppersurfaces next, but no. I've decided to use home-made masks for the wing roundels. Remember sitting in geometry classes in school, learning how to construct all sorts of shapes and find the centre of a circle using nothing but ruler and compasses? And I'll bet you thought you'd never use it outside said geometry classes? Well, I for one was wrong: I photocopied the decal sheet and used the copy and the aforesaid method to find the centre of the roundel, measure the circles, and cut them into Artool Ultramask with my Olfa Compass Cutter. I masked up for the white, and that included adding the roundel masks on the underside of the lower wing. I also noticed from the photos included in the kit that the white returns onto the underside, as does the PC10/12 on standard RFC schemes; so incorprated that too, then sprayed a mix of matt and gloss white above the wings, on the lower roundel area, and on the fin and rudder. When that was dry, I applied the rest of the roundel masks except the centre. I measured the rudder width at 0.63 inches, so rather conveniently that's 0.21 inches per stripe. A simple strip of Tamiya tape sufficed, then it was out with the red paint. Next up blue; hopefully soon, thanks for your patience.3 points
-
MH-6M Little Bird
Greg W and 2 others reacted to Pete Fleischmann for a topic
sure! I use Vallejo Panzer Aces 336 for the green, and whatever light grey you like for the leather portion/3 points -
The engine Inbetween finishing up the Zipper and a lot of stuff at work the Wildcat's engine recieved some paint. Alclad Aluminium for the cylinders, Tamiya black for the push rods and Gunze H308 (should be close to engine grey) for the crankcase. The next task can be seen right in the background: the ignition. I added the one piece spark plugs from Anyz and the braided line 'copper' - well more like yellowish brass Since the engine isn't really visible once the cowling and prop are on, this was used as a testbed for future builds. What worked out? What didin't? + melting the braided lines ends with a soldering iron (snatched that trick from Brian's Tigercat build) to ease glueing with CA + overall looks + handling the tiny spark plugs - the butt joints to the ignition ring look rather sloppy - braided lines are way too big in diameter for the one piece spark plugs maybe the two piece ones are a better fit Next up: Adding the eduard PE to the cockpit3 points
-
Thank you Troy! I grew up in Hawaii (Kaiser High School Class of 83) so going back to Hawaii means lots of different things to me. No fishing this time. I brought no hobby-related equipment with me besides my camera so that I could spend more time with the family. Thanks Chuck! I really appreciate the input! Spending time in Hawaii was great! Thanks Matt! That is a word that I think about alot when modeling... depth. Depth and complexity. I try to impart an impression of depth and complexity in my builds, even on smaller sub-assemblies such as props, landing gear, wheel wells, etc. Thanks so much Andy! Thanks Kagemusha! I have a hard time achieving consistent results with the hairspray method and this time was no exception. The wing roots were sprayed with Tamiya AS-12 Silver decanted into my airbrush and thinned with Tamiya Lacquer Thinner. Over this I put several coats of hairspray (Garnier Fructis Full Control in a green aerosol can). I was pretty generous with the hairspray application as the wing root would be impacted by multiple layers of paint (pre-shade black, RLM 74 or 75, and the fuselage RLM 76). After the fuselage and wing colors were sprayed on, I started attacking the wing roots with water and a trimmed stipple brush. For some unknown reason, the starboard side gave way to the water/brush treatment MUCH easier than the port side, which was the opposite of what I wanted since I'm assuming that the port side, with the boarding ladder, would experience more wear. So I stopped very early on the starboard side and worked overtime on the port side. The port side required some manual removal of the paint using a tip of a toothpick. And so the chipping patterns look very different. I'm not too worried it about since chipping wear on Yellow 10 did not seem to be a major issue. Thanks for checking in Gaz! Thanks Jim! I have returned from my Hawaii trip relaxed and rested. I usually experience a loss of motivation when I pause from my builds and I've not yet worked up the mojo to start again on Yellow 10. I put her in the light box today just to get sense of where I left off. She's nice and clean with the exception of some post-shading work that I started on the bottom. When the build resumes, I will start on the field-applied mottle of RLM 82 and 83. Hopefully SOON!3 points
-

Mig-21 UM BG Air Force
blackbetty and one other reacted to ShelbyGT500 for a topic
Hi friends Here is the last Bulgarian mig-21 UM that was in flight The build was inspirited by this plane: The model is 1/32 scale trumpeter kit. I build the bird without any AM, used only re-works and scrach. The paints are from tamiya, aqua-gunze, alclads, oils and acrylic pencils. The cyrilic label over all of the back means: "50 years in the service of Bulgaria" Unfortunately no more flying 21's here at BG . . . How ever, here are the pics of the birdy. Hope you will like her: Thanks as always for watching and cheers friends2 points -

Atlantis Models / Convair Space Shuttle
Anthony in NZ and one other reacted to patricksparks for a topic
I needed a break from reality modeling, so I picked up the Atlantis "Convair Space Shuttle" 1:156 scale ??? Like all my other projects I just can't bring myself to building out of the box, so into the spare parts box and searching the web for ideas and then finding graphics images that I downloaded and re-sized to create decals for this project. What I came up with is the Strategic Air Commands "SUB ORBITAL BOMBER" or the SOB-66 ??? I have added shrike missle halves to the main booster body to look like fairings that real spacecraft use and couple Rolls Royce Merlin engine parts to the bottom ring. I added some bits and pieces to the "Conformal Fuel Tank" just to liven it up a bit. The fuel tank is painted to look as if it is made of "composite" materials. The shuttle had no windows so I cut some in and fitted some gold mirrored plastic into the openings, all the details on the shuttle are painted and mostly decals that I made. Thank goodness I had plenty of spare stencil decals which is key to making this simple model look "complicated". Still have a bit to go, all the paint is Tamiya spray can lacquers(love this stuff).2 points -
2 points
-
Fantastic Peter Great choice of scheme and for a very noble cause. Derek2 points
-
I feel the same way about yours And many other threads here on LSP2 points
-
I have uncontrollable bouts of drooling every time I open this thread... it's just perfect at every level - a master craftsman at work Peter2 points
-
HH-60G Pavehawk
Dope737 and one other reacted to Pete Fleischmann for a topic
Thanks all for the nice comments-really appreciate it! here’s a belly shot- cheers Pete2 points -

Fw190 D-9 | 1/12th scale scratch build replica
Derek B and one other reacted to bdthoresen for a topic
34.316 inches give or take. Monstrous! THOR2 points -

JetMads 1/32 Viggen
Derek B and one other reacted to Eagle Driver for a topic
That is actually a very good note. I am from a Christian family, but far from religion in general. Also from a country where Muslims/Turks are not favored particularly due to bitter history. However I have very good friends that are both Turks and Muslims and none of them behaves differently during their tradition-respecting periods. Point 1 and 2 describes things perfectly well here and I was tempted to leave a comment. Modern thinking people are generally not bounded by religion traditions in any way. Be patient is great advise too.2 points -
I saw the email notification, Thank You again!2 points
-
promises promises ......
adameliclem and one other reacted to Bob MDC for a topic
"You may think so" but I couldn't possibly comment Bob2 points -

EA-6B Prowler (02 April: Done!)
Greg W and one other reacted to easixpedro for a topic
Continuing to faff about in the cockpit. This is attempt eleventeen thousands...we're at about a 75% solution. Or TLAR...that looks about right. Used the throttle quadrant from the kit, but flipped it so the throttles will be in the right position. Seats are in their approximate positions...ECMO1's seat is a couple inches lower and further aft. The circuit breaker panel is just resting there till I get the breakers on there (approximately 44 of em) Here's how it'll look under the canopies. This is one of my failed pulls, so have used it to mark up the approximate canopy frames. Goal of that wonky looking section that looks half built is to give the impression of the lining (and for something to attach the front cockpit bits to). Wont be visible from the back and the amount of junk up front should limit viewing...that's the theory anyway! -Peter2 points -
Got most of the parts I have been waiting for from Fed-Ex today. Ammo bay, gun bay, and air brakes. Time to get back on this project. Doing some Alclad experiments today. I really want to get the right aluminum finish for this build. Andy2 points
-

Mirage F-1
D.B. Andrus and one other reacted to Finn for a topic
There is always room for a sharkmouth: Jari2 points -
Righteous! Where are the drawings from, please?' This is what I have. I don't know how helpful it may be. Sincerely, Mark2 points
-

AGGRESSOR F-5E in Afghan Camo - Finished!
Derek B and one other reacted to themongoose for a topic
Masked it up and got the 1st camo color down tonight. I mixed 6 parts brown to 1 part red. Off to my 1st show in a year tomorrow, Indianapolis Roscoe Turner IPMS is this weekend. Hoping to find a few things from vendors for the next series of builds. Will get back to this in a few days and start the green2 points -

Mirage F-1
JMcD and one other reacted to thierry laurent for a topic
Beautiful lines, multiple versions, many users, decades of service, some incredible schemes and several war campaigns... Why is that plane so badly covered by model companies and fully ignored in large scale...?2 points -
I decided to actually mix up some 5-minute epoxy to attach the engine/cowl and the landing gear, in the interest of maximum strength for the bond. Here are the rest of the bits and bobs that attach underneath the airframe. For both the drop tank and the tail hook I drilled and ran a piece of wire into the part and drilled a corresponding hole into the fuselage (same as I did with the LG) to add strength to the bond. For anyone contemplating this kit I would recommend doing this all over the place - the kit provides little dimples to indicate where parts are to go, but there's no positive interlock - you have to provide that for yourself. And flipped right side up. I applied the rest of the (few) decals last night. They are *very* thin and consequently somewhat tricky to work with. The upside to this is that the decal film effectively disappears on top of the Alclad finish, without resort to any harsh decal solutions. Still a few bits yet to go: Aileron actuators. Antenna mast (another place you need to drill for a reinforcing wire) and rigging. Paint and install prop. Ditto for the canopy (I'm dragging my feet on dealing with optimizing the masks right now, by writing this instead...). Make a little headrest pad for the pilot (a part that is curiously not included in the kit, even though it is visible in photos and clearly indicated in the cockpit paintings I posted at the beginning of this thread). Finish "rusting" the exhaust stubs and install them. Do some low-key exterior weathering with pastels. Since this is an early-war (pre-war if you are counting from the start of hostilities in Europe) carrier-based fighter it should not look banged up, just like it's been on a few missions over coastal China). One other thought on the decals - given how challenging it was to maneuver the very small stencil decals that I used, I think that painting the hinomaru and tail codes is almost a must for this kit - I can't see how I would have been successful getting decals of that thin/fragile a nature flat and un-torn for something as large as the wing roundels.2 points
-

Dragon / CE 109D ... nearing the finish line ...
Paul in Napier and one other reacted to MikeMaben for a topic
So I tried lining the side markings up in Illustrator (easy with guides) and applying them as a unit with transfer tape. Everything I tried was too sticky and wouldn't let go of the 810 no matter what. I finally got fed up with the mess and decided to go with an old method I tried with the Mustang. I painted some clear decal sheet with white first then a section in red and another in black. Then cut those out on the Cameo. Muuuch easier (for me) although the black cross is made up of 6 decals each , it came out pretty clean. So first had to do the strip again , then remask and repaint. Decals went on OK , no film/silvering anywhere this way So I'm happy now and can get on with the finish Thanks for tuning in sports fans !2 points -
So, more work for the RLM. In order to glue the lower wing, it was time to get busy on the wheelbay. The ammo chute was lengthened and the hole in the bay where it protrude was made an actual hole. Ejection pins were patiently filled and sanded, needless to say the boredom it brings.. And the plumbing was lenghtened to actually goes somewhere (in the hole of course) Having skipped to take pics during the assembly phase, lets jump straight to the result. Should I have to redo this, i would invest in PE sheet to busy up the rear spar. With this last inner job done, the airframe is assembled and the preparation for paint can begin. The bird is given a few Tamiya LP70 (Gloss Alu) passes, alterned with filling and sanding where needed. and looking at the pics, i still can spot some areas that needs to be treated. Once at this point, the excitement is palpable as the most interesting part of the build is about to begin : Rivet and Paint job. As said earlier, I spent some time in getting dimension on every panel of the bird. Simply by "foiling" the model with oramask, cutting it in the panel lines, and transfering it back to a plain sheet, the sheet is then scanned, and serves as a base for designing cuttable panels. Lot of trials and errors as you have to cut the designed panel, to see if it fits back onto the model. When the panels are good to go, rivet pattern (lines of spaced 0.25mm circles) is added using references. In the end I come up with this: (You will notice the panel scan is of a different kind of focke wulf as I was lasy redoing the job for the Anton, that brought some trouble later on) After hours (!!) of a creepy noise (The machine puncturing holes in the mask is as enjoyable as a baby crying in your ears..) the vynile is ready for application. The whole idea here, is to (try to..) recreate the flush head rivets the Focke wulf sported. When spraying a well dilluted paint on the holes, the paint will tend to concentrate on the "outer ring" of the hole and create the illusion of a flus head. The process relying on the manual application of paint, it could also be emphasized on high wear areas, and softened on others. Enough to apply on a half rear fuselage. The area is then sprayed with Tamiya LP38 (Flat Alu) The yellow mask is then lifted, this pic is just to enjoy the symetry of the silouhette cutting. Then the vynile is removed straight away. I dont like to wait too much with the masks on as this could lead to drama's, like paint lifting or glue and solvant melting. Some macro shots: (the damn fuel filling port is ghosting me on this one, hope it will disapear with the paint..) This process is quite new to me, I just started experimenting with it on this build and the previous one, It's clear in my head, but maybe I messed up the explanation, so dont hesitate if it's unclear after you read it.. Next step is getting the whole airframe treated, then the paint could start. Cheers. Mathieu2 points
-
thanks chaps ..just a quick one I cut away the under fuselage to allow mating of the rad structure - the roof of the rad intake at the front seems also to have some sort of slat arrangement, but I only have a couple of oblique photos to work from so imagineered this bit.. ..also the flat panel in front of it was let in by using a template glued on to cut away the skinning and then some work to flatten the underlying structure before adding a more detailed panel.. TTFN Peter2 points
-
evening folks Hi Jay - so the blisters are done by first making an acrylic perspex buck - I find this good solid stuff that is easy to work, but takes the punshment of being worked on I use paper templates to get two of the axis right - plan & side and then just sand & shape ..then a bit of annealed litho is taped on one edge and the metal worked over the buck with a balsa block until it loosely conforms, then any kinks or ripples are worked out with a tiny hammer, and finally the shape fully tightened to the shape, particularly at the bottom with hardwood coffee stirrers from Starbucks.. ..then it can be untaped and cut out with scissors and the edges worked with sanding sticks... at any time it can go back on the buck to retain shape, and the final action is to fill it with CA so it doesn't crush.. ..the Template - I have no idea, but places like HLJ do a good range it might have been there Well, I don't really know - likely my cabinet with the others, but Tangmere is not too far from me and I have been toying with doing a Tangmere bird and maybe they might take it (after I have finished looking at it ) so, a weekends work in a few pictures coming up.. ..the radiator under the fuselage is quite a complex structure and now the PE bits I had made have arrived it was time to start.. ..complicated nose with cut-outs and gills.. ..rear with some details to capture.. ..I started by translating drawings & pictures into templates to make a buck for a vacform copy.. the PE included radiator faces which while they can't be seen here have all the honeycomb detail.. ..I started skinning the inside here - later I pulled all this off.. ..it was when I cut the rear & front apertures I removed the inner skinning and redid it once all the cutting was done - here the rear first.. ..the front has cutouts and I had made a PE template to get these right - I also left little tangs of litho around these as they wrap around rods each side that can be seen on the front view above ..also here I have added a fake central skin as I want to skin the front and back before adding a PE skin with all the rivet detail - the radiator on the real thing is one big unit that is a different colour metal so that works quite well.. ..by now the skinning is complete, the rods added and the fake centre panel removed - I made this slightly oversize as there are gaps around the real one.. ..with the centre panel attatched, it's time to start making the 10 cooling gills - the litho in front has been marked & scored on the back and each one was broken off, bent back on itself over a brass pin.. there is a mount in the throat with 10 holes to take them.. ..not finished yet, but nearly there - a bit of work needs doing to get this to gel with the fuselage bottom.. ..until next time TTFN Peter2 points
-
Finished this off this evening. I had some fun weathering her.2 points