Leaderboard
Popular Content
Showing content with the highest reputation on 03/28/2021 in all areas
-
I've made a slow start, in between shifts at work and things on the home front, to the undercarriage bays and legs. At a point now where I'm happy with the little detail I've added on top of the detail supplied in the kit. Basically added the brake line plumbing, some major hydraulic cabling in the bays, detail to the gear struts, and attachment points to the struts and bay doors for the wire cable system that closed the bay doors. Quite prominent on the real aircraft, so a must-have and adds visual interest. I'll use elastic cable painted a metallic colour to add these wires once the doors are added at the end of the build. Some of the detail in the pics is only dry-fitted or white-glued, makes it easier to remove for painting. Kit bay with a couple of fittings added from plasticard, punched with my hex punch and piping. Bay doors with some brass attachment points from my spares box. Knew they would come in handy one day! The pins are fitted into drilled holes - the kit doesn't offer a very sturdy mounting system at all for the gear doors to the bays, def one of the weak points of the kit. It'll add a little more sturdiness as well as increased mating area. Legs with some extra detail added. I'll wait till the end to simulate the bands with foil around the legs/brake pipes. Rest of the images are an indication of what it'll look line sans the gear doors and door retraction/closing system. Lots of lovely kit detail on the roof, etc, will look great under a coat of paint and weathering.....13 points
-

1/32 Pacific Coast Models Spitfire Mk.XIVe
Tony T and 10 others reacted to Tolga ULGUR for a topic
Hello everyone, Here is my recently finished model. This is PCM 1/32 Spitfire Mk.XIVe with the markings of “MV268 JEJ” of Grp. Capt. Johnnie Johnson No 127 Wg in Soltau Germany May 1945. Base kit is PCM s Mk.XIVc kit. I have used Grey Matter resin part for teardrop conversion. Other additions are: - Master E wing cannon set - Barracudacast cockpit door. JEJ code numbers are from DK decal “Spitfire Mk.IX aces” set. Paints: Gunze and Tamiya acrylics. Happy Modelling11 points -

Matchbox Tiger Moth
KiwiZac and 8 others reacted to Alain Gadbois for a topic
Hi everyone! Time for an update. I've been working on some of the exterior details a bit at a time, and now have made enough progress to show some more pictures of the T M. The oil tank was glued on a bit higher than what the kit would suggest, after filling in the existing locating holes. I put pencil marks where I think the retaining bolts will go. Slots on either side of the fuselage are traced and opened carefully. These are where the rudder control horns come out. Next the anti-spin strakes. These are metal and added to the wooden fuselage. On the kit, they are somehow inset in the fuselage as the photo shows (Revell reissue shown) I removed the raised section you can see at left, then made two styrene strips that correctly represent the raised detail of the strakes. Duplicating the sheet metal cover on the leading edge of the fin, made with a portion of tooth paste tube in the kit box since the nineties! There it is glued and sanded to shape. Forgot to mention the rudder was cut of the fin and will be reattached to the fin with brass rods. Two styrene tapering pieces detail the gap (from photo references). The rudder is also extended a bit. A few rivets are added too. The parts dry fitted. Still a lot of rivets to add to the strakes, as they are quite visible on the real thing. Finally, I glued the ailerons to the wings. To represent the fabric seal between wing and aileron, I filled the gap with epoxy putty. I drilled little holes where the hinges are located, then made them square with a few X-Acto cuts. Bye for now! Alain9 points -

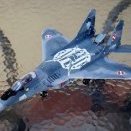
D558 Skystreak Jetmads
IvanVasili and 7 others reacted to X15 for a topic
Happy to share with the final photos of D558 from JetMads • Modification of the canopy for opening from the front • Homemade straps • Paint markings • Modification of airbrakes • Homemade pitot tubes The kit: For their first kit JetMads is strong with a new way of seeing the model, the choice of an original model and a rather good detail. It's a kit that requires a lot of work but still fun to do. On the other hand, JetMads will have to improve the adjustments between the large resin parts and the finish of the 3D parts which are streaked by the printer and difficult or even impossible to remove for the small ones. As far as I'm concerned, I'm looking forward to the Skyrocket planned for the end of the year and the X3 Stiletto !!! Well done JetMads !! The building : https://forum.largescaleplanes.com/index.php?/topic/87688-d558-skystreak-jetmads/8 points -
Hello, My recently made model DAS WERK DW32001 - 1:32 Junkers Ju EF-126 Elli.8 points
-

EA-6B Prowler (02 April: Done!)
johncrow and 7 others reacted to easixpedro for a topic
Thanks! I think my skills have improved a bit since the last time I attempted this.@Anthony in NZ, here's what I mean about drilling out the c/b panel (a poor pic from my failed 1/24th scratchbuild--I think the new 1/32 version is much cleaner. Also, hoping my painting skills are up to the job). I also look at this and realize I don't have a single right angle anywhere in that cockpit. Maybe I've learned some things over the years? ...also so glad I'm not scratchbuilding 4x GRUEA-7 seats!8 points -

Thoughts on Trumpy Avenger
Uncarina and 7 others reacted to Joe Hegedus for a topic
I recently completed one of the TBM-3 kits. The only thing that I didn't like about it was the way they handled the cowl ring inlets - there is no ducting whatsoever behind the cowl ring so you look in the inlets and see the cylinder heads. They supply PE grills to go over the engine side of said inlets, which sort of help mask that there isn't any duct there, but the grills don't seem to be prototypical (they shouldn't be there at all). But overall, the whole thing goes together quite nicely. One thing - don't push the wings all the way on until you're ready to install them permanantly - there are positive catches that lock the wings in place (quite firmly and snugly - I had no gaps at all, and didn't attach the wings until after all painting was complete because of the large size of the parts. It was easier to paint in subassemblies and bring it all together when done.8 points -

1/32 HK Models Lancaster B Mk.I Nose Art Kit RF128/ QB-V Victorious Virgin.
LSP_Kevin and 6 others reacted to monthebiff for a topic
Had very little time for any modelling for the last few weeks but back at the bench now so decided to get some primer on in readiness for some colour. A few bits and pieces of my Cirsair build on the mat as well after a mammoth priming session. Airbrush all cleaned and ready to go! Regards. Andy7 points -
Looked at the line up of the markings on the fuselage sides and decided they weren't quite right. So ... tryin' it one more time7 points
-

1/32 Hasegawa Focke Wulf Fw 190A-6 (Trying Some New Things: Part Two)
Nikola Topalov and 5 others reacted to mywifehatesmodels for a topic
The weather was finally decent enough for outdoor photography on this one, but the lighting was still strange and a lot of the photos look a little darker than I would like. But, here we go... This is the A-6 that I was working on basically at the same time as I was doing the A-5/U12 I posted the other day. However, since I used the A-5 to test out a variety of new paints, this build was going to take it to the next step. As I had mentioned before, the A-5 was (hopefully) the last build I ever did with my old Paasche H single action airbrush. It was during the construction of these two kits that I decided I was going to take the plunge and get a new airbrush that would take me closer to the direction I want to be heading. Being that the camo scheme of this A-6 is a bit more complex, it was the also the perfect test bed for a new airbrush. I looked at the Iwata Eclipse brushes at the local Hobby Lobby and did a bunch of research and review reading before I reached the decision to go with the Harder and Steenbeck Infinity CR Plus with the .15mm and .4mm nozzle/needle combo. Now, for the plane: -Kit: Hasegawa Fw 190A-6 -Decals: Stencils and "Friedel" heart decal from Eagle Cals. Werk Number was pieced together from spares and the "3s" were actually made from 8s and I touched them up with paint. Unfortunately, I only had enough to do one side of the tail and couldn't print any because my printer hates me. The "White 12" is a combination of spares from Eagle Cals and Kagero. Checker nose from Eagle Cals. -Masks: Montex used for the wing/fuselage crosses and tail marking. -Quickboost exhausts -HGW Seatbelts (but assembled from spares and not exactly perfect or complete) -RB Model brass MG17 muzzles -E-Z Line antenna wire (inside canopy, too!) with CA glue for insulators -All 20mm barrels cut from aluminum tubing -Wire brake lines and wine bottle foil straps -Drilled out holes in oleo scissors -Wire and styrene used to make the landing gear actuator wiring on the scissors and the tailwheel retraction cable was made from wire and the mount for it from styrene and scale nuts/bolts (I forget the brand). -Valve stems added to tires made from stretched sprue. -Gun sight reworked to fit after leather padding on instrument hood filled in with styrene and Milliput -Rudder light was sanded off and a new one made from copper tube and contoured back in with Milliput. Contoured sprue for the bulb. -Rudder trim tab was deformed in this kit, so I sanded it off and and made a new one from sheet styrene. _Outboard 20mm cannon fairings have the "bumps" added with Milliput. -Landing gear indicators from stretched sprue. -Aluminum tubing used in the leading edge of the wing for the 20mms. These serve as a guide and a better foundation in which to glue the barrels. -Aluminum tubing also used to depict the gun camera lens bezel. The lens itself is stretched clear sprue, polished and then inserted into the tube and being given a couple drops of Future (or whatever it's called nowadays). -Last, but not least (actually done before assembly and paint), the entire airframe was riveted using the Trumpeter riveting wheel. Paints Used: The main scheme of RLM 74/75/76 was all MRP paint and was given a coat of flat lacquer after weathering with oils. I did add a light mottle of RLM 76 using AK Interactive's Real Colors RLM 76 Version 2 over the MRP 76, as it is the lightest of all the 76s I have and it helped give more depth to the color. I also used MRPs white mixed with the 74/75 and used a similar technique to give a little more contrast in spots. I was very subtle about it, but it helps. Next time I may get a little more adventurous, but I'm still learning with the new paints and airbrush, so I'm happy with how it turned out. Prop blades were originally done with Model Master enamel mix of their RLM 70 Schwartz Grun and Flat Black. I came back and and added a light spray of Tamiya Black Green, later on. The crosses/swastika were all painted with Gunze Gloss Off White and Tamiya Rubber Black. Tires were built up in various stages with the rubber black and Tamiya Red Brown 2 (and I know there was a light mist of Model Master Italian sand thrown in there at some point, as well). The exhaust stains were also done with very thin layers of rubber black and Red Brown 2. Cockpit was done in a mix Model Master RLM 66 and black, but the headrest assembly was done later on, after I had received MRP's 66, which is much closer to the real thing and probably what I will run with from now on. There are plenty of things I would do differently in this build, if I were to do it over (and some mistakes that the photos just revealed! LOL). However, I'm very happy with how it turned out. In fact, it's probably my new favorite 190 model! Enjoy! John6 points -
Final stages, whole roundels put back in place then red centre removed, replaced and blue outer done: The transfer piece here is sold for Cricut machines - low tack, completely clear (which is a distinct advantage) and with the grid on it which helps: and before very long at all:6 points
-
EA-6B Prowler (02 April: Done!)
johncrow and 5 others reacted to easixpedro for a topic
Proof of life. Down a rabbit hole at the moment getting the back cockpit built up. Essentially have ECMO-3's (back left) almost finished. Need to do the center console and ECMO-2's side. Chose not to use AnyZ knobs--with some stretched sprue and a little cutting here and there, I'm getting a close approximation. Trying to do little chunks at a time to preserve my sanity. Dreading doing the circuit breaker panel that sits atop this assembly... Here's ECMO-3's side w/ a coat of Tamiya AS-12. It's rock hard and will allow me to scuff the edges--I never sat in an airplane that wasn't worn down to bare metal on the edges of that control panel between the legs. And a pic of the back seat from Jake's book (for illustrative purposes). This is an ICAP II cockpit, which covers pretty much any Prowler from the 80s till the end. If you want an ICAP III, (which isn't made in ANY scale) get this book. He's the only one w/ pics. Essentially, these old school Atari displays went away, as well as all the knobs. Everything went digital, with gigantic jumbo-tron displays in the back. They were only around for 10 or so years before she retired, mostly flown in the USMC Squadrons. Pretty pleased with how the canopy handle and canopy jettison handles came out. Of course they each took about 3 attempts prior to getting something I was happy with. Now to wrap up the other side and center console so I can start painting and assembling the sections. Then add the hyd lines and electrical stuff prior to getting after the seats. Anyone have some 1/32 jet crew figures they're not using? I'll happily buy them off you...! That's it for now. Hopefully the next pics will be with paint on everything and stuff starting to come together. We'll see if I can withstand the urge to go buy a crappy Revell 1/32 Huey to do an in-flight scene. With Pig's helo coming to an end, I've got a bad urge to build something similar. My conscious says no--I've got this, an F-4B conversion going on, AND a HB B-24J sitting around. But the urge is still there, and I'm a masochist that enjoys tackling older kits for some reason... Cheers Peter6 points -
Fuselage roundels; firstly the "empty" mask in place: .....then the base white coat, quickly followed by: the yellow outer ring area. Tomorrow I'll put the whole roundel back in place then firstly "weed out" the red inner circle, leaving everything else as is. When that's dry, the red centre mask goes back in (easy to get this correctly centred) and the blue outer weeded out and the area sprayed. Hey presto....with luck.....simple perfect roundels!6 points
-
hello again & thank you again Hi Matt - it is made from milliput, then painted in a couple of mixed shades of tamiya acrylics and then dusted with a lighter weathering powder - (MIG Dark Mud..) Hey Craig, thanks for dropping in and will take a look into this normally with flush rivets, I burnish the panel so all the 'pillowing' disappears, but with these I can't do that so this sounds like a very useful tip ..the only part I have actually made are the guns - bits of brass and some PE I made at the beginning - these were pre-painted before assembly so I can get in all the nooks & crannies.. ..the muzzle breech thing had square holes so these were drilled & filed.. ...& painted.. ..the rest has just been rinse & repeat with tape templates & making up panels - I am just going to stop here and do the wing root panels so I don't risk scratching / denting the forward nose panels... ..the guns sort of sit here.. ..back later TTFN Peter6 points
-

Junkers JU-88 C6 Night Fighter
Rick Griewski and 4 others reacted to HL-10 for a topic
Revell's JU88 converted to a night fighter using the set from AIMS. Radar aerials are left overs from a He 219. Painted with Xtracolor enamels. A fairly straightforward conversion, new nose, and modified cockpit are the main bits. AIMS set comprises of resin, etch & decals. They include instructions on how to make the aerials, but I scavenged them from the Heinkel kit. Thanks for looking Angelo.5 points -

HH-60G Pavehawk Kitty Hawk 1/35 DONE!!
johncrow and 4 others reacted to Pete Fleischmann for a topic
Hey all- pressing on with the rotor blades- Erosion strips and tip weathering roughed in.. bottom: And top:5 points -

Fuji FA-200, 1/20 Nichimo
Dpgsbody55 and 3 others reacted to mgbooyv8 for a topic
Hi guys, To do something else instead of touching up paintwork, I decided to add the ignition wires to the engine. Interestingly, the instructions want you to connect the ignition wires from the magnetos to the firewall. Well, that's not going to happen! The spark plugs are not represented on the engine and are sticking out of the cylinders with an angle, as shown here. As the cooling gills of the cylinders are made of metal plates, I decided not to drill a hole but just add small pieces of rod with superglue. The hexagon at the end was simulated with masking tape. Now I had something to glue the lead wire to. I used this: The result was this: More wires etc. will be needed, but then the engine will have to be mounted on the firewall. I'm still lookin at pictures to decide what wires and hoses will be added. To be continued. Cheers, Peter4 points -
Hasegawa 1/32 Focke Wulf Fw 190A-5/U12 (Trying Some New Things: Part One)
aircare84 and 3 others reacted to mywifehatesmodels for a topic
This is the first Fw 190 of two that I will be posting. I sort of built them at the same time, but before the painting stage I decided to focus on this A-5 and use it as a guinea pig, of sorts, for some new paints. I've been using Model Master enamels, almost exclusively, for most of my life. However, there were a few things that have been leading to me wanting to change and that obviously ends with the issue of the company's acquisition by Rustoleum and announcement that these paints would be discontinued. But even before that, I was already having issues with the quality of the paints that didn't seem to be present before and I have also started using more oils in my finishing process, which is certainly easier to do with a good, acrylic based paint. Being that so many of the members here have been showing some amazing work with MRP paints, as well as some others, I knew which direction I wanted to go. I have also had limited experience with Tamiya and Gunze paints in the past, specifically for WW2 Japanese subjects, but knew I would probably want to give those a shot, as well as some of the AK Interactive Real Colors line. This would also be the last build for me done exclusively the old Paasche H single action airbrush. It's all I've used for nearly 30 years now, but this was another area where I knew I needed a change for the things I wanted to do. That will come in "Part Two", with the other Fw 190 (an A-6). For now, I'll focus on the A-5/U12, in the markings of Eric Hondt of Jg.11. While I've always like the markings of this plane, so many people do it that I was hesitant. But, if you want to build a referenced /U12 variant with the twin 20mm pods, you're pretty limited on options. I had both Jerry Crandall's decals and the resin gun pods, so I figured, "Hey, why not?". I had no real problems with any of the paints used. In fact, they all performed extremely well and I used 91% Isopropyl to thin them (except for the MRP, which you can spray straight out of the bottle). I shot the entire airframe with a rattle can aluminum as a primer. I should also note that I crushed the cowl assembly after primary painting while trying to fit it to the fuselage. The seams, which I had meticulously sanded were cracked through and I had to piece it back together. It's not perfect, but better than I thought it was going to be. This build actually fought me the whole way, for some reason and also reminded me of why I've painted the markings on most of my models for the last several years. I really don't like decals anymore. So, here's a list of what I did to the kit and the paints I used. Parts/Mods -Hasegawa 190A-5 kit -Eagle Cals #83 Fw 190A-5s -Eagle Editions MG 151/20 Pods -HGW Seatbelts (but assembled from spares and not exactly perfect or complete) -RB Model brass MG17 muzzles -E-Z Line antenna wire with CA glue for insulators -All 20mm barrels cut from aluminum tubing -Wire brake lines -Wire and styrene used to make the landing gear actuator wiring on the scissors and the tailwheel retraction cable was made from wire and the mount for it from styrene and scale nuts/bolts (I forget the brand). Also another new thing for me, as I've never added this to a 190 before. Not bad for my first attempt, but I've refined it a little on the A-6. -Valve stems added to tires made from stretched sprue -Gun sight reworked to fit after leather padding on instrument hood filled in with styrene and Milliput -Rudder light was sanded flat and a small piece of sprue added for a little better representation. Not perfect, but better than the small, split light as provided. -Landing gear indicators from stretched sprue. -Aluminum tubing used in the leading edge of the wing for the root mounted 20mms. These serve as a guide and a better foundation in which to glue the barrels. -Aluminum tubing also used to depict the gun camera lens bezel. The lens itself is stretched clear sprue, polished and then inserted into the tube and being given a couple drops of Future (or whatever it's called nowadays). -Last, but not least, the entire airframe was riveted using the Trumpeter riveting wheel (they're cheap and don't last through more than a few hard riveting jobs, but if you take your time and use a straight edge or tape as a guide, they work just fine). The A-5 was the "practice" run and the A-6 is certainly more refined, as you will see when I get around to photographing it and posting Part Two. Paints Used (Most are acrylic lacquer, except where noted) Here is where my experimentation with "new" paint started. Unfortunately, I could not get everything I wanted from any one manufacturer at that point in time. However, that was a perfect excuse to use a mix of brands and see how they look and react with each other. Again, I had no real issues and learned a good bit about all of them. The one thing I found to be important is how thin you can put these paints on. They all seem to lend themselves well to building light layers. This is another new direction for me. I've always leaned more towards a post-shading kind of style, but this was a little different. I found my work to be a little heavy handed in spots, but the paints were all pretty forgiving. I was also able to go back and paint over mistakes with relative ease. This did lead to me blotting out a lot of the rivets on the fuselage sides, unfortunately, but you live and you learn, I guess. Gunze Sangyo: RLM 74 and RLM 76. I also used their flat white to lighten these base colors for a faded effect in spots. Great, all around. I also used Gunze RLM 02 and 04 where required (mostly gear/bay for 02 and cowl underside for the 04). AK Interactive Real Colors WW2: RLM 76 (version 2). This is the lightest/brightest of AK's 76 paints (they have three variants in this line and I have them all). It was used as a mottled effect on the underside of the aircraft where the base 76 coat was the Gunze, as well as becoming the predominant color on the fuselage sides. The AK paint seems to like a lot of thinner. Sprays great and was really durable for me. I had done some tests on an old 190A-8 fuselage where I used AK's RLM 76 versions 1 and 2, for comparison, along with some of the others I've mentioned and some old Model Master enamel. I abused them with oils, Testors flat lacquer and plenty of rubbing and it stood up to pretty much everything. I know AK's Luftwaffe colors have raised some eyebrows for being a little strange, but the first two RLM 76 variants are quite useful, I think. The third, late war version, I haven't tested yet. I'm thinking of doing a Dora next, so maybe..... MRP Mr. Paint: RLM 75 and I have their White, as well. It didn't take me long to figure out why people really like MRP paint. This was what I started with as a test and it lead to me ordering several more colors, which were used to do most of the A-6 build. In the case of their RLM 75, it can be laid on in a more opaque layer that appears fairly dark from certain angles and at distance, but really starts to pop out and feel brighter, the closer you get to it. You can layer it thinly and it gives a much lighter appearance, especially if you're shooting it over a light/metallic color primer. I did add the white to play with shading a bit, but with the old airbrush, I felt I didn't have the control I would need to really get more from this paint. It really deserves a good airbrush. Tamiya: "Black Green" (I didn't write down the number, but it's close to RLM70) was used for the prop blades and spinner. However, it should be noted that I had already painted them with a mix of Model Master RLM 70/Flat black, so it's actually a layering of sorts, but the Tamiya Black Green is predominant. Model Master Enamel: Insignia Red for the stripes on the fuselage. I didn't have any RLM 23 at the time and I like the darker look of the Insignia red in this particular case, anyway. Not saying it's more correct (likely less), but just my personal preference on this model. By the way, masking those stripes was more nerve racking than I expected. Edit to add: Testors Semi Gloss from a rattle can was used to seal in the oil washes and decals, but I really wanted that sheen on this one. I like the way it turned out. I'm sure I have left a bunch out, but this is already too long. So, here are some pics. Enjoy! John4 points -
Well... It's done! Thanks for the Group Build and subsequent inspiration, LSP!4 points
-

Delta Dart
R Palimaka and 3 others reacted to Dandiego for a topic
Some more detail painting, and just a splash of red. Dan4 points -
1/32 Hasegawa Focke Wulf Fw 190A-6 (Trying Some New Things: Part Two)
Nikola Topalov and 3 others reacted to mywifehatesmodels for a topic
More....4 points -

Italeri 1/32 Tornado GR.4
Whitey and 3 others reacted to FreightDog for a topic
Big moment of nerves jangling - can she stand on her own 3 feet - and will the 60g of lead in the nose (as instructed) be enough? I know the stores aren’t on yet though but so far so good (wheels not glued so not straight/true yet)4 points -
EA-6B Prowler (02 April: Done!)
johncrow and 3 others reacted to easixpedro for a topic
Work continues on the back cockpit. Center console is attached, the rest are just floating till I get PE and some knobs before painting. Working on the plumbing too. ECS vents are done. Need to do the hydraulic lines and electrical, but might do those after painting. Peter4 points -

HK Lancaster/ Air Sea Rescue
Spooky56 and 2 others reacted to patricksparks for a topic
Well as hard as I tried to build a kit out of the box, I failed miserably, couldn't do it... This is the HK Models Lancaster, pretty much from the box other than filling in 22 windows cutting in 3 new windows, scratch building a lifeboat, blanking off the turret gun ports, removing their gun sights, ammo cans, put an Eduard cockpit set in as well as the radiators and intake screens. Also printed the markings for it which in hind sight I wished I had cut stencils for them instead... The model is pretty much finished, don't know where I can store it, it's a monster...atleast I can remove the wings still. The HK kit goes together well, I liked building it more than their B-17 or B-25.3 points -

SR71 Speed Check Story
Hartmann352 and 2 others reacted to Panzerwomble for a topic
An oldie but goodie tale regarding who is king of the air . Mucho respect to Major Brian Shul, USAF (Ret.)3 points -

Dragon Bf110C-3, 235-5 235 Squadriglia (Done)
scvrobeson and 2 others reacted to mozart for a topic
It's shame the prop is in the way but this picture gives a bit of an idea on the E:3 points -

SR71 Speed Check Story
adameliclem and 2 others reacted to vince14 for a topic
Pretty good, and reminds me of a similar story. Sled pilot asks ATC for clearance to 60,000ft. ATC, not realising that he's talking to an SR-71, sarcastically responds "FL600 is yours if you think you can get there...". Pilot responds "Roger, DECENDING to FL600".3 points -

Dragon / CE 109D ... nearing the finish line ...
Paul in Napier and 2 others reacted to MikeMaben for a topic
Hey Wolf , perfection not my thing , I'm happy to just get a decent shelf sitter (12 to 15 incher). Everything on the side of this thing references off of the cross. It always lines up with a panel line (vertically) then the height so with a 2 digit ID number, which has to be the same height as the cross, I had a limited space. Long story short, things just didn't line up right. It's just one of those things I know will bug me unless I fix it. But it's all fun ... right ?3 points -
Excellent start Iain. You’ll doubtless know that there’s a short vertical length of pipe that comes out of the underside nacelle that drains excess oil into the “square-shaped cup” athwart the u/c leg then another pipe run from that along the bracket outboard (I think from memory) of the wheel.3 points
-
 Those following this build are no doubt aware of my baby steps approach. Im cutting my as an adult teeth on an LSP. I am re learning old techniques and picking up new ones. Tonight I cut the main gear legs from the sprues, and decided to make some progress in this department. Despite the overall excellent mold quality, there are two pretty apparent mold lines running the entire length of the legs, into and out of every nook and cranny. There is a decent amount of detail molded in, its just that all the raised and lowered sections are marred by that seam line. So i went to work. I used my scalpel, sanding sticks, a tiny file. I went from one to the other, and when i went back to the first one, saw all new areas i had missed. I did this several times, and think i got everything i could reach. then a stared at them, for about an hour, planning and revising my plans to run brake lines. I decided that the cleanest way to accomplish this will be to paint the legs bare, then run the hard and rubber lines, with their assorted clamps and fittings, which i am still sorting out the best solutions in my head, then assemble the oleo scissors and delicate struts. That way i can run simulated clamps around the legs without fear of snapping off these delicate parts. earlier today i went to a local well stocked hobby shop, after checking out the other local shop and coming up empty on what i needed. I am fortunate to have two really solid shops within a half hour of the house. At the second one i grabbed...gasp....a bottle of alclad aluminum, a first for me. The last bare metal bird i did was a P38j in high school, and although the finish was very smooth, it looked like it was chrome plated, largely because i shot it with testors chrome silver. I also grabbed some Tamya rubber, XF 85 if i recall correctly. Despite using up a lot of time tonight planning my brake line route, and stopping and starting to place some clamps before painting, i really wanted to shoot the alclad tonight so that i can work with the parts tomorrow. So i got a late start at the airbrush, i think i hit the garage at about 1030 local. I laid down some light grey primer on both the Barracudacast wheels/tires, and the main legs and oleo scissors. So far so good. Then i shot a couple coats of rubber to make sure i was warmed up for the black magic that is alclad. by now it was after 11, and i was unable to put it off any longer. I shook that little bottle of aluminum, and poured it into the cup, and it sprayed like a dream. I know its just a bare main gear leg, but i am really happy with the look of this product. Again, i know many here dont blink at an entire NMF bird, but this is new to me. photos: nothing sexy here yet, just some pretty good rubber look for straight out of the bottle. Anyone remember testors “hot rod primer”? I thought that looked so much better than “flat black”. here are the legs and a shot of the covers I will shoot the hubs on the wheels tomorrow, i picked up a great trick from my armor building days, i have a circle template that has a circle for any soze between many an inch and down to maybe pencil size. Just find the one that matches, shoot the color, on to the next wheel. I have some HGW stencils for the gear legs, i think. And hopefully i can start to run the brake lines. stay tuned, and thanks for the kind comments and suggestions. I am really learning a lot on this big old bird.3 points
 -
1/32 Tamiya Thunderbird F-16C
D Bellis and 2 others reacted to Pete Fleischmann for a topic
The term “lawnmower blades” is pretty descriptive- However, as an operator the terms that make me cringe are: slime lights bird slicers bang seat just sayin Pete3 points -

1:32nd scale Fokker D.II
geedubelyer and 2 others reacted to sandbagger for a topic
Hi all, Just a quick update. Looking at photographs it's difficult to see detail for the interplane struts on this aircraft. Some look to be of wood construction only. Others seem to show a tubular reinforcing tube that was fitted to the leading edge of each strut with wood aerofoil struts attached to its rear edge. Also what appears to be four 'wrappings' of either linen or metal around each strut. Normally strut wrapping would be linen and these were used to help prevent the wood struts from splitting under stress. Anyway, the kit 'wrappings' were over sized so I decided to modify all eight struts. The 'wrappings' were sanded off and the leading edge tubes, which are not represented on the kit struts, were scribed. Base coated with 'Tamiya' Deck Tan (XF78), then clear coat sealed. The wood areas were masked off and 'Alclad' Steel (ALC112) was airbrushed over the tubes. Clear coated again then 'Flory Models' Dark Dirt clay wash applied. Clear coated yet again and 1 mm wide strips were applied from the ‘Xtradecal’ Parallel Stripes (White XPS2) set. A final clear coat was then applied to seal everything. The cutout in the two inboard, rear interplane struts, are to allow the wing warping control lines to route from the fuselage to the outboard struts. Mike3 points -
PROGRESS!.... Well, sort of Hoping to get re-enthused about this build, I cleaned up my modeling room. Luckily for me I have no desire to build a 1/32 B-17. BTW, fruit flies love Future. Back to this mess. There are times when good enough just isn’t good enough, and since I pulled the masking off before I picked out the details and didn’t overcoat with satin clear I stripped the paint off the canopy and repainted it. Since I discovered that IPA dissolves Future I dropped the parts in a jar full of it and set it aside for a couple days. The IPA dissolves the Future and the paint just lifts off. This time I didn’t bother painting the inside, just put down the interior green first. Also gloss coated and put a wash in the recessed rivets. As of this posting I haven’t satin coated it yet, I’ll do that when I’m ready to do more painting. Moving on to more details I decided to add lenses to the telescopic bomb sight. First I drilled out the ends and fly some miracle I actually got the holes in the center. Burrs left over from the drilling were cleaned off with some Extra Thin. After painting and a little dry brushing I punched out some clear disks from .007 clear sheet. I’ve never liked the way clear lenses look when done with clear paint - they never look flat so I do it this way. I used thickened Future to glue the disk. Thickened Future can be made by putting some in a jar and waiting for it to get about the consistency of syrup. Light reflection off the finished flat lens looks like a lens instead of a puddle of clear paint. Then I decided that the compass needed a decal upgrade and since none is provided I made one and printed it out on white decal film with my 600 dpi HP color laser printer. Making decals like this is pretty simple if you can create the artwork. Just print and shoot a wet coat of rattle can clear lacquer to seal the toner and acts like a lens. BTW, it’s .090” x .060” but I extended the black out past that and added trim marks. Then I sliced through the film at the trim marks and slid the decal in position. A drop of setting solution and done. Based on photos I found the details are yellow like the decal. Moving on to the last major part of the build I attached the engine assembly which was pretty uneventful after dry fitting. If you build one of these, don’t attach the engine to the firewall like it says in the instructions. It’s just too much hassle working around it trying not to mess up your wiring. There’s a lot of dry fitting required to get the bulkhead properly aligned with the fuselage. Another reason not to attach the engine early is dealing with these cowl panels. They fit against the firewall perfectly but not so much the fuselage. The bottom fits fine, but not the sides. I know it’s not me because everything up to this point fits as it should because the part that goes on top of this lines up perfectly on the fuselage. The shape is simply wrong. This is very discouraging to get this far into the build only to have this mess. There is no easy fix for this. If the top of this cowling doesn’t line up with the top of the fuselage the part that goes between the fuselage halves won’t fit so I did this to line them up and glued. Oh well, moving right along. That's it for today. Now I have to fit the nose cowl which is shaping up to be another challenge.3 points
-
..finished the top deck which is where I should have ended yesterdays update3 points
-
EA-6B Prowler (02 April: Done!)
johncrow and 2 others reacted to easixpedro for a topic
Thanks, hopefully I can pull it off! You and me both Jake, you and me both. Having fun still, but it is a slog at times. I actually have one out in the garage...did this in part to show folks it’s possible without it. I’ll probably pul it out for the pods when the time comes. Heres one side of the back cockpit almost built out. Digging how the scope for the oscilloscope looks. Old school EW for sure. Also like the glare shield around the upper edges of the panel. In real life, that thing was always beat to hell. The covering was almost always torn and frayed, so we’ll see if I can pull it off. And for grins, here it is under the canopy. Have some more polishing to do, but should work! Hope to get some more time in today...maybe get the other side built out. -Peter3 points -
More filling, sanding, and priming on the Electra: Just a few remaining issues at the wing roots, and the rear wing/fuselage join underneath. I'm also waiting on some window decals to arrive from Authentic Airliner Decals in Germany, but that shouldn't stop me from starting the paint job when the time comes. Kev3 points
-
Dragon / CE 109D ... nearing the finish line ...
Paul in Napier and 2 others reacted to MikeMaben for a topic
A little more progress. I think I'm done with the major painting. I can be assembling the bits and bobs and doing some touch up. Thanks for following along men3 points -
So ... a little more color, black this time, only red left. I've been spending alot of time messing with my new Cameo 4 ... nice . My main problem with stencils like Oracal Oramask is that they don't slide, which means you have to nail the position first thing or you have to pull up and start over. I am 'not' good at nailing these things at all. Also, when you pull them off the backing paper, they (mine anyway) are all static electricity and want to suck up to my fingers . So there were those two major hangups for me. To get rid of the static, I figgerd I'd dip them in water. Well that worked (of course) so I also thot if dipped them in hot water with a fair amount of dishsoap in it, they might slide a little better. So that worked too and it also made them a little more flexible. Two birds with one stone (I've never really thrown a stone at a bird ). Another thing that helped is that I finally got my right eyeball back. There was a sheath forming behind the lense replacement I had some years back and it had wrinkles in it. The Doc zapped it with a laser 25 or 30 times (no pain) so now I have my distance vision and more importantly my depth perception . So rolling on towards the finish line ... pocketa pocketa pocketa ...3 points
-
Hi guys, The wing root halves were glued together: After that is was time to test the folding mechanism: Well, as Andy also found out, it is weak and wobbly. The hinge will surely break sometime in the future. However, the killer was this: It's a bit hard to photograph, but with the rib mounted in the outer wing panels, it is very hard to align top and bottom wing surfaces. So, the wings will be glued solid then. I think the best way to do it is to delete the rib in the outer wing and add little tabs of plastic strip: Interestingly, during the production of the moulds, rocket stubs had been considered: There are center marks for holes on the inside surface of the outer wing. Similar marks are present on the wing roots at the location of the pylons of later Corsair versions. Both are not present in the kit, possibly to avoid rising cost? Anyway, to be continued... Cheers, Peter2 points
-
EA-6B Prowler (02 April: Done!)
A-10LOADER and one other reacted to ziggyfoos for a topic
I can only add to what others have said, excellent work. This project is pretty insane (in a good way).2 points -
Aye mate give it a go on a tester - I said the same at the time Mal told me. But then you would do it for a decal! I have definatly had less problems with paint lifting sinse I have started doing it this way. As said depends on what and how i'm applying the mask - on or over! Taff2 points
-
Hi Max love it mate - this is going to look super cool when it’s all finished. Answer your question about spraying a light clear under the masks - yes I do but a very thin coat it seems to help the mask to stick and less chance of paint liffting. I also get less bleed along any panel lines. I still warm it with may finger heat and run a toothpick gently along it to make sure. It was a Tip I got from Mal at Miraclemasks. Don’t use it every time Max depends what i’m doing but on a job over camo then yes I would. Happy Days - Taff "D2 points
-

Dragon / CE 109D ... nearing the finish line ...
Derek B and one other reacted to Wolf Buddee for a topic
Ummmm Mike, It might be just me, but I don’t think so, some paint fell of your 109 by the look ‘o things. Damn that’s a cruel desire to achieve perfection. ...........and it was looking’ so good too. Cheers, Wolf2 points -

Caveat Emptor
thierry laurent and one other reacted to J.C. for a topic
Ahhh, a nice-sized dram of Lagavulin will do that trick fer ye, laddie!!2 points -
Ain’t that always the case.2 points
-
I'm doing a Qantas machine, the decals for which I already had (from Hawkeye). The ones I was waiting on were so-called "3D" window decals from Authentic Airliner Decals in Germany. So technically I now have everything I need to finish the build. Except the time. Kev2 points
-
Italeri 1/32 Tornado GR.4
Whitey and one other reacted to FreightDog for a topic
Set the theme of the weathering now. First time experimenting with the Uschi spatter templates. Used a good few passes with different shades & hues then took it down to subtle with filters. I’ve lost the demarcation from the different panels but I can always “replace” a few panels with new ones... or maybe I won’t bother. It’s calmed down the panel line wash which I’d intended to as well. It’s quite subtle, and I may add a bit of grime too but it does show up closer2 points -
.thumb.jpg.745e9c32fdfafef712dcea77f75e8a27.jpg)
HK Models Lancaster, No. 83 Squadron, RAF, May 1943
R Palimaka and one other reacted to TimW for a topic
2 points -
Few photos of kitset:2 points
-
1/32 HK Models Lancaster B Mk.I Nose Art Kit RF128/ QB-V Victorious Virgin.
Greg W and one other reacted to monthebiff for a topic
Tamiya extra thin and a very steady hand Tom. Regards.Andy2 points