Leaderboard
Popular Content
Showing content with the highest reputation on 01/10/2021 in all areas
-
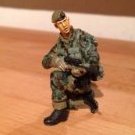
Hi guys, I already showed this Bf 109 Emil a few months ago. But something bothered me ... During construction, due to my own fault, the rear part of the canopy cracked. Somehow I want to "cover up" this without covering the whole cabin with a tarpaulin. This is the story of why and how the idea for this little composition was born. The Bf 109 is Cyberhobby, the figure comes from Zoukei Mura's "Heroic Return" set, the cat is a white metal product of the Japanese Aurora Model. I hope you like it! Sándor ...and starring:11 points
-
Interesting thread and debate, I like modern great fit kits, these are my current top 3 most enjoyable builds 1. Hasegawa Stuka JU87-G 2. Tamiya F16cj 3. ZM Ho2299 points
-

1/35 KH MH-60L "Super 63"
Zorro and 6 others reacted to Hawkwrench for a topic
Finally got a little more work done. It's just about ready for the primer Tonight I spent about 2 hours scratchbuilding the T/R de-ice ring and wires. For the ring, I used a scrap piece of styrene and sanded it into a round circle. I then made 4 starter holes in the ring with a #77 bit followed up with a #75 bit. I made the wiring by using .020 lead wire and glued them on. Just a little detail KH missed, so being a ex crew chief, I put in on there. (My SMEAMS was kicking in!) Tim7 points -
FYI, I finished my Mig-15, heavily weathered, it won 3rd it it’s category.7 points
-

Bf 109G-10 Erla, 3.JG300, Prague-Kbely,May 1945
Nikola Topalov and 5 others reacted to Miloslav1956 for a topic
My first finished model in this year. Revell kit 1/32 Aires cockpit, Eduard wheels, HGW riveting set, wet transfers, seat belts, Barracuda exhaust & decals Montex mask, All colours MRP6 points -
This is the second Skyraider from Trumpeter I've knocked out - the first being a Navy 'Nam Spad from circa 1964. HVAR Rockets are Eduard Brasin. The prop is the new prop from Barracuda which I have to say is excellent - apart from getting stung by Customs on import duty.... Decals are from Cap as the Trumpeter ones are very poor quality. Everything else is out of the box. Paints are the new MRP line which are stunning. Pilot is PJ Productions and the quality was pretty good. Not a great deal of colour piccies around of the Korean War spads but enough black and white to get a feel for the extent of the emulsification. Spads shed a lot of oil when flying, emptying most of the oil tank. It's carrying 3 x 2000 lbs bombs withe the HVAR. A heavy load but not uncommon. Anyway - here it is. My next effort is completing a 1/35th Wokka (Chinook). I started it in 2015 and put it on the shelf as the sand filters were doing my head in as I couldn't get them right. A huge amount of work went into the interior and it would be a shame not to complete it. Its circa 2006 around the time of the Kajaki Dam incident where 3 Para very sadly lost a Tom and has a further seven Toms seriously injured. Anyway. Back to the Spad. Hope you like it. Its my favourite piston engined plane and a truly awesome ordnance platform.6 points
-

Matchbox Tiger Moth RAAF Air Ambulance
VW Chris 1969 and 5 others reacted to LSP_Kevin for a topic
Unfortunately I didn't quite get the time I had planned with the Tiger Moth today, but I did get as far as installing the landing gear: I think from here I'm probably good to get a coat of primer on the poor old girl so I can start the paint job. Kev6 points -

F3H-2 Demon
Starfighter and 5 others reacted to Lee White for a topic
Progress update! I cobbled together some wheel wells, and am that much closer to getting the wings sealed up.6 points -

1/32 Revell Me 262B-1/U1 Nachtjager
Paul in Napier and 5 others reacted to Thunnus for a topic
Thanks guys! I really appreciate the comments and the encouragement! Still futzing around and being gun-shy about starting the painting on this build. I still need to paint the wheels so I did that instead. I'm using the resin replacements from Barracuda Studios, which come with some nice hydraulic line details for the main wheels. I've painted the rubber portions first, with a mix of flat black, grey and brown to simulate worn rubber. The color is progressively lightened as I travel from the wheels to the tread surfaces. I scanned the wheels and made adhesive masks with the Silhouette Portrait. I really LOVE having the Portrait... so useful! The metal hubs are painted in black and then the wheels were given a gloss coat. To highlight the tread, you can either go light and portray dirt/mud in the treads or go dark. I'm going dark since I think this gives a better impression of an aircraft operating off tarmac, which may or may not be true of these jets.6 points -
With my Training Day GB build sent to the SOD, I’m going to join this GB with the vintage Hasegawa F-86 kit, and I’ll be using the Avionix cockpit with the build. I’m looking to build a Korean War jet, and I have a lead on some decals. I’m aware I’ll need to perform surgery on the wing tips. Are there other external adjustments/change need to make a Korean War Sabre? I began the build by closing up the gun bays and speed brakes. I was pleasantly surprised how well they fit, so minimal filler was needed. As you can see I got heavy handed with the Tamiya Extra Thin Cement along a couple of the panels. Next up is working on the cockpit. Thanks for looking in on my build. Mike5 points
-

Kittyhawk OS2U Kingfisher Royal Navy
Loach Driver and 4 others reacted to Grunticus for a topic
Once I was walking towards the bin to dump this one after getting frustrated with the engines and some other less important annoyances, but didn't because of the hefty price tag. "Die another day", I thought to myself and put it aside. Well, glad I did not bin it. Once you prepare for and get past the engine assembly, this is truly a very enjoyable and very well fitting kit of a magnificant floatplane. Paints used were MRP Sky, EDSG, and Slate Gray, the beaching gear was enhanced with added detals. All markings except "Royal Navy"and te serial number are airbrushed. Thanks for looking. ps: I see I forgot the pitot tube of the left wing, which has now been added.5 points -

Priller Double Thriller , Part 1 Complete - Revell 190
mpk and 4 others reacted to Panzerwomble for a topic
.......& back after a little while a brief update Some progress, as predicted the engine I spent some time building , caused no end of problems when it came to attaching the cowlings and frankly will never be seen again . Slight misalignment of the mounting was the main culprit . With hindsight , I could have just built the front cylinders , would have been an easier fit and since I was 99% certain it would be covers closed........, meh . So engine in , covers on , some filling around and about but a reasonable fit. Decals from Peddinghaus arrived as well . Made a start on the basic paint , used Lifecolour.....mixed emotions on that , perhaps not as bad as some would have it , but not as good for me, as my "go to" Tamiya. I quite fancy giving MRP a go sometime but getting hold of them in the UK seems problematic. Mottling on the sides is way too pronounced as of now so going to have a rethink on that / re paint , and then I'll be using my more common techiques for blending weathering and chipping . Sorry for the low res pics , my Iphone doesn't want to perform today .5 points -

Bodenplatte duel build Spitfire IXc vs Fw 190 A-8
mpk and 4 others reacted to Wackyracer for a topic
Building/damaging (delete as applicable ) Test fit of the pe flaps, But even these will need smashing up! But the pit and fuselage are sealed up and I've tried to lay the belts in a 'get the **** out ASAP' sort of way but pe isnt the most flexible. However given the canopy will be over they wont be that visible anyway.5 points -

Trumpy EA-18G Growler
D.B. Andrus and 4 others reacted to Whitey for a topic
Oops wrong button. Not 100% accurate but it looks interesting. A pin wash will bring it out a bit more. Next up will be the main wheel bays.5 points -
This ignition harness is nowhere as detailed as Mark's, but it still took me two solid hours of squinting and cussing to make. My nanofabrication skills clearly leave much to be desired. The upside-down tape on the work surface trick is a great one though. It shifted the task of drilling 0.5 mm holes into 0.8 mm round styrene rod from impossible to merely maddening. Let's see if I can now paint and install this without breaking it. Then make the other one...5 points
-
So, the Electra takes the lead in the airliners build race. Plenty of filling and sanding ahead for this one. Kev5 points
-

RAF FG.1 XV571 WILD HARE Phantom Conversion
Greg W and 4 others reacted to Anthony in NZ for a topic
Thanks Jim, maybe too clean??? Thank you MARU! Appreciate your encouragement sir! Great to have you along Thanks Marcel I shot some super thinned grey down there to tone it all down, but it still looks like that even after that and using a greyed off white on initial painting. I guess the flash didn't help. What would be nice would be decal panel lines and hinges. Often panel lines are obvious in intakes as they seem to collect dirt. I am just sorting the transition between intakes and resin fuselage before gluing. Getting the 'line' close as possible and the width of the fuse correct is best done before gluing the intakes on so I can work on the enlarged shoulders, see below as one of my refs from Ferodo Bridge's Flickr acct highlights There is a LOT of info in this photo below which explains where the shapes all are. I will explain more later on when I get them glued on In the meantime, back to the upper and lower intake vents Cheers Anthony5 points -
1/32 Revell Me 262B-1/U1 Nachtjager
Paul in Napier and 4 others reacted to Thunnus for a topic
Thanks guys! I'm still in the procrastination mode and filling the time with some of the final small details. The loop antenna was redone to fine tune its shape and also so that it is oriented vertically when mounted at an angle. The plastic radar array will be replaced with this Master brass Neptun upgrade. Very easy to assemble. Mounting to the narrow stalks on the plastic part was very dicey as it was very difficult to drill the necessary holes. I was barely able to manage it. I'll shoot this with primer. If the joint is too messy, I'll have consider re-doing the connection.5 points -

SBD-5 of the Royal New Zealand Air Force - Trumpeter 1/32
Nikola Topalov and 3 others reacted to Brett M for a topic
Afternoon/evening everyone! Hopefully, everyone enjoyed the New Year. Here is my finished build of Trumpeter's 1/32 SBD-5 Dauntless. I've modeled this after the planes the RZNAF used in World War 2 for a 3 months by 25 Squadron before being returned the US, and switching to F4U Corsairs (thanks Alan!). After starting the 1/32nd world with Tamiya's Corsair, this was a bit of a change! Thankfully, even if it's not super crisp like Tamiya, it still built up quite nicely. Aftermarket includes the following: Archer Fine Transfers complete resin raised rivet set Archer Fine Transfers SBD stencils Synthetic Ordinance Works landing gear Master Casters SBD weighted wheels/tires Montex Masks Master .30 caliber barrels Ventura Publication decals Airscale placards Eduard canopy masks MRP, Tamiya and Alclad paints I think that's all...... A huge thank you to Woody @Archer Fine Transfers for letting me test out his rivet skins, they worked perfectly! For those of you considering them in the future, I HIGHLY recommend them to replace the recessed rivets on this kit. Everyone that provided information on the Dauntless and the RZNAF during the build, a big thanks to you too. Build thread is below. Feel free to critique, offer suggestions, point out anything I may have done wrong. It's just learning to me! Thanks for looking! Click on any picture to view it at Flickr and full resolution4 points -

Fuji FA-200, 1/20 Nichimo
Paul in Napier and 3 others reacted to mgbooyv8 for a topic
Thanks, guys! Fun it is indeed! Today I prepared small stuff to go on the cabin floor. Glued small instrument panel illumination lights into the edge of the glare shield, and glued the whole assembly into the surrounding nose/windscreen edge part. After hardening of the glue, I could fill the area behind the instrument panel with pieces of lead sheet, cut to shape with scissors. They were fixed with double sided tape and secured with pieces of sprue, glued to the instrument panel and the forward edge of the nose/windscreen part. A lot of lead sheet was needed: ...to ensure that the Fuji will stand positively on its nose wheel: To be continued. Cheers, Peter4 points -
Thank you for your comments. Finally, decals!4 points
-
The 777 would be close to 4x larger than this little Electra, Brian, so you've got quite a beast on your hands! Here's my best attempt at a comparison (I left the Minicraft 777 in its wrapper for expedience): The 777 is pretty close to twice as long as the Electra, and would be about the same in wingspan too, I reckon. It's a deceptively large aircraft! Kit decals will usually be of the traditional screen-printed variety, but aftermarket sheets can be all kinds of things. Depending on the livery, the window decals are often printed as part of the fuselage cheat striping, so even when they're printed on a continuous sheet, it's usually just a matter of closely cutting the entire cheat decal out of the sheet and applying it. Even then, it's often more practical to cut it into shorter sections, as ultra-long skinny decals can be a real challenge to apply! In cases where the windows are not part of a fuselage cheat, they're almost always printed with the correct spacing required for the kit, so you really just do the same thing. That's pretty much how it was with these Ansett 737 decals below (from Flightpath): Kev4 points
-
Haynes site is just down the road from me. Some years ago I applied for a job there as a technical author, driving there in my old rather rusty mini. My interview was interrupted by a man putting his head round the door asking if I owned the mini reg. NAM484G, apparently I had parked in (the) Mr Haynes spot. I was politely asked to move it, and I wasn’t offered the job.....the wages were rubbish anyway!4 points
-
Fair bit of work achieved since my last post but still a long way to go. Satellite Comms antenna close to done. May need to add more to the sides but it looks pretty close. A little bit of clean up and restoration of panel lines once undercoated. And trimmed down the exhaust vents with new vanes inside. Nose wheel bay almost complete. Added some wiring, connectors and clips both with very small fuse wire and paint.4 points
-

HK Dornier Do 335 B-2 Heavy Day Fighter
Panzerwomble and 3 others reacted to Ted Barrett for a topic
Thanks guys, In answer to you question Panzerwomble, our laminate is going to be a tannish RLM 79 with RLM 26 brown graining throughout. I'd have to clear photos of it with Kevin before I would stray from the topic at hand . Here's where I am so far. Back to the laminate...lol!4 points -

Weather Delayed Sets Coming in March/April 2021
Martinnfb and 2 others reacted to D.B. Andrus for a topic
March/April, 2021: Douglas A-4 Skyhawk (Hasegawa, Trumpeter coming in Feb) Messerschmitt Me 262 Schwalbe (Revell) Curtiss P-40 (Hasegawa) Later in 2021: (Not in Order of Release) Messerschmitt Bf 110 (Dragon/Revell) Heinkel He 219 Uhu (Revell) Boeing B-17 Flying Fortress (HKM) North American B-25 Mitchell (HKM) General Dynamics F-16 Viper (Tamiya) Dassault Mirage III (Italieri) North American F-86F Sabre (Kinetic/Italieri) Northrop P-61 Black Widow (Hobby Boss) Messerschmitt Bf 109E Emil (Cyber Hobby) And Others! Stay tuned! Suggestions for other kits welcome. Cheers, Damian3 points -

Type XXVII A "Hecht" German midget U-Boat, 1:35
Pastor John and 2 others reacted to Ramm66 for a topic
Hi guys, This is an old resin kit from JF-Models with small modifications. I hope you like it. I painted with few grey shades from Gunze's colours, then weathered with oils, pencils and pigments.3 points -

F/A-18 A+ Aggressor - Finished
blackbetty and 2 others reacted to Dukie99 for a topic
And I call this one done. Overall a very fine kit and a very enjoyable experience. I am actually thinking a building a C for the air superiority GB (in Swiss markings). We'll see. Here are the pictures of the finished bird. Cheers, David3 points -

KT-03 aerial tow target
Rockie Yarwood and 2 others reacted to dutik for a topic
Congratulations, it's a fuselage: Front is facing to the right, rear to the left. Thats it for the next days. All the etched lines have to be covered with triangular profiles, but these profiles are not provided with the kit. Not very professional, Profimodeller I've ordered a fistful of styrene profiles from Ebay, but delivery might take two days or three. Also ordered square profiles of different size as inserts for wings and rudder. There are PE parts for the wing ribs, which are OK, but I want to use something more solid to get the wings straight and even. Meanwhile started to cut resin for the trolley to go on with the build. BTW, this one is surprisingly large: Close to the size of a Texan/Harvard... Regards - dutik3 points -
For a good start to 2021. My new model AH-1Z "Shark Mouth" Academy 1:35 The model is old, but very well fitted and easy to build Painted: Hataka Cockpit: Eduard interior3 points
-

Kinetic 1/32 CF-18 Hornet Build
Starfighter and 2 others reacted to DrewH for a topic
So after thinking about it for a half glass of Scotch, I redid the intakes. Overall much better after the second time. Main fuselage is glued together with the intakes. This will take some time to clean up, fill, sand, rinse repeat at nauseam for a while till I get it acceptable. Nose wheel bay is in the forward half so I can start getting the cockpit aligned. The "fat Pylon" is done, this is likely the easiest part of this build. Only took 2 glasses of Scotch to get the courage to scratch build this. and lastly just because I know this exists - had to put the "ashtray" on the IP coaming It's actually an instrument mount which the pilot will install when needed. I think it's still one of those not to be mentioned items but I'm not sure. Anyway - back to toils of this beast. *Edit - sorry for the crapy iPhone pics I didn't rotate*3 points -

Scale Modeling and History
thierry laurent and 2 others reacted to MikeMaben for a topic
I have no explanation for why I build what I build. I just like airplanes. It's like trying to explain why you like your favorite color. Why you like the other gender. There's no explaining it. It just is what it is. I've always liked things that other people don't have. Most of my vehicles have had some aspect that made them unique. I think that's why I got into image editing and the Alps printer (found out about it's existance and capabilities from Mike Grant). Now there's the cutting machines that open up similar options for more people. It can be cnallenging but fun to achieve your goal. The history attached to the subjects I choose is interesting but not really the reason why I choose them. It's the look of the subject (coolness factor) that piques my interest. ... but that's just me.3 points -
Like many here I enjoy the historical aspect of modeling particular subjects. I probably spend as much researching things that have a historical connection with what I build, be they people, events, technical aspects or all of the above. I spent nearly 22 years as a soldier and since retiring I lead what the U.S. Army calls "staff rides" to study various battles or campaigns in Europe covering the timeframe from the Napoleonic Wars through WWII. So the study, and application, of the lessons of military history has been part of my professional life since I was 18 years old. Just about all my builds have a historical angle to them, sometimes more than one; and I that provides a lot of my motivation to build. Ernest3 points
-
Well after your positive comment and Ray's review - I decided to go ahead and purchase one... I look forward to seeing it in person... Mike3 points
-

MiG-23 MF TRUMPETER
The Madhatter and 2 others reacted to IrekM1 for a topic
Very slowly 'after COVID I return to work. I want to show next elements which I did in the meanwhile. These are elements from the hatch behind the pilot's cabin. I use some elements, decals from ANYZ.de. 90% elemts are hand made. In the half of last year I was flying SBLim-2 (MiG-15) too. Photos from the flight are at the end of the post SBlim-23 points -
my 2020 last buit , a very very nice kit from fisher :2 points
-
This build will feature the Minicraft Electra kit in 1/144 scale: Even though the kit-supplied AA decals look OK, I'll be building this one in Qantas livery, with the aid of a sheet from Hawkeye Models Australia: I like to build my airliners in Aussie liveries whenever I can. This is a very simple kit, and I've already done quite a bit of assembly work. Here's the fuselage, with the insides painted black, the nose wheel bay fitted, and nose weights fixed in place with Blu-Tack: Here's a close-up of the nose weights in place: And the inside of the windscreen painted black for good measure: I've also assembled the wings: Here are the wings test-fitted to the fuselage: That's a total of 6 kit parts! And for those of you wondering why I bother painting the interior of the fuselage in black, notice the difference in colour between the fuselage and the wings. The plastic is translucent enough that you can see a hint of the internal black colour on the outside. The point of doing it, though, is to lessen the number of coats of paint you have to use on the outside to eliminate any translucency effects. The fit of the wings looks OK at the roots, but there will be some gaps to contend with below: As you've probably already surmised, I'm hoping to make this one a pretty quick build! Kev2 points
-
My Completed LSP Projects of 2020
Hartmann52 and one other reacted to Thunnus for a topic
I'm not as voluminous a modeler as some of you and was only able to bring five builds across the finish line in 2020. All of these builds were shared here at LSP. At the beginning of the year, I finished the Tamiya F4U-1a kit, which was a change of direction for me as I usually focus on Luftwaffe subjects. My next completion was the Revell Bf109G-6 kit converted to a G-6/AS using the AMUR Reaver resin conversion. The next one was also another conversion as I backdated the Zoukei Mura Ta152H-1 kit to a Ta152H-0. The Hasegawa Bf109G-14 build was next as I attempted to portray Eric Hartmann's winter mount as a blotch scheme. My most recent completion was the Hasegawa N1K2-J.2 points -

1/32 ITALERI TORNADO IMAGE UPDATE
johncrow and one other reacted to miketippingmodels for a topic
1/32 ITALERI TORNADO Well I had to do it, just to see what it was like compared to the old faithful Revell kit. at first glance it's nice, but there are flaws, well there are with most kits, but when it's all new tooling, and such avast array of online images, you would think it's impossible to get wrong. so this is the cockpit OTB, with a few ANZY decals and switches, but the ejector seats are from the kit, I also opted to use Tamiya tape for the seat belts, as the PE supplied is thick, and not very pliable. any enjoy landing gear is next.2 points -

MiG-17 vs MiG-15
Rick Griewski and one other reacted to Gary Needham for a topic
It really is a mystery why the MIG-15 along with the F-86 have never been tackled by a major player in 1/32 given their iconic status. The Hph one in resin is very expensive and I understand a complex build whilst the Kinnetic F-86 is a bit toy-like needing quite a bit of AM. I would love to see the MIG-15 tackled in 1/32 by someone like Tamiya or Z-M or even at a push, if Trump were to revisit it and put the same team on it who did some of their better (not perfect) efforts like the F8 Crusader and Swordfish. Gary2 points -
YOU ARE RIGHT Kev, the HpH address was the wrong one, my mistake, but it worked and is working. I have preordered one kit. Alfons2 points
-

Did somebody say 3D printed bf109Z conversion?
Anthony in NZ and one other reacted to seiran01 for a topic
This has been a want of mine for for a very long time, and now with my CAD skills getting to a point that I'm comfortable with I've started designing a conversion to take two Hasegawa 1/32 bf109 kits and stick em together to make a Zwilling. D Bellis has been a huge help with details already, he scratchbuilt a conversion for these kits back in the 2005-2007 timeframe and has been sending many suggestions recently to help the design be as accurate as possible given what information is available. If I can get the parts looking nice enough I'll look at opening this up for sale to modellers who want one, but that's something I won't start looking at for a few weeks/months yet. Will post on the vendors board if I opt to start selling. In the meantime, here's the first test print of the wing and tail parts to check the fit - the contours of the belly insert are deceptively complicated and it took many hours of trial and error in Fusion360 to get that part to look as close to identical to the Hasegawa part as possible. I blew the fuse in my basement when this was 90% complete which killed the print job, that's why you're seeing a gap in the center wing and at the rear of the belly insert... Still to design are the cockpit cover for the starboard fuselage, cowling top panels with gun troughs removed, long-span ailerons, mk108 30mm cannon gondolas, a new wing spar setup, and of course, all that detail for the relocated gear wells.2 points -

Zactomodels new website!
Basta and one other reacted to Stokey Pete for a topic
Great new site Chris, and you know I love the stuff you offer. My Flanker will be getting these hanging from them now they’re built and painted. Just need to build the monster kit now.2 points -

HH-60G Pavehawk Kitty Hawk 1/35 DONE!!
J.J. and one other reacted to Pete Fleischmann for a topic
Hey all- doors are up..got the upper deck/fuselage seam cleaned up cheers P2 points -

Ju388 Instrument Panel
monthebiff and one other reacted to Pastor John for a topic
The bomb bay only needs a little deeper scribing and cleaning up. I did my best at the time. The conversion is a massive comprehensive kit - obviously there is some work involved! I hardly think you need an aftermarket part to fix an aftermarket part!2 points -
For pure quality of the kit, I'd say it's a tie between the Tamiya F4U-1D and the Mosquito. Both kits are amazing and I'm not using "amazing" lightly. They are that good. For pure enjoyment, it was my 1/32nd AH-6C, the first "Littlebird". About 10 years ago, "GT" one of the original first 6 AH-6C "Nightstalker" pilots, back in the day when the unit was in the black and known simply as TF160, posted a bunch of pictures of his AH-6C online. Previously, there was next to nothing out there for pictures of these early special operations helos. I decided to take the plunge and using the Dragon OH-6A kit, I scratchbuilt all the extras to turn it into the AH-6C. The pilot who posted these pics corresponded with me and answered a million questions I had about "his" helo and what it was like flying in those early days (he flew this ship into combat). It took me a year but I finally got it completed. I loved every minute of the build. I've stayed in touch with GT all this time and if the stars align and COVID ever goes away, I MAY be able to get this model down to him this year.2 points
-
Thanks, Max! The last days were spent with painting many small parts, constantly checking references etc. The engine is painted, I had a nice blue-grey colour in my collection of paints which matched pictures and memory: Xtracolour X157, FS16176 "Grey F-15 Mod Eagle" (!) The kit parts were installed on the engine with the exception of the exhaust pipes: The engine is clicked on its firewall temporarily for handling. Here are other views: Things to add to the engine: exhaust pipes, wiring and additional scratch things like oil filter, oil filler cap and baffle plates. The instrument panel was also given attention. The kit has decals for the instruments: Annoyingly, they were printed on one contiuous film within the surrounding line, so they had to be cut out individually. They settled nice in the instrument recesses with help of DACO Strong (red cap) decal solution. Glass was simulated with drops of Klear. Some additional placards were required on the lefthand side of the panel. Fortunately, I have an old Mike Grant instrument and placard decal set which yielded suitable placards: And here is the instrument panel in all its glory: The kit instrument panel is faithful to an old factory picture which can be found on internet, most probably from the version which the kit portrays. For PH-MBK, some modifications were necessary: Pedestal: - remove propeller pitch control lever, - move throttle handle to the right, - mount it higher than intended by the plastic and by the instructions. The pull levers on the right side of the pedestal got small handles (you can put your fingers behind them). Headset connectors were added on the lower lefthand and righthand corners of the panel. The slot below the pedestal is for a microphone and the small hole on the left of it is for its cable. These items will be added much later in the build. In the sixties and seventies, it was quite normal to fly without a headset. The noise level is very high in a small plane, for the simple reason that sufficient insulation material adds too much weight to the small plane. It's unthinkable now to fly without a headset, and rightly so! A nose cancelling headset has been the best investment I ever made for flying. The control yokes also will be added much later in the build. Remember that I showed a picture of the amount of lead required to let the Fuji stand on its nose wheel? I was able to put a lot of it in the cabin floor part. Below the centre console: And in the recesses below the front seats: This is about half the amount of lead needed. The rest will have to be put behind the instrument panel. I hope the space is sufficient! To be continued. Cheers, Peter2 points
-

1:32 scale Ansaldo A.1 'Balilla'
Trak-Tor and one other reacted to sandbagger for a topic
Hi all, Some modellers think photo-etch 'is your friend' :eek2: Here are the wing and strut rigging attachments plus the aileron control levers. All are photo-etch and with self-aligning 'hinged' anchor plates for attaching the rigging lines. Mike2 points -
MiG-23 MF TRUMPETER
Alain Gadbois and one other reacted to IrekM1 for a topic
Oryginal photos:2 points