Leaderboard


Popular Content
Showing content with the highest reputation on 11/28/2020 in all areas
-
Thank you all for the comments. @Antonio Argudo I followed your work with great attention before starting mine. For the transparet parts I 'm considering clear acetate cutted to shape. @Johnny Cloud Well, what you correctly underlined is call "age"! I confused what I really have in my hand with my initimate whish! With this second post I put in pair both forums. Arranged the frame and radios Cables, paint a fuselage closing. This model will have the engine not exposed because I do really want to enjoy her elegant silhouette. This create a problem with the exaust, as they should be glued to engine block. I made a template of exaust holes and replicated on 1mm plastic sheet then glued the exauts an cover All this block was glued inside the nose. A also cut out section with the wing fillet. I decided to try a metal foil cover for the fuselage and after many test I feel confortable with 0.2mm tin foil, heavy but flexible fot this first attempt. I started with epoxy glue 2 panels in order to have a solid straight pattern. I made a copy of the fuel fuselage cup with the coocking alu foil and glued it from backside The result Now one of the herdest poit: wings. I carefully studied Antonio's work and the drawing that MikeMaben added (thank you!). I made 4 templates of the highlighted wing stations Cutted the kit wing root, inserted the templates and refined the whole as per scale plan Eduard set gun by for the revell kit adapted here and roughly ammo ejection holes Filled all panel lins with epoxy putty Final stage and forum paired Ciao Fabio10 points
-

1/32 Revell Me 262B-1/U1 Nachtjager
Paul in Napier and 9 others reacted to Thunnus for a topic
Continuing on with today's work... The kit wheels are very nice and compare very favorably to the resin ones from Barracuda Studios. Where the kit wheels lose points is along the seam line. The tread detail loses significant definition at the join edges. What little detail there is will be eroded even further when it comes time to clean up that joint. So the resin wins hands down in this comparison. A similar comparison of the nose wheel results in a different verdict. This time, the casting irregularities on the resin wheel near the casting block may be more difficult to repair than the glue joint on the kit wheel. The resin main wheels are sawed off their casting blocks using a fine razor saw (RB Productions Medium). To help establish a flat spot on the tire, I use a piece of coarse sandpaper taped to a small sheet of glass. The tires are slightly bulged at the casting block where I established my flat spot, which will help facilitate that "weighted" look to the inflated tires as they compress under the great weight of this aircraft. It's a subtle but significant effect. Finally, a word about parts clean-up. I don't usually document the very basic step of cutting pieces off of the fret and preparing them for painting/assembly. But I think it is something at all modelers should pay attention to. It's important to remove any and all mold lines from your parts. Some flat-sided parts won't have a visible mold line but many curve and almost all cylindrical parts have them. I usually scrape them off with the edge of an x-acto blade and then re-establish the round contour with sandpaper. The kit tires fit perfectly on the kit landing gear leg, of course. One of the tricky things about using resin wheels is that the hole in the wheel usually needs to be deepened or enlarged to accommodate the landing gear. Without a drill press, it is difficult to drill that hole perfectly perpendicular. I usually counter this by drilling the hole a tad larger so that the wheel has some wriggle room sitting on the axle and can be adjusted as needed. I don't have the appropriate drill bit size so I'm going to have to come back to the resin main wheels later.10 points -
1/32 Revell Me 262B-1/U1 Nachtjager
Paul in Napier and 8 others reacted to Thunnus for a topic
Thanks guys! Appreciate the feedback! I agree! It's a bit awkward to receive information that I will not be incorporating but as I long as Johnie doesn't mind, I don't mind and I sincerely appreciate the information as a resource for others. There are going to be LOTS of things that are not representative of a real Me262 or missing altogether from this build. My intention is not to build an accurate-as-possible Me 262. I just want to produce something that seems authentic and towards that end, I try to be accurate but accuracy is not what drives my work. Obviously, I got the wiring on the back of the instrument panel wrong but I'm not going to change it at this point and I think it will be sufficient for the limited view it is going to get in the end. But thank you for that great info, Johnie! Ok... back to the build! I expanded my preliminary dry-fitting to the wings. The outer wing bottoms attach in a strange arrangement of tabs and pins. Due to the forced geometry of this connection, it was very difficult in getting the locating pins to go in their proper hole at an angle. Reminds me of the Zoukei Mura Ta152H push-and-twist landing gear legs. I figured something was going to break either forcing the pieces into place or trying to disassemble them. Put my engineer's hat on for a sec and decided to enlarge the two of the holes into ovals. It gives me just enough clearance to get the wings on and off and still providing a positive fit. Just a quick look to see how the fuselage and wings go together. Hard to tell from this stage since so little has been glued together but I haven't spotted any obvious trouble spots yet. The cockpit inner side of the "tube" have been painted. I added some wiring to the radio operator's starboard wall. Thinking about adding oxygen tubes to the cockpit using lead wire. Finished off the painting of the seats with some dry-brushing to simulate cracked leather. The cockpit sill has been painted and chipped. A bit more to come....9 points -

PZL P.6 1931 from scratch scale 1/32
Sasha As and 5 others reacted to Marcin_Matejko for a topic
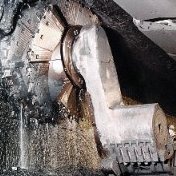
Thank you for your appreciation, that's very kind of you This model is important and personal to me, so I try to make it good. This is thin aluminum foil, but much thicker than such a chicken baking foil. I bought it once at a model market, but I don't remember where, a product without a name. Engine done, even went quickly6 points -

1/32 RAF WWII Bombs?
Dennis7423 and 4 others reacted to wunwinglow for a topic
I do some of the smaller bombs, in fact just finished a 250 lb GP type for a member here, so that can go in the range too! More coming... http://flyingstartmodels.com/Flying-Start-Models-Free-Fall-Bombs.html Sure I can do a deal for a bulk load! I have the 500 lb versions in CAD too, so they can be run off if you need them. I just haven't got round to putting them on the website yet. PM me, or e mail, for more details. Tim5 points -
So far, so good........5 points
-

Bf109 G-14 Blau 62 JG 110
Chris Wimmer and 4 others reacted to Wackyracer for a topic
Masking for markings Spinner had a 3rd white and a spiral over the top, 3 stage process, made my head hurt Reveal time5 points -

MikroMir Miles Magister RAAF Finished.
Paul in Napier and 4 others reacted to ericg for a topic
I left a couple of parts out as well. Some more work. As I am now modelling an earlier mk. no. aircraft, I had to come up with a solution for the new tailwheel yoke which is attached further back on the sternpost. I made up a new yoke from a section of flat brass and tube with plastic card details. I soldered the brass pieces together and in total, the new part not including the tailwheel is 8 pieces. I also cut the tailwheel down the middle and added a shim of plastic card to increase its width slightly as I reckoned it looked a bit skinny as supplied in the kit. You can see the small holes that I have drilled in the kit that match up with the two small attachment lugs to give the part some strength. I began working on the rib detail of the rudder. As this is a work in progress, I am still refining it! I marked out the position of the ribs with pencil I then positioned a no.11 blade in the holder so that I could use it as a scraper. I worked up to the pencil line for each scallop. Progress so far. Some further work will be required to sharpen each rib up a bit to match the horizontal stab.5 points -
aeroscale.kitmaker.net - Friedrichshafen FF.33L Planned - LUKGRAPH www.facebook.com/lukgraph/ Juraj5 points
-
Dear friends, my entry in WIP section and my very firts model since many years of inactivity. I hope you will forgive all the errors and imprecisions I will perform (fo sure). I'll be more the happy to receive critics and suggestions in order to improve my skill and my english, of course. Why a P-51? For me is the best ever made fighter. I spent hours admiring this https://forum.largescaleplanes.com/index.php?/topic/74079-118-p51c-mustang-lopes-hope-the-3rd/ It is a source of technique and inspiration. I'll try and if I cannot manage, I'll try once again, error after error to learn. Where starting from? From a more then welcome present I received my last birthday It's a work I started 2 months ago on my domestic forum that I wish to share here too. This first post will be a long up to date so both forums will be in pair for the future. By now I do not have any camera ( I'm searching for a decent one) so I made all the pictures with the smartphose. I bag your pardon for the poor quality but, by now, that's it. Satrted wit a rough texture for the main fuel tank and the roll bar Some work on side frames with eduard's photoetched set dedicated to the revell one For the floor plywood I made a template to be used with a real thin foil of wood that is used by few cigar's manifacture Few drops of wood polish and the result is this Time to have the office completed to check the measurements. I used Yahu panel for the early D version, but I could't resist. First error. I'm not so focused on detail by now, I have to practice. <a href="https://imgur.com/Ec0945i"><img src="https://i.imgur.com/Ec0945i.jpg" title="source: imgur.com" /></a> Work on tail section and tail wheel Now arrive one of the hard poit, a correct hump. The very first attempt was to use the upper part frm an lod revell kit, but after mnay attempt and mistakes I managed to get something like a low silhouette. A sort of convertible mustang! The corretc profile template did not allow replies. But I never forgot the great work made by Rodney Willimas many years ago with his 1/24 Airfix models. I reduced his drawings to 1/32 scale and started to create single frames. Once the main cage was tested on fusolage , small strips had been glued, first layer longitudinal and a secon layer vertical. I had a rough hump, but at least resembling it. Next step will be closing the fuselage and plan a strategy for the wings. Ciao Fabio4 points
-

Hurricane PCM 1/32 Douglas Bader
FreightDog and 3 others reacted to X15 for a topic
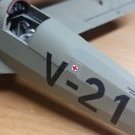
Hi everybody, For the Battle of Britain 80eme aniversary i buit this Douglas Bader Hurricane from the Pacific Coast Models kit. Not an easy kit !! Paint with Tamiya and Gunze and oil paint weathering. X154 points -
I finished work on the very nice WNW Sopwith Triplane that represents one of the Triplanes flown by Canadian ace Raymond Collishaw. Collishaw was credited with 60 aerial victories, 33 while flying with Number 10 Naval Squadron and two of those victories were achieved while flying aircraft 533; a twin machinegun variant. I built the kit mostly oob, adding only an HGW seatbelt and spark plug wires for the engine. This is the third WNW aircraft I have built and it went together as nicely as the first two. I only weathered the aircraft lightly, with the exception of underneath where I did add some heavy castor oil staining. Unfortunately I did not feel brave enough to handle the plane by turning it over to take some photos, it is a bit fragile and I did not want to wreck my work right after completion. Maybe later. I faded the upper horizontal surfaces slightly and did add a bit of dirt to the lower rear of the plane. In closing I want to thank LSP K2 for very generously selling me the kit a few months ago after I lamented that I probably would never have a chance to build it with WNW closing down. Thank you Kevin!!! I hope I did the kit justice. First up will be some overall shots of the build.4 points
-
Wings Cockpit Figures were not MDC we just sold them for David via our site,and I can assure you they are NOT out of production as at present we are casting a batch for him with several new subjects including WW2 RAF Bomber Command a couple of WW2 French pilots and Doug Craners new Werner Voss trio for the Meng Triplane which I think will be reviewed in the new Windsock Book . You can purchase them direct from David david.allen@wingscockpitfigures.com and steps are afoot to have a few more outlets will keep you posted on that. Bob4 points
-
The first of last weekend’s FB group auction wins. I need to be very careful about this site, as I can tend to be way too compulsive.4 points
-
And here are some mid-distance and close up shots. Too much light in this shot, which is too bad as it washes out a lot of the face's detail and shadows. I might replace the prop with a wooden one. You can see some castor oil staining near the wing root. Another view of the castor oil staining. I painted the prop with a base coat of acrylic color and then wiped a fairly thick (for me) coat of oil paint on it to simulate fine wood grain and to add a bit of warmth and depth. Unfortunately I was too light with the effect so you can really only see it in macro shots like this. I decent macro showing both the prop boss area and the engine. Some of the bracing wire eye bolt joins.4 points
-

F111-A
mywifehatesmodels and 2 others reacted to HL-10 for a topic
Hobby Boss's F111-A. This is a development airframe, hence the non standard scheme. Apart for the crew figures, it was built out of the box. Thanks for looking Angelo.3 points -
1/32 Revell Me 262B-1/U1 Nachtjager
Paul in Napier and 2 others reacted to Thunnus for a topic
Thanks Kev and Mark! The cockpit is connected to the main wheel wells, which requires a bit more thought and preparation. The gun compartment and the nose gear well are similarly connected. I'm just starting to look at these areas and trying to form a strategy. Adding details like wiring can be difficult when construction is modular like this. And I have to start looking for places to place weight to keep the model from tail sitting. Like most of my builds, my preference is to preserve the lines of the Me262 and close all panels and canopies. But that hasn't stopped me from admiring the included gun parts. The gun compartment has some nice details and I took some time today to place the Mk108 cannons into place.3 points -

Trumpeter 1/32 Czech MiG-21UM Stress Team
Anthony in NZ and 2 others reacted to spyrosjzmichos for a topic
Hi all! Work continued with the seats! I ended up using the CAM seats as I found the HAD ones to be undersized. Painting was done with a mixture of MRP and Lifecolor. While no decals were provided I was able to find some from the spares box to put on the headrest. With the seats done, I can finally call the cockpit done (although a few more additions are required on the canopy). I also completed the wheel wells. Trumpeter has provided quite a bit of detail but due to limitations of injection moulding they looked flat. I instead used lead wire and masking tape to get a more 3D look. Quite unusual even for a special livery, the main wheel wells and covers were painted with a brick wall effect. I used the kit's decals to get the final look although in hindsight I think it would have been better to paint them myself. The front wheel well had the normal interior colour. Finally, I also detailed up the undercarriage struts with lead wire, too.3 points -

ResKit stuff with photos.
Stokey Pete and 2 others reacted to Helmsman for a topic
Reskit is correct, Aires is not.3 points -

Hawker Nimrod Mk.1 1:32 scale
scvrobeson and 2 others reacted to LukGraph for a topic
Unfortunately, postal items are not as well traced as courier items. I am sure that the slightly extended shipping time is the fault of the pandemic and simply the pre-holiday period. One thing is certain, you will get the model for sure, if by some reason you will not, I send another one or money to be returned - it will certainly be good, best regards.3 points -

1:32 scale - Nieuport N.28C1
mgbooyv8 and 2 others reacted to sandbagger for a topic
Hi all, Rudder pre-rigged with double wires on each side, Mike3 points -

ResKit stuff with photos.
Landrotten Highlander and 2 others reacted to Stokey Pete for a topic
Forgive the not so great iPhone shots but they show off both offerings quite well I think. My conclusions are mixed. The Reskit parts clearly fit the kit better, are much thinner, display the exhaust petals more correctly. They appear to be deeper than the Aires set, and the reheat section differs from the Aires set, I haven’t been able to find any reference photos that show whether the Reskit reheat sections are accurate for the real aircraft or not. The two renditions vary quite a bit in shape and size as you can see. Inner details are beautifully rendered in both sets, but feel sharper, and have more subtle engraved detail in the Reskit set. Overall, I think much prefer the Reskit over the Aires set. The fit and how thin the edges are sell it to me, along with the resin cast flame rings for the reheat section. Enough waffle, here are a few images.3 points -

New, Incredible, Beautiful Tamiya Release Coming Soon; Anyone Know What it is?
TAG and 2 others reacted to D.B. Andrus for a topic
It's out worldwide, but you just can't see it.3 points -

J2M2 Raiden Model 11, CPO Akeshi Ochi, 332nd Kokutai
Rocat and 2 others reacted to Miloslav1956 for a topic
1/32 Hasegawa kit Eduard PE parts HGW seat Belts Riveting & painting mask homemade All colours MRP IJN set / test sample3 points -
Here's the last lot of models I picked up on sale. My next move is to sell off the things in my stash I probably won't build. I bought this guy for my 1/16 panzer.3 points
-
1/32 Revell Me 262B-1/U1 Nachtjager
Paul in Napier and 2 others reacted to johnie hopper for a topic
Really nice work John! I would like to say something generally to Me-262 instrument panel back side. Maybe it will be useful for someone else too. When you look at these pictures, almost each type of instrument has another type of connection. Some use pressure inlets (with hoses) some use one or two electric cables/wires. Here you can see how pressure inlets should be arranged and where they go through the cockpit walls. All electrical wires should go to the terminal strips V8 on the ride side wall or V4 and V5 under the switch box on the right side. Here's my scratch built attempt of Avia's S-92 IP using Eduard's single Luftwaffe WWII instruments (the IP body was really black). Instruments under panel were added for flight tests only.3 points -
1/32 Revell Me 262B-1/U1 Nachtjager
Pastor John and 2 others reacted to Thunnus for a topic
Thank you Alan and Peter! Finally making some noticeable progress on the cockpit. The front bulkhead has been glued onto the frontal cockpit assembly. The sidewalls of the cockpit are a separate piece and they are double-sided and form not only the cockpit enclosure on the inner side of the tube but the wheel well surfaces on the outside of the tube. Because the attachment of the front bulkhead was quite flimsy due to the three small attachment points, I used the "tube" as a temporary brace to hold the front bulkhead in place as the glue dries. Once the glue dries, I can remove the front cockpit assembly from the tube. Both surfaces of the tube need to be painted prior to assembly so I'll have to get to that soon. But first I'm going to continue on with this front cockpit. Revell has kindly molded the instrument casings on the back of the instrument panel. So I glued a single wire into the back of every casing. These were then bent into painting position and trimmed to appropriate length, trying to keep the wires separate to facilitate snaking the paint in between the strands. These will not be attached to anything, just bent down into the dark space between the IP and the bulkhead. The wires were painted randomly light grey and yellow. The wires are then pushed into final position and the instrument panel is glued into place. The rear cockpit assembly is glued together next. I forgot to chip the floor so I may have to do some retro-fit hair spray to match the front cockpit. The attachment tabs offer a nice tight fit so I can temporarily place the two cockpit assemblies together to check the fit. Again, the tube is used to make sure that the components are in the right position. The whole assembly is taped into the fuselage. The view from the top. Everything seems to fit together well without the need for any significant adjustments. Once the wing bottom is attached the view into the wheels wells is greatly reduced. A small check on how the radar unit sits on the cockpit sill. There is still a lot of work left on the cockpit but now I feel quite relieved that I've been able to dry-fit the cockpit assembly into the cockpit and found no significant fit issues. Happy Thanksgiving to all!3 points -

1/32 Spitfire Mk.IXc weapon bays (for TAMIYA) 32001
Coneheadff and one other reacted to CruZz for a topic
Hello Gents, let me introduce you new Weapon bays for Spitfire with C wing. (for Tamiya KIT) Set including both main weapon bays with full interior. (2x Hispano, heating tube system, ammo etc.) 2 types covers be ready in few days. And I´m working on instructions also... Please, note here, if you are interested. Price will be 28USD +8 USD Shipping (worldwide). Hope complete set be ready for shipping next week. Payment via Paypal. Thank you! Regards JAN2 points -

1/32 SH Hawker Tempest Mk V, "Kicked Up A Notch" New eBook!
Seversky and one other reacted to chuck540z3 for a topic
November 24/20 After 7 months I have finally finished the 1/32 Special Hobby “High Tech” Tempest Mk V, kit number 32052. This kit has some really nice additions in the box already, like several resin parts, photo-etch parts and even some fabric seat belts, so you don’t need too much for aftermarket accessories if you want to “Kick It Up A Notch”, like I always try to do. Still, I did add the following: #32234 Barracuda Nose Correction Set with Props #32141 Barracuda Intake Ring #32239 CMK Exhaust Set #32122 Maketar Paint Masks for all insignias and other markings #232016 HGW Wet Transfer Decals, which appear to be currently out of production The subject for my Tempest is one that French Fighter ace Pierre Clostermann flew, and there is a good article on him at the Hawker Tempest Page website here, where I derived most of my references for this build. Pierre Clostermann's JF-E Aircraft In this article is a pic of Clostermann standing on the wing of NV724, which has the Cross of Lorraine on the chin and the 3 Squadron “Cockatrice” at the top of the tail which were applied after the war, along with a kill scoresheet next to him. To weather this model I tried to show that while most of the aircraft had been heavily used in battle, these items were left relatively clean. And here is my attempt at more or less the same, which went by kit instructions rather than try to match this one side exactly. While the kit can create an impressive Tempest, there are many challenges that I tried to document in a long build article that goes through every step of the model, including detailed instructions here: SH Hawker Tempest Mk V, "Kicked Up A Notch" I tried many things in this build that were new to me, like liquid mask on a sponge to create paint chipping, MRP acrylic lacquer paints and Metal Liner metallic accent wash to enhance the rivet and panel lines with a metallic color, rather than the traditional dark washes that usually look really good, but often don’t look realistic. Now the pics, taken from just about every angle- so sorry there's so many! Note: Tempest landing gear and wheels toe outwards a few degrees. Cheers, Chuck2 points -
1/32 F-16C 90-813 Spangahlem
Loach Driver and one other reacted to CruZz for a topic
Kit: Tamiya Extras: Cockpit, wheel bays, jet exhaust - Aires Weapon bay: CMK for hasegawa kit + Aber gun barrel Avionics bays and some part of engine 3D print same as ALE-50 on the wings. AMRAAMs and training AIM-9 : Eduard brassin... ACMI Scratch Anyz decals for cockpit RES-KIT wheels RBF Eduard. HTS modified from kit Sniper pylon modified from Academy. Sniper container Eduard brassin. Exterier PE parts Eduard. Dischargers master same as pitot tubes. Astra decals insignia + some my own decals Numbers on pylons by dry trasfers Hobby Decals. Colors Gunze C....2 points -
In my quest for what will be my next build, I've been thinking about the Tamiya Spit IX. Problem is that I'm just not a fan of the standard Ocean Grey / Dark Green or the standard Desert scheme. While surfing the net, I came across this Spitfire, based in Italy in 1944: I think that might be a good subject. Only question is on the finish. Some references show all over NMF (or painted silver, I have no idea): While others show NMF with a couple of panels in original paintwork. Of the two options, I really like this version. The nose panels really make for an off-beat appearance which is something I really enjoy replicating. Does anyone have info on UF-Q? Thoughts on which version is correct (although it's quite possible that the aircraft was 100% NMF and those camo panels were added later to replace the damage originals, so both profiles could be accurate). Also, anyone have the "backstory" on why this aircraft would have had it's original camo stripped off? Any thoughts on this are most welcome. Also, any info on the Techmod decal sheet above (quality, availability, etc) would be quite useful.2 points
-
Glad the the journey is over. The kit was underwhelming but overall I'm happy with the end result. It's clichéd and iconic. MRP krapplack red for the overall finish. As usual it goes on like buttah. I substituted Master barrels for the kit PE. The kit has its issues; warped wings, crap instructions, questionable engineering fitting, lots and lots of flash and seam lines that need clean-up and frah-gee-lay structure that needs wire bracing. Admittedly I got caught up in all the hype surrounding this kit but I do like the Dr.I and if i ever get around to building the Roden F.I i have in the stash it will be an interesting comparison. For now though my WWI itch has been scratched and satisfied for quite some time. Great War planes are always like a session of self-flaggelation. https://hosting.photobucket.com/images/j8/jbrundt/LRM_20201125_062354.jpg https://hosting.photobucket.com/images/j8/jbrundt/LRM_20201124_104709.jpg https://hosting.photobucket.com/images/j8/jbrundt/LRM_20201123_200737.jpg https://hosting.photobucket.com/images/j8/jbrundt/LRM_20201123_200805.jpg https://hosting.photobucket.com/images/j8/jbrundt/LRM_20201108_100958.jpg https://hosting.photobucket.com/images/j8/jbrundt/LRM_20201108_101143.jpg https://hosting.photobucket.com/images/j8/jbrundt/LRM_20201104_151940.jpg https://hosting.photobucket.com/images/j8/jbrundt/LRM_20201104_151920.jpg https://hosting.photobucket.com/images/j8/jbrundt/LRM_20201104_151832.jpg https://hosting.photobucket.com/images/j8/jbrundt/LRM_20201103_080413.jpg https://hosting.photobucket.com/images/j8/jbrundt/LRM_20201103_080403.jpg https://hosting.photobucket.com/images/j8/jbrundt/LRM_20201103_080312.jpg https://hosting.photobucket.com/images/j8/jbrundt/LRM_20201014_161636.jpg https://hosting.photobucket.com/images/j8/jbrundt/LRM_20201014_161531.jpg https://hosting.photobucket.com/images/j8/jbrundt/LRM_20201014_161621.jpg https://hosting.photobucket.com/images/j8/jbrundt/LRM_20201014_161503.jpg https://hosting.photobucket.com/images/j8/jbrundt/LRM_20201014_161447.jpg https://hosting.photobucket.com/images/j8/jbrundt/LRM_20201014_161439.jpg https://hosting.photobucket.com/images/j8/jbrundt/LRM_20201014_161341.jpg https://hosting.photobucket.com/images/j8/jbrundt/LRM_20201011_115703.jpg https://hosting.photobucket.com/images/j8/jbrundt/LRM_20201010_142701.jpg https://hosting.photobucket.com/images/j8/jbrundt/LRM_20201010_121420.jpg2 points
-
Works for me.2 points
-

Revell/ AIMS Mistel S3C Wk Nr 460066 Bernburg 1945
red baron and one other reacted to monthebiff for a topic
Some serious progress today with first up getting the fuselage extension glued in place after some careful sanding and trimming Than the massive sail of the vertical stabiliser was fitted followed by the equally massive horizontal stabilisers Also couldnt resist a quick test fit of the main sub assembies Absolutely massive with the fuel tank extension fitted, lots of filling, sanding and scribing coming up! Regards. Andy2 points -
Hasegawa 109F-4 to F-2 conversion..
Gazzas and one other reacted to D.B. Andrus for a topic
In general, the differences between the F-2 and F-4 consist of smaller air intake for the supercharger, shallow oil cooler(F-4 Trop had deeper oil cooler as well as enlarged air intake); a large part of F-2 production had squared-off wheel openings w/ exceptions; a large number of F-2's retained the clear triangular glazing on the lower right of the windscreen; supplementary external armor glass could be fitted; capability of using 300 ltr. external fuel tank; 4 external tail stiffeners added after several accidents because of tail separation; use of DB 601 engine required 100 octane fuel - C3 fuel triangle. My conversion consists of a small air intake w/ cowling panel; small oil cooler w/ mount and screens; 4 foil external tail stiffeners. Everything else will be provided by F-4 donor kit. Will post some photos shortly. If more info is needed I can post some photos of pertinent 109's. Cheers, Damian2 points -
1:32 scale - Nieuport N.28C1
mgbooyv8 and one other reacted to sandbagger for a topic
Hi all, Upper wing fitted. Although the outer struts located fully, the fuselage cabane struts were slightly clear of the underside of the upper wing. However, a bit of pressure and CA adhesive did the trick. Also the rigging, which is the next stage, will hold the wings together, Mike2 points -
I’ve been post processing (filling, sanding, & high build priming) the seat backs for the troop compartment over the course of the week. Dull, though necessary, work. Test fit (ignore the angles): Once life returns, I’ll design & print the seat base, as well as the driver’s & commander’s seats. With a coat of paint, that’s the interior sorted.2 points
-

QF-4S Phantom "VX-30" - Tamiya/Cutting Edge, 1/32
Starfighter and one other reacted to Rainer Hoffmann for a topic
Once the new set of wheels has arrived and once you've painted them, the old one will reappear from the 11th dimension through a wormhole that spontanously formes on your bench. Mark my words. Rainer2 points -

Hasegawa 109F-4 to F-2 conversion..
Isar 30/07 and one other reacted to nmayhew for a topic
very interested from a modelling standpoint but primarily from a technical one i have never *definitively* seen the differences explained between the two variants - i mean done properly including engine specs, propeller specs, and then on to radiator and supercharger cowls, fuel ports etc etc i have lots of books which skirt round the subject because clearly they don't really know either @D.B. Andrus what are you planning? I would also be interested in the input of perhaps @Vincent who maybe knows?2 points -

1/24 F6F-5 Hellcat--In Flight
JayW and one other reacted to easixpedro for a topic
Long Holiday weekend here in the States. Not much to report, as I'm waiting to make a run to the local craft store for some brass wiring to make the ignition harness. But waiting for the shopping crowds to disperse a bit before going. Also need to see if they have a small electrical motor and maybe a solar panel as a power source. Here's the engine as it stands. It's a work of art. And it shows how much work JayW and Brian have put into either scratch building or using resin. There's 24 parts in this shot alone, and I'm cross-eyed from just building OOB! All I've done so far is hit it with Tamiya rattlecan aluminum. Will weather it a bit before I do the harness. Have to make a decision on motorizing this before I can button every up. Hopefully I'll figure it out this weekend. Till then Peter2 points -

Tamiya will never offer the following aircraft as LSP. Your choices.
Tnarg and one other reacted to Panzerwomble for a topic
My penpal in Sizuoka is mates with a girl , who met a guy in a sushi bar who apparently empties the bins at Tamiya HQ every other month . Apprently it's the old MkV version of the Fruitbat due to be relased before Xmas not the MkVII which maybe available as a later edition . Eduard already produces the PE upgrade for this 'soon to be $300 masterpeice' according to their twitter account . Bon chance eh ??2 points -
Thanks Brett! Added some details to the radar operator's instrument panel. Thanks Johnie! And some wiring was put on radar box terminal. The frame has been primed but not yet painted.2 points
-
Great cockpit work, John. Happy Thanksgiving!2 points
-
 So, one problem with using Montex and adding raised rivets......the masks won't conform to the rivets well enough. I tried placing the tail number just now and cannot for the life of me get the oramask to stay flush. I have Ventura's decals for the same plane, but didn't really want to go the decal route, especially for the big insignias. Any suggestions on where to get custom Kabuki masks for New Zealand WW2 insignias? EDIT! Surprisingly, they look fine. I did the tail number and it really had no bleed on the edges (LOW air pressure and kept the airbrush completely straight while spraying). I'm happier now, ha!2 points
 -

1/35 KH MH-60L "Super 63"
Zorro and one other reacted to Hawkwrench for a topic
A little more done on the MH-60 tonight. The top doghouse was a tight fit that needed clamps to get it down fully onto the fuselage. It's definitely not as good as Pete's helo, but I like it. Comments welcome Happy Thanksgiving guys! Tim2 points -
Hi All! The wheel wells repainted in a nice, bright red color )Hu.19); I primed the metal nose cone with Alclad Black Microfiller and then I painted it Wood Tan (Hu.110) Some of the instruments were missing so I used some from an old Mike Grant sheet; Much to choose from, but I tried to follow my references as far as I could; I painted the instruments gloss black (Hu.21) and then i placed the individual decals with micro-set and -sol, then I topped it off with some gloss varnish; Front cockpit; Rear cockpit; As You can see, I have done some detail painting with red, black and white knobs and handles. The sight was painted silver (Hu.11) and then clear orange (Hu.1321),,,, More to come soon! Stefan2 points
-
1:32 scale - Nieuport N.28C1
mgbooyv8 and one other reacted to sandbagger for a topic
Hi all, Apart from the propeller, all of the decals have now been applied. Undersides using ‘Aviattic’ aged varnish CDL (ATT32094) over base colours. Top surfaces 'Aviattic' Linen Weave Effect (ATT32236) over base colours. Individual marking from the ‘SuperScale’ WW1 Nieuport 28C-1 (MS320243) set. Final sealing coat of 'Alclad' Light Sheen (ALC-311) lacquer. Now I'll need apply weathering before adding details, such as the retaining strap for the engine cowl and ring supports for the front of the machine gun cooling jackets. Then it'll be pre-rigging and start the construction, Mike2 points -
A few more...2 points
-
1:32 scale - Nieuport N.28C1
TorbenD and one other reacted to sandbagger for a topic
Hi all, I've applied the decals to the wing struts and the rudder from the ‘SuperScale’ WW1 Nieuport 28C-1 (MS320243) set. The pre-moulded lined wrappings around the struts were way to thick. I sanded them away and replaced them with white 1.5 mm wide white stripes from the ‘Xtradecal’ parallel stripes white (XPS2) set. Also applied are the wing decals, which are ‘Aviattic’ aged varnish CDL (ATT32094) linen effect decal undersides and Linen Weave Effect (ATT32236) on top surfaces. The decals are glossy due to the base coat, but will be toned down eventually, Mike2 points -

F-104C, 435 TFS, a 'Pussycat' at Udorn, 1967,
Lee White and one other reacted to Daniel Leduc for a topic
And part two.... Hope you liked it, thanks for watching and have fun, Dan.2 points