Leaderboard

Popular Content
Showing content with the highest reputation on 11/14/2020 in all areas
-
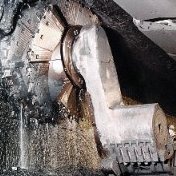
Annnnnnnnnnnd WERE BACK! After a 2 year hiatus from this build guess who is back on the main stage (bench) and ready to be finished! I had to go back to 2018 to see where I was last. Apparently the tedious task of cutting out engine nacelle ribs................. I think since that kind of thing is what seems to kill MoJo quite fast for me, Im going to start back on my pretty kitty with the R2800s, and utilizing the amazing ANYZ LARGE engine upgrade set, which looks like its not even available anyomore First order of business will be to remove the ignition rings from both front trans faces and redo them to support the 72 total ignition wires needed for the two large R2800s. Tonight I only managed to clean the benches, remove all the extra Ki-45 stuff, and move the big girl from the side bench to the main bench. I have a 3 day weekend starting tomorrow, so I plan on getting serious with the big F7F. Cheers!16 points
-
Thanks Brian! Setbacks like paint lifting during masking kinda takes the excitement away but I'm going to keep plodding on and see this one to the end. Actually... I'm planning on leaving the engine cowling detachable. So the model could be posed like this... Some shots of the model in the photo box (sometimes I forget to use it!) prior to decaling.13 points
-
afternoon ladies Thanks Alex - appreciated! Yes, the PE I design and have PPD in Scotland make them for me, I would like to do it myself, but they make magic happen in a way I don't think I could Thanks Troy! no the Fw190 was shelved, much like the others you mention - each one has a place in my history, but I am not great at going back to them, so once a decision is made, for now it seems it's terminal... ..mind you, I count them as collateral damage as I do them and then hit on one I really enjoy every day like the Spit, P51 and now the Fury not so much a WIP as a status update... but I found I had got to the point I really needed a jig I could put the side frames in and out of so I could work up assemblies that go in them.. ..this is just a sheet of perspex with a drawing I made from the plan stuck to it and then a bunch of hold points that hold the spar / brass front end, and then the side frames in the right place & orientation.. i had missed the side frames are canted inwards after the seat - I thought that was further back, so they were amended too... ..then all the control assemblies were painted & further detailed - this is the control column.. ..the rudder bar - used painted masking rubber again for the covering on the hoops.. ..the kickboard assembly was made up and this is the heart of this whole subassembly - also added some control cables & fittings from a bunch of microscopic bits.. ..that lot is now cemented into this one assembly which was done while in the jig so all the reference & touchpoits align.. ..and test fitted in the jig... ..and thats it for now, going to make the triangular fuel tank and start detailing the sidewalls next TTFN Peter12 points
-

RAF FG.1 XV571 WILD HARE Phantom Conversion
AlbertD and 9 others reacted to Anthony in NZ for a topic
Whilst is it not a lot to see, the fin surface is being completely redone. All new panel lines and rivet detailing. The RWR fintip antenna has been completely rescribed to match the actual thing. Still some more to go, but nearly there, still yet to add the different fuel vent, Aires intake at the front and the Master pitot's....then finish off with the ILS blade antennas on the sides. Who would have thought so much work in a fin??? Anyway, when I sort a few more areas out and get a 'Chuck wash' on, then all the differences should become apparent Cheers Anthony10 points -
Although I'm not completely happy at this stage, I gotta trust in the plan and that subsequent steps will eventually tie the different elements together. The next step is to apply a pastel wash to the model. I mix my own washes using pastel chalks, water and a dab of dishwashing soap to help suspend the chalk in the liquid. Very simple and can be used on any type of paint finish. I'm using a dark brown overall. The wash will have the greatest impact on lighter colors so I start on the bottom. You can see the effect as I've stopped halfway to show the difference between wash and no wash. The main purpose, besides highlighting details, is to turn holes (rivets) and grooves (panel lines) into dots and lines. I believe that the "flattening" of these 3-D features help make the model look less like a model. Since the topside green is so dark, the panel wash will have less effect. So I've concentrated on the lighter areas (stripes, hinomaru and tail codes) and major panel lines and have gone through the trouble of getting every rivet. I'm going to seal the panel wash with another clear coat and then do the decals, which are primarily small stencils.10 points
-
Thanks Mark! I normally don't paint with the model on the stand. I usually hold the model in my gloved left hand and spray with my right. For mask work, I spray very closely and in small areas to reduce/limit overspray as much as possible. The nylon brush is a good tool for chipping but I found it to be a little TOO stiff and potentially damaging to the paint surface if used too aggressively. I also experience bristle loss and got tired of wiping away all of the little lost bristles. Painting continues on the Shiden Kai. More bumps in the road but I'm used to them by now and have learned to roll with these punches. I used flexible white Tamiya tape to mask off the fuselage stripes. Lots more paint lifting occurred. Again, the lift patterns are pretty interesting and almost usable. If I was going to do a really heavily chipped Japanese scheme, I would've incorporated these mishaps into the build... maybe even purposefully caused them. But for my bird, I've decided that they are just too much. I've not found a good way to preserve any of the paint lift areas so it is all or nothing. I carefully masked the white stripe areas and repaired the paint lift sections. You will note some paint lift on the wings which resulted from the masking and painting of the red NO WALK line. They are quite heavy but since they are constrained to what I consider to be the highest wear area, I've decided to keep them. I elected to paint the engine mount area in the interior green color as offered in the kit instructions. I still need to do a pastel wash and post-shading so this area will get more dirty as we go on. This is what it will look like with the engine mounted. I am leaning towards leaving the engine cowling unglued. The prop is removable via polycap so there will be an option to pose the aircraft with the cowling off. Some shots with the cowling in place...8 points
-

The large-scale-bug. Bitten.
Royboy and 6 others reacted to ironman1945 for a topic
Ahh yess. Welcome to the Dark side. Join your fellow Imperial Large Scale troops as we decimate the weak willed, oh so tiny scales, and grind them to dust! Cheers! Dave/Ironman19457 points -
Decals are complete and weathering has started with a panel line wash from Ammo by Mig.7 points
-

Short Sunderland MkII
Sharkmouth and 5 others reacted to tomprobert for a topic
Good evening ladies and gents, I've not updated this thread for a while but I've nevertheless been beavering away with the mighty Sunderland... I've made four small tabs on the sill of each porthole which will support the glazing when the time comes. Once these have been painted black and the 'glass' is in, they should be all but invisible: I've also sprayed the bulk of the interior and the bulkheads black for the areas that won't be seen. The forward section and basic flightdeck structure has been given a coat of British Interior Grey/Green: There's obviously lots more detailing to be done here, but the basic shapes are coming together quite nicely. The 'bomb room' in the centre section has been given a base coat of Aluminium in preparation for more detailing: When the fuselage is closed it should look busy enough when depth charges etc are hanging from the racks: I've begun making interlocking tabs to help alignment and the joining of the fuselage when the times comes - a must for vacs: This will give a lovely strong join: Still lots to keep me occupied on the interior, so until next time... Tom6 points -

DH 82A Tiger Moth S Rhodesia 1943
VW Chris 1969 and 5 others reacted to mozart for a topic
My lovely little Tiger Moth will get her identity today! She's probably Australian-built, de Havilland's Australian subsidiary were already building Tiger Moths for their own use as part of the Empire Air Training Scheme (EATS) and a large number of Tiger Moths were sent to Rhodesia via South Africa. Many arrived without serial numbers, though the Air Ministry had allotted "DX" serials to distinguish the Aussie-built planes, but some already had numbers which it is thought were the constructor's production number, hence this one is simply No. 202 off the production line!6 points -

Colombia Kfir C10 Revell+Isracast
Starfighter and 5 others reacted to red Dog for a topic
More work on the IP: The final layout parts have been selected from the Airscale PE and some bits from the scrap PE box: Once satisfied with the whole IP, the different components were glued in place and given a splash of paint Some gross attempts at micro painting to paint buttons Then hi gloss varnish and the Airscale decals The glareshield were redone with aluminium foil, A HUD was also added Final result: and the real one: Macro photography really helps seeing the default on your work but once in pit, none of these are strikingly visible anymore (luckily!) :6 points -
The large-scale-bug. Bitten.
Panzerwomble and 5 others reacted to mozart for a topic
Old men (with failing eyesight and arthritic fingers,) that is!6 points -

Hasegawa Ju87G Josef Blümel
thierry laurent and 4 others reacted to Thomas Lund for a topic
Another one done. Hasegawa's lovely Ju87G Stuka with Aires cockpit and HGW belts. Finished as 60 tank ace Josef Blümel... that is... I did not in ANY way want to do the Nazi Rudel so I went looking for something else. Not a lot of variation and not a lot of documentation. I found a color profile with a winter washed S7+BU but no pictures... so a but unusual for me I decided to go with the color profile alone - looked too cool... Hope you like it5 points -

The large-scale-bug. Bitten.
Rick Griewski and 4 others reacted to Gazzas for a topic
It's finally happened... I finally have enough LSP's in my stash to drive me to get rid of some of my 1/48 single engined fighters. I still have a few of the little ones to do... Foiling projects, and a Gaspatch HS 123.... but I just find myself liking the opportunities that come with a larger model. I still have some twins in 1/48... but I don't see myself ever getting having enough space to put anything bigger. I'm taking the little ones to a club meet today to see them off.5 points -

PZL II C IBG MODEL
scvrobeson and 4 others reacted to red baron for a topic
my last built , a really very nice kit : voila voila5 points -

SH Tempest Mk V "Kicked Up A Notch". January 14/21 New eBook!
Greg W and 4 others reacted to chuck540z3 for a topic
Hi Matt, Yes, that is where they excel! Below is a pic of the HGW decals on the bottom of my Spitfire, with the top one lying along 2 deep panel lines. No way you could accomplish that with a lot of decal film. November 14/20 As mentioned earlier, I want to weather the paint to make it look used, but not abused, to try and replicate this pic which I’ve shown many times. To do so I used the old tried and true salt weathering method. Although I wrote it 12 years ago, this thread at ARC on how to do it still applies today. Unfortunately, the pics are watermarked by Photobucket now, but you can still get the gist of it and I have my F-4E and P-51D added to that thread many years later: Salt Weathering Technique Tips Salt weathering isn’t for the faint of heart, but after you’ve done it a few times it’s pretty easy. For this model, I modified things a bit, because I: 1. Didn’t apply a gloss clear coat. This is a bit of a risk, because with a clear coat I can delete any subsequent painting if I want to. Without a clear coat, what you see is what you get, permanently. 2. Did not use the hair dryer hardly at all. Rather than drying the model immediately after applying the salt, I let the salt crystals dissolve for a long time, which allowed them to reform into new and complex patterns. If you dry the salt too quickly with a dryer, you risk blowing much of it off and only little salt squares remain. 3. Applied the subsequent coats of paint very sparingly. This model is not a heavily weathered F-14 Tomcat or WWII Pacific Corsair, so while the paint is chipped, I just wanted the paint to look worn and a bit faded. So here we go! I sprayed a coat of warm water with a drop of detergent from a spray bottle, then simply shook salt from a shaker all over it. This is messy, so I did it in the kitchen near a sink, placing the model on a small box that I could discard later. Letting the salt dry slowly without a hair dryer, you get a terrifically random masking pattern like this. Same for the bottom, although less salt since the undersides are protected more than the top. For weathering paint, I mixed a small bottle of Light and Dark Ocean Grey, Dark Green and just 1 bottle of Dark Medium Sea Grey for the bottom, because it is very light colored already. Each bottle has a bit of White or Black to create each color. I also mixed a bottle of Tamiya Smoke that was heavily thinned, to create dark patches and knock down the glare of the bright insignias. After painting, I let the model dry for an hour or so, then carefully rinsed the salt off under the kitchen sink. All this water will eventually get under the masks, so all masks were removed to allow everything to dry and remove all the salt. Here’s the bottom, which is again subtle. I will be adding staining with pastels later. The top after a coat of Tamiya Clear Flat lacquer. Very subtle from a distance, which was my goal. No zebra pre-shading and no dark washes filling in every panel line and rivet. Just weathered paint that looks natural. Now some close-ups so that you can see the difference. BEFORE. All you can really see for weathering is some chipping AFTER. Note the tonal variation in the paint, especially the light grey. I think this is more effective than using masks with holes cut in them, because it’s so fine and random. I’m happy to report that there was no leakage under the cockpit masks, which scares every modeler! This angle shows the lighter colors within the Dark Green. Too bad you can't see into the cockpit a little easier, since I spent so much time in there getting everything just right. The side roundel is not as bright as it appears in this pic, as you will see in the pics below. Here’s another BEFORE/AFTER comparison. BEFORE AFTER. Now weathered paint, including the roundel and fin flash. A few more angles I can envision ground crew boots on this wing doing maintenance. And Pierre Clostermann getting in and out of the cockpit, chipping the paint with his boots and flight equipment. Close-ups of the wing. Those HGW stencils are amazing. It’s sure nice not having to worry about attaching the wingtip navigation light at this late stage. Closing thoughts on the salt weathering: 1. One thing I forgot about is that the final dull coat knocks down the effects of salt weathering and paint chipping a lot. You need to overdo it a bit, because the dull coat smooths out all light reflection and diminishes the differences in paint colors. In hindsight, I wish I had made the salt weathering a little bit stronger, but I’m still happy with how it looks now. 2. Salt weathering is often (if not usually) overdone. I hope my experience shows that you can get a nice tonal variation to your paint work without it jumping out at you- and not look realistic. So that’s it for now. I still have a lot of work to do with the landing gear and other bits, but I’m on the home stretch now! Cheers, Chuck5 points -
I remember 10 years ago I was happy doing 1/72. Then I bought a 48th kit and I though it was a massive turning point for me. Then one day 2 F-15s’ flew over Boscombe Down(where I worked) and they were looking for Stonehenge. This was my first glimpse at an E model (for 10seconds) and I had to build one. My research found the Tamiya kit and my wife bought me one for Christmas; this was my first. Ever since; bar 3 x 1/48 builds, 2 of those being commissions I have exclusively build 1/32. I just find them more rewarding to build for me. I do look at others builds and they can be great but after those commissions builds which I didn’t enjoy, my future is set. I blame the Americans for getting me into 1/325 points
-
I've been working away at the riveting, but have run into a few wing and fuselage section seams popping due to the force I'm having to apply with the rivet wheel. If I was to do this over, or more likely do a whole bunch of similar Special Hobby models in the future because I can't resist the selection of obscure subjects, I would reinforce the insides of the fuselage seams with strips of polystyrene and maybe add some reinforcing spacers inside the wings to prevent them from deforming under stress. Next time. I also built and painted the landing gear, which like most of the rest of the exterior on this plane are bare aluminum. I've experimented with Vallejo, AK, Mr. Metal Color, and a few others, but IMO, when you want something plastic to really *look like it's made of metal*, it's hard to beat Alclad. These were hit first with Alclad Gloss Black, which levels to a beautiful shine, then quickly afterwards with Alclad Airframe Aluminum. The kit parts were a bit hard to suss out, lacking clear instructions or any locating mechanism. Looking at reference photos I eventually sorted out (I think) how the sections of the cover slide over each other when the oleos compress. It may not be perfect, but it sure is shiny. I'm hoping to be able to replicate that level of metal-ness for the entire model. To that end I bought some felt buffing cylinders for my rotary tool, and some plastic polishing compound. Hopefully this will let me get a nice, uniform high shine to the plastic before that critical gloss black coat goes down. Once I finally re-glue and clean up the popped seams and finish the rivets....5 points
-

Pacific WWII B-25 J "Strafer" 1/32 HK model kit
themongoose and 3 others reacted to aquatarkus10 for a topic
Hi to all, I present the B-25 model in MWP (Metal Work Panels) version completely covered in aluminum (metal tape), customized & detailed in the following optional version: North American B-25 J Mitchell "Lady Lil" (correct nose for this version ) Hong Kong Models kit 1/32 scale model - version: 498thBs "Falcons", 345bth Bomber Group " Air Apaches" 5th AF in Philippines, May 1945 : for more info & pics :http://www.adventurephotomodels.com Thanks for the attention George4 points -

Zoukei-Mura J2M3 Raiden
Jan_G and 3 others reacted to lucgeenen666 for a topic
Today I want to share my Raiden Jack with you. The kit was a real delight to build, but care was needed concerning the alignment of the parts. Comments always welcome. Luc4 points -

F7F-3 Tigercat - BuNo 80405 - VMF 312 MCAS - El Toro, CA 1946
thierry laurent and 3 others reacted to airscale for a topic
Yey!!! So good to see this back Brian - I reckon you will ace it now the hard miles are done. I am quite envious of your capacity to go back to something, as it's something I singularly fail to do... that said, i know your love for the F7F so in a way you are just stretching out the love affair ..Also interesting to see those R2800's - I did all the 3D work on them & the wheels (with the exception of the cylinders) and gifted that to HPH along with all my research in exchange for the 1/18 Spitfire GRP form - nice to see what a good job they did with it Peter4 points -

Hobby Boss A-26, Why Not ? Lets Make a A-26K Nimrod
themongoose and 3 others reacted to patricksparks for a topic
Put some filler caps on the wing tip tanks... Started to move the wing roots, I cut the kit fuselage from the front of the gunner's window all the way forward to about the point where the instrument panel mounts, this point on the kit is very close to the correct shape in cross section, I ground some material off the inside of the fuselage pieces from the wing leading edge forward so that I could re-shape the cockpit walls to a more curved shape to match the cross section at the instrument panel. When I cut out the fuselage sides I left about a 1/16 of an inch below the bottom of the wing and I cut horizontally based on drawings and photos, the kit wing root fairing flange is wrong on the bottom of the wing it should be straight/horizontal and curve up at the front and back edges of the wing. I raised the cut out parts 9/32 of an inch(the white styrene strips) I will go back and cut the cockpit sill back down. I will make a small pattern and form a new fuselage top cap...4 points -
Today, finishing touches after my 0630 work call. Gun barrels, antenna, prop, canopy on...then a few snaps with the camera. Cheers Collin4 points
-
Believe it or not I spent a full day just trying to get the sheen of the skunk stripe to look right... which is a little glossier than the surrounding gray, but not totally glossy either. I replaced that funny looking braided wiring... Cheers, Marcel4 points
-
I recently finished Eduard's new 1/48 Spitfire Mk. I as a pre-war aircraft from RAF Squadron No. 54. Excellent kit all around. I used Eduard Brassin exhausts and a LOOK pre-painted instrument panel. Decals are from Iliad Designs Pre-War Spitfire sheet and paints are from Mr. Color and Mr. Paint. A full build review will appear soon in TMMI.3 points
-
Hi guys, I finally finished this build, phew! Definitely the most challenging project I have completed, there are modifications big and small required for about every assembly step (so no point documenting them all). But now that I have her done I am really pleased with the result. This pic was taken just prior to finishing, so still lacking a few things like some oil streaks at the wing gloves. Close-up to follow...3 points
-

P-47D French AF [Trumpeter 1/32]
Johnny Cloud and 2 others reacted to discus for a topic
Hello Here is my latest built: P-47D "Bubbletop" from trumpeter in French AF colors, Lafayette squadron. Nice kit overall except the complext turbocharger system that is totally useless as fully hidden in the fuselage (except that it support the cockpit tub). I used some goodies: - HGW fabric seatbelts - Master guns and pitot tube - Berna decals - Yahu models PE instrument panel - Eduard Brassin Rocket launchers (not sure they were actually used by the french jugs but since I had them anyway...) As usual this is brush painted. I used Vallejo Metal Cote Aluminum for the overall surfaces and Duralumin for the upper wings weapon panels. Other colors are usual Humbrol enamels. And now, I have to close down the modeler's shop to prepare for a move. And I have to pack 80+ kits hoping the unavoidable damages will stay limited. Cheers3 points -
Finally a real update and some good progress made. I buttoned up the interior yesterday and have glued the rear canopies in place. I'm only leaving the pilots canopy removable, as the rear canopies provide enough size to really view the interior pretty well. That and the guns looks like junk, hardly any detail on them. I also found that parts of the mount are painted white, after I was done....so yeah. You can't see much anyway with the turret installed. One thing to mention, with the machine guns in the stowed position, the ammo belts don't line up with the ammo box, at all. I was going to modify them, but while test fitting I dropped one into the cockpit and it subsequently disappeared. I have no clue where it is (under the floor, somehow?) but I can't find it or get it out. I did add a few Airscale placards to the radio boxes in the back, to try and spice things up a bit. So here it is, almost ready for Mr. Finishing Surfacer 1500 in black. Canopies in place, pilot canopy just sitting in it's spot. I'll hold it in place with blue tac once the other canopies are solid in their spots. Eduard masks in place, much prefer these over the vinyl that came with my Montex mask set. Rubber band helping seat that canopy, as it wanted to pop up. Now to go clean my paint booth out of all dust!3 points
-
DH 82A Tiger Moth S Rhodesia 1943
Daniel Leduc and 2 others reacted to mozart for a topic
The serial number is on, fuselage and underwings, but I've just noticed that I've got the fin flash wrong......too narrow! Serves me right for checking a reference for portions (red/white/blue) + height and not re-checking my photograph! Ah well...... Talking of things being wrong, the position shown on the SW model to fix the venturi tubes is too far back by a couple of mm and too high in my opinion. Using their position would put the aft end right against the cabane strut fixing, not ideal, so I've drilled new holes and fixed them. Lots of yellow touch-ups needed so all easily sorted:3 points -
The canopy masks that I designed and cut yesterday fitted well, just a question of finding time now to spray the frames:3 points
-
I remember I started off like that..........................er... and then some extra kits later....3 points
-

Your modelling plans for today
Troy Molitor and 2 others reacted to Out2gtcha for a topic
(RE) Startred my 32nd F7F today after a 2 year break3 points -
My observation is similar to others, not to structural and not on critical areas ok on diorama stuff. Mr Surfacer is my got in it's many shapes and grades, it also is a wipe off even when hard if you you Mr Color Thinner or isopropyl alcohol. I use the lens wipes for optical surfaces the paper is tough and is great at removing material with the thinners. Really liking Mr White Putty R a bit interesting to used but fantastic results. Bob3 points
-
HK B 17
dodgem37 and 2 others reacted to lucgeenen666 for a topic
Today some pictures from the nose section. Hope you like it. Any comments are welcome of course. Luc3 points -
Pacific WWII B-25 J "Strafer" 1/32 HK model kit
Tnarg and 2 others reacted to aquatarkus10 for a topic
Thanks Ron for the comment and for the wonderful feeling you managed to convey to me with the memory of Okinawa. I hope I understand your request and post these images on the ammo bay: this is the Eduard pe set: and now........... Erika, my personal assistant, in the role of the Strafer pilot, presents the final version with the nose correction for the 'Lady Lil' version. Thanks Jeeps for the intervention and the information, I took note Thanks for the comment I appreciated it very much. I also was quite surprised by the absence of smoke behind the exhausts (I love to highlight them) but, from the photos of the real aircraft it seems to be like this: I thank everyone for the attention and interest shown in this work: extracted from the wip:3 points -

HK Models Avro Lancaster Mk.I WIP: Canopy Attached 3/31/2021
Thano and 2 others reacted to Dennis7423 for a topic
Update time! It's been a while, and this work was actually completed several weeks ago, and I am just now getting around to posting it. Sorry everyone! The kit has since been shelved, temporarily, while I work my brain power to work on some other portions of the interior. I'm trying to decide just how nuts I want to go inside with the rest of it... her side windows aren't painted over, but really, how much will be visible? Plus, there's the ole problem of we all know what's in there, and what isn't! What if someone asks! What if someone gets in there with a super small camera! Oh the horrors of modeling... Anywho, here's some photos to whet your taste. This kit sure is fun! The Eduard instrument panel is quite nice, and if you take your time and bend the throttle levers appropriately, and add a little drop of CA to make a round handle, your work will be rewarded. The converted and improved pilot's seat was also attached to the completed pedestal. I really enjoy how this piece turned out: You'll notice, too, that I have done some conversions to the Navigator's station as well. As this was an early Lancaster, I elected to build her as a true early bird, which means no radar equipment. I found a few photos of early Lanc interiors, and I enjoyed the simplicity and space of this position as depicted. So, out came the saw, putty, and I ended up here. The map was made with a piece of scrap paper, with some faint pencil scribbles on it to create a semblance of a Western European target area. Some additional bits and bobs from the scraps box, to include Eduard bits from other LSP sets, and a scratch build pencil bin, rounded out the space. I quite enjoy how it looks inside the bird: The last little bit of the cockpit proper was the wireless operator's position. I used Barracuda Resin's lovely radio set to replace the kit stuff, and ran some wires to and froe. It's delightfully busy, even though it will hardly be seen through two windows: And that's where I'm currently at! I'm working out filling in the large fuselage interior gaps where the wings meet the fuselage, and ultimately deciding how much work is really necessary there to be seen through the small fuselage windows. I'm also working out how much fitting of gear I want to do in the rear of the plane, as the only visible access is, again, small fuselage windows, and the rear entry hatch. At the very least, I'd like to add flares, so I'm working out how to build several of those. As always, comments and critiques are most welcome! - Dennis S. Thornton, CO USA3 points -

Matchbox Tiger Moth RAAF Air Ambulance
chuck540z3 and 2 others reacted to LSP_Kevin for a topic
Thanks for checking in, Andy! I can report that I decided to remove the incorrect brass Venturi pipes, and replace them with the hollowed-out kit parts. These are now not only oriented in the correct direction, but also more closely represent the real thing as seen on actual Tiger Moths. (By the way, I have a strong suspicion that the yellow machine I posted a picture of earlier is not actually a real Tiger Moth, but rather, a very large scale RC model!) Here's the photos: That's it for now! Kev3 points -

Most elegant WW-2 design ? The Spitfire !
Alain Gadbois and one other reacted to Erwin for a topic
Hi all, It's clear by now that the "winner" of this topic is the Spitfire . It was interesting to see the other types being nominated too. In the end this design got the most votes...2 points -

F7F-3 Tigercat - BuNo 80405 - VMF 312 MCAS - El Toro, CA 1946
Anthony in NZ and one other reacted to Troy Molitor for a topic
Too cool for school Brian! Nice to see her back on the bench.2 points -
Hello ! As I was on the weight board operators, did one in a kneeling position, as often see on the catapult area : Cheers Norbert2 points
-
The large-scale-bug. Bitten.
Archimedes and one other reacted to The Phantom for a topic
Men do 1/32. 1/48 is more a toddlers scale.2 points -
The large-scale-bug. Bitten.
Gazzas and one other reacted to CharmyDown for a topic
It's an inevitable thing - we've recently undergone a loft conversion and my stash space has been reduced a tad. Good bye 1:48 stuff courtesy of ebay. Though I've hung on to my FAA types unlikely to appear in LSP form - currently!2 points -
It's good for some things, but not others. For seams, I prefer it over anything because you can remove the excess with a wet cotton bud, brush or whatever without disturbing the surrounding area. It is not good for larger areas because it does not form a molecular bond to styrene like Tamiya white and therefore it doesn't feather well when sanded. It's perfect for filling rivet divots because you don't have to sand it. It's too thick straight from the tube so I dilute some with water and keep it in an old paint jar. It tends to dry up in the tube, so I squeeze the tube in a way where it sucks the putty back into the tube and put a few drops of water in the void to keep it soft. If it does dry up in the tube, cut the tube open, dump the contents in a jar, add water and mix to the desired consistency. It's not stringy like Tamiya white putty which I find very annoying. Like most things, it has it's good points and bad.2 points
-
Thanks guys! After letting the green paint sit a full day after the chipping exercise AND with a clear coat over it as an insurance policy, it is time to do rest of the mask markings. First I tackled the yellow tail codes. I used a coat of white to serve as a base for the yellow which was Tamiya Yellow plus a dab of Tamiya Red. I got a little bit of paint lifting on the starboard side but nothing too alarming. No lifting on the port side! There was a bit of overspray since the raised details on the rudder prevented the masks from sitting flush in certain areas. The starboard side "4" was the worst offender and since I had to fix the paint lift, I used the positive "4" mask to fix both areas. The chip fix area stands out right now because it is flat but should disappear once a clear coat is applied. The upper wing hinomarus are next. They are done just like the bottom. No paint lifting on either side... what a relief! With the cowling and stabilizers attached, it is starting to look like a Shiden Kai. Next come the fuselage hinomarus, which have white borders. First the outline mask is applied and white is sprayed on similar to the other hinomarus but with more white around the circumference of the circle. That is allowed to dry for a couple of hours. I thought a circle would be much easier to manipulate than a flimsy ring so I used bits of Tamiya tape to affix the ring to the inner circle temporarily. Once the composite circle mask was placed in position, the tape and center circle are removed, leaving only the outer ring. To prevent any paint leakage between the two mask components, I sprayed the joint with clear. Liquid mask would be another alternative. The red is then applied. The finished two-color hinomaru. There was only a small paint lift on the white ring of the starboard hinomaru. I might just leave it alone. No paint lifting on the port hinomaru. It's a big relief to get these major markings on without too much paint lift trauma. Still to come are the white fuselage stripes. I haven't quite decided how those will be done... masks or tape?2 points
-
I finally had some time today. To be able to make the intakes work well, I had to cut the forward section, due to the resin intakes being not deep enough. I think it all went well.2 points
-
Hi Mike First the cad datas has to be done, this will take a while , adding all the Details like on the real Aircraft. But if done, I will think about it . Adding the panel Lines on the main Wing.2 points
-

Your modelling plans for today
Stevepd and one other reacted to Confusionreigns178 for a topic
My modelling experience for today has been the same as for the last year or so. Lots of thinking about making models.... and no actual doing any. Ho, hum. Chris.2 points -

Your modelling plans for today
Troy Molitor and one other reacted to mpk for a topic
1st coffee before modelling.2 points -

DeAgostini Millennium Falcon 1/1 scale, updated 11/8
Kilroy Was Here and one other reacted to cbk57 for a topic
Here are some photos as it comes into final forms. I have made some creative decisions as if you have to make a tough choice here. If you are trying to replicate the studio scale prop, it has a lot of features that never show up in the movie. For example along the sides there are extensive use of weathering materials that resemble rust effects. Also the Satellite dish area looks totally different from what is replicated in the model. Also the prop is fairly clean. There is little panel lining, there are subtle streaking effects and some basic washes. Now when you go back and watch Empire Strikes Back the look is totally different. The falcon in the movie is just filthy. The sides are just loaded with soot and very dark dirt effects. Also in the movie scenes the set designers loved leaking hydraulic fluid. You look at anything where there are hydraulics like the entry ramp and there is leaking fluid everywhere. The thing is filthy in the movie. I in the end went more for the movie look. I rewatched the movie and the rust effects don't seem to ever show up or make any sense. When you see the movie prop it looks fire enough back that I think the movie close ups should influence the look more. So here you go:2 points -
And here we are at the end of the month:2 points