Leaderboard
Popular Content
Showing content with the highest reputation on 10/07/2020 in all areas
-

1/32 Eduard (Hasegawa) P-40N-5 Warhawk
daveculp and 9 others reacted to Tolga ULGUR for a topic
This is 1/32 Eduard (Hasegawa) P-40N Warhawk finished with the markings of 89th FS 80th FG in India during 1944. Paints: Gunze Sangyo acrylics Decals: Nose art (Skull & shark eye) and numbers (61) are made by customhobbydecals.com Happy modelling10 points -
.thumb.jpg.f23b2dc356f90ead35d25aa5e3609a95.jpg)
RFI ICM 1/48 Ju-88 A-4(14) Torp.
nmayhew and 8 others reacted to Dart_Schatten for a topic
Good day friends! I've built this model just for relax and some fun That was OOTB constructing. I just added some belts by scratch and wires and PE gun sights. I used empty ("refueling") markers to paint "snakes" over original camo. All paint are from Gunze. Thank you! Regards, Sergey Budyansky9 points -
Just a quick proof of life picture. For the last couple of weeks it's pretty much been just doing stencil decals. The bottom is done and I just started the topside today. Been having some family stuff lately so not as much time as I would like but it's at least going in the right direction.9 points
-
Well hell, I'm excited that Richard has finally announced the sheet! Wingnut's sold-out decal sheet has been selling on ebay for higher prices than some wingnut kits. Available for sale directly from https://www.aviattic.co.uk/132-fokker-dvii-markings-sets.html8 points
-

Most elegant WW-2 design ? The Spitfire !
Dpgsbody55 and 7 others reacted to mpk for a topic
Spitfire Mk. 1. No contest. Most beautiful machine ever designed by man. That's not my opinion. Its just a fact, and you all know it. It doesn't matter how many suppositories Jennings posts. I'm joking of course. No I'm not. Yes I am.8 points -

A6M5c Model 52 Hei Takeo Tanimizu 1/32 Hasegawa
dodgem37 and 7 others reacted to Miloslav1956 for a topic
Last update . Now I have sanded the rivets. Not evenly, but more in the places where there was abrasion.8 points -
So after looking at a fantastic Mosquito build over on Brit Modeler (if you are interested, check it out here, it's a great resource: https://www.britmodeller.com/forums/index.php?/topic/235060272-148-tamiya-mosquito-fb-vi-hairless-joe/ ), I realized I missed some details on the bomb carriers. Missing parts included the sway braces and front and rear fuse wires. Spent last night adding these bits (and breaking off two of the bomb bay struts). At this point, I think I really am done in the bomb bay. Really wish I had caught this prior to gluing the bomb carriers in place, I could have done a much better job. Actually, looking at this pictures, I think I need to fair in the struts where they connect to the carriers a bit. Nothing a few blobs of superglue and some paint can't fix. Anyway, that's it for tonight. Thanks for looking!6 points
-

1/32 Trumpeter SBD-5 Dauntless in New Zealand markings w/ full Archer rivet replacement - DONE
GROWLER 96 and 5 others reacted to Brett M for a topic
A bit more progress to report. Starboard fuselage is riveted, minus one section I have a question out to Woody on. I had big plans to have this and a wing done Sunday.....that didn't happen!6 points -
the fuselage is ready5 points
-

Zvezda Star Destroyer - a new detailing project
Uncarina and 4 others reacted to The Madhatter for a topic
While I wait for my new 3D printed tile to arrive, I have been quietly working away on the ship and have finally finished one side. Now I just need to start the other side.... Trying to get a shuffle on this one as I want it done for Expo next year (providing its on of course) Well, that's it for now, but as always, thanks for looking! Cheers Si5 points -

1/24 Trumpeter: Hurricane IIc
Creeperboy and 3 others reacted to Erwin for a topic
Hi all, Finished this as "museum-quality".Representing a restored Hurricane IIc. Painted by brush using Revell satin enamels.4 points -
Going to add another - Lockheed Constellation - not that I'm biased in any way... Iain4 points
-
Hi guys. Thanks for your kind words. I have learned something that is very interesting regarding our feet. Here it is: the shoes we wesr damage our feet. A pair of shoes that don't hurt us retails here in Australia costs, wait for it, $4000.00 AUD. This price is for a pair on the cheaper end of the scale. I must conduct a full body check before I sleep. More than 70% of my body is numb. That was caused by all that chemo I had plus the shingles that wrapped my body. Let's just say I'm no longer chasing women and leave it at that! A couple of years ago I was interviewed for a drumming podcast. I was asked about my illness and told the guy I'd had 290 chemo treatments. My doctor put me right. I had forgotten Royal North Shore hospital. I had 2 chemo treatments per week there for 19 months. So a further 152 had to be added, plus 8 more lumbar punctures. So the lumber punctures now total 42, and another 159 chemo treatments. I reckon it is some kind of record. Most people can't have so many. Their bodies can't take it. I was very lucky mine was able to cope. I'm a very lucky man. These days I don't post anywhere. I even stopped visiting YouTube because all the news is bad. I watch Netflix and Disney. We had a budget in Australia yesterday. I was oblivious. I have been building models. I built a rafale that I thought turned out well. I gave it to a kid for his birthday. I forgot to take pictures. It turned out okay. My new focus is on jets and Russian subjects. I mainly build 1/48 due to space. I managed to screw up a 109 yesterday. So, everything normal. I had to close my studio. I teach from home now. This is fine but distracts the young boys who stare in awe at the model shop in which I live. Seriously, it's ridiculous! I now have my own band. Sadly there's no gigs. We played 4 shows. I can't afford to pay the guys to rehearse. So we never rehearse. We just make it up on the spot. As drummer I put my ego on hold and just play time. My job in that situation is to make the music work. Here's a jam. I really do love modelling. It's been wonderful for me. Including all my screw ups. Again I want to thank you all for dealing with me while I had chemically induced insanity. I was crazy when I joined. My brain is still clearing. Thanks guys. Dale4 points
-

R.I.P. Eddie
scvrobeson and 3 others reacted to D Bellis for a topic
Terrble news. His playing was absolutely epic: I was only 12 when that hit the streets in 1978, and it instantly changed my understanding of music forever. D4 points -

Infinity Models de Havilland DH.100 Vampire - first test shots
Rick Griewski and 3 others reacted to Iain for a topic
Valletta, Malta - or at least that's what I think it's meant to portray... Grand Harbour on the left, Marsamxett Harbour on the right. Grandmother, Rosetta, was born in Valletta, her mother in Żebbuġ. I'm 1:16 genetically Maltese, 1:4 by birthplace* *Probably just the 'cross' bit! British Army and Royal Navy have a lot to answer for... Iain4 points -

Got my jet back from rehab- The Wave
chukw and 2 others reacted to Pete Fleischmann for a topic
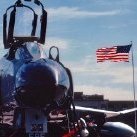
After my emergency gear-up landing back in 2018, the jet is back, fully operational, and has some new Garmin avionics. missed the old girl. cheers Pete3 points -
I came back to this thread to report that the McDonnell F-4B/C/D/J drawing says 23 degrees, 15 minutes "negative dihedral," but Derek already found it... I feel like the guy in the original Right Stuff movie running down the long government building corridor to report "It's called Sputnik!!" "We know." ("Sit down!")3 points
-

1/32 F-5E/F exhausts coming soon - FINALLY!
Squizzy 78 and 2 others reacted to chuck540z3 for a topic
If anybody is interested, the Eduard PE mesh does a pretty good job of creating a decent looking exhaust area without a lot of fuss. I have some pics of it and my application of the Black Box/Avionix resin cockpit here: 1/32 Kitty Hawk F-5E Build Cheers, Chuck3 points -

R.I.P. Eddie
Rick Griewski and 2 others reacted to Kagemusha for a topic
I don't think I've ever seen anyone so happy playing a guitar, the widest smile in Rock and Roll. RIP3 points -
The T7 hasn't been entirely neglected, I've been doing some work on the cockpit area, these are the main elements of the IP. Paul has very thoughtfully positioned all the dials accurately to line up with the ironwork, so it's just a case of cutting out, sandwiching betwixt front and back panels and Bob's your uncle!! (and how nice to have a spare set......just in case......3 points
-

DH 82A Tiger Moth S Rhodesia 1943
VW Chris 1969 and 2 others reacted to mozart for a topic
Probably the easiest solution; I'm going to use the supplied support arms and add a further section of Milliput or similar to cover the wire, this will give me the necessary flattened section which is then bolted either end.....that's the theory!3 points -
Got my jet back from rehab- The Wave
mpk and 2 others reacted to Pete Fleischmann for a topic
stunning restoration that took 13 years. This L-39C is immaculate. Hoping to fly this one some day soon with the new owner- cheers Pete3 points -
Thanks John1. Here some more pictures from last night’s fiddling with the kit:3 points
-
A6M5c Model 52 Hei Takeo Tanimizu 1/32 Hasegawa
dodgem37 and 2 others reacted to Miloslav1956 for a topic
Last update. D1 lightened with Zinc Chromate yellow. For stains used, stencils, 77propeller. com3 points -
1/32 Hasegawa P-47D-25 “GABRESKI”
red baron and one other reacted to Tolga ULGUR for a topic
Hello everybody, Here is my recently finished model. This is 1/32 Hasegawa P-47D25 with the markings of 4226418 Lt Col. Francis Gabreski from 61 FS, 56 FG, 8AF Boxten England in July 1944. Cockpit enhanced by MDC cockpit set, Eduard instrument panel and seat belts. Engine magnetos are from Trumpeter spare parts. Wheels are Barracudacast goodies Paints: Gunze Sangyo acrylics Decals: Mixing of kit and Techmond decals Happy Modelling2 points -
.thumb.jpg.cd22b958c9e88a898a21e18b862c523e.jpg)
Lemkits 1:32 IL-10 "Beast" the first details of the new project
Anthony in NZ and one other reacted to upor for a topic
the first details of the new project Lemkits at 1:32 in front of you. And soon the "beast" will come out of the shadows).2 points -
Revell 1/32 Tempest... new?
D.B. Andrus and one other reacted to Kagemusha for a topic
On its way...2 points -

Matchbox Tiger Moth RAAF Air Ambulance
VW Chris 1969 and one other reacted to LSP_Kevin for a topic
I'm pleased to report that I've made some minor adjustments to the painting of the frames on the windscreen, and it's actually looking much better - to the naked eye, anyway. The hi-res macro photos often tell a different story, but I'm sure I can live with whatever they show me. Kev2 points -
I will also say that nothing in this earlier post will prevent me buying at least one of each; it's great news that there are not one, but two variants of Vampire coming.2 points
-

RAF FG.1 XV571 WILD HARE Phantom Conversion
cmayer and one other reacted to Anthony in NZ for a topic
Thanks so much for looking into this for me as well...I really appreciate it! Stand ready son, you might be needed again soon!2 points -

Hasegawa F-4EJ Eggplane
Michael931080 and one other reacted to Greg W for a topic
Now, the stabilators can easily be added and removed for painting.2 points -
Hasegawa F-4EJ Eggplane
Michael931080 and one other reacted to Greg W for a topic
Your sugestions are well worth considering! I sometimes think they are too big when looking at some of the photos on the thread but then, looking at the model in person, it all just works (for me). There is kind of a bad ass Hank Caruso Aerocatures vibe that I've been going for, that I think the big cans bring to the model. What I find interesting is how the thing takes on a different character, depending on the viewing angle. We shall see as everything comes together. I just might shorten them! Thanks for the comment and checking in, very much appreciated.2 points -
Health
Landrotten Highlander and one other reacted to mpk for a topic
Cheers mate. Every morning I wake up is a gift. I am also lucky in NSW. Our government did a good job of holding down the virus. Victoria isn't so luck. Similar to what America is experiencing, but on a much smaller scale. Incompetent governments are a real problem. I hurt for Victoria because that's where I was born. Tomorrow I am back at the High risk foot clinic at Concord hospital. They will operate on my foot. It's really funny because I don't require aesthetic. The guys are like "does that hurt???" Me, "Nah, I'm good." They shake their heads. Classic. Stay safe and wear a mask. I have really nice masks. The only issue is I fog up my glasses.2 points -
Yep, Its easy to tell that he enjoyed playing. As said earlier a large piece of my child hood gone too, There will never be another like EVH. Rock on Eddie, Legends never die!2 points
-

A6M5c Model 52 Hei Takeo Tanimizu 1/32 Hasegawa
dodgem37 and one other reacted to Jerry Crandall for a topic
Really great job so far. I don't know if you have this photo so I thought I'd share it. We met with Takeo Tanimizu in Japan years ago and he autographed this photo for me. He pointed out there were patched bullet holes in the lower fuselage but they are a little hard to see. Hope this helps. Cheers, Jerry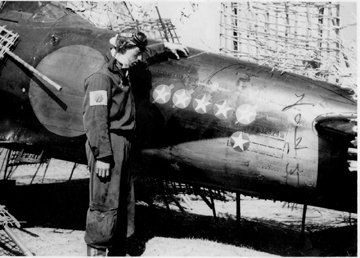 2 points
 -

1/18 Scale Blue Box F4U-1A Corsair Modification
JayW and one other reacted to bdthoresen for a topic
Here is the build thread Jay..... THOR2 points -
Zvezda Star Destroyer - a new detailing project
Squizzy 78 and one other reacted to LSP_Kevin for a topic
Really looking forward to seeing this at Expo next year! Kev2 points -

Infinity Models SB2C-4 Helldiver update
zerosystem and one other reacted to Mirek O for a topic
When we have everything OK we will run our e-shop of course. For members we will have discount :-)2 points -
That looks stunning! I'll bet that's in far better condition than when serving with the Luftstreitkräfte der Nationalen Volksarmee! Iain2 points
-
Ah, mystery solved, thanks Ryan! Good timing too as I have not fitted the part yet so might look at adding the plumbing from the bottom of the box. So, on with the hairspray chipping of high wear areas in the cockpit. I think this adds a little visual interest and realism to the cockpit. I like to keep the chipping quite fine here so I find it important to use a flat aluminium base for a bit of tooth and to control the thickness of the hairspray layer. The hairspray layer was given an hour to dry before application of the top coat. After another hour, parts were chipped with a damp brush. The steel parts are yet to be painted black and the fire extinguisher control box fitted on the cockpit bulkhead. I'll also add a little more weathering with oils. The cockpit floor was treated similarly, concentrating on areas that would wear from the pilot climbing in and out of the cockpit. I've also tried to pull off a shading effect for recessed areas of the floor. I'm not 100% happy with some bits of the chipping here so may do some minor touch ups. I've then got a few more weathering steps to do in this area before final assembly of components. I might actually get to build something soon...2 points
-
Got my jet back from rehab- The Wave
mpk and one other reacted to Pete Fleischmann for a topic
Flying the Firecat L-39C.2 points -
OK, I'm back with the promised update, and I'm happy to report that I've now finished the canopy parts. At least, I think I have! But, I can't say I'm completely happy with the result. My attempt to match up the inside and outside masking was passable, but certainly not perfect. I've managed to touch up a few problem areas, but the biggest issue is one I didn't see coming: in some areas (most notably the windscreen), the styrene strip I used to form the framing on the inside is still visible as thin white strips beneath the paint. This is because they're glued into the grooves in the vac part that produce the external frames, and the two paint layers that should have covered them completely from within and without, are actually separated by the thickness of the clear plastic. This area obviously isn't covered by paint, but is still transparent, and exposes the unpainted white plastic sitting in the groove. Here's what I mean: The problem is especially evident in the top frame over the windscreen, but is present on the two side frames as well. The only solution I can think of is to make the external frames unreasonably wide in an attempt to cover the white. Otherwise, I'm telling people it's sealant! Anyway, here are some more flattering photos: Since taking these photos, I've given the clear panels a polish with some WD40 sprayed on a cotton bud. This cleans up any grunge and tape residue on the clear plastic, and leaves them clean and sparkling. Just don't rub it over enamel paints, as it takes them off nicely. I also spraying the fuselage area under the windscreen, ready for the fixed section to be installed: It'll need a little blending in on the starboard side when the time comes, but before I do that, I must get some seat belts in there. At first, I was scratching my head about how to tackle them. I knew they were a style of Sutton harness, but all the aftermarket ones I'd come across had the Y-shaped strap configuration seen on Spitfires, etc. I had resigned myself to having to scratch-build them when I decided to trawl through my aftermarket stash, just in case. And then I found these: Anyone remember Model Technologies? I reckon I must have had these for 20+ years, and don't even really remember why I bought them. You're meant to assemble them into a Y configuration, but as they're simple straight straps, they'll be perfect for the Tiger Moth. Or at least will be once I can figure out how to replicate their prominent grommets... Kev2 points
-
1/32 Revell-Hasegawa Spitfire Mk.1a "K9906"..... Finished.!!
jgrease and one other reacted to Tolga ULGUR for a topic
The wings. They have engraved panel lines. It needs to backdate the oil cooler. I have used Eagle part resin part. It works well though produced for new Revell kit.2 points -
Infinity Models SB2C-4 Helldiver update
pacificmustang and one other reacted to Mirek O for a topic
Will be two boxes, we would like to issue the model asap. Waiting for last mold. The rest is ready. we do not decided the price jet.2 points -
I love the Silhouette machine. This was the first try at making these masks - all applied with no issues. I'm going to need to be careful with the 4s on the cowl that cross the raised lip between panels - they need to be firmly pressed down right before painting as they don't stick for long...2 points
-
A6M5c Model 52 Hei Takeo Tanimizu 1/32 Hasegawa
dodgem37 and one other reacted to Miloslav1956 for a topic
Today I started painting.2 points -
I got the two upper engine bearer panels glued in, and couldn't resist a chance afterword to set the props and nose cone on to see what I had. Shes starting to look like something now.............the Nick has a very sleek and beautiful look to me, even at this stage: All for today boys. Ive now come to a point where I need to start spraying some of the underside/upper base coat on in places that will be impossible to reach later, so I need to make a decision on paint. I had hoped to use some of the new MRP IJA paint scheduled to come out, but it will be impossible, as I'm at the stage of needing to make a decision on paint now in order to proceed. I have a very light gray in mind, and a dark green, both MRP, one is a Mig intake interior color, and the other is a Swedish green. Ive sized up the camo masks I intend to use here on the Silhouette cutter, and will be doing paint experiments today to find out of I guess right on the colors or not. Cheers!2 points
-
Ok guys, I need an honest opinion on the seats. These are the Quickboost seats with molded in seatbelts. I still have the Aires seats and PE belts that I can still paint up and use. Also have a set of Eduards painted PE belts I could use with the Aires seats.2 points
-
Got my jet back from rehab- The Wave
Buster99 and one other reacted to Pete Fleischmann for a topic
Towing my jet out some other L-39’s I get to fly! cheers Pete2 points