Leaderboard

Popular Content
Showing content with the highest reputation on 09/08/2020 in all areas
-

Matchbox Tiger Moth RAAF Air Ambulance
Chris Wimmer and 13 others reacted to LSP_Kevin for a topic
Right, time for an update! I've spent most of the last 3 days scratch-building a replacement instrument panel, having already decided to go to town in the cockpit. And yes, I did check to see if there were any aftermarket options available, first! Sadly, not to be. In fact, apart from the odd decal sheet, there's virtually no dedicated aftermarket for this kit at all. I elected to go with the tried-and-true 'sandwich' method, whereby you sandwich a sheet of acetate (or other clear plastic) between a back plate and the instrument panel itself. Here's the result: I'll let you guys figure out which is the kit part. Remember, this is several times larger than the actual item! I relied heavily on the wondrous gift to superdetailers and scratch-builders that is airscale's range of decals and photo-etch sets. I did set out describing how I built this in some detail, but started to bore even myself, so if you have any questions, just sing out. I've also been working on improvements to the empennage, and have started rebuilding the cockpit interior, but will leave that for another update. Kev14 points -
Getting closer on the back part of the engine. Those lines that still head off into nowhere will end up running to the oil cooler or to the firewall (gas line, instrument cables, etc). This is my attempt at making the oil cooler. The one color photo I could find showed a brassy, almost phenolic-looking color, so that's what I tried to do. It appeared to be plumbed into a loop between the oil reservoir tank and the engine block, so that's what I'm going to show. It's obvious now looking at it that this (feeding air to the oil cooler) is the role of the little chin scoop you see there. The kit actually supplies a little PE baffle that goes in there (you can't really see it at all) to adjust the airflow to the thing.13 points
-
Thanks Black Mamba. Yup, get rid of old stock on trees and anthills first.... I gave the paint job a very gentle rub down with wet 12,000 grit micro mesh cloth to get rid of the slightly fuzzy, rough finish of airbrushed matt paints. IMG_6196 - 800 by Malcolm Reid, on Flickr A bit of random airbrushing of thinned dark paint to add some more character - the mottling from the airbrush mask is very subtle. This is a new technique for me and I like the result : IMG_6201 - 800 by Malcolm Reid, on Flickr All bombed up and ready for a flight to Roodewal IMG_6199 - 800 by Malcolm Reid, on Flickr12 points
-

Colombia Kfir C10 Revell+Isracast
HerculesPA_2 and 8 others reacted to red Dog for a topic
And that is exactly what I have done I learned about that technique initially in Chuck's kicked up a notch series - episode T-6 harvard Chuck moved the gear attachment points outboard in the wheel wells and since seeing that and how clever that was I knew one day I would need this product as well. So I immediately went on Amazon and bought a small set of Oyumaru. First occasion to use it is with this KFIR model. I need to add two RWR sensors from the Isracast C2 nose to the Cheetah nose Nick kindly provided. So out goes the Oyumaru. A small piece was cut and immerged into 80°C water for 3 minutes. I malaxed the oyumaru and then pressed it on the Isracast C7 nose on top of the bit needed duplicating. Let it cool down until it became hard again and removed gently the oyumaru from the resin nose. All good this far. Best candidate to pour material in there was the ZAP epoxy resin I usually use for strong bonds for my in fight builds. Poured equal part of the two and filled the mould. No particular care was taken except to ensure the liquid went to the bottom of the mold. I wasn't too cautious about air bubbles or anything treating this more like an experiment and honestly I didn't expect the first try to be successful. I let it dry for about 18 hours and to my surprise the part came out easily from the mould with a more than decent shape for a first try. The base of the part is messy and sanding will be required, to flatten the part. I must say I am very surprised at how easy this was to do... I did another pour for the other's side sensor and result was as good as the first one, ruling out the luck of the newbee. Both sensors where then attached to the resin long nose. Some final adjustments needed, but another step closer to the painting ... So Chuck if you read this: thank you for a great tip and thanks Alain for suggesting the same. This is why I feel this place is so great. Thank you9 points -

PZL P.6 1931 from scratch scale 1/32
blackbetty and 8 others reacted to Marcin_Matejko for a topic
Thank you for your appreciation and kind words, it is very motivating Recently, I managed to make a few small elements for the interior of the fuselage. In fact, the hull is practically ready for interior painting. I also made wings, the structures of which were based on the wings from the resin PZL P11c Silver Wings model. I cut the wings properly and remade them to fit the P6, at the same time I improved the profile of the center wing as it is way too flat there. The trailing edge of the center wing is made of a thin brass plate. I glued a carbon flat beam to the wings so that the wings do not bend after a few years (which unfortunately happens in resins). I glued the wings together, giving them the right lift, so that the connection was strong, I glued two steel wires with a diameter of 2 and 1.5 mm into the center. I smoothed out a large amount of polyester putty and gave them the right shape. I painted the rebuilt wings with primer several times and sanded it smooth. By the way, I made new ailerons and made the fins, these elements were made from scratch from polystyrene plates.9 points -
More sub assemblies.9 points
-
Back from vacation and a little bit of paint applied. The obligatory in-process shot And more paint.9 points
-

1/32 Mig-29C (9.13) Ukrainian "55"
Paul in Napier and 7 others reacted to Marcel111 for a topic
Here is where I am with the outer exhausts, basis of which are the beautifully done and correctly sized Zacto renditions. Chris sent me a spare set after I screwed up my first attempt... I tried to use liquid mask to create a splattered effect but just couldn't get the mask off, plus the paint would form a noticeable ridge at the demarkation in those instances where I was able to get the mask off. For the below, I started the painting with an overall spray of half flat aluminum / jet exhaust mixture (all metallic colors are Vallejo acrylic). This to get a duller overall finish, applying glossy metallic over such a surface will still result in a flatter finish because the metallic paints go on so thin. Next, I started applying various other metallic shades, at times using the Uschi splatter masks. Finally, I applied some old Alclad hot metal blue and violet shades. I found the blue to work really well while the violet would quickly clog my fine airbrush (went to the rough H&S instead) while the violet doesn't come through all that strongly. I'm pretty pleased with the result. Compared to the real thing, that is the Duke Hawkins book (a must-have for this build): Cheers, Marcel8 points -

1/32 Avro 504 scratchbuild
themongoose and 7 others reacted to kensar for a topic
A small update. Still working on the wings. The upper wing roughed out. More progress Tips are made from laminated strips and sanded to shape. Reginald is waiting patiently.8 points -
I grew up with this image hanging on our wall at home. If the drama of this picture isn't enough to inspire building a Korean War Sabre, then I don't know what will! The F-86 is one of the most beautiful aircraft ever produced, and many pilots (including Bob Hoover) consider it the finest to fly. It certainly has something to do with its sensual curves... as well as its rakish angles. It just plain looks fast, that you want to touch. There is a problem however - no kit in 1:32 does it any justice. Sure, there is the Hasegawa offering from 1972 with its raised panel lines, and the chunky plastic moulding from Kinetic (2007), but neither of them cut it. I have both. And lots of books. I have a real mish-mash of aftermarket stuff, and hopefully with a bit of this and a bit of that I can construct a satisfying F-86F 30. The first thing was to try and determine which kit, or parts of a kit best resemble the Sabre. I measured, compared and even tried to mate the kits. I personally think the Hasegawa Sabre is closer to the mark than a kit produced 35 years later! The "stressed skin" of the Kinetic (Italeri) F-86 was very tempting to me, but in retrospect I think it is not intentional, but rather a by-product of the heavy rivet treatment. Still looks good though, and with the chrish (LSP) foil treatment can look very convincing. Where it really loses out to the Hasegawa kit is around the cockpit. It is very broad, and the front portion of the canopy doesn't have the right shape. The kit air intakes are quite different from each other, and here again the Hasegawa part is closer to the lines of the aircraft. The Kinetic/Italeri wings, apart from being badly warped, are pretty accurate for the 6-3 "hard" wing. Here it beats the Hasegawa wing which is a little too swept and dimensionally kinda nowhere. My money is on the Hasegawa exhaust area however. I am leaning toward just using the Hasegawa big bits, re-scribing, and modifying the wing because I need a narrow chord wing anyway. Since I had the Aires cockpit for the Kinetic kit, I have been whittling away madly at the resin to squeeze it into the unintended narrow space of the old kit. I think it will work out eventually with shims and epoxy and maybe some nails or chewing gum. The usual resin cockpit conundrum. The Aires seat is very nice. And their instrument panel is almost correct, although the compass bezel is way too small. I might just have to live with some inaccuracies however, since the real work will be in scribing the panel detail, and getting the intake and engine to fit! I suspect however that the minute I get all of those cards balanced, Tamiya will announce the new 1:32 partner to their F-51 in Korea... just saying. Sean7 points
-

Lukgraph Hawker Nimrod Mk.1 announced!
VW Chris 1969 and 6 others reacted to LukGraph for a topic
Hello Guys, some news.. Fuselages are printed (both scales 32 and 48) – on the picture directly from the printer + primer. Parts requires minor smoothing adjustments. This time the cast elements in kitset will be only: fuselage, wings (upper and lower) and rear fins (vertical and horizontal). Everything else will be directly 3D printed: all struts, wheels, exhaust pipes, headrest, air intake, radiator, rear support (with additional brass wire). 3D printing is also the whole interior and here it is a novelty - the grate is already assembled as a whole (as one piece part). Additionally, the seat, the instrument panel, the control column and all the elements inside. The rest will be complemented by photo-etched parts to enhance the interior. The model will be given without resin casting blocks - they will be removed and the model will be pre-cleaned. Supports for 3D prints - the minimum quantity to guarantee a good print. Windscreen as photo-etched frame + laser cut foil 0.5 mm, secured with double-sided foil ensuring perfect transparency. Painting schemes: 2 or 3 in both scales. Due to the advanced release technology, the model should be easy to assemble even for people who have not dealt with resin kits. Wings are printing... Cheers Lukas7 points -
Major cleaning up done, still a little sanding in places. Two noticeable factors; firstly the casting on the central trunking on the cockpit floor is incredibly thin, so I'll be "beefing" it up with some 10 thou card, and secondly I think Silver Wings have slightly miscalculated with the number of castings provided for the rudder pedals/control horns(?). I've checked all three of my Tiger Moth kits and they all contain three such castings but there should be four - clearly four rudder pedals are needed and if they are elevator control horns then four there too. It's no big issue, both are a few minutes work with some scrap plastic but for this model I've stolen one from another kit.7 points
-
That engine looks great! Where would you be shipping it from? Meanwhile, I think my kit transport was just sighted off Singapore:7 points
-

KH T-6 Texan - SNJ
Sepp and 6 others reacted to Len Turner for a topic
Cockpit... Regards, Len7 points -
So this will be my contribution to the Training Day theme. It will be a while before I have substantial work to show, as I need to finish my Zero first, AND I have an airliner kit that I may build in parallel. But I can definitely get it done before the end of February... It's not a complex kit in terms of the plastic, but there's the joy of biplane rigging to consider, as well as the opportunity to detail the engine... And then that color scheme. The kit provides several suggested monotone schemes, but who could resist that two-tone green camo OVER trainer orange? "Eye catching" to say the least. That will be an adventure in masking.6 points
-
Finally I can call this bird - DONE.6 points
-
Apologies for slightly fuzzy pics! First fiddly bit done, more to come!6 points
-
Thank you very much! A bit more progress accomplished between marathon watching Sons of Anarchy on Netflix. back to work now... Thanks for looking6 points
-

F-89F Advanced Scorpion
scvrobeson and 5 others reacted to Dandiego for a topic
Incremental progress. Pylons have been scribed and riveted. Sprayed one with black lacquer from a rattle can. Panel lines and revits on the top of the wing. First pod epoxied to the wing. Dan6 points -

ICM Wish List
R Palimaka and 5 others reacted to Tony T for a topic
1/32 ICM subjects are likely to be dinky and have a trainer and/or European bias and possess a propeller. I know therefore that a big Foxbat is highly unlikely. However, the 1/48 scale kit's design is "flat pack" in nature and not inaccessible. So, Foxbat (and Flagon) Cold War dreams aside, there are a lot of "smaller" jets that deserve attention that fit into ICM's portfolio if they can let go of propellers every now and again: especially a decent MiG-21 Fishbed family which could start with a PF. Something without licensing baggage which Eduard are too reserved to tackle in 1/32. Ditto a MiG-15UTI. Did somebody say Duck? Surely that and the Thunderstreak have to be Kitty Hawk territory? Both would be super. Deuce and Six? — that's Trumpy type stuff. Fairly hefty subjects for ICM and not much Eastern European interest but maybe Meng go nuts and deliver one of those and a Voodoo. Tony6 points -

NITTO Yokosuka/Kawanishi K5Y1/2 Willow
Uncarina and 4 others reacted to Troy Molitor for a topic
Not wanting to duplicate any entry already mentioned here, I read Brad's entry again and noticed he is planning on doing an Indonesian marked aircraft. I thought I might join in here and add a Japanese example? My kit is a NITTO. I purchased it from someone here on LSP. I only have the land based version and I have noticed a personal note written on the instruction sheet mentioning this person pinched the flight crew out of this kit and dated their note as 07/03/1973! I was 11 at the time. I have built this kit more than a few times in my life and recall it being a lot of fun in my basement in Wiscony as a kid. I hope to do something like this mentioned below. Hoping this is the fair play with using the excellent reference book ARAWASI Eagle Eye Series, No 2. Highly recommended. If any one can help on vinyl stencils/ templates I welcome a PM. Im also in the process of moving cross country so my updates will be delayed at times. Thanks for the understanding.5 points -
OK, about time I got my act together to start my Tiger Moth, though the "start" is a little underwhelming! My first job with any Silver Wings kit is sorting, I need to know what is what and where it's going. There are no "sprue shot" equivalents so it's a matter of dumping all the contents on a table, looking carefully at each bit, identifying it with the aid of the instructions (but again, no part numbers so it's a Mk 1 eyeball job) and bagging it up with associated bits: There usually a "Miscellaneous bits" bag, but I think I've accounted for everything this time! The next part is even more underwhelming, cleaning off resin flash.5 points
-

Zvezda Star Destroyer - a new detailing project
scvrobeson and 4 others reacted to The Madhatter for a topic
As promised, here are a couple of pics of the start of my base. Doesn't look much now but these are just detail tiles which will form a much bigger area later on Yes, there will be a trench for X-Wings to run down to This base idea is nothing new, but I have always wanted to have a go at building something like this and this is the perfect time. If it fails, then I'll just stick to a pole and mirror (with something built along the sides or similar. I have a back up plan!) See you soon5 points -
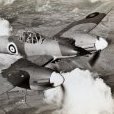
OK, so moment of truth - time for paint. There are four constants in life - these are death, taxes, prostitution and the fact that no one photo of a Cheetah will show the same grey. This varies based on the lighting conditions, the camera settings and the base paint itself. I've seen photos of Cheetah Es from a light neutral grey to a very dark grey with a distinct purple hue. It also doesn't help that most of my modelling is done after work under artificial lighting conditions. So I took all the greys I had in my collection (around 30) and airbrushed each colour onto a large white plastic spoon. These were spread out and compared to the various photos I have. The best reference photo I believe I have is the one below - why is it good ? Well, look at the white of the clouds and the 707 - it's, well, white, indicating that the camera has captured the tones nicely (in my limited understanding of photography). There are also references variably to the Cheetah E being painting in some FS and BS greys. The Es were painted in a single tone dark grey, similar to the early Cheetah Ds - which is what we have in the foreground of the photo - so that was the colour I was going for, but maybe a bit lighter for scale effect. Note the distinct purple hue to the D's grey : 20200508_111049 - 800 by Malcolm Reid, on Flickr Photo below taken under artificial light so does not look the same as in the pic...ho hum... IMG_6194 - 800 by Malcolm Reid, on Flickr Nick kindly donated his old Revell Mirage III/V wing tanks. These are the correct diameter, the Italeri ones being 1 to 2mm smaller in diameter which I can live with - I prefer the detail on the Italeri ones : IMG_6192 - 800 by Malcolm Reid, on Flickr I used the Uschi van der Rosten airbrush templates to spray on a random mottling of a box of lighter and then darker grey. This is then over sprayed with a thinned coat of the base grey just to pull everything together and minimise an over-obvious mottling. More specific weathering will still be added : IMG_6191 - 800 by Malcolm Reid, on Flickr OK, I challenge anyone to tell me my grey mix is wrong5 points
-
Colombia Kfir C10 Revell+Isracast
HerculesPA_2 and 4 others reacted to red Dog for a topic
The air to air refuelling probe has been in the back of my head since planning this build. I have been looking at the stash and being a fan of the scooter, I initially thought I scored with the bent probe of the Skyhawk. Since the Colombian KFIR have been updated with the help of IAI i figured that reusing old proven modification would surely be SOP with these guys. So why not re-use the skyhawk parts? Getting my last skyhawk box (for the future AF-1) I found both the straight and bent probe. Upon checking on the Kfir I realised it was not matching. So the itch was wrong… but then I found this: and that seem pretty close to the Kfir 2000 probe. The tip of the probe will be donated by the skyhawk straight probe which I won't need for my AF-1 (using the bent probe) The rest is scratched with pasticards and metal tubing, based on pictures. The most difficult part to shape is the one connecting into the back of the aircraft. It's made with plasticard 2mm laminated with an extra 1.5mm plasticard, cut and sanded to shape. The tube attached to the fuselage is a hollow round section flattened at its base and clued on a 1mm thicj plasticard section shaped. The fact that it is hollow allows to insert the metal tube which has been cut to length and shaped accordingly. the tip is glued atthe end with a rod inserted into both end to provide better strenght. It sags a bit but that's because it's not glued yet and thus not perfectly aligned. nevertheless happy with the result. What else can I do to delay that anhedral wing issue …5 points -

Mitsubishi A6M5a Zero, Sadaaki Akamatsu , Atsugi 1945
Brett M and 3 others reacted to Miloslav1956 for a topic
Another Zero finished. 1/32 Hasegawa kit, Eduard color cockpit & wheels, Yahu instrument panel, HGW wet transfers & seat belts, Aber gun barrels, All colours MRP test sample IJN4 points -
Thanks to all responders! Time for the next episode in my MiG-21 Story…. The engine is built up and I have painted the fan with Alclad Aluminium… The landing gear wells glued to the fuselage…. The nose gear done, just some hydraulic lines and paint left to do later…. The wheel wells painted and washed…. There´s not very much aftermarket stuff for this kit but I found some really nice resin seats from Pavla. A detail kit from Verlinden…. More to come soon…. Stefan4 points
-

ICM Wish List
Troy Molitor and 3 others reacted to Andreas Beck for a topic
4 points -
After some deep internet research I determined that Northrup used blue tape and big ass rubber bands to hold the pod in place while workers riveted the pod into place. Although it was not a common construction technique it was effective and cheap. Dan4 points
-
Got 15 minutes of spare time and managed to get a base coat of grey over the black base. The coverage is not as solid as it looks in the pics. I'll lighten the base with some white and hit some areas for some highlights ….. then start working on the cockpit side consoles and instrument panel. -Scott4 points
-
I have not updated in a little while but I've been working on some of the little stuff. I have the pylons and weapons painted, decaled and clear coated and have started priming. I'll update again when I have something worth posting. In the meantime here are some progress pictures. That fuselage is sure taking a bunch of primer. Definitely need the respirator and and paint booth spraying that much Mr. Surfacer.4 points
-

Quinta Studio - 3D printed interior for NEW P-51D, Su-25, F-16C
Derek B and 3 others reacted to Pete Fleischmann for a topic
I ordered 2 sets for the F-16. I think they look pretty cool. I noticed one or two things missing that I’ll have to scratch, depending on which block I am doing. They’ll sell a bunch of these I bet. cheers Pete4 points -
Thanks Sean. One never knows when one will suddenly need the white-gold. Always be prepared...3 points
-
(OK, the other Derek B here, so don't get confused!) I like the compass! Actually I like your whole panel, but particularly the compass. Is that AM, or your own effort? I'm going to need two of those for my Wirraway build...3 points
-

First 24th scale set from DN Models is out today
chukw and 2 others reacted to Eagle Driver for a topic
This is it.3 points -
ICM Wish List
Rick Griewski and 2 others reacted to CharmyDown for a topic
How about some of the more Interesting Fleet Air Arm subjects? Skua Fulmar Firefly Barracuda Albacore3 points -
Thanks Derek, almost every step of the way is a new little problem to ponder but it’s my kind of modelling! It makes me both smile and wince when the instructions say “fit attack radar and appropriate gun sight” but nowhere does it identify nor point out what either is or how it fits. The assumption is made that the modeller knows what he is doing and is familiar with Lightning aircraft!3 points
-

Mistel - Wot? Another one?
Sasha As and 2 others reacted to Bruce_Crosby for a topic
Hi Guys, More painting, this time stencils for code numbers. Ef-126 masked and shielded Numbers by Bruce Crosby, on Flickr The result: Numbers by Bruce Crosby, on Flickr The 262: Numbers by Bruce Crosby, on Flickr And after: Numbers by Bruce Crosby, on Flickr Some Flory Dark Dirt clay wash: Numbers by Bruce Crosby, on Flickr Numbers by Bruce Crosby, on Flickr Numbers by Bruce Crosby, on Flickr Numbers by Bruce Crosby, on Flickr That's all for now. Regards, Bruce Crosby3 points -
A few more details in the rear pit and a test fit. Now to do the same to the front cockpit and then some paint! That seat is going to want a bit of work. It looks rather bland as is.3 points
-
No, the record is three, it's there in the archive.3 points
-

MiG-21 UM "Mongol"
Daniel Leduc and 2 others reacted to Phantom2 for a topic
Hi All! I found this kit dirt cheap many moons ago, I couldn´t resist the crazy scheme and started it right away. But the build stalled after the nose gear bay and cockpit, don´t know why, really. The Czech Stress-Team was a unit for combat training, very much like the US Top Gun unit and have a similar job, training units in combat and tactics. I don´t know if they are still active, anybody here knows? Who can resist this grin? This is a really early Trumpeter kit and it shows, well molded and quite detailed injected parts, a small and crappy instruction sheet and useless decals. Later I found out that this is a up-scaled copy of Academy´s MiG-21UM/MF, Academy´s kit is a good one so let´s hope this will be good too. I started the build by building the nose gear bay, complete with the nose gear leg (metal!) in place. The nose gear leg is screwed in place, Tamiya-style. I will not have the engine on show so I closed up the fuselage and glued the two sections together. Wings, wheel wells, seats and cockpit fell together quick and easy. The two fuselage halves filled…. The engine is quite nice, but I´ll paint only what will be seen. Nice detail; The engine done…. More to come soon! Stefan3 points -

EE Lightning - Echelon vacuform
Anthony in NZ and 2 others reacted to mozart for a topic
Finished and fitted: Poor light for photography!!3 points -
PZL P.6 1931 from scratch scale 1/32
blackbetty and 2 others reacted to Marcin_Matejko for a topic
Thank you Engine frame: Fuel tank: Propeller: Further work inside the hull: Work continues3 points -
If they move ahead with their previous products, it makes sense that they would do the Polikarpov I-15 and maybe the I-152 to fill out the family. After they do a CR-42, then a CR-32 series would be amazing also. Moving on from the Gladiator, the Gauntlet makes sense. They have done an He 51 in 1/72, so maybe some of those also (including one with floats)? What else would I like? Just about all of the 1930's fighters and other planes could be open for their consideration. I'd go nuts for a Karas, but leave that to the Polish to follow their P.11c.. If Lukgraph don't do a Shrike, the A-8 and A-12 are pretty amazing planes and not that much larger than the fighters. Imagine an SBC-3 or -4 dive bomber from just before WWII... especially with those cool yellow wings. There are more than enough great subjects for them to work on and still fit right in with their current projects. I guess it is a bit much to hope for a Martin B-10B.... I am stuck on those yellow wings and 1930's planes. If you look at their 1/48 scale kits you see some amazing opportunities to up scale a B-26 or an early Mustang or a Do-17Z. Have a look at their big 1/48 scale kits and you start to think maybe they could do something amazing in 1/32 also. They have an He111 Zwilling in 1/48, so BIG is apparently not an issue with their capabilities. Tnarg2 points
-

32nd Cheetah E (ScaleWorx resin conversion set)
D.B. Andrus and one other reacted to Mistral for a topic
Thanks, but there's another way of spelling it ?? From dictionary.com : Grey and gray are both accepted in the English language. They refer to a color of a neutral tone between black and white, and can also be used metaphorically to convey gloom and dullness. However, gray is the more popular spelling in the US, while grey reigns supreme in the UK as well as Ireland, Australia, and other places that use British English. Gloom and dullness ???... Anyway, I guess with South Africa being an ex-colony, we'll stick to grey....now back to the regular programme...2 points -
Good work on the ordnance but a couple of things, the Marines didn't get thermally protected bombs, the Navy had priority so the bomb should only have one yellow stripe. Also I'm curious what the red is on the back of the Zuni pod, here is what they looked like: Jari2 points
-
Zvezda Star Destroyer - a new detailing project
Michael931080 and one other reacted to The Madhatter for a topic
hey guys Well, the cursed COVID continues and so does this build. Over 2 years now and lots more to do. I've slowed down a bit lately due to other things on the go but there is some progress - probably not as much as you'd like. but there is some I spent a few hours on the dome thing on the bottom and I am pretty happy with how it's come out (one 1 side anyway - haven't done the other yet). I've added stuff to the man hull plates and now I'm concentrating on the raise edges along the center of the ship. I'm going to do concentrated pockets of details here and there but lessen it as I work outward You can see the difference in the 2 sides one of the overall shots. It's pretty bare on the right and not so much on the left. As I say frequently, I need to be careful not to loose the sheer size of it with too much detail. From afar, and under paint, it'll look a lot less busy but up close is where the time spent on this will come through. Anyway, enough words, you came to see pics, so here's my latest update Looks like I need to fix a couple of sprue pipe too: Anyways, that's all I have sorry. Sorry for the yellowish photos but I couldn't be bothered getting the light tent set up tonight, but next time, I'll hopefully have better quality photos As always, thanks for stopping by and having a look! Stay safe and I'll catch you round the boards Si2 points -
Thanks for the vote of confidence, guys. I'm conscious of how rusty I am after a long break from serious modelling, so while I'm not feeling all that confident, my enthusiasm has definitely returned! So, open the cockpit I will! I'm also going to be implementing many of the fixes and improvements I've seen in other builds, especially Max's and Eric's. Update soon! Kev2 points
-
Let's proceed - resin GasPatch machine guns are much better than kit ones - lower wing is on it's place - upper as well - other details: wheels, wooden parts, etc. - almost done2 points
-

Roden 1/32 Fokker Dr.I 477/17
Troy Molitor and one other reacted to olgerd83 for a topic
small update - put masks to paint white base for national markings upper wing after removing masks, even though that upper wing should be red, I decided to paint it in a same way, as it was more than 100 years ago. Red colour applied on top of white one, that should give me same effect as on real prototype lower wing - also painted in red tail and other parts thanks for watching2 points


.thumb.jpg.5da8bff9741de420eb2e87addd8f2cf6.jpg)


