Leaderboard


Popular Content
Showing content with the highest reputation on 08/18/2020 in Posts
-
This model was built to represent a very new aircraft as flown by 3 SQN Royal Australian Air Force. Modifications/additions Scratchbuilt throttle. Scratchbuilt exhaust and intake FOD covers. Enlarged exhaust pipe. Scratchbuilt seat cusion and seatbelts. Some addiditional panels applied to APU area. Modified the wing flaps to pose them down. Eduard AIM-120s and GBU-12's. Scratchbuilt canopy seal. Eduard RBF tags. RESKIT wheels. Paint and finish. MRP Camouflage Grey with HAVE GLASS matt varnish. Custom made paint masks for intake and exhaust covers. Ronin graphics fin flash and serial decals.14 points
-

RAF FG.1 XV571 WILD HARE Phantom Conversion
Kagemusha and 7 others reacted to Anthony in NZ for a topic
Sorry, not a lot to report for the many hours spent working on the surface details. This has taken longer than expected, mostly trying to even the panel line depths and correct their positions etc. Only 2 more access panels to scribe on the fuselage just behind the intake opening. Then correct the panel lines on the lower half of the fuse between the intake opening and going back to the midway point on the fuselage, then the nose....phew8 points -

Liberated during quarantine -PB4Y-1
scvrobeson and 7 others reacted to patricksparks for a topic
Worked some more today on the ERCO turret, scratched some parts, scrounged the parts box for others. Still have to make a gun sight that mounts behind the angled armored glass, also have to put seat and shoulder harnesses in, the guns will get brass barrels as well.8 points -

Zvezda Star Destroyer - a new detailing project
Dart_Schatten and 6 others reacted to The Madhatter for a topic
Hi again everyone So, time for a small update. Things are progressing slower than I had hoped as I had to fix my screw up with the hangar bay installation. I've got one side sorted and I just need to finish the other side later on. I forgot to grind down the existing surface detail before slotting in the hangar bay, but it's fixable. You can see the gap that mistake left in the first pic if you look where it goes in. Then on the pic below it, you can see my fix for it which is working well. It looks very busy up here but the paint will bring that down a few notches. I'm also going to space out the detail more and not add as much the further back I go. I have to be careful not to over do it (although I dare say there are some of you who already think I'm well past that) as I fear I will loose the grandness of the ship. Well, that's all I have for now, but once I have done something worth taking pics of, I will of course update again. Feel free to critique, make a suggestion, comment or just do nothing at all but as always, thank you for stopping by and having a look Till next time Si7 points -

Any Tamiya 1/32 rumours?
dutik and 6 others reacted to thierry laurent for a topic
I fully agree. I do not understand why people are still waiting for Tamiya LSP releases. I'm waiting for kits from Eastern Europe manufacturers as they are the only ones producing regularly good if not excellent kits for a fair price and they do not hesitate going out of the comfort zone topics. Asian producers have terribly slowed down the pace, are quite often releasing kits that are too often not that accurate or easy to build (Chinese producers) or quite expensive with very few and too often 'mainstream' releases (Japanese producers). The LSP drive was in Asia up to 2010-2015. Now, it is clearly in Eastern Europe. Love or hate it but this is a fact. This does not mean I'm not buying the new Asian kits but at least I'm not 'waiting' for them.7 points -
After not getting to the bench in two weeks vacation I made some progress today. The blck primer is on, some clean up on th seams has been done and now the zipper is ready for paint My plan is to paint most of the markings before the actual camo. So with a little patience I drew all the templates for the Silhouette cutter. Drawing the letters with outline is a tedious taskn and applying the masks to the model (even with transfer silm) will be incredibly fiddly. As one might guess from the numbers - I decided to go for 27+81 which appears quite clean and tidy in most pictures with some touch ups on the tail. I think those make a great contrast to the otherwise "boring" two tone camo. Cheers Joachim7 points
-
Hi All, Here is the cover. Now, to test into body, then completing drawings for IP.7 points
-

1/32 F-16C 90-813 Spangahlem
Loach Driver and 4 others reacted to CruZz for a topic
Kit: Tamiya Extras: Cockpit, wheel bays, jet exhaust - Aires Weapon bay: CMK for hasegawa kit + Aber gun barrel Avionics bays and some part of engine 3D print same as ALE-50 on the wings. AMRAAMs and training AIM-9 : Eduard brassin... ACMI Scratch Anyz decals for cockpit RES-KIT wheels RBF Eduard. HTS modified from kit Sniper pylon modified from Academy. Sniper container Eduard brassin. Exterier PE parts Eduard. Dischargers master same as pitot tubes. Astra decals insignia + some my own decals Numbers on pylons by dry trasfers Hobby Decals. Colors Gunze C....5 points -
I finished this one about the same time as my Roden Stearman and Aeroclub Pitts Special. Somehow in the excitement of finishing the 35 year Pitts project, I failed to post this one. I started this one in 2002 while living in San Antonio. It sat for a long time waiting, along with the Pitts, to be finished. I used Yellow Wings decals as kit decals were badly yellowed.5 points
-
My latest haul: One of these kits may be used in the upcoming trainer group build. The other ones will be displayed as/converted to recon planes.5 points
-
Just a quick update. The Aires cockpit is about ready to fit into the fuselage. I'm pretty happy with the way it looks. Looking at pictures of the real thing the buttons and knobs tend to be pretty subdued so that is what I went for. I didn't want them to be too bright though being in the dark recesses it might have been the better way to go. Should be able to close it up tomorrow.4 points
-

Make the others jealous
Rick Griewski and 3 others reacted to Artful69 for a topic
Today my next BIG Tank arrived ... Supplied by Gazza via trade ... If anyone seeks to trade with him at any point - do so with confidence ... the way this thing was packaged, it would've survived Hiroshima!! This discontinued Pz.38(t) by Panda could have probably had the tooling maximised by creating an early war boxing (Ausf.B) ... or the later Panzerjäger 38(t) 'Hetzer'. And ... of course there's the customary turret shot Rog4 points -
Thanks guys! amazing what a coat of paint can do eh? I've made some more progress today (very hot here today...+35 is about as hot as it gets here) so A/C on and into the hobby room for some big time fun. Decals, details and touch up underway; Still a ways to go but I'm really enjoying the build...may go straight on to the H-6 in the stash after this one Thanks for looking4 points
-

Test Build: 1:32 Flying Start Models Tornado F Mk.3 Conversion (Revell base)
Paul in Napier and 3 others reacted to Iain for a topic
OK - some images... Nose cone - printed in HIPS using an FDM printer - so a little surface prep required. As with some of the other parts printed using this process, there's a 'flash'-like wafer of excess material to be removed from around the print. Not that Tim has designed each plug in section with an associated bulkhead/location section - more on this later: The forward underside insert - with Skyflash missile recesses. This will probably need the most tweaking to the surface as there is a noticeable 'stepping' in the print in the missile troughs - nothing a little spray can filler and some wet and dry can't fix: One on left - as printed. One on the right partially prepped and the Revell kit nose-gear well dry fitted in place. Plug behind cockpit: Intake trunking - something completely missing from the Revell Tornado kits. I suspect this will work just as well with any IDS Tornado build, so a wider application than just the F3. And the compressor blades - printed on an SLA printer, so resin, but very fine detail: Rear missile fairings: Late type Chaff/Flare dispensers: Engine extension plug: Lower tail/thrust-reverser insert: That's not exhaustive - and bear in mind these are prototype parts! I have started cutting things up - so more photos to follow. I would sign off with 'blue skies' - but we're in the middle of some serious Cumulonimbus activity just now! Iain4 points -
.thumb.jpg.f23b2dc356f90ead35d25aa5e3609a95.jpg)
1/32 Trumpeter MiG-23MLD
Marcel111 and 2 others reacted to Dart_Schatten for a topic
Good day, colleagues! Now, I want to show my MiG-23MLD from Trumpeter. This model I built for my boss (he is a great collector, bye the way). I used pilot from Aires and add some wires on landing gears. I used paints from different manufactories, that was Tamiya, Akan and Gunze. At the end model was heavily weathered with acrilycs paints, oils and pigments. I've added imitation repainted numbers with some paint streaking. Thank you! Regards, Sergey Budyansky.3 points -

Flying Leathernecks FL32-2017 and FL32-2018 GBU-38 Now available
blackbetty and 2 others reacted to Dave Roof for a topic
A couple small details left and the tail assembly will hit the printer. Nose strakes are printing out great!3 points -
Made a little progress on the cannons. Painted them a semi-gloss black with a very small amount of flat steel, after that dried, I rubbed on some graphite to try to replicate the gunmetal finish. I also painted the bolts that show through the bottom a lighter shade of gunmetal. I added the feed drums and then glued the cannons in place. Tamiya thoughtfully provides guides to make sure the barrels are properly aligned. Keep in mind that this assembly is upside down When installed in the Mosquito's bomb bay, the ammo boxes will be above the cannons. The copper colored fitting on the end of the cannon will be connected to the pneumatic lines I'll be installing. Still have to add some hardware such as heating hoses and clamps but we're getting there! Here's a picture of a 333 Squadron Mosquito being rearmed. Note the pneumatic lines hanging loosely, I assume this was a safety measure to prevent the weapons from firing while being serviced? Note also that the example above has a long-range fuel tank mounted in the aft bomb bay. That's it for now guys, thanks for looking!3 points
-

Make the others jealous
Rick Griewski and 2 others reacted to scott_t for a topic
Big day for deliveries here .... MiG AMMO weathering pencil set (very fast delivery from Spain to the U.S.) Kitty Hawk Mirage 2000 C Eduard LOOK instrument panel for the 2000 C Big ED 2000 C set SAC landing gear for the KH Mirage The wife only saw the box from MiG ..... lucky day !!!!!!! -Scott3 points -
On the weekend, I picked up a couple of books I had on backorder at my local ... And then today ... this big box arrived ... It's my BIG 1/16 Panther Ausf.G Late ... And for scale ... the customary turret shot ... I have another BIG Tank inbound ... and some metal barrels ... and then I'll decide which of these suckers I'm going to try to build. Rog3 points
-
RAF FG.1 XV571 WILD HARE Phantom Conversion
Tony T and 2 others reacted to Anthony in NZ for a topic
Quick update: blocked down the join and gave it a 'Chuck Wash' little bit of missing panel lines and fasteners to add. Also note the lamp has been filled with plastic rod and the small antenna behind it removed. Depending on the airframe modelled there was either no antenna here, or a much larger square one. The cover panel has been fitted behind that on the spine has also been shimmed for a better fit and superglued in. Few more rivets to restore etc. Derek, there appears to be another lamp on the spine and although Iain has sent me a pic of it, I am unsure where it is located. Thanks also to Spooky56 (Rick) for your help with parts and info, I owe you one buddy! Cheers Anthony3 points -

Takom 1/35 M46 Patton - Completed diorama!
TankBuster and one other reacted to Bstarr3 for a topic
Main painting done on my Korean War M46. This is one of the famous tiger face Pattons from the 6th Tank Battalion, 27th Infantry Division in the early going on the Korean War. I'm making it as part of a diorama for my father in law, as his dad was a communications officer in the 6th. Only a couple WIP pics so far. First primered in black, then with main coat on. Really happy with how the masking went for the yellow, and the stripes are hand painted. And then, some shots of my new updated space. After a year of sweltering in the garage in NC, I finally got some indoor space after my daughter went away to college! And my homemade spray/photo booth with newly upgraded lighting. Will post more as the weathering proceeds, and hopefully be able to show pics of my finished diorama... someday.2 points -
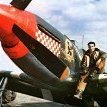
Here is my completed RAAF P-40N, depicted in the last months of WW2. This aircraft was originally flown by the C/O of 75 Sqn, Squadron Leader Clive Toldhurst but appeared to be taken over by Squadron Leader Alan Thomson after he was posted to 75Sqn, becoming the acting Commanding Officer. I managed to find a fair bit of information about Alan, including many pics of him flying `Hep Cat' (G) and also many pages of his logbook. I have spliced these pages together, made them clearer and have included some of them here. They show the many combat missions that he flew in it and show his affection for this particular aircraft. The notes on the right side of each page make for some fascinating reading and give a unique insight into what it must have been like flying combat missions in the pacific, as well as the wind down after the war in which he continued to fly this aircraft. As can be seen in his logbook, danger was always close, even after the war finished. A bio of Alan: Alan Thomson was born in Brisbane on 13 May 1920, and grew up in Brisbane and Bundaberg. He was educated at Brisbane and Ascot State Schools, and then Brisbane Grammar School. He left school before matriculation and joined the Commonwealth Bank, starting as a junior clerk at Brisbane's Queen Street branch. In the late 1930s he enrolled in a weekend flying course run by the Queensland Aero Club at Archerfield, during which time he logged up some three and a half hours flying time with an instructor. He joined the RAAF in July 1940 and attended 2 ITS Bradfield Park, 6 EFTS Tamworth, and 3 SFTS Amberley, before being posted to 1 BAGS Evans Head, where he spent over a year, clocking up 580 hours on Fairey Battles. He was posted to 2 OTU Mildura in September 1942, where he carried out conversion to P-40 Kittyhawks. His first operational posting was to 76 Squadron at Strauss, Northern Territory in late November of the same year. Japanese intrusion over the Northern Territory at this time was sporadic at best, and 76 Squadron along with 77 Squadron (Kittyhawks) saw little action, although each squadron was to claim one aircraft destroyed each. He was to stay with 76 Squadron for almost a year, following them to deployments at Onslow, Bankstown, Milne Bay and front line deployments to Goodenough and Kirriwina Islands. He then spent all of 1944 as an instructor at 2 OTU Mildura, and in early 1945 attended the RAAF Staff School at Mt Martha, Victoria. In late May he was posted to 75 Squadron (Kittyhawks) and became acting C/O of the squadron during its move from Morotai to Tarakan in late June 1945, and subsequent operations during the Borneo campaign. On 29 October, some six weeks after the Japanese surrender, Alan was involved in a serious landing accident. Suffering from his burns and shock he was evacuated to Brisbane, where he spent several months in hospital undergoing treatment for his burns. He was discharged from the RAAF on 18 April 1946. He was awarded a DFC promulgated in the London Gazette on 25 June 1946, and received the following citation: "Flight Lieutenant Thomson has completed two tours of operations against the enemy from the Trobriand Islands and Borneo, displaying daring and ability and keenness to destroy the enemy. He has participated in 29 sorties and 26 strikes and the successful results achieved by No. 75 Squadron, operating from Tarakan, are largely due to the courage and determination displayed by him. Flight Lieutenant Thomson has led his squadron on many successful strikes against the strongly defended Samarinda area with utter disregard for personal safety". After leaving the RAAF Alan returned to the Commonwealth Bank but never again flew another aircraft. Although he did retain a lifelong interest in aircraft and aviation. Alan passed away in 2002. The model: Eduard boxing of the Hasegawa kit. Modifications/additions: I elected not to use most of the included photo etch. Brengun aftermarket gunsight. Music wire front bead gunsight. Scratchbuilt brake lines, undercarriage extended inticators, whip antenna and fuel drain pipe lower fuselage. RB Productions paper seatbelts. Paint and markings: Gunze Sangyo acrylics Custom designed masks for the nose art, serials, squadron codes and roundels. A picture that I have wanted to do ever since I found out that there were two Hep Cats!2 points
-

1/32 B24D crashed on Peleliu, 1943 ( fixed airfoil as well as other things)
Derek B and one other reacted to Julian Farian for a topic
Hello! I am creating this forum for anyone who is interested in my new project, a 1/32 B24D that crashed on Peleliu in 1943... I have a YouTube channel where I post updates on this and other projects that I’m working on! Have a great day! https://www.youtube.com/channel/UCJaLkhrUAvKAjeGLffHlhwA?view_as=subscriber2 points -
Thanks for the encouragement! I really do appreciate the positive re-enforcement! Keeps the mojo moving. And with that, the He 111 is ready to go drop...onto the display shelf...if I can find some room. The last few details have been stuck on as of 17:00 CST and my contribution to the BoB group build is done. I hope it meets approval. (I'll try to get better pics soon) Thanks for keeping me company along the way, to all who liked and commented, it's appreciated.2 points
-

MiniArt Liore et Olivier LeO C.30A Aeronavale
scvrobeson and one other reacted to dutik for a topic
Coming close to finishing the cockpit. Added some electrical wiring, some connecting rods and an invisible spacer below the front seat, because the styrene frame is just to flimsy to hold this seat in place for a longer time. The wiring is grey/silver braided line from Anyz, secured in place with Tamiya tape "cable ties". A bit of dusting later we are here: Just have to add the compass shelf and the compass himself, a knob and a handle to get ready to close the fuselage halves. I've just to find a proper compass face decal in the stash, because MiniArt doesn't provide one. Regards - dutik2 points -
HobbyBoss 1:32 Liberator GR Mk.VI - RAF Coastal Command
MicroShket and one other reacted to Julian Farian for a topic
hello all, since Iain isn’t posting any updates on his 1/32 B24, I thought I would. here is are some videos I made in my Liberator. FYI if you’re interested in the airfoil fix, I have that on my videos too. Thank you! Thanks! Have a great day!2 points -

Any Tamiya 1/32 rumours?
Jack and one other reacted to Starfighter for a topic
I'm still dreaming of Tamiya upscaling their stunning 1/48 scale Tomcat to a proper (i.e. q/32nd) scale. Sadly, they are literally still printing money with their long paid old moulds (which in addition sadly still are the base for the most accurate 1/32 Tomcat...) so there isn't much hope. I for one am not really interested in props anyway. Oh, a re-issue of their small mouth F-16 kit would be most welcome as well...2 points -

Trumpeter P-47 D (bubbletop) - how to make belly tank plumbing accurate(-ish)?
Sepp and one other reacted to Joe Hegedus for a topic
The standard theater recognition markings for the P-47 were bands on the fin and stabilizers, and the forward section of the cowl. On OD/gray airplanes the bands and cowl were supposed to be white, and on NMF airplanes they were to be black. When airplanes were delivered to the theater, they went through a central depot (Burtonwood?) that painted the recognition markings on before sending the airplanes on to the receiving units. The depot would also apply the invasion stripes per the current directive on new airplanes coming through after D-Day. So it is entirely possible that the image above shows O7-Q with the standard recognition markings, before squadron colors (if any) were applied.2 points -

Liberated during quarantine -PB4Y-1
patricksparks and one other reacted to brahman104 for a topic
The turret looks like it's always been part of the kit! Nice Craig2 points -
.thumb.png.84c5d3a464f2dd83f0ac37a5aac81ec8.png)
1/32 Bf 109E Adolf Galland
MikeMaben and one other reacted to Antonio Argudo for a topic
thanks Chrish, until patience allows it cheers primed with RLM 02 thanks for watching, cheers2 points -
Liberated during quarantine -PB4Y-1
chukw and one other reacted to patricksparks for a topic
I finished the vertical stabilizers and rudders, applied some Flory wash to them, the horizontal stab and elevators are painted as well. Spent some time cleaning up the upper fuselage seam, put some gray paint down to check it. Put the side windows into the new lower nose, have to make some clear parts for it. Started working on the ERCO turret, painted the interior, added some HK models B-17 gun support frames into the turret and I'll use Eduard B-17 50 cal.s with the solinoids to make up the armament.2 points -
Hi All, On advice from a fair guy, I test a print at 5s exposure time. It looks better. By the way, I tried to make grills on IP cover. Hard job, hope it will make sense at printing.2 points
-
Make the others jealous
Rick Griewski and one other reacted to scott_t for a topic
Decided to make some additions to my library ….. Can use them on some planned projects -Scott2 points -
Hello gentlemans. I made a few copy of my own resin parts for 1/32 F-16 Tamiya. 1) HTS pod for left side 2) Pylon for sniper pod 3) ALE-50 Towed decoy system If someboby is interested, please let me know. Minimal order is 12USD for a set (1x HTS + 1x Pylon + 1x ALE-50). +5USD Shipping. If somebody need more of some parts it´s plus 5USD for 1pcs HTS 3USD for 1pcs pylon 5USD for 1pcs ALE-50. payment via paypal. Thank you very much guys. Jan1 point
-
I don't know about that, considering first you would have to actually locate said Warrant or Specialist...1 point
-
Tamiya 1/32 JASDF F-4EJ Black Panthers
AlbertD reacted to spyrosjzmichos for a topic
You won't regret it Albert. Definitely superior results than what I can achieve with a paint brush!1 point -

Heinkel 111 H-2 finished
j ferguson reacted to Lothar for a topic
Apart from being an outstanding build, your paintjob is one of the best of a German camouflaged aircraft I've ever seen. I bet the originals didn't look any bit different than yours, the camouflage colors are there, but there is no hard demarcation line - just perfect1 point -

Italeri F-35A, 3 SQN RAAF.
Martinnfb reacted to Troy Molitor for a topic
Cracking build Eric. Love it.1 point -

A poll (of sorts); do you stay focused on one model project?
LSP_K2 reacted to Rick Griewski for a topic
I keep 10 to 15 going. My BofB group build is one of them. I want it to be the first to be out of the line up. The new Dewoitine D500 is pretty darn shiny but I have resisted starting it beyond a few key test fits. I do this to determine if I want another kit. It is one of my favorite French ac. I will sometimes clear the bench for a week or so and work on a sci-fi kit. The war of the world’s Martin Warrior or a dinosaur. I will post the Martian in the Non-LSP section when I get it done.1 point -

Tamiya 1/32 JASDF F-4EJ Black Panthers
spyrosjzmichos reacted to AlbertD for a topic
I just went back to the cockpit part of your build which is beautiful by the way. I was wondering how you painted the tiny tic marks around some dials and on the throttle? I can't seem to get that really fine detail that you do.1 point -

F-14B Tomcat 'VF-102 Diamondbacks' - corrected Revell kit
Starfighter reacted to jenshb for a topic
Can you not go over the decals again with MrPaint Gloss varnish and use a different matt varnish? I wonder if the MRP matt is partially dissolving the underlaying gloss to somehow "bond" with it, and that changes the finish where there is decal film.1 point -
Hello all This is my latest build, I-16 Rata from Revell/ICM in 1:32 Sorry for bad photos , done with mobile phone.. Hope u like the little guy1 point
-
G'day Everyone, First of all many thanks for the kind comments guys. Craig to answer your question I use ordinary contact adhesive - the sort one would use for gluing linoleum etc. In Australia it goes under the name of KwikFix and is marketed by Selleys. It can be removed with lacquer thinners or toluene and you can also by a specialist solvent. However they all attack plastic so caution is required. Finishing the model Since my last post the model has now been finished and this involved attaching numerous pre-assembled parts and also painting etc. The biggest job and one which I had been dreading was the u/c doors. On the P-38 they are attached by Studebaker hinges see below and I had dreaded this part of the build. To re-create these I had several sheets of photo-etch made up in the belief that i could then make the individual hinges and they would work. Unfortunately dealing with the small brass pieces proved almost impossible and in the end they were glued in place. I had to make a small jig to hold the doors in place whilst I affixed them to the actuating cylinders and then methodically set about gluing up the hinges on each door. A fiddly time consuming job that took the best part of two weeks. Once this was done the wheels could be attached. I had these 3D printed by my nephew who runs an engineering shop and they came up beautifully. Next was the canopy and although I had built a hinge I decided to glue the top piece in place but not locked down. I figured this was a safer option than having the top section sticking up in the breeze waiting to be knocked off! Final details for the superchargers, lights radio aerials etc were attached, once painting was completed. The aircraft was painted prior to all these biyts and to facilitate painting a rough jig was constructed. This made spraying markings etc considerably easier than manhandling a very heavy model with which the slightest slip could result in ruin! Colour scheme. This was a vexed question. I had from the beginning decided to finish it in the markings of Jack Purdy from the 433rd FS of the 475th FG in the Pacific. There are a number of schemes floating about in various publications, however nothing is simple. I managed to track down his family and they were very helpful but unfortunately many details had been lost over the years. Purdy flew several P-38s marked with the name Lizzie and toward the end of 1944/45 he had two; Lizzie IV and Lizzie V both of which crashed within a short space of time. In tracking down the serial numbers of these a L1 and L5 respectively it would appear that serial numbers have been mixed up when it comes to applying markings. The markings of the restored example in the Museum of flight would appear to be a combination of both the IV and V Lizzies. The serial number on the nose does not fit for an L-5. After much searching and exchange of information the final scheme was based on that shown in the Osprey book on the 475th FG which I think on balance is probably the most accurate depiction. The blue colour was also a subject of much debate and and I must acknowledge the help of a number of LSP members in earlier correspondence on this. Markings were sprayed using stencils cut from Frisket and in the case of the flags and No-step, photo etched stencils from Custom photo-etch in Melbourne. The airframe stencils are dry transfers made by Allout graphics in West Vancouver and they worked a treat. Anyway to cut a long story short here's the beast in its glory and so after 8+ years of toil the story is concluded. I concede the photos could be better - apologies. In conclusion this build was a challenge and were I ever stupid enough to do another I would do things differently and follow more closely the original design by building and attaching the outer main planes separately to make handling easier. To permit the model to sit on its u/c there is a large amount of lead in the nacelles and I estimate the completed model weighs well over 5kg. Its now safely stuck in its cabinet. Apologies for not providing more details of the build - I guess I'm just not that good at this sort of thing. Many thanks for viewing Cheers Kevin1 point
-

Meng/Wingnuts Tripe
Uncarina reacted to steel_tiger for a topic
Sorry I wasn't able to give any info. I got the package from Sprue, verified contents then went to bed. Work, work, work that's all I get done. Terribly disappointed in the instructions. Not anywhere near Wingnut quality. Call outs for the different options for the variants could be a little confusing. No information is provided as to what the differences are other than aircraft "A" uses this and aircraft"C" uses this one. Decals seem a little thick and the photoetch is really thin. One side of my cockpit combing is busted off from the wing. Definitely the Wingnut feel to the kit without the final finish they would put in it to make it a great kit. And the heavy paper sheets they included seem like a total after thought, like lets put something in the bag we inherited to look like an instruction sheet from Wingnut. On a side note I like it. I think it will build nice. I have another one coming.1 point -
Test Build: 1:32 Flying Start Models Tornado F Mk.3 Conversion (Revell base)
Paul in Napier reacted to Iain for a topic
Hi all - pleased to see there's some interest in this... Tim really has done a wonderful job on these parts - this just looks 'right' to my eyes and captures the shapes beautifully, as well as being well engineered. Back in the day, late '80s and earlier '90s, the F3 simulators were amongst a number of types that I used to write the AP updates for (Technical Author, Rediffusion Simulation). At the time I had full sets of aircraft APs in the cupboards - I really wish I still had them! Was also a civvy in part-time uniform at the time (RAFVR(T)), so my path with the F3 kept crossing; a number of summer camps at RAF Coningsby (one week managing the AEF Chippy Flying - from a caravan and deck-chair near the runway), and 15 days at RAF Akrotiri (while 29 Sqn there on APC) - so I have to build at least one F3! I did start one in about 1990 - the original Revell F2 release with the DJ Parkins/Flightpath detail set/F3 conversion - but that's long-since been 'file thirteened'. Truth is - there are quite a few I'd like to do... I started cutting plastic yesterday - will try and take some photos later - but there will be a limit on some things until the Aires GR1 cockpit and afterburner castings arrive. I'll be 'converting' the resin cockpit to represent the F3 as best I can. For anyone that's not aware, Tim was the man behind PP Aeroparts - one of the UK's aftermarket pioneers in the '80s and '90s, with a more recent career in rapid prototyping/3D modelling/commercial 3D printing. He knows his stuff, as well as having a good eye for shape! Have fun! Iain1 point -
Nice build! The finish is exceptional! Well done.1 point
-
Nice MiG. Congratulation.1 point
-

Revell 1998 Pontiac Ram Air Trans Am
themongoose reacted to mustang1989 for a topic
Ok gang...... This is my first real out of box build. I had been working on a Pro Stock Maverick for around 5 months and needed a break from it to just get something completed. I've been wanting to build this car for the last few years and figured that now might be a good time to break it out. There's not much in the way of AM for this kit so it was the perfect one to do an OOB build on. The only things that were added was an "AC Delco" decal on the oil filter, a Hot Rod Magazine in the passengers from seat with a picture of an older T/A on the cover and I robbed the dual outlet exhaust pipes from the Revell 2000 Camaro SS kit. Just couldn't build this car with the single outlet exhaust system like it came from the factory with. The kit wasn't too bad but there were several fit issues with it starting with the chassis to body assembly. For some reason the glue adhesion didn't set up right at the rear of the car resulting in a slight twist. I made some bracing that went from the body down to the chassis and glued that in place to suck the chassis up on the side that got the lower part of the twist. Flash and mold lines were TERRIBLE on this thing. I spent ALOT of time getting rid of those and still didn't get them all. The front and rear facias fit great during the test fit and didn't want to cooperate at all during the assembly process. I got them as close as I could without disassembling the whole friggin' car to straighten everything out. Once I got the chassis sucked up in the back on the drivers side to where it was supposed to be I noticed that now there was a gap between the engine throttle body and the molded in intake duct on the body. I ended up cutting a piece of plastic and carving it to fit the gap there. The only other thing that I did with this car that needed to be done was that I lowered it about a scale inch or so all the way around to give it a more aggressive stance. Anyways....here are the finished shots...….and now....back to the Maverick!!!1 point -
Excellent!1 point
-
Agreed, on both counts. I've been in the vicinity of B-1's when they take off, and they are monstrously loud.1 point