Leaderboard


Popular Content
Showing content with the highest reputation on 07/13/2020 in all areas
-
It's the Revell 1/32 kit with Paragon flaps, Black Box cockpit, TAC Scale avionics and oxygen bays and ladder, kit and XTradecals decals and Xtracolor enamels. The kit decals were prone to silvering and caused much frustration. Fortunately, scoring the decals with a sharp blade and applying Testors brush cleaner eliminated most of the silvering but not all.15 points
-
happy days Don't forget we do one of these... I was quite looking forward to researching a new kit, but this I think was one of our best.. Peter12 points
-
But...all the hype came from this thread! None of it was marketing; all of it was rampant speculation by fickle modellers who (as noted earlier in this very thread) weren't going to be happy whatever was announced. Kev12 points
-
Meh. So after all 30 pages of speculation it turns out not to be a new kit, but rather a small part of an existing kit.11 points
-
Afternoon gentlemen ..thanks for the vote of confidence on the RLM66 colour - I will stick with this one Some Fw190 bobbins for your entertainment.. ..I painted the layers of PE for the instrument panel – there is a backplate (not shown), a layer with just the bezel surrounds and the blanked instrument in black, and the detail layer in RLM66.. The lower panel has some colour coding (thanks Roger) for the instruments that are on their way and should be here next week.. ..also made the ‘Ausgleichsgefäss’ that sits under the main panel from many punched discs (the 3D print didn’t really work..) ..and the artificial horizon, now just awaiting instruments & placard decals… ..while waiting I have been readying all the PE I will need for the gear wells and a load of other bits – using lots of pictures like this to map it all out.. Notice the dimples and the raised ribbed panel next to them.. ..after many hours of work, here you can see the mainspar, wheelwell roof and some of the wing ribs printed out, stuck to litho and being test fitted.. ..I wanted to start with the roof as these won’t be PE anyway, the drawings are just to give me working templates.. ..here printed, stuck to a sheet of Perspex and all the centres of all the dimples being marked.. ..and my first ever use of my new mini Proxxon milling machine to machine the depressions.. ..added the sidewalls and some filler to fair them in as the pressing is curved at the sides and primed to make sure all was well.. ..starting to work annealed litho into the female mould… the completed one you can see at the front is the first version I did in a video episode on my Patreon build after which I realised I had made the depressions too big (& therefore the dimples..) ..re-adding a template so I can see the panel outline and start cutting it to shape.. ..and the completed parts… ..the ribbed panel was approached in a similar way, just reversed so instead of dimples it makes raised strengthening ribs.. ..sticking templates down to mark out where the ribs go.. ..ribs added and a wash of thin CA.. ..cleaned up, rounded edges and primed.. ..litho being worked into shape.. ..and the finished panels with the rivets etc added.. ..a day’s work… ..and checking for fit.. ..happy with how they turned out, and don’t forget, if you want to see how parts like this are made and join me in the ups and downs of this build, please join my Patreon TTFN Peter11 points
-
Hi Tom... I found these on EBay. Do a search on Galaxy Rivet Tools and you'll find a number of vendors. The vendors are all from China so shipping may take a bit of time. Mine took a little over two months between purchase and delivery. After the black base coat, I use the Mr Hobby Kawanishi Cockpit Green C-384 as my primary cockpit color. The cockpit floor and seat have been pre-treated with a metallic color and MIG Scratches Effect fluid so those areas are chipped. And then it is time to start painting the details by hand. This part of the build gets very un-structured. It takes a lot of motivation for me to paint the cockpit details and I'll usually do it in non-sequential order... just attacking whatever piece or part that grabs my attention. Because of this, I usually don't have lots of in-progress shots until towards the end. Slowly but surely, the cockpit gets painted and after that the big parts are given a clear coat and a dark wash is applied. Since there are a lot of delicate parts, I have to be very careful during the wash process. After the wash, a flat coat is put on and final weathering effects are applied like dry-brushing edges and some oil staining. The cockpit is then partially assembled to see how the various painted components look together. This dry-fitting exercise has a few missing components, most notably the seat harnesses, which should be arriving this week. The starboard side... The port side... We can't forget the reality of what happens when both cockpit sidewalls are put into place.10 points
-

A pair of colourful Vipers - Pic’ heavy.
FIGHTS ON and 8 others reacted to Stokey Pete for a topic
As some predicted, my summer has been well and truly taken up with these little beauties. Lockdown has been kind to me, affording me both time to be a stay home dad to our 2 year old, and giving me plenty of bench time. I present to you all, a pair of Tamiya F-16Cs. One dressed up in the newest incarnation of the arctic splinter scheme from Eielson Air Force Base, Alaska. The second is the truly spectacular ‘Zeus’, from the Hellenic Air Force F-16 demonstration team. Both have been built gear up and will be posed in dynamic turning positions once I’ve made stands on which to mount them. Both have been built OOB with the exception of a couple of resin load out parts for the Aggressor jet. I’ve forgone a little accuracy with the Block versions to keep the build cost down. Arctic Aggressor. AMS Resin ACMI pod. Eduard Brassin AN/ALQ-188. DN Masks for the splinter scheme. TwoBobs sheet 32-068 decals. Vallejo model air Aggressor paint set. ‘Zeus’ CFTs and extended Para’ pack tail from an Academy ‘Suva’ kit, kindly received by donation. ’Smokewinders’ were created by removing the detail from a pair of kit missiles and reshaping the nose and fins. Paint masks from Model Maker Decals, meant for the Academy kit, but with lots of patience and extra masking tape, work with the Tamika kit. Just be very careful when studying the placement of masks before committing to paint. The top surface came from using Mr Hobby Aqueous paints. The blue shades all coming from guestimated mix ratios. Undersurface paint from Hataka Lacquer HAF paint set. Onwards to a few piccies then. I hope you enjoy looking at them as much as I enjoyed building these two.9 points -
Wow, come to think of it my initial "joke"prediction didnt come true at ALL. No wings, no engine, and no landing equipment.8 points
-
Well, I hate to put an end to this thoroughly fascinating discussion, but my sample has arrived, and I've obtained permission to reveal it. So I'll just leave this here: Full detailed look to be published in due course. Kev8 points
-
Almost done with the Martin-Baker Mk.10B ejection seat. Cheers8 points
-

So, what happened to the WNW HP O/100 and O/400 molds
ringleheim and 6 others reacted to RLWP for a topic
Can we have a bit of a break before we start another speculation-fest? I'm worn out from googling obscure RAF aeroplanes Richard7 points -
I have added the last few odds and ends to the Sabre...mixed feelings about this one, I may be off Kinetic kits for a while. Thanks for looking and encouraging to the finish!7 points
-

New HKM 1/32 model coming soon...
Thomas Lund and 5 others reacted to vince14 for a topic
29 pages in, and all we've learned is that HKM are planning on releasing a 1/32 kit in July...which is exactly what we knew waaaaaaay back at post #1...6 points -

PR.XI & Mk.Vc - Revell Mk.IXc & Mk.IIa kits
Gazzas and 5 others reacted to Wackyracer for a topic
On to the roundels and codes And painted and test fit on the exhausts Aaron6 points -

1/32 P-47D Miss Fire/Rozzie Deth II
discus and 4 others reacted to David Mooney for a topic
Hello all, I hope you all have been surviving lockdown by modelling-on.....I have. I set about Trumpeters P-47D bubble top version and I was pretty pleased with the kit, I have but the Razorback version and that game me a lot of issues, so this was a surprise and a pleasure. I attempted for the first time a natural metal finish (NMF), so I tried using extreme metal paint by AK and I found them very fragile and had to have a change of plan. I opted for the Mr metal colour paints by Gunze and these were fantastic and very durable when applied. I added a few aftermarket pieces, these were the resin wheels by Brassin and the gun barrels set from Master (32115) and I get rid of the metal seatbelts and made my own from masking tape as I can never get the photo etch belts to 'sit' right. Anyway, here she is...…..I give you Miss Fire which was piloted by Piot-Frederick Christensen in England 1944 All comments welcome :-)5 points -
So I've been having a bit of a squirt with the Mr Surfacer primer, as Andy said it goes on very smoothly: ......but it ain't gloss, anywhere near it. So my sequence as planned will be: Maybe not the final gloss coat, we'll see. I'm pondering masking some of the first layer of primer on some panels so that they don't get a gloss undercoat, then seeing if, as I hope, the sheen of the NMF is affected.5 points
-
100% agreed. Knowing it was all our own doing I'm VERY relieved not to have to spend a dime on anything, as the Lanc is nice, but I wasn't really interested in the whole thing, let alone just a part of one. I'm also highly disappointed at the same time, as when it was mentioned a "new kit never discussed before" this is definitely not what I had in mind. Oh well, see you all at the next guessing party!5 points
-

New HKM 1/32 model coming soon...
scvrobeson and 4 others reacted to kkarlsen for a topic
Ditto, maybe even some 'oil-canning' would be manageable... But a 'new subject and never discussed?' I guess it could have been a lot worse.... Now get on with the Sunderland please!5 points -

HPH FW 189 Uhu
Dany Boy and 3 others reacted to Phartycr0c for a topic
Entering into the foray of my first full resin kit build, I decided on the 189 as its an unusual subject very rarely modelled in any scale let alone gods own 1/32. I have to say, I really enjoyed putting this together and while I did have a few issues of my own doing, generally, if the clean up is done correctly, it goes together well with few fit issues. The problem areas i encountered were around the following areas. Where the booms attach to the underside of the wings, a gap needs to be dealt with. The glazing at the rear of the fuselage where the transition from square to round took me an age to deal with. its still not spot on but this was more likely a me issue rather than the kit itself. The section of upper fuselage was undersized and needed considerable shimming and re alignment to mate with the glazed areas. Again its not spot on but its good enough for government work as they say. First time with a HPH kit. The glazing was weird, being soft and maleable polypropelene (i Think) they gould be bent easily without cracking or other damage. There are other mistakes I have made but for anyone who is thinking of building this kit, do it, just ensure you take your time and dry fit multiple times before committing to glue. Anyhow, on with the show. Based VERY VERY loosely on this colour scheme, Here we go.4 points -
Another project started some time ago - waiting to be finished. So in total I have 3 birds on workbench ;-) I will add some Sidewinders from Eduard, Pitot from Master, SAC undercarriage, wheels from Eduard as well as Zoom set: Starting with seat, wheel bays and intakes: . . This time I will load only 2x AIM-9B Sidewinders, 2x1300L Fuel tanks and 1x Matra missile. . . In the meantime I replaces ugly guns with piece of needle: And cockpit with Eduard's zoom: . . So far so good...14 points
-
*yawnsville*4 points
-

[W] AV-8B Harrier II Plus - Trumpeter 1:32
Landrotten Highlander and 3 others reacted to Gelerth for a topic
I finished pylons and wheels: . And finally I closed canopy (but I think I cracked something). And of course air intake fancy parts are in place: After that presiding was just a pleasure:4 points -

New HKM 1/32 model coming soon...
LSP_Matt and 3 others reacted to Dave Williams for a topic
To be fair, almost all of the hype was in this 32 page thread. All HKM did was post a message that kit 01033 was coming soon and that it fit in their WW2 category. That’s it. Everything else was people here getting into a feeding frenzy guessing and wishing what the kit would be.4 points -
Here are the nose art options: And no, it's not the Wingnut Wings version! Kev4 points
-

New HKM 1/32 model coming soon...
Tolga ULGUR and 3 others reacted to Cees Broere for a topic
I hope it is a Ford pickup truck.4 points -
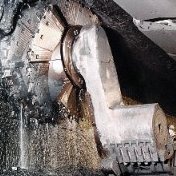
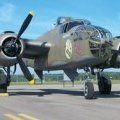
Small update - I've gradually been adding some extra bits to the starboard engine, which I plan on leaving partially exposed. So far, I've just focused on the inboard side. At this point, I've added approx 10 additional bits, ranging from a cylindrical (filter?) housing on the forward engine bearer, to the yellow high voltage cable that runs off the side-mounted generator, to multiple small diameter hydraulic and instrumentation lines. Again, I'm not attempting to replicate every single fitting / line perfectly, I'm just striving to generally represent the cluttered nature of the Merlin engine. Here's a shot of the real thing. Note also, this is a modern warbird, which may not be completely accurate and certainly is much cleaner than engines on operational aircraft. Here is my "enhanced" motor (sorry for the poor pics, I was losing the light as I took these): It does appear that the exhaust heat shields will cover the spark plugs. I'm going to remove the plugs and just leave the bottom part of the leads which should be visible. Probably a big improvement, given those plugs are pretty "rough". I'll add my standard disclaimer - I'm still in the process of incorporating a few more bits and still need to finish my final painting / touchups / weathering. Lastly, I stumbled upon this nice picture of a 333 Squadron Mosquito online. It's painted in the Coastal Command scheme of Extra Dark Sea Grey over either Sky or Medium Sea Grey (can't tell which from this B&W picture). Note the Norwegian flag on the nose, the very dark framing on the canopy and the rough finish and multiple touch-ups around the MG ports. Also note that this aircraft had the mesh "snowscreens" removed from the carburetor intakes. That's it for now, thanks for looking.4 points
-
HK Models 1/32 JU52!
RadBaron and 3 others reacted to MitchellB25 for a topic
No, the individual corrugation ribs are all molded separately on 5 big sprues and you have to add them. Great for the detail lovers to show off their skills.4 points -
Master all the way, Baby!4 points
-

New HKM 1/32 model coming soon...
Tolga ULGUR and 3 others reacted to LSP_Matt for a topic
And people are having a laugh and enjoying themselves. Good times.4 points -

Teutonic Starfighter
HerculesPA_2 and 3 others reacted to Madmax for a topic
Merci Alain. Joachim, it is a strange kit - just like their Mirage III's! I have been joking about different mouldings done by an A and a B team, but here is one that confounds my theory. It literally has an A and a B side on ONE moulding. Exhibit A - Team Firenze: Exhibit B - Team Vesuvio: I have done some work on the wings that are generally Firenze quality, but need a little surgery here just to keep it all square and sharp. As well as the rear portion of the wing to fuselage join. For those considering a bit of extra surface detail, here is how I went about it. I pencil in lines where I would like rivets, and tape the spacing referenced to existing panel lines - to make sure that they all run parallel. The spacing I have used is wider than on the real aircraft. I then fold some 400 grit sandpaper and sand a shallow furrow along the rivet line, which then gets smoothly blended into the rest of the surface. Sanding sponges are useful to smooth this all out, and then 4000 grit micromesh. Give it a try. The panels on the spine clearly need some more attention. Then I discovered what the C team was up to - moulding transparencies. This crack is right inside the plastic, and may have started on clipping the windscreen off the sprue, or it was there all along? I recall the Mirage III C's having similar issues. Nurse, scalpel please...4 points -
Thanks Marc, it will be done by next week Canards getting some attention. Cheers4 points
-
.thumb.png.64af68ce3763f9af8a91e71374ce741e.png)
A-26 Invader Products under development
Daniel Leduc and 2 others reacted to Ali62 for a topic
As promised here are some of the products that are now started and being worked upon. Wheels and cowling, more will follow, including a further set of wheels and there will be two different undercarriage sets as there is variances, and there will also be a specific engine set, that is currently being drawn in 3D. Many more parts are planned for the aircraft, some more correction/ improvement sets as well as conversion sets, details will follow as the development takes place. shown below are 3D CAD drawings for wheels as well as the printed wheels that are being prepared for casting shown below is the kit cowling and the new 3D CAD cowl, once printed will check fit and details to the kit parts3 points -

1:32 scale - Siemens-Schuckert D.III
Rocat and 2 others reacted to sandbagger for a topic
Hi all, I've applied the linen effect lozenge decals from 'Aviattic' to both wings, ailerons and the elevator. Also added 1.0 mm wide strips of 5 colour lozenge to represent the rib tapes and edging. The wing outer 'V' struts were tubular steel covered with a Spruce wood fairing. The fairings were then covered with the lozenge linen or in some cases, the lozenge pattern was hand painted. I've used the same 'Aviattic' lozenge decal that used for the rib tapes. Mike3 points -

So, what happened to the WNW HP O/100 and O/400 molds
LSP_Matt and 2 others reacted to thierry laurent for a topic
If the molds exist the kit will be released. Keep in mind the production costs are ridiculously low in comparison with the design and molds creation investment.3 points -
Thank you Mike I've glued the fuselage - bottom is quite nice: However top is not - with large gaps: . And this is worst: So putting, sanding all again and in the meantime engine and cart: . . Got struts from SAC, and well, I'm not too happy. Metal is quite soft, you can easily bend most of the parts:3 points
-
The hype was 100% our own doing! And good fun it was too I can breathe a sigh of relief that my wallet will get a breather for the moment. See you guys at the next hype rally!3 points
-
New HKM 1/32 model coming soon...
Jeff T and 2 others reacted to Dave Williams for a topic
Looks like it was outed today at The Modeling News too. https://www.themodellingnews.com/2020/07/preview-hk-models-ahead-by-nose-on-new.html#more May just be me, but compared to US aircraft, this is a pretty loose definition of nose “art”. Except for one, or maybe two options, it’s just a lot of mission markings.3 points -
Ah good it doesn't clash with my magnum opus, I'll keep the machines running. I think it's a great idea and very marketable too, my local museum that houses 'Just Jane' I can see that kit selling quite well if they did her. Any prospective buyer isn't faced with a whole kit to do and doubting their own modelling skills to do it justice but would be a good momento because as they say a lot today it could be displayed as a 'statement piece'. Grham3 points
-
Hi guys Well this will definitely be the last post before I return to the UK for a month or so....I will be returning back in September to continue with this project! What I wanted to do was get as much done as possible with the tail /rudder and dorsal fin before my break and so first off I sprayed the tail unit yellow. This was more difficult than I thought as my airbrush decided to give up the ghost!...when I turned the outlet valve on the compressor to send the air flow to the brush the blasted thing kept spraying and I couldn't stop it! the only way was to turn the outlet **** off to stop spraying! I have had the air brush for many years so I am not surprised to be honest. I think the air in let valve is knackered...thought it might be blocked with dried paint but that isn't the case.Any way I will buy a replacement when I'm in the UK. So I manged to cope with the yellow paint being half sprayed on the model and half all over the place!.....here is the tail unit now sprayed! Now came the tricky bit!.....no decals in 1:20 scale so I had to make them all. The base colour of black/white was sprayed in the appropriate place and then I made the markings by cutting out the numbers/letters from some sticky back Teflon....you can see I am in the process of doing this in this next photo........ Once the paint had dried I took off all the masking and here is the end result...... There are two greenish stripes that also have to be sprayed on the tail but need to have the two half's completed and skinned before I can do that. So the tail is now virtually complete (a few more minor details to add later). Of course there is all the interior parts to be scratched yet ,which is what I will look forward to do in September! I needed to take a look at the whole thing to see how she was looking so far!....by doing this you can also see if there are any headaches to sort out down the road. So to that end I got the completed front section out of it's box and temporarily attached it to the rear section and took a few photos.....what do you think so far?.... Its huge!...the model that is!...like a meter in length....don't quote me on that....but it's ...HUGE!! OK....So I will continue with this beast in September and so until then happy modelling and stay safe guys! Cheers Fozzy3 points
-
New HKM 1/32 model coming soon...
Rick Griewski and 2 others reacted to Phartycr0c for a topic
In all fairness, I think this is a "banker" for HKM as it will be a popular seller, added to this are the nose art decals from the likes of Kitsworld etc that can vary the actual kit contents and Master barrel guns, Airscale dials and HGW belts. Certainly an alternative for those who cant store or don't want a full Lancaster.3 points -

1/32 ERA-3B Skywarrior - 3D printed / scratchbuilt
A-10LOADER and 2 others reacted to Starfighter for a topic
Thank you, Pete! I was too busy to make progress during the last few days and this week will be more or less the same, but summer holiday starts next Monday - with a bit of luck, I should get some bench time.3 points -
www.facebook.com/DoraWings Dewoitine D.501 (DW32002) marking options: Nice! Juraj3 points
-
1/32 Fokker Dr.I from Meng
Rick Griewski and 2 others reacted to Bob MDC for a topic
This could be the start of a great "Whodunit" "So it was Mr Meng with a 150 tonne lock press in Korea " or "Mr Peter Trum with beryllium moulds in China" WE could call it " Plasto" Or Clue**** Just my random musings after a couple of vintage ports !!! Bob3 points -

HK Models 1/32 JU52!
Christoffer Lindelav and 2 others reacted to LSP_Ron for a topic
25.4 and 3.28 are the magic numbers Bob! 1" is 25.4mm 1m is 3.28ft3 points -
New HKM 1/32 model coming soon...
Royboy and 2 others reacted to MitchellB25 for a topic
Do 17 makes the most sense. It's the missing Battle of Britain bomber of the big three. Not that big or complicated. Wide open to extra variation kits too.3 points -
seems that Resin2Detail is going to release 3D printed R-2800 + there is plan to release only front part of the engine renders posted on FB page https://sk-sk.facebook.com/RESIN2detail/ jan3 points
-
You made this happen mate - we just came along for the ride, and the banter! Iain3 points
-

1:32 Hawker Siddeley Andover E.Mk 3A - 3D Print
Derek B and 2 others reacted to Anthony in NZ for a topic
Thanks Iain.....I am just unpacking mine right now. Initial impressions are...I am super impressed (HUGE) but super impressed. Man this thing is COOL!3 points -
Been a while but I finally have something to show, and some of you may have seen this coming…. Rivets. I spent about 9 months developing rivets for this kit, not just rows, but pre-arranged rivet “skins” - individual rivet decals that fit each panel. One of the reasons it took so long is that when started I didn’t know what I knew when I finished. This is a monumental undertaking. Then when it was finally time to package it all up and price it out, I wondered if anyone would pay over $200 to rivet one of these kits. Yes, you read that right…. $200. The only excuse I have is that these resin rivet sheets are priced based on size, and the SBD is covered almost entirely with brazier head rivets - and this isn’t a small model. All told this kit nearly fills an 11x17” (A3) sheet. Then everything has to be priced so we can still make something after dealer discount. So I’m conflicted and asking for opinions. Would you pay $200 to completely rivet your model? Should I release them as a Limited Edition? Should I just pass the dealer discount onto retail customers and not offer them to dealers? Have I lost my mind? I really hate to have wasted all that time for nothing. Regardless, I got the fuselage buttoned up, gloss coated and one side of the fuselage riveted. Thanks for looking.3 points
-
For some reason, probably related to the fact I never finish my Group Build entries, I thought I'd missed the end of this one, and was about to move to Work in Progress - but - looks like it's not over yet! With some quiet time I thought I'd take a break from the mighty Andover and pick up on some of my other projects - the Thunderjet being one. I've been putting off the natural metal finish - last one I did that I was happy(ish) with must have been 30 odd years ago, using Heller Silver enamel - 9008? Then I had a few attempts with Alclad and, quite frankly, didn't get on with it - but that was me, not the product, as I've seen stunning results by those that can handle it. I've been getting good results on small components using Xtreme Metal - so thought I'd give it a go. Here's the model after one coat - and a little rectification. She's sat on the patio table hardening off at the moment - before a rub over with some kitchen towel (to remove any loose surface material) and a quick second layer of Xtreme Metal 479 'Aluminium'. Have fun! Iain3 points


.thumb.jpg.5da8bff9741de420eb2e87addd8f2cf6.jpg)