Leaderboard


Popular Content
Showing content with the highest reputation on 07/01/2020 in all areas
-

AH-1Z Viper, Academy 1/35
albymoore and 17 others reacted to Starfighter for a topic
Here's a quick look at the first and probably only model I have finished in 2020, Academy's excellent 1/35th scale AH-1Z Viper. Probably the best kit I have ever built - excellent surface detail (raised rivets!!), perfect fit. The cockpit is a bit of a letdown detail wise, but nothing that can't be fixed with a bit of effort. Clear parts are a bit of a disappointment as well. The model was published in issue 6/2020 of German magazine ModellFan, so I can just post a minimum of photos at the moment. I am working on a little diorama which I'll show you once it's finished. Just a quick summary of the materials used: Blade fold & blade fold rack by Legend Productions, some PE from Eduard's AH-1W set, Master Model gun, Flying Leathernecks decals, Werner's Wings stencils. MSR/SAIP pod, ground handling wheels, Sidewinder seeker head cover and FMV pods on the tail boom designed & printed by myself. If you have comments, critique or questions, please do not hesitate!18 points -

SH Tempest Mk V "Kicked Up A Notch". January 14/21 New eBook!
Sakai and 12 others reacted to chuck540z3 for a topic
July 1, 2020 Happy Canada Day! Not that happy these days? Either am I, but we all truck on, don’t we? Steps 13 to 16 on Page 6 of the instructions are all a blur of assembling the resin seat, adding HGW fabric seatbelts and getting the entire cockpit assembled into one unit before installing it into the front fuselage halves. Here are Steps 13-15: Before I did anything, however, I dry fit the resin seat to the cockpit cage, since seat supports I59 and I71 have variable angles, so it’s better to glue them to the seat installed than after the fact. I found this fit to be a struggle, since the lower seat support I79 didn’t fit the seat very well. After many dry fit attempts, I wound up gluing the seat from the bottom, despite the poor fit. Despite this, it looks OK. But you can see that the seat was glued a bit higher than the tabs on the sides, exposing them slightly on the bottom. I then painted and detailed the seat according to a few references, then added the HGW fabric seatbelts. The top of the seat was painted the same canvas color as the belts, the cord at the top was picked out with brush paint and the seat was heavily worn by dry brushing brown paint over a black base. The seat belts were also heavily worn, by wrinkling them and adding oil stain pastels to add staining. The belts included in my kit were a bit of a mixed bag. While I appreciated the fact that they were already pre-cut, which is a big bonus to other HGW belts I have used, the stitching on them was almost nonexistent. These belts are almost identical to the “Late Spitfire” belts I used on my last build of a NA Harvard, so I already had instructions to compliment the kit ones. I recommend you find these instructions on-line before attempting assembly, which was done entirely with CA glue. I posed the shoulder harnesses a bit high to separate them from the bottom, since they can be pushed upward over the seat back on the real deal. Excuse some of the belt "fuzz" that has since been removed. I recommend you don’t glue the “towel bars”, Parts I67 and I70 into place before you add the belts, because the clearance behind the bars is barely enough to allow the seat belt hardware to pass through. The end of the shoulder harness should be glued to the inside of the upper seat support, I71. Seat glued into place, which is quite a complicated feat with all the other parts of the cockpit cage fit and glued at the same. For wiring, I added only one line from left throttle to the rear. Only one! First of all, there doesn’t seem to be a lot of super obvious electrical and hydraulic lines visible in the references I have, as found on a Spitfire. Most of the cables are tucked underneath. Second, as you will soon see below, you won’t be able to see much of it anyway, so why bother? Step 16 has you add the instrument decals, which I’ve already done. But I also added the Mk II Gyro Gunsight, mounted on Part J21, used on a Mk II Tempest. 2 Holes were drilled at the top of the instrument panel to accept the gunsight mount. For the gunsight, I used the kit resin one, but the glass and overhead shade were sourced from my last Tamiya Spitfire build, because they were more solid than the kit PE and thin acetate glass. Decals for the gunsight were sourced from Barracuda for this same kit. Here’s a bit of a walkaround. The main reason I added the gunsight now, rather than in Step 40 as per the instructions, was to ensure that the gunsight would fit under the windscreen. It does, but barely, so make sure you mount the gunsight at the very front of the mount. The windscreen also fits poorly and isn’t molded very well, so it will need a lot of work to get it installed and glued cleanly. Now a bit of a disappointment. With all the work I did in the cockpit, you can barely see any of it from the top with the fuselage halves together. At least the Spitfire has a big door that is left open to peek inside, but from the top, this is all you see, which is very hard to photograph. Oh well, at least I know it’s all in there, which is why I didn’t bother with a lot of wiring that will never be seen, especially from the top angle. On to Steps 17 to 27, which includes the new Barracuda nose assembly. Cheers, Chuck13 points -
another sprue pic https://www.facebook.com/pg/artscale.eu/posts/?ref=page_internal12 points
-
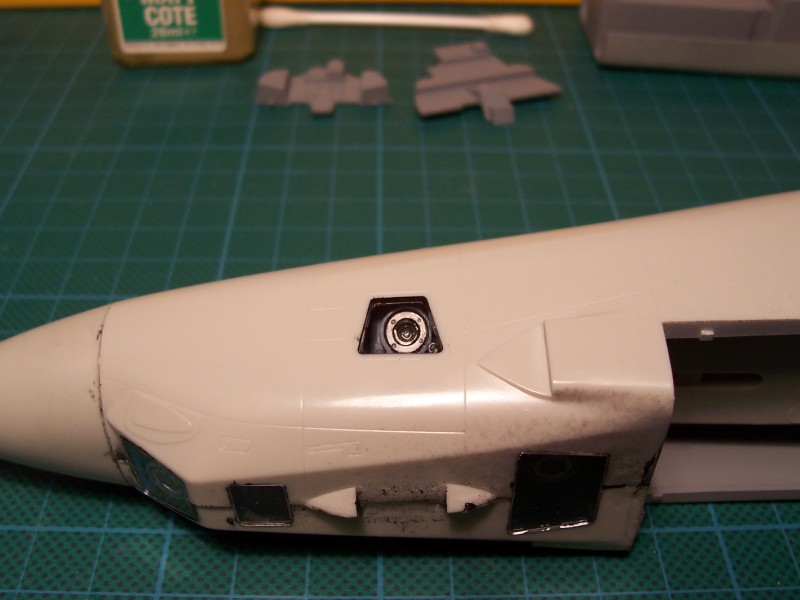
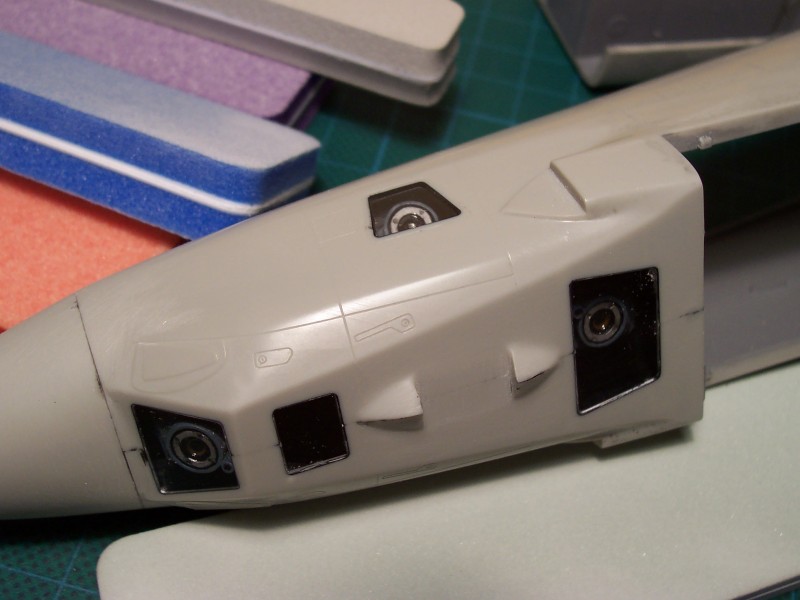
The following shots show the build after matt coating. I used Alclad II matt for this, spraying it in four very light coats. I was after a slight sheen, instead of dead flat which I managed to get with the exception of the cowling which looks very flat. The mottling blended very nicely and I am satisfied with the final look. Tomorrow I will post some shots of the bottom; I forgot to take any while documenting; stupid I know! Port side, decals and mottling are well blended and (fortunately) zero silvering; which I did not expect of the wet transfers at any rate. Not all the decal are wet transfers as I did not have enough of the stenciling markings in just wet transfers - heck I did not have everything in normal decals either, but one makes do I suppose. Above rear view nothing special to see. Starboard side, you can see that the mottling now looks slightly faded. Close up of that 3 again. I left off the marking for the external electrical connection because I thought it spoiled the look of the 3; a bit of artistic license on my part i admit. Compare how the mottling looks in this close up shot to the first one I posted. Finally, the JG27 crest, I think it looks pretty nice. Ernest6 points
-

EE Lightning - Echelon vacuform
Landrotten Highlander and 5 others reacted to mozart for a topic
So my main focus today was supposed to be making the scoops and ducts for the Lightning, before I got side-tracked into fitting the undercarriage! A little time spent carving formers from some scrap resin, then "moulding" lead foil over the top, finally putting some UV-cured glue inside (thanks Quang) to make them more robust. Like most things, they are fiddly to do at first but practice makes it easier. The best tool is the Mk1 finger nail: All undercarriage now firmly fixed and epoxied:6 points -
One of the most interesting airplanes for people who like strong weathering. F-4E Phantom II Hellenic Air Force Tamiya 1:32, model made of course straight from the box so it may not be an ideal reproduction of the F-4E HAF. The Tamiya set is probably well known to everyone. In short it's realy good set. Greek planes can be very heavily exploited, which makes them a great material for modelers.5 points
-
Hello After KH Miragge 2000, I decided to go back in time with this Mirage IIIc from Italeri I built the IIIe version some times ago and I new what to expect: kit is rather good but there are few shortcomings. Notably the nose cone adjustment: it is wider than the fuselage so sanding and putty are in order. Then the fairing round the exhaust and the vertical tail plan are quite tricky due to very small contact surfaces with the fuselage parts (especially for the fairing, if the photoetch frame is not presicely installed, there is no contact surface anymore. After several dry fit tests, I decided not to follow the sequence of steps from the instructions. Some addons I used: Pitot from Masters PE from Eduard for the seat and cockpit panels Resin wheels from reskit The squadron insigna is from an old Berna decal sheet for a 1/48 Super Mystere B2 if I remember well. It happens that it is nearly the right size for the 1/32 Mirage IIIc. Lucky me. Handbrush painting as usual : Humbrol 230 "pru Blue" for the top. For the lower part and the fuel tank, I tried vallejo metal colors. I must say I love them. I found by chance a video on YT (dogma72 - Brushing Vallejo Metal Color) showing how to brush them. It is a bit unatural way of working but it worked well: in fact you dry brush them. I put a layer of vallejo black primer then I used a large square brush, with nearly no paint on it and brush the surface. I did 3 or 4 layer, waiting overnight between each. Result is to my opinion close to what you could have with an airbrush. Not brush marks. Pigments are much thinner than the Humbrol Metal cote and the range of colors is wide. I used aluminum 701 and for some parts pale burnt aluminum 704 (it is not really visible on the photos due to lighting conditions). I also used jet exhause 713 for the stove pipe I had a lot of fun with this kit. A pair of French Deltas5 points
-

HH-60G Pavehawk Kitty Hawk 1/35 DONE!!
Renegade and 4 others reacted to Pete Fleischmann for a topic
Thank you all for the kind words! So many great modelers here- great friends as well. heres some more. Really; it’s not that bad to do- and oddly relaxing. Who knew? Started on the opposite side of the tail, and as before, moving forward towards the cabin, I find this side a little easier as I am left handed. cheers Pete5 points -
It's no big issue for me - I'm used to it - accept here in the UK the Iain is usually mis-spelled as 'Ian', rather than the US 'Lain'. Iain is a Scots Gaelic form of the name John. And don't get me started on the spelling of my surname - generally only spelled correctly when I'm North of the Border (Scotland). On the Andover - decision made last night, after some deep overthinking, several good coats of 'looking at' and a test clean-up of the interiors of the fuselage shells, is that I'm going to remove all internal printed detail, sand smooth and replace. A Fin (family motto - To The End - hopefully something I can apply to the Andover!) Iain5 points
-

Trumpeter F-105G (Done)
Daniel Leduc and 4 others reacted to denders for a topic
Well, everything is in the cockpit tub and a first fit in the fuselage. Looks like it needs some work. There is a piece at the top of the rear instrument panel that will need some work. Either filing in the plastic fuselage halves, or removal and relocation a bit lower, or perhaps AWOL . There are some other locations that need some adapting in the fuselage sections. And of course, there's a whole lot of other items that have to fit before final closing up. So far, I like what I've got.5 points -
Its been a few days since I posted an update. The ISP for our area was doing some work this past Thursday and something obviously went wrong as the internet was very flaky until late this afternoon. I could not access LSP at all until yesterday evening and then only intermittently, but all seems to be ok now. I will make a couple of posts showing the progress on the build which included an initial gloss coat, decaling the plane, final gloss coat, pin wash and matt coat. Next up will be some fading of horizontal surfaces. Several years ago a looked at some photos of a Bf109 that a friend had gotten from a relative, a couple of them were in color; I don't know if they were shot in color during the war or if they were colorized afterwards, but there were some interesting things that caught my eye.. First, the wing crosses were more inboard than you normally see. I know this was not an unknown practice, but it was an uncommon one and I thought it would be a nice change of pace to decal my build like that. Second the aircraft number, which was 5, was black outlined in red, and looked pretty neat. I did not have a 5 in the right colors, but I did have a 3 - close enough! Finally, there were three victory marks high up on the rudder; again not unknown, but certainly not real common either - and the color photos showed them in red. I decided early on to decal my 109 to show those three features, and fortunately I have enough spare decals that I was able to bring that off. The first set of photos show the mottling in raw form. A lot of JG sprayed RLM 71, and often 02 as well, over the RLM 65 fuselage sides. I opted to spray fairly large irregular mottling of just RLM 71 and then give that a very light overspray of RLM 65. Again several JG used a light overspray to tone the mottling down and blend it. My aim was to achieve that soft blended effect using both the overspray and several very light matt coats. I like the final result, which you will see in the next post, and think it is a fairly accurate representation of the real thing. You guys may have other views and I am glad to hear them, so fire away! Initial port side mottling. It looks rough and grainy at this point. The starboard side in the same condition. Port side after RLM 65 overspray, gloss coat and decaling. Things are starting to blend at this point. From above, note how the wing crosses are more inboard than normal. Starboard side, one can see the things I tried to replicate from the photos I talked about at the beginning of the post. Finally, a close up. I really like the 3 and think it adds a bit of color. The mottling looks better at this point as well.5 points
-
I apologize for jumping around not really getting into the meat of the build. I'm still waiting for the cockpit paint and rivet tools to arrive so I've just been doing small jobs not requiring paint. I've spent some time looking at the Brengun detail set and have specifically highlighted the non-cockpit items so that I don't overlook anything. The spring end of the landing gear actuation arm has no attachment point... it's just floating in space. You can also see how I've scrubbed the paint off the wheel hubs and added the PE bits to them. Brengun supplies a PE attachment point. A small but nice touch and Brengun has thoughtfully added an attachment pin to the part so connection is more positive. Brengun also offers a replacement for the oil cooler exit flap. I was especially proud of my efforts to match the curvature of the kit part... .sometimes this kind of thing gives me trouble. The interior side of the flap has some nice detail. But you really aren't going to see that detail unless you show the flap fully open. And if you do that, you'd be given a view into where the oil cooler assembly is supposed to be. But there is nothing to show. So... unless I want to add an oil cooler, it will be easier not to use the enhanced flap and just use the kit parts showing the flap closed. This PE part is not an addition but just a convenient way to cover up some ejector pin marks. Again, a thoughtful addition to the Brengun set. I punched a piece of brass sheet to create some more detail on the drop tank. I got a set of brass 20mm cannon barrels from a company called RB Models. I don't think it is related to Radu's company, RB Productions. And finally, another photo to show some of the additional staining I've put on the tires.4 points
-
1:32 Hawker Siddeley Andover E.Mk 3A - 3D Print
Pete Fleischmann and 3 others reacted to Starfighter for a topic
Absolutely stellar work, Iain! The windscreen looks very convincing. I have to try that as well for the flat windows of my MH-53E. Pete, there would be no problem at all with your name over here where I live. Funny enough, I've never heard your name - at least in Germany or Belgium. Kev, your name actually not only means "fodder" but also "lining" in German.4 points -

Interesting Spitfires
Rick Griewski and 3 others reacted to LSP_Ron for a topic
Using a colorized photo as reference..... holds no water. Is the lady really in red? or is it blue,? or rose, or light blue? Great photo, real color???? we know it's not4 points -

P51 D (early production)
MH Design Scale Models and 3 others reacted to HL-10 for a topic
Revell's all new P51 D is a lovely, straightforward kit with no vices. I added a set of etched seat belts, and the rest was out of the box. Painted with Humbrol enamels. Thanks for looking Angelo.4 points -

Revell BF109 G6 Late or Trumpeters BF109 G6 Late kit which one is better?
Nighthawk Calling 1 and 3 others reacted to Andreas Beck for a topic
The molds are done for the early Gs. They consist of cowling (this time with correct spacing for the guns) spoked main wheels and the early landing gear legs small tailwheel and fork inner top wing w/o bulge Not done are the tropical filter and the underwing gondolas (still do not know why this had happened). This sincerely limits the color options. It surely will be released.4 points -
Some more interior work... Thanks for looking: Kent4 points
-
This is by far the most complete/complex model kit I've ever seen, and the polar opposite of the approximate fit / approximate instructions Special Hobby Ki-27 "Nate" that I just finished. This large box: Contains six large and another half-dozen small sprues of parts: And a bunch of ancillary parts and pieces: I bought the Eduard canopy masks for it because the Tamiya-supplied ones are just printed on a sheet of tape - you have to cut them out on the printed lines. I figure that I'll use the die-cut Eduard ones on the outside of the canopy and then cut the Tamiya sheet just a hair small and use it to mask the inside. The kit also includes a bunch of features that I don't particularly want - landing gear that retract, movable control surfaces, etc, with elaborate spring systems to help move the gear. I am going to build these per the instructions, because I suspect that any deviation might make it difficult to get the parts attached strongly and in the right alignment. Then I'll glue them in place at the end of the process. This is an intimidating subject to approach - the Zero is such a cult airplane, and there has been SO much research done on it that it's effectively impossible to build it as "right" as someone out there has figured out how to do. Even with the impressive level of detail that this kit embodies, there are pages-long articles on how to fix its many minuscule errors, as well as a very impressive writeup on LSP about how to rework this kit as a Nakajima- rather than Mitsubishi-built Zero. I'm not saying this one will be strictly OOB, but I'll restrict myself I think to adding things in the cockpit that are missing like wires and conduit. While I plan to paint on all of the national and unit insignia, the kit also has an extremely complete set of stencil decals that should really help the wow factor of the final product. The quality and detail in the moldings is beyond anything I have ever seen in another kit. I tried to capture this in the shot below - the super-fine rivet lines that follow all of the internal ribs (which the truly obsessive tend to hand-apply in other kits) are molded in. Also, the plastic is impressively thin and super-crisp - no sign of obvious out-of-scale thick edges to parts. The kit provides seven (!) schemes to choose from, all planes from the carrier groups that attacked Pearl Harbor. The scheme on the box lid, a plane from Akagi, looks too much like the Nate I just built with the horizontal yellow stripes on the tail. I'm leading towards scheme D (lower left) flown by a Lt. Iida from the Soryu. I'll need to whip up the right shade of blue; based on the color of the decals they supplied, the KLM Blue enamel I already have, with just a touch of Royal Blue added, should do the trick. The kit instructions actually have you assemble the fuselage sides together first since, like the Hasegawa Shiden-Kai that a couple of folks are building now, the cockpit assembly can be inserted from below into the finished fuselage. I'm cleaning up cockpit parts and getting ready for some painting, but am not going to go too far down the road of assembly yet. I ordered a copy of the Aero Detail book on the Zero, and I want to wait until it arrives to figure out what I want to do vis a vis adding plumbing detail to the cockpit.3 points
-

SE-210 Caravelle III Air France 1/72 Mach2
scvrobeson and 2 others reacted to discus for a topic
Hello Not a LSP, but a large model. I wanted to build a Caravelle for a long time. But not just any Caravelle. This particular one, msn 12, F-BHRF christen Auvergne This one was exposed for many years at the entrance of the airport of my home town. As a kid, I always was fascinated by the "huge" (Huge is a matter of perspective... but as a kid, it was hude to me) plane parked there, on the side of the road. Then when, as a teen, I started flying gliders there, we use to spend some evening on board with the friends from the flying club. Some even slept on its wings... It was unfortunatly scrapped in 2006. Anyway, enough with the nostalgia.... All Caravelle kits are quite old and they all have their issues, some worse than others. Mach2 is a French short run brand. It is known for producing subjects that are definitely not mainstream. It is also known for the "limited" quality of its kit. I knew the Mach 2 kit would be a challenge but having built several fonderie miniature kits (another French short run brand known for its bad moulding and hard fitting) , I was not afraid..... Well.... I was in for an adventure... It is probably the worse kit I ever built... I had already decided not to use the "clear" parts, which are clear only by name. This turned out to be a great decision. Then I got rid of all the interior stuff... anyway there is nothing to see because ref previous line... The wheels: directly in the bin as well. The two parts of the mould were not aligned, I let you imagine the shape of the wheels... I replaced them with 1/48 Mirage F1 wheels for the MLGs and 1/48 NLG wheels from an F-100 for the NLG. Not the most accurate but who cares, it cannot be worse than the kit "things". I also replaced the engine exhaust by Whirlybird resin exhaust initially planned for the DH Comet. Now the funny part: wing to fuselage assembly. I quickly realised that this would be an adventure in itself: the wing sweep between the upper and lower parts was not the same by a significant margin. Sometimes on some kits, you need a bit of surgey to assemble parts. Here it was butchery. I reworked the complete wing root with a dremel and a miller (not sure of the english term, it is not a drill, it is the tool used to machine metal parts if you see what I mean) I think I never had to remove so much plastic to fit parts. Then, a truckload of putty here and there and I could finaly start painting. Humbrol 147 for the lower fuselage and the wing/horizontal stabilizer walk ways hu metal cote for the rest of the wing For the white on upper fuselage, I sprayed Tamyia true white TS-26. I could not imagine all this white area with an handbrush. Orange and dayglow for the wingtips. The decals: another adventure. I ordered them from F-Decals, a french brand producing a wide range of airliners decals. I must say that was a bumpy road as it took him 4 months to send them. And having exchanged with others on French forum, that's not only due to the covid mess and lock down. No answer to the numerous reminders. the only two emails I received were to tell me the decal sheets would be sent the next monday, which never happened. I ended up opening a claim with paypal. and then by miracle, 3 days after I received the decal sheets, but not excuse, no message, nothing which is a realy shame because those decals are real nice and good quality. I also used windows and windshiled decal sheet from Authentic airliners. I think they add a touch of realism compared to the usual grey windows we see on mist airliner kits. Here is the result:3 points -

1:32 Douglas A-26 Invader from Trumpeter/Hobbyboss?
Daniel Leduc and 2 others reacted to Finn for a topic
In case someone wants to do B-26K here is some useful info: https://www.docdroid.com/oiHN1it/douglas-b-26k-illustrated-parts-breakdown-pdf edit: it could even carry torpedoes: https://www.docdroid.com/oiHN1it/douglas-b-26k-illustrated-parts-breakdown-pdf#page=324 Jari3 points -
One of the great things about this website/forum is the huge number of very experienced and well-read people who generously share their learnings here. Having spent all evening and a chunk of today carefully re-reading Ryan Toews tweak list for this kit and the epic Ryan/Sean collaboration on a 42/43 vintage Nakajima A6M2, I now have 15 pages of to-do notes for this build. And some AM photo-etch and resin wheels on the way, as well as some more scratchbuilding stuff that I didn't have and decided was essential. So much for OOB! I'm even more excited about this project now.3 points
-

Lukgraph DH 89 Rapide
Kagemusha and 2 others reacted to thierry laurent for a topic
Hi Max, Happy you like the Barracuda radios. They're indeed very nice. This cabling drawing may be useful if you do not have it: If you look closely at your picture, you can see what looks to me like the corner of a small table: Or is it a box but, in that case, this does not leave much room for the legs of the seated guy...? In any case, there is something between the radio rack and the seat, for sure. With regard to the color scheme, I intended to comply with this one (the camo colors were simply inverted: A and B schemes I guess?). It also complies with the lighter color scheme on the lower wing. This is the camo of the one preserved in Netherlands. Hth Thierry3 points -
There’s always a silver lining Kev!3 points
-
The AeroMaster RLM 02 sprayed beautifully, didn't even need to thin it. Interestingly, upon opening the bottle of paint and can of airbrush thinner, I saw why the contents of each container have survived intact after all this time. The opening of the jar of paint had a thick disc of plastic film glued over the top, sealing everything completely. The airbrush thinner can had a metal plug, tightly capping off the opening. AeroMaster paint was made by Floquil. Modern paint manufacturers should take notes on the quality and design of this packaging, it's the best I've seen. I purchased this stuff back in '98 or '99 and it is not just useable but as good as the day it showed up in the mail.3 points
-
Well, apparently my last name means "fodder for animals" in German. Sounds about right. Kev3 points
-
1:32 Hawker Siddeley Andover E.Mk 3A - 3D Print
ctayfor and 2 others reacted to Pete Fleischmann for a topic
I get it. My last name gets butchered all the time..which is funny, because Fleischmann literally means “meat man” ( butcher) in German. cheers Pete3 points -
This is going to be awesome Iain! I did something similar for my RF-4C. Derek
 3 points
 -
Evaluating Trumpeter Aero-1D External Fuel Tanks
stusbke and 2 others reacted to Starfighter for a topic
Very interesting thread! I've drawn and printed some Aero 1Ds for my Prowler and Viking using the same drawing as reference a few years ago. It's probably time to finally start my range, maybe they could be helpful for some among us...3 points -
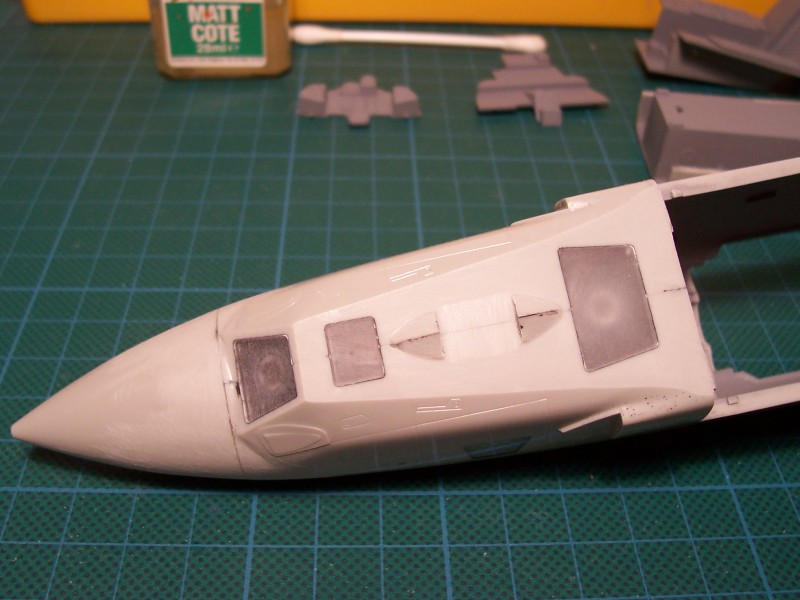
Little time, but I made some progress. I removed the gunsight which I will re-add after the windscreen is in place. The transarencies have been painted on the inside. All the panel lines that suffered from sanding have been restored, mostly using a micro saw. I'd say with about 90% success rate While building this my admiration for the advanced yet simple design and good looks of the little Spatz has grown considerably. The same goes for Revell, due to the design, exceptional detail (matching the simplicity of the design), and fit of the kit itself. The wheel and gun bay are complete and painted. The wheel bay is weathered, still have to start on the gun bay. The protruding guns will be made from brass rod. Cheers!3 points
-
Oh, go on then, Gold Star for Derek! Yes - with my fresh supply of 1.5mm clear HIPS sheet I thought I'd take a break from sanding/cutting/reinforcing big chunks of ABS and have a play with a glazing - to see if this particular cunning plan was going to work. I'll let you guys be the judge by the end of this post. The quality of clear parts can make, or break, a model and so I usually spend a lot of time on a project trying to get these as good as I can get them. I try to use the most suitable material for any given purpose. The fuselage windows I'm going to do as a single strip each side - so wanted a clear, non-yellowing, plastic that would easily conform to the single curve of the fuselage - and gould be glued to the ABS fuselage prints with solvent. So - 0.25mm UV Stabilised PETG sheet will be used. For the cockpit windows I wanted something absolutely flat and distortion free - and something I could use wet and dry followed by polishing with Novus Plastic Polish. PETG doesn't like sanding/polishing at all - but HIPS does - and at 1.5 mm thick substantial enough for shaping and to hold it's flat shape on fitment. Add to that the trick of 'edging' the clear part with a permanent marker that I've been using for years to make neat edges, as well as create the impression of thinner 'glass', I thought I might have the tools to make a go of these. Tonight I cut the first window: An oversize section was laid over the window aperture and the edges marked on the surface with a new scalpel blade. The section was then trimmed back using Tamiya side-cutters to within about 1mm - then the edges taken back with the T-Bar sander - bit by bit, with lots of trial and error - as well as corner rounding, until it fitted absobl**dy perfectly - even if I do say so myself! Here it is just press fitted in position - took about an hour - but hopefully looks OK! Final bonding will be with a little solvent touched into the corners and into the joint - followed by a polish. So, I think there's another challenge sorted, perhaps... Iain3 points
-

1/48th Boeing B-52H Stratofortress
Greg W and 2 others reacted to tomprobert for a topic
I've finally had the opportunity today to add a splash of colour to the flap bays. Trouble is, this beast is a little too large to fit in a spray booth: IMG_0277 by Thomas Probert, on Flickr Equally, finding a place for it to dry off is equally problematic: IMG_0280 by Thomas Probert, on Flickr Anyway, size issues aside, Xtracolor's Zinc Chromate has brought this area to life: IMG_0285 by Thomas Probert, on Flickr I've also given the out-rigger bays another spraying as I felt the Humbrol Chromate Yellow was too brownish: IMG_0282 by Thomas Probert, on Flickr IMG_0283 by Thomas Probert, on Flickr IMG_0288 by Thomas Probert, on Flickr IMG_0290 by Thomas Probert, on Flickr Pretty happy with the outcome Regards to all, Tom3 points -

75 Sqn RNZAF Mosquito Detailed Build
Chris Wimmer and 2 others reacted to Anthony in NZ for a topic
Ok the nose gun bay is pretty much finished. I re-did the screw attachments for the screws around the edge of the allu cap (these screw the cap to the wooden structure and frame inside the edge of the nose) as I felt they were too big the first time I did them, si I filled them with CA and redid them a better size and the correct number. In reality there are more flush head rivets....but lets be honest, they are barely seen looking even in real life so I decided not to add them all for fear it will start looking like it had once been used as a pin cushion. Balance is the key me thinks. All of Roberts gun bay is now in and I just have one or 2 tiny additions to add once Air freight is opened up to NZ again. HGW are kindly sending me the numbers 1 & 4 which I messed up and I am waiting on suitable tiny chains to arrive to complete the suite. But its pretty much finished until I can sort these items. All the wiring for the lamp, terminal blocks and suppresser box were scratchbuilt and wired in G45 camera fitted along with ammo feed chutes etc. A couple of pneumatic lines for the firing solenoids need adding, but waiting for suitable chain until I pop these last couple in. Wolf, notice the 2 wing heads are lock wired together. Looking at photo's though they were done on some airframes and not others...so take your pick. Anyway, hope this is interesting to those interested in the Mosquito Cheers Anthony3 points -
Anyone for an RNZAF Skyhawk 'Kahu' panel and HUD?
Greg W and one other reacted to Anthony in NZ for a topic
It is Kah specific details that can be used in conjunction with the kit or Aires cockpits. It will also include antenna set up externally2 points -

Lukgraph DH 89 Rapide
thierry laurent and one other reacted to Rick Griewski for a topic
My kit is in the post. Two weeks is a long time for my inner child to wait. Thanks for all the great info gentlemen. Rick2 points -
Lukgraph DH 89 Rapide
scvrobeson and one other reacted to mozart for a topic
The Barracuda Tx/Rx sets have arrived, look pretty good I think. I'll have to think about making racks for them to sit and add a few extra "black boxes" and cabling when I start the build, almost certainly in the Trainer GB now. Thierry, I'm not sure that I'm seeing a table in front of the instructor in any of the pictures in this thread. I can see another box of electronics below the side-mounted Rx in the one where I've over-printed their names but no desk. I don't plan moving any of the seats, their position will fit the bill for me. Really looking forward to starting the kit, but another question!! What's your take on the colours of this Dominie? I assume Dark Earth and Dark Green uppers and Trainer Yellow lowers but what about the distribution of colours on the engine nacelles, sides and fronts? I see a line front the wing leading edge along the nacelle side separating upper and lower colours, but the front cowling? Yellow?2 points -
1/32 ERA-3B Skywarrior - 3D printed / scratchbuilt
Derek B and one other reacted to Starfighter for a topic
Depends on your budget and what you'd like to do with the printer, Thomas. I am happy with my upgraded Photon; the Photon S and Elegoo Mars are a bit more expensive and seem to work very well, too. All of them are rather small, so if you want to print large parts, you need to chuck your 3D models into small pieces in order to print them. I think Elegoo will bring a slightly bigger affordable printer onto the market within this year, but I have forgotten the name. All of them are resin printers. I also have an FDM printer, namely a Creality CR-10S. I use it to print very large parts without too many details; one has to play around with settings a lot in order to get decent results with such a budget FDM printer and that's not my strong point. But if it works, you can print parts using ABS or HIPS both of which have pretty much the same characteristics as normal plastic kit parts.2 points -
Silver bullet, more like! Kev2 points
-
Hi Alex, don't do that with any flat glass panels, only the curved / radiused panels. The flat ones should be the same inside and out. Have fun.2 points
-
2 points
-
Here, you can see some detail added to the main landing gear using 0.3mm copper wire. The section of white wire insulation is 3/4" long.2 points
-

1:32 Hawker Siddeley Andover E.Mk 3A - 3D Print
Anthony in NZ and one other reacted to LSP_Kevin for a topic
Not sure why, but I get a bit protective when I see Iain's name screwed up like that! Kev2 points -
1:32 Hawker Siddeley Andover E.Mk 3A - 3D Print
Iain and one other reacted to Pete Fleischmann for a topic
fixed!2 points -
1:32 Hawker Siddeley Andover E.Mk 3A - 3D Print
Iain and one other reacted to Pete Fleischmann for a topic
Fantastic Iain! you just helped me sort out an issue on the chin blisters of my HH-60G. very fine craftsmanship! cheers Pete2 points -
boxart posted on Lukgraph FB page2 points
-
Thanks Tony.....I took a big sigh of relief when this stage was reached: Obviously still a massive amount to do but I feel as if I've reached a major milestone. I wouldn't normally add the undercarriage to a model till much later in the build stage but something is telling me now is the right time for the Lightning. I hope experience+intuition is right!!2 points
-
HH-60G Pavehawk Kitty Hawk 1/35 DONE!!
A-10LOADER and one other reacted to Pete Fleischmann for a topic
Hey all- I needed to build something that would protect my crew chiefs arm while I riveted the opposite side of the fuselage. I tack glued it into the slot that the main gear fits into. It also serves as a stand of sorts- My plan is to rivet the other side up to the cabin like here..then fix the cockpit doors, windows, and windscreen in place, then do the fuselage sides around the cockpit, then finish up riveting the belly- cheers Pete2 points -
Still plugging away on the motors. The Barracuda valve covers are a nice upgrade. Very reasonably priced, perfect fit and very well cast. Typical Barracuda! So both motors are now complete. Next up is a coating of semi-gloss black. To that, I added a dark brown wash, some pastels and started highlighting some of the nuts and bolts with a silver artist's pencil. Have a lot more detail painting and weathering to do here. I've added the ignition housing on the motor above. At this point, I think I'm only going to add details to one motor. I highly doubt I'd ever have both cowlings off the finished model. I'm winging the paintwork on these motors. Just about every color pictures I've seen are Merlin's mounted in restored warbirds or in museums after being "restored". Either way, they typically don't represent wartime engines. Here's one pictures I thought was pretty nice (assuming it's not colorized), not a Mosquito but shows a WW2 vintage Merlin pretty well. Note the spark plugs, their wires and the ignition assembly. Tamiya didn't include these bits. BTW, what's with the green and blue paint scheme on those Spitfires? Never seen that scheme before.. That's it for now, much work to still to do.2 points
-

Messerschmitt Bf-109G-8, Suomen Ilmavoimat, 1:32, Hasegawa
MH Design Scale Models and one other reacted to Hartmann52 for a topic
2 points -

Abandoned Soviet T-62 in Afghanistan
TankBuster and one other reacted to ShelbyGT500 for a topic
Hi friends This is the end of this project: Thanks for watching as always Stay safe my friends. Cheers2 points -
Originally, when I started the kit, I wanted to do a North African tropical version, so I had glued the air filter to the intake. Now I want to do a Russian JG 52 scheme, which means the filter had to be taken off. Removing it damaged the leading edge of the opening, so I glued on a styrene disk with Tamiya Extra Thin Cement and let it dry overnight. After drilling a hole in the center of the disk, the opening was enlarged with a reamer but because the reamer was conical shaped, there was some very thin plastic "flash" on the trailing edge of the white evergreen lip. It was proving hard to clean up because the tools normally used to scrape or sand something like this away, were to big to fit into the small opening that close to the engine cowl. A quickly improvised tool got the job done. A small strip of brass sheet bent at a right angle, chucked into a pin vice allowed me to scrape out the inside of the scoop and get it clean of the flakey plastic. I don't have a before picture of the intake but it was pretty chewed up... All cleaned up, inside and out.2 points


