Leaderboard

Popular Content
Showing content with the highest reputation on 06/26/2020 in all areas
-

1/32 Nakajima A6M2-N RUFE
CZPetrP and 10 others reacted to corsairlada for a topic
Very old 1974 TOMY kit plus MDC conversion color AK Real color , Gunze C, Yahu Instrument panel homemade mask - drawn in corel draw, mask which was edited and carved on plotter by my friend Pavel Shortland floatplane base, Solomons Islands, February 1943, flown by Lt. Keizo Yamazaki11 points -

1/32 Hasegawa N1K2-J Shiden Kai 343-45
Paul in Napier and 10 others reacted to Thunnus for a topic
Thanks guys! Instead of a metallic finish, I elected to paint my landing gear legs a light grey. I don't know why... I just like the look better than what I was getting with a dull aluminum finish. The wheels were painted in a mixture of black and brown and then the contact areas were lightened with a sandy color. I'll weather these more with pastels. Here's what the gear looks like after the details have been painted and given a dark wash. I filled the joints of the wing inserts with black rubberized CA glue. I like this as a filler because it is easy to see and it sands a little easier than regular CA glue. You can see where the filler gets really close to some of the raised details. I'll have be very careful when sanding not to lose this detail. I'm pretty frugal and like to re-use my sandpaper. I keep the pieces in a small cup. But when dealing with CA glue that's close to details that you want to avoid, it's essential to use fresh pieces of sandpaper. The bite of fresh sandpaper is needed to cut down the ridge of CA glue without wearing down the surrounding surface. Plus it is stiff enough to be able to be made into a narrow sanding tool when folded. After the CA glue is sanded down, I treat the joints with Mr Surfacer 1000, sand that down and then give it a spray of primer to check my work. It looks ok from this perspective but from certain angles you can see where putty has not been blended in perfectly. There are also some slight elevation differences between the insert and surrounding wing areas as well a few slightly jagged panel lines. I have the time and inclination to fix these issues so one more round of Mr Surfacer 1000 to see if we can make those imperfections go away.11 points -
Wow, time has flown! That was 15 years ago! Thanks again for your kind words. At that time I was fascinated with the 1/32 models by Rodney Williams and I was trying to imitate him. I was not even thinking about turning this kind of work into "kits", but because of this model Vasko Barbic of Warbirds Models contacted me and asked me to make some masters for resin conversion/detail sets. At his request I made a few Hurricane sets that were later sold under Warbirds Models label, then under the MDC label and finally under the Grey Matter Figures label. This was really the "start" of my professional model design career. It led to all kinds of designs for complete models, conversion sets, detail sets, tools, decals, and lately CAD design for injection-moulded kits. I met a lot of great people along the way and I found myself in great situations where I had to pinch myself. So, even though that particular model was not turned into a kit, it led to a lot more other exciting stuff. Radu7 points
-
Unmasking the canopy is always a nervous moment for me, but this one turned out nicely - no leaks, none of the paint peeled off the canopy framing. This is also the first post using images hosted on my new ImageShack account (thanks for the tip, Kevin). So hopefully these are now permanent, will not expire, and perhaps will be easier for some folks' browsers to load. Closer-up image: I may actually finish this thing today if I can wrap work up in a timely manner. Which would be nice on a Friday regardless...7 points
-
I bought this monster right after it first became available and shelved it for some time. Too many things on the work bench ahead of it. Now it's time to get busy. First, a short history. 2106 is an SBD-2 Dauntless that joined the Navy prior to Pearl Harbor assigned to the "Lex" as part of the Atlantic Fleet. 2106 participated in war games conducted in the US gulf coast area and flew mostly from hasty dirt airfields. During this time, 2106 ingested a lot of dirt and dust through the intake of the radial engine, destroying the rings on several cylinders. Shortly after the war games, the "Lex" was reassigned to the Pacific Fleet and 2106 was dropped off at Ford Island for engine replacement. The "Lex" left for a delivery cruise taking aircraft to other islands and 2106 stayed at Pearl. 2106 survived the attack on Dec 7th and, upon the return of the "Lex", rejoined her on-board squadron. 2106 was then a part, six months later, of the Midway campaign. During it's second attack run, 2106 was heavily damaged, but made a one-wheeled crash landing on Midway and was later recovered. She then went back to the factory and was repaired, but instead of rejoining the fleet (newer SBD-3/4s were coming out by then), 2106 was sent to Michigan to join the training of new Navy pilots learning to land and take off from small aircraft carriers in Lake Michigan. 2106 was spun into the water and sank to the bottom of the lake. There she laid until discovered in the '90's and raised for salvage and preservation. 2106 is now on display at the Naval Aviation Museum in Pensacola, FL. This thing is going beyond extra large! The cockpit tub is a large sub-assembly with a lot of detail hidden from view most of the time. There is a section behind the firewall and ahead of the dash bulkhead where the oil tank, engine mounts, and intake are hidden. To make an access door or panel will, in my opinion, weaken the forward fuselage joints and make them took fragile. So I'm going to cover them and leave the details inside. I've added so more details the are easy to see, but were omitted from the kit. Seat belts, switches, and plumbing have been put the best that I can. The engine has received a wiring harness and some other enhancements...not many though. The decals are crap. I nearly destroyed one small decal in a test and discovered they are paper thin and don't adhere to much. So I'll paint most all the markings instead. This is the rudder with red/white strips added. I still have to thinly coat it with light sea grey leaving the strips to show through some. Such was the hasty attempt to change camouflage. I have added metal landing gear from Scale Conversions for their strength.6 points
-
1/32 Hasegawa N1K2-J Shiden Kai 343-45
Paul in Napier and 5 others reacted to Thunnus for a topic
Thank you! I don't remember the exact size. I used lead wire for the brake line that was 0.020" in diameter and I just found the appropriate brass tubing that would accommodate the wire. I recently purchased a couple David Union tools from Troy here at LSP. What I was initially interested in was the sander. But when he also mentioned a small router with an RPM range that was slow enough not to melt plastic, I thought it was time to replace my clunky, plastic-melting Chicago Tools rotary tool. You can check out the specifics of these David Union tools over on the Vendor Board. Check out the size difference between the new router and old! Fits in the hand very nicely! The important thing is its RPM range of 1,500 to 12,500 RPM. The slowest my Chicago Tools' spins at is 6,500 RPM and at that speed, any sustained contact with a grinding tool will melt styrene plastic. I've verified that I can use the D300 router with all of the tools that fit my old rotary tool without melting plastic, which is a huge plus. I performed a little test on how these two tools might help me in the future. As an example, here is a raised injector pin mark. It was previously doused with sprue goo when I was monkeying around with the stuff on my Ta152H build. Hopefully, it is cured by now! Using a round grinding head (from a set of grinding tools I bought off EBay a while ago) on the D300, I carefully remove the raised feature, being careful not to gouge the surrounding plastic. Notice the dry sanding dust and no remnants of melted plastic. Now I switch to the D400 loaded with 400 grit sandpaper and sand down the area to a flat surface. What's nice about the D400 is that it has perfectly mechanical motion. That combined with the flat plastic surface of the tool, gives you great uniformity in the sanding motion. Using my old sandpaper-held-with-fingers technique, the finger will naturally deform over the whatever your sanding and that tends to scoop out the surrounding plastic as well as the raised surface you are trying to remove. The bump gets removed but there is often a subtly uneven surface that results. Using a mechanical sander greatly improves surface uniformity. I probably should've used the 600 grit on the D400 because I had to clean up the sanding marks with finer sandpaper. You can see the remnants of the injector pin mark but is it in color only... the surface is nice and flat. To verify how flat, I've shot the repair area with Mr Primer Surfacer 1000. Usually my injector pin mark removals have very subtle surface irregularities that are hidden from certain angles but visible from others. I think the D400 will give me an incremental but noticeable improvement in my surface repair work. We'll test the D400 out again on the Shiden Kai's wing insert panel.6 points -
I have waited for this moment for some time. No longer posting in "In the Works" on this one. IT IS DONE. The 35 year journey has come to an end. This kit was purchased in 1984 or 85. It was tinkered with off and on for years starting back then. This kit is a world traveler having resided in New York, Oklahoma, Germany, back to Oklahoma, Texas and completed in Tennessee. It is far from perfect, but it is finished...well, other than putting back on one flying wire on the tail...I didn't notice had fallen off until I was looking at pictures preparing this post. N66Y is a Pitts S-1C built by my dad in the early sixities and one of the earliest of plans built Pitts Specials. It was bought by well known acro legend Bob Herendeen in 1965. He won the US National Aerobatic Championship flying it in 1966, the first US Team member to compete in a Pitts. He also flew it in the world competition in Moscow that same year. It definitely put the Pitts Special on the map and soon all the pilots were flying Pitts for many years after. The kit is of a four aileron S-1D. I've back dated to the S-1C which only had ailerons on the lower wing, but with longer span. Both had a flat bottom airfoil. Soon, the Pitts S-1S with symetrical airfoil eclipsed the S-1Cs and Bob sold N66Y and moved into his new Pitts S-1S N266Y. Unfortunately, I was too young to fly when dad built his Pitts (3 total) and sold the last one. I have been lucky enough to fly three different S-1S Pitts...and they are an absolute delight and fly inverted as well us right side up. Today, N66Y is owned by the Experimental Airplane Association, but is on loan to the Aircraft Spruce and Supply Company and on display at their Peach Tree City airport location where it hangs in the lobby. The real N66Y then and now... This picture was made shortly before completion and first flight. Notice the missing windshield. As it hangs in ACS Lobby today. My dad sitting in cosmetically restored N66Y at OSHKOSH 2000 when it was displayed in memory of Bob Herendeen.5 points
-

HH-60G Pavehawk Kitty Hawk 1/35 DONE!!
A-10LOADER and 4 others reacted to Pete Fleischmann for a topic
Hey all I won’t torture you with every rivet picture- but this part took me so long I felt like I had to photograph it! cheers Pete5 points -
So after having the kit smudged by Tibetan Monks and getting my attitude straightened out a bit with the CF 188...I have decided to try revisiting the cursed Kinetic Kit. I first dealt with the splitting seams which (knock on wood) have, as yet not re-appeared. Then since I had a dozen sheets of foil that I had originally planned on using on a HK B-17 (which ultimately received Alclad and was the better for it) or building an aluminum canoe...I figure I'll stick it all over this kit and kill two birds with one stone. The saga continues; Thanks for looking5 points
-
I sprayed the base colors on the 109 today. The following photos are really nothing special as they just show what the plane looks like with a basic paint job of RLM 02, 65, 71. I went for a very subtle "black basing" effect as I will also be fading the surface. I used Tamiya Acrylics mixed to represent the different RLM colors and thinned with their lacquer thinner 50/50. The paints sprayed very well, as usual for Tamiya and I only had to do a couple of very minor touch ups afterwards. The next step will be mottling; always a fun but tense job for me. The next step after mottling is complete is to gloss coat the aircraft. With luck I will have both those jobs finished by tomorrow night and can post a photo or two. Ernest5 points
-
1/32 Hasegawa N1K2-J Shiden Kai 343-45
Paul in Napier and 4 others reacted to Thunnus for a topic
Hasegawa not only molds brake lines onto the landing gear legs, they provide a separate piece for the brake line half loop at the scissors link. But curiously, it stops short of the wheel. Based on my references, the brake line goes all the way to rear wheel cover and Hasegawa, if they are gonna go through the trouble of representing the brake line, should've completed the connection. Using lead wire and short sections of brass tubing, I've extended the brake line in a much simplified fashion. But at least it's not just hanging out there, open-ended. I've also created a strap using foil tape to cover the joint between the two brake lines.5 points -

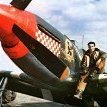
US Navy pilot hands out of cockpit adapted to F-14 wider fuselage by Reedoak
A-10LOADER and 3 others reacted to norbert for a topic
Hello ! We adapted the US Navy pilot hands out of cockpit to the Tomcat wider fuselage , BTW, we changed also the MBU-23 by a MBU-14 mask. the open face version is designed to change the face without too much work (by us, it's still a CAD work). For late Tomcat : Cheers Norbert4 points -

HAL-3 and PBR scene 1/48
Uncarina and 3 others reacted to easixpedro for a topic
Thought I'd share this as it's been a long 2+ year slog, but I finally cleared it off my shelf of doom. No real in progress shots as I lost quite a few when I destroyed my phone. But I can tell you that the PBR is scratch built after scaling down plans to 1/48th. Kind of a fun thing to build. The helo on the other hand is why this project almost got scrapped. It's the archaic Monogram Huey Hog. It's got some nice details, but is not correct for either a UH-1B or UH-1C. HAL-3 flew predominately B models, though they were updated along the ways. Hueys are confusing... Enter the Kitty Hawk UH-1D. I bought a perfectly good kit just to cut it up and improve the Monogram dog. I have a screw loose. Gutted the interior and replaced it and then used the entire KH section forward of the overhead windows. Didn't help that the Huey Hog kit was so warped that getting things to align sapped my will to live. Then I went back and recovered the KH bits with Archer Rivets to blend it with the Monogram pieces. Used the KH rotor pieces and trimmed the blades to B model standard. Rocket pods are from Shapeways, and saved me a lot of heartache. Anyway, on to the pics... With this project finally complete, I can start thinking about my 1/32 EA-6B. -Peter4 points -
I was really excited about this release seeing as how I've long been a Stearman fan. I put two other projects on hold to jump in and run though this build, using the other two projects for filler when I had to wait on this one for paint to dry or glue to cure. I grew up around Stearmans. My dad had Stearman dusters before he sold and moved into airplane built for agricultural aerial application. In the mid-70s, we began restoring old crop duster back into stock two seat military trainers from WWII...the same as my dad trained in. We rebuilt three complete Stearmans and did many partial restorations or components for them. As a teenager in the later seventies, I can remember Scale Modeler talking about Hasegawa possibly releasing a 1/32 Stearman and AT-6...I was so excited. Little did I know I'd wait almost 40 years for it to happen. So when the Roden Stearman was available, I ordered two...to go with the two Silver Wings Stearman I have but haven't yet built. I'm already like a kid waiting for Christmas for the ICM release about to come out. I started this kit mid-May and have had it mostly completed when I began the push to finish my Aeroclub Pitts which I just posted in another thread. It was one of three completions that all pretty much happened about the same time. Quarantine has given me a bunch more time to build than I normally have. When I began this build, the idea was to build it to appear as my dad's primary Stearman duster would have appeared when it rolled out of the factory in 1940. I was well along in my build and doing some research when I found out dad's old duster had been an Navy N2S-1, not a PT-17. Oops. So, I chose marking to represent the first Stearman I actually flew...I wasn't old enough to have my license to fly the ones I helped restore and was gone away to school when the last one was built and sold. This is the one I was checked out in, by my dad in 1985 while home on leave from the Army. Rigging is 0.015 steel piano wire. Kit decals for the most part except the red circle in middle of star. Kit supplied "meatball" was too large and touched the blue field. I used center from some Yellow Wings extras I had from my Boeing F4B-4 build going on at the same time. The white 498 on fuselage sides and accessory cowling were masks cut using a Cameo cutter and Studio software...my first foray into painted markings, which was a trail run for my Aeroclub Pitts.4 points
-
4 points
-
here you go!4 points
-
That's Radu Brinzan. I have to agree. That hurricane is truly a gem of a build.4 points
-

Finished! HPH Mig-15 Korean War
Daniel Leduc and 3 others reacted to Padubon for a topic
Primer time.4 points -
Main colours on. Next up, decals. Sorry for the cruddy pics.4 points
-
1/32 Hasegawa N1K2-J Shiden Kai 343-45
Paul in Napier and 3 others reacted to Thunnus for a topic
I've glued in the wing inserts. When the glue is dry, I'll fill the joints with CA glue since they do not correspond to any panel lines. I was curious about the fit of the major components so I cut the pieces out for a dry fit. The tail unit features an internal baffle, presumably to help align the horizontal stabilizers correctly. Fit is very good but again, the joint does not correspond to any panel lines so the joint needs to be totally smoothed out. Instead of gluing the tail assembly as a unit, I will glue the left tail to the left fuselage and right to right first. This will ease the cleanup process and help facilitate the riveting that will occur later. I placed the fuselage with engine cowling onto the lower wings to get a sense of the size of the model. It is a big bird. The sprue attachment for the one-piece cowling is in the most obvious and visible of places so I took a lot of care to trim away the remnants as well as mold line. It doesn't have the most graceful lines for a WW2 fighter but there is something appealing and purposeful in its chunkiness.4 points -

Make the others jealous
Dany Boy and 2 others reacted to BloorwestSiR for a topic
I forgot to post pics of the finished display case. With the doors on: This is the first time I've had all my finished Tamiya Spitfires in one spot. I swung by my LHS today and picked up some new armour kits.3 points -
One more view of the completed model with canopy in place. I just left it loose so it can be taken off to peer into the cockpit. And paired with its adversary, the Flying Tigers P-40B. The AVG and the 77th Sentai tangled repeatedly in the skies over Burma in the early months of 1942. And yes, just to close an earlier loop, I did fill in the ammo magazine inspection windows with Krystal Klear ;-) Thus the first pair in my overly-ambitious plan to build all of the principal fighters of the Pacific War in 1:32 scale and in this kind of historically apt pairing. That's the end of this one, so thanks for following along and for all the encouraging words and advice. After a bit of a nap, it's on to the Tamiya A6M2 Zero. That will get built as a plane from the carrier Akagi that took part in the Pearl Harbor raid. Once it's done I'm destined to return to the world of limited-run Special Hobby kits, since it will need to be paired with a P-36 - one of the few American planes that actually managed to get off the ground and fight back on Dec 7, 1941.3 points
-
OK, last bit. I got the optical gunsight installed through its little hole in the windscreen, added the tailwheel, and rigged the antenna. Here's some blow-by-blow on that last... First, here's the gunsight. I painted the back of the propellor in "Japanese Propellor Brown". The Nates used this (as anti-glare) only on the back of the prop blades. Later in the war many IJAAF aircraft had the whole prop and spinner painted in this color. I tried out a new brand of paint "Vic Hobby" that HLJ now carries. Figure the Japanese are by far the most likely to do the research and get these colors right. I also got some Nakajima IJAAF Dark Green from them (these are acrylics) that may figure prominently in a war-weary Ki-43 that I'm cogitating on. On to antenna rigging, I figured it was essential to reinforce the antenna mast or it would snap off, so I carefully drilled into it lengthwise and inserted a garden-variety sewing pin. Of course I drilled a hole in the fuselage to match. I drilled a hole in the top of the vertical stabilizer in which I would insert a tiny eye fitting made out of fine wire. It's a bit hard to see but I also drilled through the flange at the top of the antenna mast so it could accept a wire fitting. The wire I am using was sold for the purpose of detailing model car engines, but it works great here - very easy to form, and has a rugged black coating that does not come off. I made a couple of these little fittings to represent the tensioners / insulators on the antenna wire. That's actually the "tensioner" already hooked through the "eyebolt" that will get glued into the vertical tail. Even with the optivisor I am pushing the limits of what my eyes will resolve, much less my manual dexterity... And then that thingy plus the "tensioner" attached to the antenna mast. I closed the loops with tiny drops of CA, which will get painted black later. Now to rig the thing... I used this stuff, which is what Wingnut Wings recommends for biplane rigging. It is very elastic, so easy to get taut AND won't break or come loose if you bump it accidentally. Et voila - this went down in one pass, nothing broken, nothing smeared with glue, nothing needed to get re-done. The modeling gods smiled on me today for sure. Another view. I'm declaring victory on this one now and putting it on the shelf. Given how well today went, any attempts at further detailing are sure to only make things worse...3 points
-

Lukgraph DH 89 Rapide
scvrobeson and 2 others reacted to mozart for a topic
It’s a knotty old problem that I’ve been trying to untangle unsuccessfully for a while Thierry! It's largely a matter of trying to glean snippets here and there from personal accounts (can memories be trusted?) and the few photographs available. I reckon these two pictures were taken on the same training sortie: and identifying the two major items: The usual T1154 and R1155 arrangement in a Lancaster: In the picture below I think that's the open side door to the left, so four seats in front of it, another two behind? That's enough room for five trainees plus the instructor. Given that they could all receive signals but only one at a time transmit (the desk in front of the T1154 with the morse key on it) I can imagine exercises with signals coming from the base at Yatesbury which they all "translated" from their seats but one by one they moved to the front to transmit back. But like Thierry said, I can't square this memory with these pictures: I can't envisage space in a Dominie for all those Rx/Tx sets. Example of other wartime memories, I knew Louis Butler and would trust his pithy comment: The Dominie carried a pilot, a Corporal Instructor and five or seven trainees. Frank Swan recalls, “Looking back makes me think of how those cabins smelt of sick, primarily because it was mostly the cadets’ first flight in a shabby old aircraft which already smelt”. L Butler, writing in “RAF Yatesbury – the History” reminisces about the biscuit tin which was kept on board. “It was odds-on that least one of the seven trainees would be sick. When queuing up to take your turn to fly, you would almost inevitably see one trainee coming off the plane holding the biscuit tin. He would have been the one who had been sick and it would cost half-a-crown to pay the ground crew to clean it out”. The trainees would carry out exercises during the flight. But these flights were sometimes almost as terrifying as anything that they eventually encountered on operations. The pilots were usually those who had complete a tour of ops or were waiting to be posted to an operational squadron and were not too happy flying a Dominie. Members tell of hair-raising rides flying in between canyons of clouds, mock dogfights with other Dominies and Proctors, flying alongside a flight of B17 bombers, flying under the Clifton suspension bridge, dodging balloon cables over London for ‘fun’ and chasing sheep on the downs.3 points -

P-40E-1 Lt. John D. Landers 1/32 Hasegawa
mywifehatesmodels and 2 others reacted to Miloslav1956 for a topic
Here is my another P-40E Included all sets from CMK All colours MRP3 points -

The antique BoB Revell Spitfire Mk.I
Alain Gadbois and 2 others reacted to thierry laurent for a topic
Another thing I did not mention: the round holes for the main LG wells are not fully... round! So, I used fine sandpaper sticked on an aluminium cylinder normally used to roll photoetched parts. It has a slightly smaller diameter and was perfect to restore a better round profile. This just asks for some minutes to correct the issue. This kit is a nice canvas but it is only that. I would never consider building it OOTB. For people willing to build quickly the recent release is a far better choice even if the surface detail treatment is less accurate!3 points -
The antique BoB Revell Spitfire Mk.I
Starfighter and 2 others reacted to thierry laurent for a topic
And the last thing for today: correcting the MG holes location. Initially I did not see it but they are not correctly located. This is actually quite easy to see as soon as you have a look at the MG doors on the upper wings. Fortunately, as Revell molded the patches protecting them over the wing leading edge, it was just a matter of sanding them and drilling/filing the holes where they should be. Here's the lower wing. You can see the alignment with the chute doors: And last, you can somewhat see here the alignment with the doors: This is a quite basic change but I really hate seeing MG holes not correctly aligned on a kit! The major challenge is taking care of the heigth as all of them are not centered on the wing seam. So, you must use good pictures of the front of the wing to locate accurately the center of each hole. The holes closer to the wing tip are higher in comparison with the seam between the wing halves. We will go on with other wing corrections and detailing.3 points -
The antique BoB Revell Spitfire Mk.I
Starfighter and 2 others reacted to thierry laurent for a topic
Thanks guys! I'm probably nuts but I love doing that. Yesterday, I forgot publishing pictures of some other wing corrections. The MG chute holes edges must be refined but this is a quite classical work. However, what is not that common is the fact there is a noticeable gap between the ailerons and the wings and is even less common is the fact the gaps are not similar on both wings! So, I added plastic shims, sanded them, extended the panel lines and added rivets. The goal is to fill most of the gap. Only a hair thick one should stay. This is the lower wing: And here's the other wing: And here you have the upper sides: Here you can see that I also added the aileron hinges covers. I had to re-do it several times because those damned tiny parts always disappeared. This was linked to the fact the wing trailing edge is VERY thin. So, Finally I used CA glue and sanded them in situ. At last, this worked! Another quite inconsistent feature is the fact that if some trailing edge areas are very thin others are too thick. So, this also asked for a little bit of work: The shapes of the ailerons arms/hinges was also modified. Otherwise the ailerons could not be correctly positionned.3 points -
The 35+ year journey ended tonight. The Pitts is done. I've posted a completed photo series in "Ready for Inspection" along with brief history of N66Y and my own quest to build this kit.3 points
-

Trumpeter P-40E Now Out. . .
Reuben L. Hernandez and 2 others reacted to Darren Howie for a topic
look mate 5% of modellers make 97% of the noise about kit accuracy. Look at some photos if you cant see issues build the Trump kit. If you can save up some cash for a Hasegawa or ex Eduard N and build that. However if you saw issues with the Trump kit you will probably see the issues with the Hasegawa kit which are smaller but still visible, well unless your a Trumpeter hater. Then even an old poorly moulded over riveted frog kit is a vocal better choice. Pay your money and take your choice but when your showing off your kits i can guarantee you 99.8% of people couldnt tell if it was an N, a E a P-39 or a Mustang.3 points -

My first double build - Calling them DONE - Pic’s in RFI
Squizzy 78 and 2 others reacted to Stokey Pete for a topic
Minor progress being made. Glossed, washed, and a few decals started, after spending countless hours masking up the individual colours to sharpen the lines and cover up over sprays. I must have gone through 3 rolls of tape to get a result I’m happy with. ‘Zeus’ is still waiting for his touch ups at the moment. My mind has kind of switched from double build to ‘finish the paint job on this one first’.3 points -

1/72 Rockwell B-1B Lancer ("BONE") bomber
Zippo The Zipdrive and 2 others reacted to checksix for a topic
Completed All done. The base of the display stand was cut from poplar. The vertical portion is a temporary mdf template that will be replaced with clear acrylic. With clear acrylic display stand, cut from 3/8" sheet:3 points -
I would like to show you the model of the jet that I love. A-6E Intruder from Trumpeter 1:32 scale as always, a model made straight out of the box. Therefore, some of the decals don't match the original. The Trumpeter A-6 model is one of the best models of this company in the 1:32 scale. Unfortunately, model it's quite complicated and demanding to build. However, this is one of those jets that you must have on your shelf. 1: 1 I 1:322 points
-

MIG 3 TRUMPETER
MH Design Scale Models and one other reacted to red baron for a topic
the last kit out of the workshop, I started it yesterday:2 points -

75 Sqn RNZAF Mosquito Detailed Build
Chris Wimmer and one other reacted to Anthony in NZ for a topic
Ok the nose gun bay is pretty much finished. I re-did the screw attachments for the screws around the edge of the allu cap (these screw the cap to the wooden structure and frame inside the edge of the nose) as I felt they were too big the first time I did them, si I filled them with CA and redid them a better size and the correct number. In reality there are more flush head rivets....but lets be honest, they are barely seen looking even in real life so I decided not to add them all for fear it will start looking like it had once been used as a pin cushion. Balance is the key me thinks. All of Roberts gun bay is now in and I just have one or 2 tiny additions to add once Air freight is opened up to NZ again. HGW are kindly sending me the numbers 1 & 4 which I messed up and I am waiting on suitable tiny chains to arrive to complete the suite. But its pretty much finished until I can sort these items. All the wiring for the lamp, terminal blocks and suppresser box were scratchbuilt and wired in G45 camera fitted along with ammo feed chutes etc. A couple of pneumatic lines for the firing solenoids need adding, but waiting for suitable chain until I pop these last couple in. Wolf, notice the 2 wing heads are lock wired together. Looking at photo's though they were done on some airframes and not others...so take your pick. Anyway, hope this is interesting to those interested in the Mosquito Cheers Anthony2 points -

Make the others jealous
Anthony in NZ and one other reacted to Jack for a topic
oeoeoeoeh......NICE.....!!!2 points -

Trumpeter 1:16 Jagdtiger
mustang1989 and one other reacted to RLWP for a topic
One more diversion: Worst of both worlds, wheels AND tracks http://www.douglas-self.com/MUSEUM/TRANSPORT/nwheelcar/nwheelcar.htm#4 Richard2 points -

Hong Kong Models B-25 Glass Nose.
Juggernut and one other reacted to ade rowlands for a topic
Yes, they will be included. I hate making them but like the look. It’s a ‘worth the effort and swearing in the end’ deal.2 points -
hello all, No up-date , being in the process off painting the little beast, she also had some minnor damage, when she was attacked by my cat, a real hellcat, damaged by friendly fire, **** happens. Rammstein2 points
-

The antique BoB Revell Spitfire Mk.I
thierry laurent and one other reacted to Troy Molitor for a topic
Unbelievable. The Gustav wheel bulges on an early Mk-Spit. I love it!2 points -
Here ya go after a 10 second Google search... The Trumpeter P-40E kit's canopy parts directly from the Trumpeter website: Note that the cross section is curved all the way over the bows from one side to the other, and results in a bloated shape that is wide on top. That translates all the way down the spine, is right on top, and VERY obvious on a built model. Google "Trumpeter P-40F" (same canopy parts as their E), look at some built models, and you should be able to see it clearly. This is the real thing: Note that the sides of the bows are flat with only a narrow curve over the top. Hey, if you can't see it and therefore find the Trumpeter kit acceptable, by all means build it and enjoy it. Just keep in mind that the Hasegawa P-40E kits actually LOOK like P-40Es, and are sold in the same price range as Trumpeter's balloon toys. As for online reviews, there aren't any, yet. Might never be, either, because it might not be worth reviewing. HTH, D2 points
-
aeroscale.kitmaker.net - Second Kaydet Release Planned Juraj2 points
-
HH-60G Pavehawk Kitty Hawk 1/35 DONE!!
Martinnfb and one other reacted to Pete Fleischmann for a topic
Pressing on! having good luck so far. I measure each run with the dividers, then transfer that measurement to the decal. I trim the decals pretty tight. Solvaset has all but eliminated the carrier film. I avoid the temptation to do one long continuous run- it is much easier to keep every rivet line straight if you butt shorter lengths. cheers Pete2 points -
Two cockpit photos of a real He-162: And the R4M missle rack of a Me-262: I guess the screw terminals are modern ones But I like that the wiring is shown. The 262 is a mock-up using orignal parts. Fuselage front and some UC parts are original. This is also the only 262 where you are allowed to stick your head into the UC bays. Normally are these kind of exhibits strictly fenced in like this one in Prague (yes, this is a real one): Regards - dutik2 points
-
Thanks guys. Some more work. I have painted the model now. I used Alclad pale burnt metal for the gold, and a significantly lightened mix of Gunze light blue. The cooling panels were painted with polished brass and the floats with a couple of different shades of Alclad Aluminium. Still a bit of work to do chasing around some areas of overspray, but fairly happy with how it is turning out.2 points
-
And for that, I am eternally grateful. I served from 85-94, and quite a few of my senior NCOs and officers had served in Vietnam. When we returned from Desert Storm the reception was overwhelming to many of us. By then I had been on quite a few deployments and never had more than some family or friends at Pope AFB waiting. This time it seemed the entire state was there! The most touching thing, to me, was to see my brigade commander, a Colonel who served 3 tours in Vietnam, tear up as our Sergeant Major said "it's been a long time coming, but welcome home sir."2 points
-
1/32 Hasegawa N1K2-J Shiden Kai 343-45
Paul in Napier and one other reacted to Thunnus for a topic
Thanks for checking in! I spent the day wiping off my first paint job on those landing gear legs. Didn't like a number of things so I decided to wipe the paint off, clean up the legs a little more and try again. After that, I start putting together the kit cockpit to see how she looks. It's pretty complete but I have the Brengun photoetch that proposes to replace a lot of this stuff. I haven't put everything into place but the major components have been tacked into position either by friction or Blue Tack. When the other sidewall is put into place, you get the sobering reality of a very limited view into that spacious cockpit. I'll have to think about the Brengun photoetch and any other additions that I had in the back of my mind like more wiring.2 points -

A-6A Intruder
Daniel Leduc and one other reacted to Dukie99 for a topic
Thank you Karl for the link. The least I can say is that is quite a complex modification that you have done and you pulled it off beautifully. I don't think I will attempt it but the one thing that bothers me is that the IP appears to be at a right angle with the cockpit tube where in reality it is a bit angled. It will try to change the angle of the IP without making too much of a mess. Progress has been slow because working remotely and helping my kids with their remote school means that modelling becomes more and more remote... I was able to work on the intake. A bit nerve racking to cut into this expensive kit but all went well. Hopefully more progess soon. Cheers, David2 points -

Scratch building a landing ship medium in scale 1/35
Starfighter and one other reacted to rammstein for a topic
hello all, brackets placed on the starboard side, also placed (temporarely) some cables. door is temporarely in place with some wooden clothes pegs, I have to prime and paint the doors first, then tightening the cables. enjoy, Rammstein2 points -
Aftermarket parts Here are the Barracuda Studios canopy masks and resin parts I'll be using: These parts of the model will be replaced:2 points


.thumb.jpg.cd22b958c9e88a898a21e18b862c523e.jpg)