Leaderboard


Popular Content
Showing content with the highest reputation on 05/11/2020 in all areas
-
I've decided to group the prop into some sub-assemblies. The prop blades have been glued into the individual blade mounts. The cannon mounting plate has been glued onto the prop hub, trapping the brass prop axle within. I've scanned the Eagle Cal Ta152H decal sheet and have prepared four spiral masks. The first two were used just to work out how the mask best fit onto the unpainted spinner. When I thought I had that figured out, I painted the spinner white and applied the mask. It didn't go on as easily as I expected until I figured out to take advantage of the flex of the Oramask 810 material to pull the mask into the correct position. The black (Tamiya Black thinned with Mr Leveling Thinner) gave me a funky reaction that I had not seen before. The paint seemed to pool on the areas where the mask had been... some unseen leftover adhesive? So that effort was scrubbed off using iso alcohol. The second time around worked very nicely and I got a clean spiral right off the bat. In the meantime, the prop blades were being painted. I used a sandy brown as a base coat since the Ta152H had a wooden prop. Hairspray was used to do a little bit of chipping on the blades. The painted blades were given a couple of layers of salt fading to roughen them up a little. I still need to weather the spinner but prop painting is essentially finished.20 points
-

CVE-73 USS Gambier Bay, Hasegawa 1/350
easixpedro and 9 others reacted to BradG for a topic
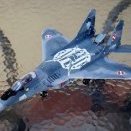
I finally managed to finish this kit a couple of years after starting it. It's a complex model with many small parts, however, the fit of the parts is exceptional. I used lifecolor USN paint sets number 1 and 2, which go down very nicely with airbrush or standard brush. I decided not to use the deck decals, so the guide marks and the '73' at each end were painted on with masks I made myself, although if you want to, there is a commercially available masking set for the deck. I burned through a lot of Tamiya tape and I think my eyes still hurt from all the painting! Weathering was done with dry pigment and washes, cos I like a dirty ship. Gambier Bay was the only US aircraft carrier sunk by surface naval gunfire in the Pacific. As a part of task force 77.4.3, she was caught by Admiral Kurita's Battleship and Cruiser force during the Battle of Leyte Gulf in October 1944. It's reported she took hits from the Battleship Yamato, Battleship Kongo and Heavy cruiser Chikuma along with several other warships before sinking.10 points -

Cold War FrankenMiG-27
Derek B and 9 others reacted to thierry laurent for a topic
And now here is the solution, put the crown part on the engine end supports (the picture is showing a dry assembly), add it in the LEM tube and put over that the Aires cylinder with the cut end. This looks fully acceptable to me. Note that the crown parts are too far into the LEM tube. I will need to put them closer to the Aires cylinder. However, the dry assembly picture gives a good idea of how should like the final result. One side-benefit of the use of the underscaled Aires part is to insert it easily in the LEM fuselage end. The rear mechansim made of two parts (yet to add) close to the fuselage end will not be easily added but I think I've found another solution. But this will be for later as this exhaust problem sufficiently required head scratching time for that day! Cheers!10 points -

HH-60G Pavehawk Kitty Hawk 1/35 DONE!!
Starfighter and 9 others reacted to Pete Fleischmann for a topic
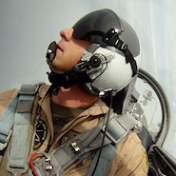
Hey all! big day today! Actually put glue on the pilots butts- Also put some pegs in the crewchief ‘s knees that fit into holes in the floor ...Remembering that this will be an inflight display, here’s where I’m going mit dat- cheers Pete10 points -
almost done. I need still to add some pigments and exhaust soot I have used neutral grey (MIG) and different tan shades (AMMO) for panle line wash finish with mixture of matt and semi matt MRP varnish wheels exhausts thanks for looking jan9 points
-
Please allow me to present to you my latest project and at the same time my first post on forum. This is my rendition of a Bf-109 G6, "Weisse 11" as stationed in France, 1944. I chose this scheme as I was a little intrigued by instructions from Trumpeter. Did a little research and found just a couple of photos for my subject that looked not as the manufacturer provided, so after some more digging I was confident that I could do a close representation of it. So, here it is, built OOB. I hope you will enjoy it as much as I enjoy looking on this forum for some beautiful models and inspiration. Cheers from Romania! Alex8 points
-
muzzle )))8 points
-
Cold War FrankenMiG-27
Derek B and 7 others reacted to thierry laurent for a topic
And while we are in a zen mood, this is the correct time for more origami... The crown parts are very thin and cutting them out of the resin gates should be done very cautiously. Then they must be added on a photoetched frame to be folded beforehand. My advice: take a lot of time before starting that as this is very tricky and believe me, this is an understatement. When done, this is a marvel of fine details but to get that reward needs a lot of patience. Now, I can re-start breathing!8 points -
OK, back on the job! I decided to have a look at the radar bullet assembly. The original kit owner had made up the bullet, but a "housing body" was included in the Aires undercarriage set since the nose wheel retracts into the lower portion, but it did not include of course the pointed shock cone. I wanted to use the Aires piece if possible because the nose wheel well has some good detail in there: Question was, how feasible was it to combine the two? The nose area on the kit is really quite complicated, comprising the intake trunking, the fuselage sides/nose with its cut out for the wheel well, the radar bullet and the intake ring. All need to align accurately and precisely. The 1/32 scale drawings that come with the kit are an enormous help, so checking as carefully as I could I cut off the shock cone from the Echelon kit and mated it to the Aires part - it fitted remarkably well dimensionally so I hope that means I've got it right. I know that I'm going to have to adapt the fitting of the intake ring, Iain has kindly sent me a couple of resin ones that he made, so there's room for error and bodging yet!7 points
-

Unique opportunity 1/32 Andover C1
scvrobeson and 6 others reacted to Iain for a topic
Well, as of 50 minutes ago, it's arrived at my local Royal Mail depot - only 5 miles away. There's a Customs/RM fee to pay (less than budgeted) - now paid - so down for delivery on Wednesday... #frustrating Iain7 points -
primer ...and masks7 points
-

Tamiya 1/48 F4U-1A ..........blimey finished one.
Rockie Yarwood and 5 others reacted to gunpowder for a topic
This lockdown situation gave me a little more time to do some modelling. I have given up on 1/32 and 1/24 i think. I keep buying them , then loads of aftermarket , starting them , getting bored with them and selling them on. Time for a change. I want to build good quality models , that actually fit on a shelf. I will not be using aftermarket if i can help it. I have been getting more into the Pacific Theatre and so have decided to go with planes from that. I will be sticking to Accurate miniatures or italeri , Tamiya and Hasegawa. I really dont have the patience for poor fitting kits anymore. This kit has really bought the fun back into modelling. Beautifully detailed and easy to build. I have a great time just building from the box. The problem is i think i need the rest of the F4U line now! Apologies for pics i took them on my Iphone6 points -

F 116 what if
Loach Driver and 5 others reacted to red baron for a topic
F 100 +F 16 = a relaxing montage without taking yourself seriously :6 points -
First parts that needs to be scratchbuild are the front undercarriage doors because are really different compared to the one used on the 23MF. On the 23BN they have two prominent bulges to accommodate the wheels. Just for curiosity, inside the front fuselage parts HpH wrote the ID number of the resin cast... I think because mixing left and right parts of different conversion set doesn't match... mine is the 08. Next step is to scratchbuild another parts that identify the 23BN: the Delta-N pod under the starboard wing glove. It's made using the front section of a Sparrow missile... Inside the lower section of the wings glove I removed the stubs around the wing rotation pin. Doing this the two wings glove sections will be much tighter at the wings leaving almost no gap. Fitting the resin main undercarriage bays inside the central fuselage section is not a problem. Be careful that I choose to not install the engine parts inside the fuselage... because I will put FOD covers at the jet intakes and at the rear exhaust. I have read about a lot of fitting problem putting the engine inside and to match the various fuselage parts. ...6 points
-

HPH FW 189 Eagle Owl.
Shiba and 5 others reacted to Phartycr0c for a topic
Progress on this build is still crawling along. I have started a second build of a Hobby Boss Fiesler Storch to occupy the time during drying times for the epoxy . It helps.... The build has progressed unremarkably right up to the point of starting to attach the glazing parts which Is where I now find that the addage of dry fit dry fit dry fit comes into play. The geometry of the various parts are critical in this aircraft as are the compound curves transitioning into the flat underside panel of the rear glazing unit. Its an attractive aircraft but unless you get all of the test fitting absolutely precise then its a complete cow to put together. I dunno if im losing my dexterity but i had parts correct one side and not the other, and vice versa, In the end it came together of a fashion. The shape is all determined by the gun ring which might be a little undersized but i'm not sure. Grinning footballer included to distract from the arse end work going on. Forgot to mention, as you can see I have completed the flap structures in prep for the final construction process. I will clean them up and pop a wash over them to bring out the lovely details. Any Hoo! having beaten the back end into submission, ( with the exception of the final cleanup,) my attention turned to undercarriage components, which again are sublime with the exception of a slight short shot where the reinforcing rod has popped through the resin casting. No big issue but to try and cover it over would make the offending UC leg horribly thick in appearance so I'll leave as is and camouflage it best I can. Excuse the yellow hue to the photos, whit balance dont you know.... Then on to the next issue which certainly isnt of my making. The centre section of fuselage between the two sets of glazing is slightly out of profile, almost squat in its appearance and therefore not wide enough to span the fuselage gap. Reading Jan Gauber's build article, he encountered exactly the same problem which required the part to be built up using several shims to compensate for the difference in height between the front and rear glazing parts. The following photos hopefully illustrate the issue. You can see the gap between the edge of the upper fuse part and the fuselage sidewall, its meant to be flush. Shim and packing city beckons! Finally I would like your opinions on the below photograph. Taking into account the scheme I am looking to complete I have been experimenting with various methods to achieve the "squiggle" pattern. Airbrushing was NOT successful, the airbrush needs to be at 90 degrees to the subject at all times and there are far to many curves on this beast so I failed. The best I could come up with is an acrylic paint pen in pale green (rlm 76 ish). I had a squiggle session on the painted engine nacelles and while it looks a little bright I will tone it all down with a filter and wash. Its probably the best solution to my issues but I would like to know what you guys think.6 points -
Those people may think that their WNW kits are "rare" and an "investment", but they are wrong. Only MINE are rare and a good investment. All the other thousands of people who own WNW kits will lose money. Not me though. BTW, anyone want to buy a piece of the "true cross"? Only a few tens of thousands of people have such a piece. Radu5 points
-

Anybody else here building balsa and tissue airplanes?
Grant_T and 4 others reacted to alaninaustria for a topic
Cool, I’m building the Dumas Grumman Bearcat right now. Lovely build, takes me back to my youth! I’m really looking forward to flying it too! Cheers Alan ps: this is what got me interested again -5 points -
I haven't been motived to do any painting on the build, so I decided to work on the in-flight stand. It's been awhile since I've done any woodworking; it was enjoyable to generate some sawdust! The stand is made from 3/4" MDF, and I gave the base a 45 degree chamfer. And here's the build posed on the stand. I may shorten the acrylic rod a bit. The stand will be primed and painted gloss black. Thanks for looking in. Mike5 points
-

75 Sqn RNZAF Mosquito Detailed Build
Greg W and 4 others reacted to Anthony in NZ for a topic
Thanks for that, I might revisit it in the near future and see if I can do a better job...advice taken! In the meantime I have been getting all the gun bay main components sorted and hope to start painting some more of these bits. Once they are all set up I can then start making some terminal blocks and a supressor box so I can finish off all the wiring and plumbing, then some decals Thanks for looking in as always Cheers Anthony5 points -
Hello, here I am with my last project, a MiG-23BN attack-fighter of the Czech Air Force during the early 1990s. The following is what I need on kit and accessories in 1/32 to start: MiG-23MF Trumpeter kit HpH MiG-23BN resin conversion set Two Mikes resin cockpit set for MiG-23MF Eduard Colored PE interior set for MiG-23MF Eduard PE exterior ser for MiG-23MF Quickboost resin airscoops for MiG-23MF Quickboost resin ventral fin for MiG-23BN Quickboost resin FOD covers for MiG-23 Aires resin undercarriage bays for MiG-23 Master metal pitot tube for MiG-23 PM metal static electricity dischargers for MiG-23 It's a lot of stuff... and other parts I will have to build from scratch. Starting from the cockpit, as usual: the Two Mikes resin set is a direct replacement of the kit parts, so the only effort is to remove the casting resin parts to have a good fit with the fuselage parts and the resin front undercarriage bay. Another matter is for the front Instrument Panel: starting from the Eduard PE part I have to make a sandwich using bezels and switchs from various Reheat PE sheet. Here the result. For the Russian cockpit torquise color I'm using the AK Real Colors RC206 reference. It's perfect to match the Eduard pre-painted parts. It's my first time with the AK Real Colors and they are very good to be used with brush and also airbrush thinned with Tamiya acrylic thinner. All the details are brush panted with Vallejo and AK Colors. Spare instrument decals complete the job. Fitting the cockpit and the front undercarriage bay inside the front fuselage parts of the HpH set is not a problem, but I have to to a lot of dry-fitting of the HpH resin parts to match and align them. CA glue is a must here together with Tamiya epoxy putty. Some recessed panels has to be rescribed. ...4 points
-

SYLDAVIAN P.11C. The final cut!
Alain Gadbois and 3 others reacted to quang for a topic
Max’s fav4 points -

Best place to live in the UK
europapete and 3 others reacted to Kagemusha for a topic
Even this!?4 points -

F-104G DC+109 (JaboG 33 Büchel)
F-4Phanwell and 3 others reacted to Dutch Man for a topic
Decal sheet I will be using for the Hasegawa kit. Excellent material. I have some additional stencils on order and reference from Daco. This week another F-104G will land on my doorstep, Italeri kit this time. Good price for the kit, so... Next I will update with some progress pictures and livery I have in mind. Robert Jan4 points -
Cold War FrankenMiG-27
Derek B and 3 others reacted to thierry laurent for a topic
This gives a better view of the modification. This picture shows from left to right the too small exhaust tube, the section I removed with the small part I retrieved to correct the internal end and that corrected internal engine end:4 points -
Cold War FrankenMiG-27
Derek B and 3 others reacted to thierry laurent for a topic
First I had to solve the issue at the level of the turbine end. So, I saw the rear section of the Aires tube in which the turbine end is normally inserted and cut out of it a smaller one in which the turbine end must be positioned. I had to do it as there are two small parts that were glued to that section. Look at the picture hereunder and you will see that two protruding yellow-green colored sections to which angled tubes had to be glued. Now, look at the left one (close to the white spot). A section of close to 3mm had been added to its right. This is the diameter that was missing! I made it from the leftover section of the Aires end tube I cut. Jeez!!! I also glued the resin V-shaped parts intended to support the nozzle crown-shaped parts. This is a critical step as there is nothing to indicate you what should be the angle of the parts whereas there is no margin for error... Take a deep breath, cross your fingers and glue...4 points -
Wow... WNW gone....
Jan_G and 3 others reacted to The Phantom for a topic
I asked about orders and received this today: Hi, Thank you for your interest in placing an order with WingNut Wings. We just wanted to acknowledge receipt and confirm that we’ll be in touch when we’re in a position to resume sales. Best wishes, WingNut Wings4 points -
When and if I return the the UK, I imagine a gentle semi-retirement where I can potter around my garden, visit air museums, watch flying somewhere and volunteer at a museum where I can get my hands dirty. It's a dream, like the dream that I will clear my stash one day.4 points
-
evening folks a bit more done over the bank holiday... I started to work on the left hand side console as seen below - I don't have a drawing of this side so I made one from scaling multiple pictures, made tricky by the oblique nature of the photographs - note also the oval pressing shapes which would need reproducing... ..I made up a female shape as I did with the first side, but I couldn't get happy with the results - the metal curves into the hole rather than the sharp lines seen in the photo - I tried annealed (left) and non-annealed metal, but both were a fail.. so I used the drawing I made to generate it in 3D and will just add a metal side plate and fair in the join - here is the pre print image Tim sent me.. you can see the console on the left and the other bits are the artificial horizon as thats quite an iconic part (& cannot be done in etch) and the Ausgleichsgefäss that sits unfer the main panel in the one cockpit photo I have.. ..so while that gets printed I moved on to sorting the fuselage around the cockpit.. ..I scaled the Bentley drawings and marked the key lines of the rear bulkhead & floor.. ..then I cut out the sides and added scaled templates again from drawings to make sure the bulkhead shapes were correct - they were out quite a lot - the rear especially was flat sided and too narrow compared to the template so the first round of P38 filler was added to start to bulk it out.. ..once that was done, the canopy area was checked, again this was a bit out with the angle being wrong (too tall at the back), too low, and the 'footprint' shape being too fat at the rear - I started by correcting the angle to the right one.. ..then a scaled template added to make up the height and give the correct shape - I added a brass sheet tip so I didn't sand away the right shape... ..another set of templates added and the whole lot filled with P38... ..and after shaping & priming, I know this bit is right... ..also made double sure the front was right.. ..I also added the nose bit (not the cowl) and tried to replicate the unique top cowling area the V18 had - it is not the same as any A or D model so all I can do is work from photo's - it's not finished, but it's closer than it was.. ..I now had made enough changes to start to set out where things go by using the drawings to give me a scale skeleton of major reference points.. ..I will start with the sidewalls, so I cut some litho sheet that overlaps slightly front and back and made a jig for the sheet to sit in - this is both sides, on the right is the carrier, a sheet that the actual sidewall will sit in that matches all the cross section drawings and on the left a sidewall is sat on it's carrier with the areas that will overlap the fusealge taped up so I know the boundaries of the space to work in.. ..it's this sort of principle - I can keep taking the sidewalls out of the jig to align with parts etc and build up the detail until at some point they get mounted - I can then just skin over them.. TTFN Peter4 points
-
Onto the engine, which is engineered very well. Everything fit as it should. A little trick I learned doing paste-up when I was a graphic artist. Bestine for cleaning plastic. Drop the parts in a jar, swirl it around and done. I painted the cylinders AK Xtreme Metal aluminum and did a wash with AK Engine and Turbine wash. Next time I’ll use their White Aluminum, this looks a bit too shiny. Exhaust is painted with AK Xtreme Metal Burnt Metal. Also randomly painted some rust color. It’ll do especially because you can’t see any of the exhaust once the engine is installed. Firewall, engine mount and more stuff you can’t see, but I need more paint time. Primed with black and randomly painted over with zinc chromate. Doesn’t really look that yellow. Engine assembly complete. I actually managed to drill out the ignition harness and wire with .015” lead wire without messing it up, something I could have never done before my cataract surgery. If you’re contemplating having cataract surgery done…. Just do it! It’s life changing. Not having learned my lesson regarding PE I decided to add some details to the guns. The problem I always have with PE is that it often covers places where other things go. In this case, the armor shields had to be modified to fit. You also have to remove the breech ch arging handles and re-attach them to the PE. Nerve wracking for me anyway. Also added Master brass barrels which by some miracle came out straight and plumb. After I put it all together I have some touchup to do. Guns painted dark neutral gray with old school graphite shine. Wish I had paid closer attention to the gun barrels, my OCD tells me that the cooling holes should both be on the top. Next time. That’s all for now. Next installment will be the gun mount and rear cockpit details. Thanks for looking. Comments and constructive critique is always welcome.4 points
-
A lot of time passed since my last post here, I promise I'll try to be more active. Since my MiG-23, I finished 4 birds, I'll present one of them here, next will post in a few days. My Nighthawk was made almost Out of the box, I've changed only wheels for Eduard ones. Base was inspired by last flight box by Academy. Biggest problem was with exhaust painting, I did some research, but it is so hard to find a decent photos, so it is my vision of exhaust. Watch and comment - and please, be gentle. . . . . . . . . . . . . . . . . .3 points
-
SYLDAVIAN P.11C. The final cut!
thierry laurent and 2 others reacted to quang for a topic
Stephen Spielberg tried to make a Tintin film version in 2011 but failed miserably to convince Tintin fans as you can read HERE. In the 1960s, Hergé created a series of 60 chromoprints dedicated to aviation. Click HERE to see the entire series. An example of Hergé’s clean and exacting style. Note the details on Tintin’s RAF flight gear.3 points -

Anybody else here building balsa and tissue airplanes?
D Bellis and 2 others reacted to Troy Molitor for a topic
Before I left Singapore last December, I had two A321 transfers going on at Seletar airport. Just outside our office space there was a round blacktop area where the mechanics had a U-control flying area area they flew their aircraft all the time. I was amazed at how many young people were involved in this activity. Both female and male youth. Some of the older team would actually stand behind the younger fliers and coach them. The majority of times I would I come to work or would leave at the end of the day, there would be people flying U -control a/c. I thought it was a great activity to witness. Drifting back to Alan’s original topic. I was amazed at how long the aircraft actually flew at the end of that video. I had no idea they flew that long on rubber band power. Thanks for sharing that with us Alan. Troy3 points -
HH-60G Pavehawk Kitty Hawk 1/35 DONE!!
D.B. Andrus and 2 others reacted to Timmy! for a topic
You know I got glue on my butt once... I was ass-fix-iated. Tip your waitress!3 points -

Abandoned Soviet T-62 in Afghanistan
Christoffer Lindelav and 2 others reacted to ShelbyGT500 for a topic
Hi guys, I'm glad you like it so far :) Now - start with painting the interior - brown primer, hair-spray, base off-white color, chip the paint and weatherin with oil paints, a lot of dir, isn't it ;) Also start work of the base: That is for today :) Cheers friends.3 points -
Cold War FrankenMiG-27
johncrow and 2 others reacted to thierry laurent for a topic
Thanks Karl. I knew I had already seen that part somewhere...!3 points -

Anybody else here building balsa and tissue airplanes?
D.B. Andrus and 2 others reacted to mozart for a topic
I have happy memories of my father building tissue and balsa models when I was a child, we’re talking 1953/54 here! He was meticulous and his gliders were particularly successful. A smell that transports me instantly back 65+ years is (I think) nail varnish remover (used by my wife of course!) which smells like the “dope” used to tighten the tissue. Marvellous.3 points -
Cold War FrankenMiG-27
Derek B and 2 others reacted to thierry laurent for a topic
Ok, I'm back on track. I forgot taking pictures of the Reskit bomb ejector racks but have other things to show in the meanwhile: the engine exhaust. The LEM parts are barely acceptable and totally miss the movable section of the exhaust. You have the part showed here and a tube going up to the end without afterburner. This is better than nothing but does not look like the correct Tumansky turbine end... Fortunately, I have the Aires one and if you you just remove the nozzle, you have the correct parts! However, my set had a major problem: the exhaust tube was clearly too small! There is no way to put the rear engine parts inside! It is exquisitely molded but it looks the silicone mold retracted too much before the casting of that part... Damn it! I must be quite unlucky as I know at least four modellers who used that resin engine without problem! Rather than cry on my chair and wait weeks for a replacement part, I found a solution. In any case, the rear of the engine will not be that visible. I just had to find a way to insert the engine rear section crown parts. After thirty minutes of assesment, I had a plan!3 points -

Anybody else here building balsa and tissue airplanes?
D.B. Andrus and 2 others reacted to petrov27 for a topic
Ha well as a kid I did - I think the Guilows kits? I had terrible luck trying to fly them though. I still remember spending a couple weeks on a biplane (maybe a nieuport?) and it really turned out great. I think the first time I tried flying it, it nosed over and smashed into a zillion pieces. Probably the 10 coats of gloss testors enamel from a spray can might have had a negative effect on the flying qualities lol....3 points -
Belated 1/32 Trumpter Harrier GR7
Orfordness and 2 others reacted to Phartycr0c for a topic
I too had this kit and conversion set. Piero did a great job in kicking this kit into shape and it looks like your following suit. Here's my build.3 points -

Italeri TF-104G Marineflieger - final struggle
F`s are my favs and 2 others reacted to Lee White for a topic
To paraphrase the old Crazy Eddie commercial, "(That detailing) is INSANE!!!!".3 points -
Hello, my last model aircraft in 1:32 scale Ki-44-II HEI Shoki (Tojo), kit Hasegawa ST30 and P-38 J Lightning, old kit Revell 04741. Thanks for watching.3 points
-

1/32 Lockheed U-2A?
thierry laurent and 2 others reacted to Jack for a topic
thickness is indeed the issue with this kit, at least the combat one, i had it, but after trying several methods of reinforcing by using bulkheads, foam, balsa core, what have you, it didn't do shape justice, so i just binned it..... Never had the opportunity to get the ID version though. But as a sidestep i'm still working on the ID RB57F (thanks to Iain), it has the thicker plastic but this kit is a whole different kind of ballgame due to its size......3 points -

Italeri TF-104G Marineflieger - final struggle
F`s are my favs and 2 others reacted to Fanes for a topic
Electronic and computer bays - the madness continues I have no idea why I started detailing the electronic bay - maybe because Italeri's attempt was so poor. Here's the result after hours of wiring to the kit part on the left and the original. The cover on the left will get a PE cover (coverception?) from eduard, so there's no need to clean it up. Work on the inside of the bay door has started (removing pin marks). Unfortunately there is no piano hinge on the kit part. I'll crawl through my spare parts box. I have an itch that there might be a PE hinge from an armour build years ago.. Until then I went over to the computer bay aft of the cockpit. I removed all detail from the boxes to prepare for the eduard PE. I did a quick colour check and as I feared the printed colours are a litle of. The greenish tone doesn't match YZC (Tamiya XF-4) and interior green GZC (Mr. Color). Since it should be YZC I'll have to repaint the PE and somehow mask the placards (FUN!!!). The computer boxes should be dark gull grey (FS326231), somehow eduard matched them perfectly to FS36230. Lucky me that I have a jar of that colour from Gunze in my stash. You may ask: can he go futher with his craziness? - yes, I can! If you look closely, you may notice the holes I drilled into the PE parts to acommodate the wiring. i may have snapped on, two, or three 0.25mm drill bits Onto the next part - the front hatch. I made a start in detailing the inside, added copper wire for the cables and made an attempt for the spindle thingy up top (brass tube and steel wire) The inside of the rear hatch is a story for another day. A little teaser: rivets, missing boxes and an ID light3 points -
Thanks guys! One of the tougher builds I've encountered but I'm definitely over the hump and it should be more of a downhill glide rather than the uphill slog I've had to deal with. Alan...like most of my large scale builds, this one is for a commission. I just don't have the desire (or room) to store my completed models. I've got a coat of primer on her. Very light and uneven... just wanted to get a look at the all of the surface fixes, panel lines and rivets and make any last minute repairs before I start painting. One area needs some attention...3 points
-

World Of Warships Tier 7 Richelieu in Type 3 camo
private_hell and 2 others reacted to The Madhatter for a topic
Hi guys As some of you know, I am a massive WOW fan, and I had built a 1/570 Scharnhorst for my friend who is also an avid player. I had a blast making it, so decided that I'd build a ship for myself. I bought the Flyhawk Konigsberg as well as this, the Trumpeter 1/700 Richelieu. In the game (XB-1 / PS-4) this is the top tier French Battleship (alongside the Jean Bart) and I love it. It's fast and maneuverable for a battleship and it just has that French beauty to it with its raked funnel and those awesome secondary batteries on the rear end. I used the Flyhawk PE set and the Artwox Wooden deck set. I think PE is wasted on me really. I'm not that good with it, which some of you may find surprising given the small nature of my other stuff, but PE is a very different animal to styrene. At any rate, it looks like the ship from the game, so that's all that really matters to me there The stand was just an exercise on rusting effects. I cut notes out of the top bits to try and make them look like hard rubber. Suppose I'd better go back to the SD but I am going to finish off the Konigsberg first. Besides, I don't have enough bench space with me working from home now. My work stuff takes up the rest of the space Anyways, thanks for stopping in and having a look Si3 points -
Just need a thin brush, patience and good eyesight. And yet, the base of LG is painted with Mr. Color, and for the brush - enamel. If there are a lot of details in a wheel bay, then it is easier to paint them separately. Like in this case.3 points
-
Brilliant masking! Just a question- were the blades entirely wood with no leading edge sheathing? les2 points
-
Everything is produced in limited numbers. Everything is finite. WNW produced thousands of units of each kit. They may have been produced in a limited number (like any other kit) but that does not make them rare. The crazy prices? It is a bubble inflated by the perfect ratio of speculation and gullibility. Like all bubbles it will burst. How much are your Beanie Babies worth now? Radu2 points
-
I have (had) my moments!2 points
-
Painted wheel bays and assembled a model.2 points