Leaderboard

Popular Content
Showing content with the highest reputation on 03/26/2020 in all areas
-

KH T-6/Harvard Kicked Up A Notch: Apr 14/20: Finished!
Fooesboy and 22 others reacted to chuck540z3 for a topic
March 25/20 I hope this update finds you well. Thank goodness we have our hobby to keep us from going nuts while being stuck indoors. Two more months of this and we might have record for completed models! I’ve got this bird painted now, but before I show that, I was checking to see if the interior of the engine cowling could be seen from the front with the engine installed. The answer is “very little”, but that’s also a little problem, because the interior is full of pin marks and 4 large tabs that hold the cowling together. If you peek inside and hunt around you can find them, so that's good enough for me to eliminate them as much as possible. Sanding off the tabs and filling the sinkholes is hard to do on the thin plastic without damaging it, so I set out to achieve a “good enough” job which also included the Eduard brass PE detail, just in case you can see it too. After paint. I found the inside cowling color to be all over the map from Aluminum to Interior Green, so I picked Aluminum to highlight the added detail. You won't be able to see the slight yellow over spray at the front when the cowling is installed. For the yellow paint I used Tamiya TS-34 Camel Yellow decanted from a rattle can, which is almost the perfect color of most Canadian Harvard Trainers. Like most yellow paint, coverage over a darker base can be problematic, so I painted a white primer coat as shown earlier. Even with the white base, however, I needed at least 5-6 coats of paint to cover everything! Lots of paint fills lots of rivet and panel line detail, so I was quite worried that all this paint would ruin the fine detail that I created earlier. However, everything turned out pretty darn good in the end, as the paint dried and shrunk into this detail after 2-3 days of drying time. Whew! I now think this paint is made for mostly car models, where the focus is on a deep and shiny paint job. I had the same problem with coverage with Tamiya TS-8 Italian Red a few years ago on my P-38L, where I needed a similar number of coats to cover. Tamiya AS series of spray paints are made for aircraft and cover very well, but colors are limited, while the new line of lacquer paints in a bottle do not include Camel Yellow. In any case, the TS-34 still worked very well as shown below. I am also pleased to say that I think I nailed the look of the ribbing on the elevators and rudder, where the rivet detail underneath is still there, but subtle. For the black walkways, I went back to my go-to method of using textured paint out of a spray can, in this case Krylon Fushion “Textured Shimmer”, rather than Rustoleum textured paint. While effective, the Rustoleum paint comes out of the can a bit too rough for scale, so you need to sand it down later. The first step is to mask off the walkways and then COVER EVERYTHING with a kitchen garbage bag, to avoid over spray. What do I mean by over spray? THIS and it’s not for the faint of heart or without lots of practice. After vigorously shaking the can, you spray in sweeping strokes and never directly at the model, which is why it’s all over the place. The goals are even coverage and not too thick or thin. A closer look. Some of this spray is clear, hence the blotchy appearance. After drying for at least 15 minutes, I then sprayed a cover coat of flat black, then removed all masking tape within an hour of spraying. If you leave the masking tape on too long, it may become impossible to remove, because the paint is very hard when dry. With such a high color contrast, I also used the kitchen bag method for the gloss black on the top of the front fuselage area, which was airbrushed. You would think that this should be flat black as well to reduce glare in front of the windscreen, but all my references show that it’s glossy. Note the subtle but very real over spray, which would be nasty on yellow. The results. Note that I haven’t added any details like flaps, aileron control arms or antennae yet due to risk of breakage. The front engine cowling is only dry fit. The walkways turned out just like I hoped with no sanding required. They are slightly rough, but to scale rough, but are also tough to photograph in these high contrast conditions. I will add some pastels to them later to show minor wear at the end of the build, which will highlight them more. The gloss black turned out pretty good as well, which also helps to hide the crude fit of Part D5 to the front fuselage, which is the same demarcation line. Note the brass cowling fitting at the top I added earlier. Other side… And top view. Note that the angled front of the walkways are due to panel lines at the front I added earlier, which is why most walkways are painted this way. Another angle of the ribs on the elevators and rudder. And finally the bottom, where everything is yellow, including the wheel wells and rear flaps. Next up decals and other little bits. I will be using the kit decals that I understand are quite good, but you don’t have much time to move them around much. Thankfully with my second kit to replace the canopy parts, I have a second set of decals just in case I screw up one or six. Cheers, Chuck23 points -
The clear parts have been riveted, polished and then dipped in Future. Eduard masks were used on the clear parts, which were then glued onto the fuselage. The tail feathers have been glued into place as well. Looks like I'm almost at the painting stage. The question is... do I still want to do the all-RLM76 scheme?15 points
-
I've been working on the diorama setup and finding the figures I want to use for the different 'poses'. 13 resin figures in total. Aviattic's 'Richthofen', four personnel from Copper State Models, five from Model Cellar and three Black Dog. Some of the figures have been reworked to fit the different tasks they are doing. Richthofen, pilots and personnel getting ready for a mission... Two figures handling/lifting the 'half' Fokker. A figure fitted as driver in the Automobile. This is how I imagine this part of the diorama setup. Two figures readying a Fokker. Cheers: Kent10 points
-
www.facebook.com/DoraWings Ready: Decals by Cartograf: I hope they will be able to ship it soon. Juraj10 points
-

Tamiya 1/32 F4U-1A
aviators6 and 9 others reacted to Wolf Buddee for a topic
Hopefully this photo will show what I was trying to accomplish by adding those small photo etch pieces from Part. Cheers, Wolf10 points -

1/32nd scale Avro Shackleton - scratchbuild project
KiwiZac and 7 others reacted to tomprobert for a topic
Afternoon all It's been a while since I've done anything on this long-term build, but decided to get it back out for a bit of TLC and decided to jump straight back in and tackle something that I'd been needing to correct... When building the fuselage what seems like years ago I had somehow managed to make the extreme rear fuselage (where the rear observation glazing mates) completely the wrong shape. In my example, you can see I've made the fuselage sides curved, and the upper and lower fuselage too curved as well: IMG_1859 by Thomas Probert, on Flickr ...when compared to the real thing - taken at the Charlwood museum - which shows flat sides and top: Tail Glazing by Thomas Probert, on Flickr So, using some better plans as well as the good old Mk1 eyeball, I made a new shape for the rear fuselage: IMG_1861 by Thomas Probert, on Flickr ...which when offered up already improves the look: IMG_1860 by Thomas Probert, on Flickr The difference has now been built up with filler, and slowly a much better-shaped rear fuselage is beginning to emerge: IMG_1868 by Thomas Probert, on Flickr Still plenty of shaping and blending to do, but I'm much happier with this now. I've also began inserting the framing into the cockpit as these will be needed to support the glazing when the time comes: IMG_1867 by Thomas Probert, on Flickr I'm enjoying being back on this - let's see how long the motivation lasts! All the best, Tom8 points -

1/24 Airfix MkVb to LF MkIX
Loach Driver and 6 others reacted to red Dog for a topic
Final report of a completed long haul conversion from a 1/24 Airfix Spitfire MkVb to a late LF MkIX Started this one last July so about 8 months worth of bench time. This one really put my mojo to test and I'm glad it's over !! I guess I now understand why we don't see too many late Mk Spitfires in 1/24 but in the best tradition, I am now clearing Airfix (or anyone else) to release one ... Full WIP is in the in progress forum Thank you all LSpers for the support while building. I doubt this would have been completed without the forum7 points -
This is looking soo cool - will be an impressive piece in 1:32 Anthony! What a wonderful canvas this is going to be! Iain7 points
-

First project on here (Kinetic 1/32 F/A-18C)
Paul in Napier and 6 others reacted to Crew Dog for a topic
As promised/requested, here are some pics of the front office. It's currently all sealed up in the front fuselage, and I used Aires late cockpit and gear bays. I'm throwing a lot of AM at her, because while all reviews I've read on this model say it's one of the best 1/32 out there, I want this one to be the best one I've ever done. AM list includes: Aires pit, gear bays and closed nozzles; True Details wheel and tire assemblies; DMold seamless intakes and corrected spine; Eduard GBU-12; CAM AGM-65 (unless North Star restocks); Zactoman's AIM-9M; and videoaviation GBU-38's. I'm planning on doing a "double ugly" configuration, as that would've been the most common loadout for the timeframe I'm trying to model. Anyway, enjoy the pics and thanks for stopping by the hangar!7 points -
I should have punctuated C.O.W - but where's the fun in that? Tail skid: That horizontal bar was apparently a sort of brake, it was operated by a cable attached to the front end leading up into the cockpit Richard6 points
-
Tamiya 1/32 F4U-1A
Fanes and 5 others reacted to Wolf Buddee for a topic
Well.....the world is a rapidly changing place and as a result I'm self isolating as well as laid off from my place of employment I was at for just over 30 years. Hopefully it's temporary. As s result the extra time I now have has brought me back to my Corsair build. I'm learning to use our new computer at home plus re-acquainting myself with the joy of using Photobucket. I'm a little slow on the uptake and as a result my photos may not be the best but it's a start. I'll try and take some better ones later now that I have an idea (somewhat) of what I'm doing. Cheers, Wolf6 points -

1/32 Tamiya F4U-1 Corsair "Birdcage" - Reluctant Dragon - VMF-213
Loach Driver and 5 others reacted to Brett M for a topic
6 points -
I saw that too - was going to ping you guys as I had exactly the same thought! Group is "Airliner hobby model world" https://www.facebook.com/groups/471475156211444/permalink/4304929599532628/ Iain5 points
-

F-117A • Nighthawk
johncrow and 4 others reacted to F`s are my favs for a topic
10x Kahuna, the Future or the substitute that I have (Revell Contacta Clear and a couple of gloss acryllic lacquers) could very easily make a mess. The goal is to keep the mesh screen as "pristine" as possible because the transaprent acryic pieces underneath offer a very nice shine through the holes. It would be more than enough to secure the PE screens only along the edges and from the wider middle strut. The thing is that I'm really concerned about the outcome but if anything goes wrong - the original plastic parts will be used of course which mesh patterns are also quite good indeed. So, here are the painted PE screens and one sitting flush over the acrylic part with the nice shines at a certain angle: The intake trunks and the engine faces are also painted. I was also curious about the color... believe me, I checked all my reff. pics and a couple of magazines, and I can't find a picture of the intakes. I was very curious of whether they are painted black because of stealth, some bare metallic finish or white gloss because it's typical for the US jets. Nevertheless, there are many pics that show a distant view at the engine faces through the relief doors, and they can't be seen because everything is black... without a doubt this could be achieved with flat black on the intakes. And perhaps the intake faces could only be partially/barely seen if lit with a torch through the doors for example. So that's why I painted the itnakes black. The compressor parts of the engines will of course be covered from the inner sides.5 points -
Thanks all for the comments. I've decided to make this an in-flight build since I'm running out room in my display case. With an in-flight build I can utilize the upper portion of each shelve space. I'll be using a 5/16" acrylic rod to support the build, and two sections of 7/16" styrene tubing will hold the acrylic rod in the engine. I drilled a 5/16" hole in the flame holder and glued the first section of tubing to it. To hold and center the second section of tubing, I added small pieces of styrene strips within the enigine. The rod goes the entire length of the engine, so it should be strong enough to hold the build. Fingers crossed! I'll take a heat gun and bend the rod to the shape needed for the in-flight display. I'll use some MDF for the base. Now that this is done, I can start working on the cockpit. Thanks for looking in. Mike5 points
-
Final pics of the crew area before I put the fuselage halves together.5 points
-
hey everyone got this the first day they came up on Sprue Brothers. Since most everything is shut down I dug out one of my F-4EJ kits. If I pull this off might have to wear to look at it. I did get pick up Mr. Color 124 Dark Green and Mr. Color 308 Gray for exterior colors. Dan5 points
-
1/32 Tamiya F4U-1 Corsair "Birdcage" - Reluctant Dragon - VMF-213
Loach Driver and 3 others reacted to Brett M for a topic
Here is my finished 1/32 Tamiya F4U-1 Corsair "Birdcage" as "Relucant Dragon". Beautiful kit and a joy to behold when complete with all of the detail that Tamiya sticks in it. Of course, I added more! I wasn't able to find any images of the actual aircraft, instead only finding artist interpretations of what it could have looked like. This plane was flown by 1st LT Alonzo Treffer of VMF-213, based in Guadalcanal from what I can find. https://www.aviationillustration.com/hikashop-menu-for-categories-listing/product/7467-13-f4u-1-corsair-buno-17675-no-1-reluctant-dragon-flown-by-1-lt-alonzo-b-treffer https://vmf-213.com/ The men of VMF-213 1. Vector resin cowling 2. Barracuda resin wheels and tires 3. HGW Fabric and photoetch harness 4. Barracuda cockpit stencils 5. Montex Masks and decals 7. HGW Wet Transfer Stencils Paints are a mix of MRP and AK Real Colors, with Tamiya Acrylics thrown in here and there. The build can be found here: The wings are permanently attached, which may prove troublesome later for space and transport. I also wish I had used the closed canopy spine pieces so I could have the canopy closed to prevent dust. 20/20 hindsight!4 points -
Hi all, Encouraged by the relative success of my ongoing Bf-109, and with it drawing close to being finished, I wanted to make the most of my current enthusiasm and not lose momentum. I've had a Hasegawa P-40E in the stash for ages, but the schemes provided did little to inspire me to actually build it. By chance, I came across a lone example that the Finnish air force "obtained" in 1944. A bit of Googling later, and I found out that suitable decals were available from SBS Models. The base kit and decals are as follows: These Hasegawa multi part fuselages are a bit of a faff to assemble and make good the resulting join. Work started in the cockpit, colour is speculative (essentially RLM02!) but I like to paint the cockpit lighter where possible, because the colour always darkens with weathering, and once the fuselage is assembled. Belts are homemade from HGW buckles and painted foil. I originally intended on using a replacement IP from Yahu, however thought I'd give the kit decal a go, figuring I had a Yahu shaped replacement available if it went wrong. Turned out reasonably well after copious amounts of Mr Mark Softer! A lot of filling and sanding, and filling and sanding was required to get a reasonable finish to the fuselage. It's not perfect, but then none of my models are. I used superglue as a filler and restored lost panel lines using a Tamiya scribing tool which worked well. I'm also using replacement exhausts from Quickboost. Next up is the painting! Thanks for reading. Matt4 points
-
Hi Guys This set is now available for the Roden kit, offering great more strength and a little more detail than the kit parts. These are in limited numbers for now as the brass casting company has now closed, due to the current situation. see the link below https://aerocraftmodels.bigcartel.com/product/cessna-l-19-o-1-bird-dog Please all keep well and enjoy your modelling, Ali4 points
-
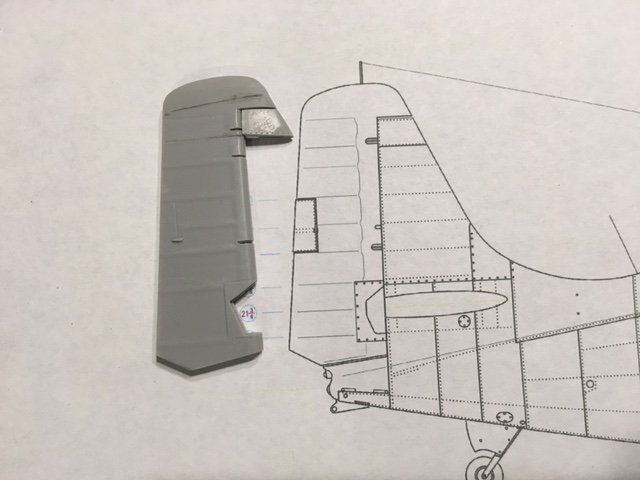
I have started on a conversion. Here is the parts to convert the rudder: I had hope to have it done by now, but hit a snag when I had a series of medical problems, then we started our move to Arizona. Now in middle of fixing up the new house. Hopefully I can get back to it soon. Major problem I had just started work on was a new cowling. I am hoping to convert a pair of Trumpy SBD-5 cowls into a FM-2 one. Would be pretty simple if I was just doing it for myself, but trying to create a master... The SBD-5 used the same engine, so cowls are close, except for the MG troughs on the top, and a little different in shape, but can be coerced. What doesn't help is Trumpy making all their SBD cowls in clear, brittle, plastic! So, if everyone will forward me their free time so I can get back to it...
 4 points
 -
Can’t begin to imagine which forum you are unhappy with, probably the same one as me, but welcome to the best and friendliest forum there is where all modellers are appreciated!4 points
-
Here is a link for the Australian War memorial Me 163, there are several photos of the machine in its original finish. Me 1634 points
-
KH T-6/Harvard Kicked Up A Notch: Apr 14/20: Finished!
109 and 3 others reacted to chuck540z3 for a topic
Thanks Dan and to give me the inspiration to get this build over the goal line, here is my subject again, all clean in a hanger at the Canadian Warplane Heritage Museum near Hamilton, Ontario. The Kitty Hawk kit has these exact decals. Cheers, Chuck4 points -
There's also one from Hobby Boss. I have both, but have yet to build either. A few years ago, I did convert the ancient Monogram kit to an FM-2, however: This build got me excited for trying the same thing in 1/32 scale with the Revell kit. Still yet to do that, too. Kev4 points
-
Sorry to go off topic but Kitty Hawk now needs to add a 1/32 F1 to their line up: back on track: Jari4 points
-
Some quarantine work today! Detail painting using Mission Models and Vallejo paints. MM paints, by the way, brush paint very well and are the perfect consistency right out of the bottle, although I do thin them when painting very tiny details. Finished up the kit supplied PE harnesses, glossed with MRP, and applied kit placard decals and IP decals. Also added a few Airscale placard decals to busy things up a little more. Got a wash on after these pics, then will do a little chipping with a sponge. I've seen the radar operators compartment in green and yellow. I decided to go with yellow for further visual interest, since there were no good references I could find to confirm the right color.4 points
-
F-117A • Nighthawk
Marcel111 and 3 others reacted to F`s are my favs for a topic
The intakes went through some pretty substantial modifications. I cut off basically the entire top walls to make sufficient provisioning for the doors when down (open), and walled off the voids up to the edges of the doors to make smooth transition to the engines. And the compressors had a flat blank wall behind the struts so I had to get rid of it to make better depth effect. The stator struts are also thined down slightly. The next up is in the PE screen mesh - if I replace the plastic parts with just this thin and fragile PE, just 1 touch and it will bend. So, I will still use the PE substitute but with a thick piece of transarent acryllic underneath as well. It was quite an adventure of adjustments but they are all done now.4 points -

1/32 P-47D-40RA Hasegawa
Anthony in NZ and 2 others reacted to CZPetrP for a topic
P-47D-40RA, Big Stud Coll. Robert Baseler, 325th FG kit: Hasegawa engine: Quickboost cockpit: Aires wheel Bay: Aires wheel: Barracuda studio stencils: HGW Decals: Cartograf Masks: home made paint: Alclad II, Gunze C Photo: my good frend Miloslav(thank you)3 points -
Time to pick up were I left the 'dreidekkers' - Still got a diorama to do... The photo's I'm using as inspiration for the diorama: The 'walkway' in the front, that would be a nice feature to add. I also want to add a lot of crew and ground personnel. This is a nice shot showing the preparations for a 'sortie'. German staff car has been in the making, on and off, for some time now... This is were I left it, almost a year ago... The last week or so, I've had time to refresh and practice the spoke wheel technique to make some wheels for the car... The Fokker 'dreidekker' triple are ready. The half 'dreidekker' is ready as well... Hope I will be able to get somewhere with this in the foreseeable future.. Kent3 points
-
KH T-6/Harvard Kicked Up A Notch: Apr 14/20: Finished!
Rocat and 2 others reacted to chuck540z3 for a topic
Thanks Guys! Thanks you Max and yes, I've actually painted it already, but I painted it grey like this one. Cheers, Chuck3 points -
Just received my kit and what did I find inside the box? Yes, exactly. Couldn't help it, but I had to laugh. Nice gesture anyway. Now it's time to look at a lot of plastic. Maybe I should wear one of the masks when doing that ? Lothar3 points
-

Live Resin figures for HH-60 Pavehawk
Buster99 and 2 others reacted to Pete Fleischmann for a topic
Hi Anthony, I plan on mounting it on a square brass tube over a wooden base...at least that’s the current plan. I’ve done several in flight displays this way; but with fixed wing aircraft only- with the 1/32 Spad below; I motorized the prop...but I won’t be motorizing the Pavehawk. The trick will be setting the main rotor blades in a convincing lift-producing hover. cheers Pete3 points -
3 points
-

Dora Wings - Dewoitine D.500/501/510 in 1/32 scale
scvrobeson and 2 others reacted to Jan_G for a topic
looks better with the silver coat3 points -

Unique opportunity 1/32 Andover C1
Landrotten Highlander and one other reacted to Anthony in NZ for a topic
He has replied saying he will message me I am like Iain and was planning on opening up an engine cowl as well. So no this a separate thing and you have no need to worry if you don’t want one I’ll keep you all updated as I hear more on the upscale engine cheers Anthony2 points -

Unique opportunity 1/32 Andover C1
Anthony in NZ and one other reacted to Landrotten Highlander for a topic
Would be a nice addition to the kit, no?2 points -

Make the others jealous
Rick Griewski and one other reacted to Shawn M for a topic
not modelling related....but.... Bought a Yamaha Recording Custom drum kit, and a new house to put it in FINALLY i can start building again.2 points -
On the plus side, it's a very nice kit, a few issues aside, highlighted by people more knowledgeable than me, not hard, some am decals, a resin cockpit from Aires, the ResKit wheels, and Bob's your Uncle! I see the non-chaff spine is included, so will more than likely be the same plastic in the B kit.2 points
-
I think I know what forum you mean and I have to agree Max. LSP has become the place to go to for me for all questions etc. Lothar2 points
-

Kitty Hawk Mirage 2000D/N out now
Dragon and one other reacted to blackbetty for a topic
stop posting these pics or i have to buy one....2 points -
Love it..Won a good fight and it looks brilliant.2 points
-
This arrived in the mail today, via a deal with an old friend, and I'm thrilled to have it. Thanks a bunch, Jerry, I really appreciate this.2 points
-
HH-60G Pavehawk Kitty Hawk 1/35 DONE!!
jgrease and one other reacted to Pete Fleischmann for a topic
Hey all- got about 14 hours at home before my next flight. Figured I’d try to build something..here is a comm cord out of .010 lead wire with some connectors from the watch parts bag. Organic shapes like this are always a challenge..picking the right material helps. The lead wire is very malleable and easy to form into natural shapes. This, and the grab ring that hold it in place will get paint, and the north end of the cord gets a clip to secure it to the edge of the sidewall. cheers Pete2 points -

Make the others jealous
Rick Griewski and one other reacted to Neo for a topic
I like that black he111 never seen that scheme done before Alao that ki84 is one kf the best hasegawa kit ive built2 points -
evening all I trust I find you all well in these difficult times and if anything it gives you a chance to either do some modelling or if not, enjoy the work of others who do I find myself confined to quarters, not through illness, but through trying to stay safe - I am fortunate I can work from home and just do emails and conference calls for my day job rather than sweat it into London.. I think you are right Chuck - I have had a go at better alignment and am now in limits of whats possible so will leave as is now - pics next time So, where were we - elevators... always seem to be the last thing I do, don't know why here is a nice shot of Lopes Hope which shows there is more to them than meets the eye notice the rib tapes, the visible structure underneath, the many eyelet sort of 'polo mint' fixings and the four mounts for the mass balance weights.. ..I started with a brass sheet blank, cut from scaled plans and scribed with all the internal structure (also making most of the cuts for the trim tabs so they can be broken out later) - from there plastic strip was used to bulk it out and coffee stirrer sticks for the ribs. I use these as they are wood and the solartex RC covering sticks well to it.. ..soon both elevators were done top and bottom... there is a double wall where the trim tabs are ..then the bulk of the structural additions were dremelled off and sanded to final profile - once complete the trim tabs were removed.. ..after covering with solartex and wicking CA on the edges, the eyelet things were added - these are tiny brass washers, the bigger ones punched out of litho.. ..these were then covered with the rib tapes again scaled from plans - the tapes are made from foil plumbers tape (like bare metal foil just cheaper) with a riveter run along a straight edge and a scalpel cut along the holes to get pinked edges.. ..they cover all the eyelets well - although in this shot there is still a big panel of tape to go over the trim tab area.. ..a shot of primer show the fabric effect I was after.. ..trim tabs made from litho with the core from the original structure.. ..then the mass balance weights were made from left over resin casting blocks.. ..and shot with MRP super matt black - also added the trim tab actuating rods to elevators & rudder and gave them all a dusting of MIG powders.. ..all the tailfeather surfaces were attached with hinge rods and are now complete.. ..and a last shot in the evening sun so you can see the contrasts... ..thats it for now - more bits and bobs to go including the Drop Tanks that Steve at Model Monkey has kindly enlarged from his 1/32 set and 3D printed in 1/18 for me stay safe everyone and see you next time TTFN Peter2 points
-
Thanks guys! It's good to be home again. Like everyone else, still trying to adjust to the new norms. Picked up my two girls from school yesterday where they'll be doing online classes until further notice. Did the SD/SF round trip drive in one day. On the modeling front, continuing work on the G-6/AS. The cleanup work around the cowling has been finished so I've moved forward and glued the wings into place. The joint at the wing roots is good so I won't be having to spend much time here once the glue dries. There will be some work to do on the bottom however. In addition to the gaps to be filled, there is also a step along the joint between the right and left wings. A bit of scraping will be required to make it level.2 points
-
Hello again! I'm back home after my travels and like everyone else, trying to maintain some sanity in these crazy times. Since I traveled internationally, my work place asked that I work from home for the next two weeks. Which is fine by me as it allows me some... ahem... "flexibility" to re-adjust to the West Coast time zone. Gonna pick up my daughters from UC Berkeley and UC Davis as they are going to do the online class thing until further notice. Berkeley is in lock-down mode so hopefully, we don't run into issues moving and whatnot. Like I said, crazy times. Despite the coziness of self-quarantine, I've been busy doing this and that. When I last left the G-6, I had slapped on some Mr Surfacer putty along the main join between the AMUR Reaver engine cowling and the fuselage. That's been sanded, touched up with more putty and sanded again. I've worked on all of the joints and have re-scribed and riveted where necessary. I just shot the joints with Mr Surfacer 1200 through the airbrush to review the work so far. The joint on the starboard side at the cockpit came apart during riveting and will need to re-secured before moving forward. Popped the spinner into place and took a few more pics. There is some minor clean-up to do still but it looks good enough to move forward on this build.2 points
-

'Flying Circus' - Jasta 11 (Diorama base)
D.B. Andrus and one other reacted to kkarlsen for a topic
The German Staff Automobil is finally up on it's 'wheels'. It's been a tough one and a lot of detailing is still needed... Cheers: Kent2 points -

Dora Wings - Dewoitine D.500/501/510 in 1/32 scale
Rick Griewski and one other reacted to Tony T for a topic
The quintessential 1930s aeroplane - ou avion. C'est magnifique mon ami. Tony2 points


.thumb.png.64af68ce3763f9af8a91e71374ce741e.png)


