Leaderboard
Popular Content
Showing content with the highest reputation on 03/20/2020 in all areas
-

Grumman A-6E Tram Intruder VA-75 AC504
Loach Driver and 16 others reacted to reconspit for a topic
Hey, after building several WWII birds, i finished my third A-6 Intruder.... I just used the Eduard Interior and the AOA decals for the VA-75 from the desert storm period. All colors used are from Vallejo.... I hope you like her....17 points -
My Groundhog Day build.........WnW Fokker D.VIIF.......Finished
Dany Boy and 12 others reacted to monthebiff for a topic
So rather quicker than expected we have found ourselves in self isolation after my step daughter was sent home from school on Tuesday afternoon, annoyingly the girls had been at their Dads since Saturday when the syptoms apparently first started but where ignored and the first we knew of it was from the school, They normaly return back to us on Tuesday after school anyway but.......... Some people are really irresponsible but hey, i'll leave that one there. So I had no other option than to start a new build and decided on the Wingnut's Fokker D.VII, I missed out on the original D.VIIF boxing so I'm using the Early Fokker boxing, downloaded the D.VIIF insruction book from Wingnut Wings and purchased the extra BMW engine sprue and Fighting Fokkers F decal sheet. I've also got Taurus models engine detail set, HGW belts, Master barrels and Aviattic decals to add to the build. Not to much to show yet but spent yesterday preparing cockpit parts for paint, today I cocentrated on the wing assemblies and have them undercoated, pre shaded and glossed ready for decal application. Enjoying the chance to really get some serios modelling time in, I know its an awful situation we are all in but time to stay indoors and make the most of this fantastic hobby. Stay safe everyone and happy modelling. Regards. Andy13 points -
Moving along again. The rear turret glued on and seams fixed, top deck cover glued on. Vallejo acrylic putty in the seams, a bit of sanding and re-painting ahead of me it seems, in those seams. Thanks for looking8 points
-
1/32 P-47D-40RA Hasegawa
Anthony in NZ and 5 others reacted to CZPetrP for a topic
P-47D-40RA, Big Stud Coll. Robert Baseler, 325th FG kit: Hasegawa engine: Quickboost cockpit: Aires wheel Bay: Aires wheel: Barracuda studio stencils: HGW Decals: Cartograf Masks: home made paint: Alclad II, Gunze C Photo: my good frend Miloslav(thank you)6 points -
Been a bit, with the crazy world going on and some earth shaking in the Salt Lake area! But, progress is moving ahead. Landing gear attached, wheels and tires done, landing gear doors. Canopy painted and close to where I want it. Small touch ups here and there and then the radio rigging/antenna to be done. Let me know what you think so far!6 points
-

MiG-21MF JG-2 "Juri Gagarin"
Troy Molitor and 4 others reacted to Iain for a topic
Place holder while I finish the F-84G - but this is one I've wanted to do for a few years after a flying club expedition to Peenemünde, in the former East Germany, a few years ago. Will cover more of the background in a subsequent post, but for now here's the kit, along with a cockpit I stashed away for it a long time ago: This will be another 'go for it' build - not worrying too much about any corrective work, but concentrating on a neat build and nice finish. Have fun! Iain5 points -

Boxart
scvrobeson and 4 others reacted to Mark P for a topic
Mustang looks great. But shouldnt the upper surface be blue? Gonna sit back now and wait for the inevitable debate.... Mark Proulx5 points -
With a new blade, 800, then 1200, then 2000 grit wet and dry - followed by Novus Plastic Polish and those aberrations are gone - just a final polish needed: I need to fill the rivets on the external reinforcement straps - then a few tweaks to airframe and we're heading towards primer. Control surfaces next... Thanks for looking in - I think we're on track to actually finish this! Iain5 points
-
This is one of those things that falls into the category of: I didn't know I needed it until I saw it: It even has details on some of the ugly interwar stuff.5 points
-

HPH FW 189 Eagle Owl.
Derek B and 4 others reacted to Phartycr0c for a topic
Not much of an exciting update really as those who have gone before me will attest, HPH kits deserve attention to detail in terms of the cleanup of parts involved as it will pay dividends later or so I would like to think! I have found that switching back and forth through the different parts of the kit allows an effective workflow as while one part dries another can be pieced together. This kit somehow allows that to take place probably due to its unusual design. Completely new methods of working are also required and extreme care should be taken when removing the pour blocks especially from the larger pieces. Some photos. Tail booms and the gaps requiring attention. x2 of these put together now awaiting the wheel well internal parts. the engine representation is made up of an "engine block " and 12 cylinders each one of which is made up of the cylinder and the rocker cover to produce this. I wont be spending too much time as they will hardly be seen inside the beautifully case engine cowlings, talking of which i put together the spinners and left them removeable due to HPH providing tubing. Diffusing a bomb may be easier than cutting the moulding blocks from the clear resin parts. I was apprehensive to say the least mainly as they are cast really nicely with lots of rivet detail which would be hard to replace I would imagine. Anyhow cut they were and a nice dip in clear produced some amazingly clear parts I imagined the clear parts to be really brittle but I need not have worried they are in fact quite soft and malleable which is probably why HPH provides full internal frame detail for the centre section of this lovely greenhouse. Bit of a boring update with not much going on really but there you go Resin Kits! my first time by the way!5 points -

NLLSP- No Longer a Large Scary Project- finished
Alain Gadbois and 3 others reacted to chrish for a topic
Thanks all! I doubt I'd have had the stamina to keep going without the encouragement from friends here, very appreciated! I've got the seams dealt with on the fuselage and begun the agreeable task of adding the final details, glazings and decals to the fuselage...wait for it, there's light at the end of this tunnel...clearly visible now! The dark and light variations should blend in with a buff down with a terry cloth (the rest of the fuselage has had done) and the final clear coats. Thanks for looking4 points -
My Groundhog Day build.........WnW Fokker D.VIIF.......Finished
Kais and 3 others reacted to monthebiff for a topic
Thank you for your comments gentlemen and so far having a blast with this build. More done today, primed and pre shaded the inner cockpit walls and rear cockpit baffle followed by adding the superb Aviattic reversed lozenge decals which as ever worked beautifully.. More weathering needed but coming along nicely, also been working on the wooden aspects of the cockpit but not quite finished yet. Hoping to get the Aviatic lozenge on the wings tomorrow. Off to watch Ground Hog Day now so stay safe all and happy modelling Regards. Andy4 points -
First test print/assembly - 1:72 scale - for those not on FB: Iain4 points
-

F-117A • Nighthawk
Madmax and 3 others reacted to F`s are my favs for a topic
Hi guys I'm on the adventure with the intake suction relief doors. Of course I made them moveable, with hinges and magnets. Here is a short video: And a couple of pix: They sit perfectly flush and yet there will be more sanding and flattening to be done during the oil canning effects. Here is the hinge mechanism with the magnet form the inner side: Those are the intake trunks. I first traced the opening onto the upper walls, if you can see the subtle scraping. Now I'll have to open the holes and "connect them" with the fuselage so the relief doors can open freely.4 points -
Parts, parts and more parts. I must say that this is some pretty impressive stuff. I'm looking forward to some gluing and painting.3 points
-
OK - reason behind the build. Our club Exped was in 2014 - an RAF flying club - so most of the crews were either serving, or retired, along with some ex. reserves and civilians. Most had a connection with/memories of the Cold War - either through the military, or working in the aviation industry. For most of us it was the first time crossing the old border between West and East Germany - something many at one time would have thought would be impossible in the future. Our boss was ex. fast jets of the period - Phantom and Tornado F3. This had been the enemy... Flying around Europe the borders are invisible - but one afternoon we crossed the former border/Iron Curtain at relatively low level heading for our first overnight stop-over in the former East Germany, Neubrandenburg. One of the first things we spotted was an old, disused, airfield with solar panels over where the runways had been: this was Wittstock - a former Soviet MiG-23/MiG-29 base. We were told later that day after we landed at the next airfield, of which more in a moment, that in 1994, when the Russians finally left, they left the gates to the base wide open. When we overflew, the hangars and accommodation blocks had been overtaken by nature in the preceding 20 years - you can see the trees growing through the buildings in the above photo. Wittstock before the MiGs departed: Our stop-over airfield was Flughafen Neubrandenburg EDBN - Trollenhagen - a former MiG-21 airbase, once operated by the Luftstreitkräfte der Nationalen Volksarmee (East German Air Force): What we didn't realise, until we shut down, was that the marshallers/refuelers/resident flying club staff were mostly all ex. Luftstreitkräfte - they were particularly taken with the RAF marked Bulldog that my friend Chris and I were in (aeroplane belongs to Chris) - and it sparked up some good banter and, after a very short while - quite a collection of spotters at the fence. Anyway - the airfield was formerly home to Jagdfliegergeschwader 2 "Juri Gargarin" - flying MiG-21MF (amongst other types) and I was fortunate to be able to purchase a wonderful hardback history of the until, covering the aircraft, operations, training and home lives of the unit. They seemed surprised that I wanted to buy a copy - but I've had it in mind ever since to build a model of one of 'their' MiGs. The people we met, without exception were hugely friendly and accommodating - and wanted to show us some of their 'toys' - my favourite has to be the Trabant that they'd converted as an airfield emergency vehicle: And a former Luftstreitkräfte crash truck: We stayed in a hotel in Neubrandenburg - and had an absolutely wonderful stay - if only for one night. Anyway - a bit of a ramble - but happy memories of a fantastic trip - and, hopefully, explains my choice of subject. May start building over the weekend - and will post some images of that book... Iain3 points
-

AMK Announced 1/32 US Missile Set
Tony T and 2 others reacted to thierry laurent for a topic
I would be very grateful if they release a new large scale kitty but think as well they should rather consider the huge MiGs first...3 points -

Vietnam Hun "nashville sound" FINISHED
Rocat and 2 others reacted to blackbetty for a topic
working on the canopy and seat, but it allready looks like a hun3 points -

Stay well, stay strong!
mkd1966 and 2 others reacted to Proper Plane for a topic
Hello everybody! I want to say that in spite of everything happening around the world, we in Proper Planе continue to work while being in home quarantine. We understand that many of you are now alarmed by the spread of the virus, but we urge you to remain calm and continue to build your models. Perhaps this will distract you and improve your mood. We try to please you with a discount for some of our products. You can find out new prices on our website www.ProperPlane.com. We also decided to support the participants in the group build, which was announced by Mike Swinburne in WingNut Wings Fans group and provide our Axial propeller as a prize to winner. Stay well, stay strong! Alexey Belov Proper Plane3 points -
Nice price.3 points
-
FL32-2003 Mk-83 1000lb bombs with BSU-85 fins, M904 noze fuzes (shown), Mk-43 TDD's and MXU-735 nose plugs. $15.00 Currently in production. Ordering link will be opened next week.3 points
-

Hasegwa Bf 109G-14/AS
crobinsonh and 2 others reacted to MikeMaben for a topic
It's all in the painting Kevin ... ...not mine3 points -

Boxart
Darren Howie and 2 others reacted to thierry laurent for a topic
Quite nice. I particularly like the Mustang one. However, such images still have that digital imaging artificial feel.3 points -
1/12 Maserati 250F
D.B. Andrus and 2 others reacted to mark31 for a topic
thanks i use difrent grades of sanding paper,sanding sticks also fils to get rid off some casting blocks glass fiberpen for hard to reach spots good drills and i wear latex gloves otherwhise your hands will turn almost black of the metal youneed time and patience a lot off dry fitting to get it good But a fun thing to do all parts are put toghter with CA gleu good fine tweezers are also importent for the small parts i hope this helps and iff there are other questions just ask Mark3 points -
1/12 Maserati 250F
Alain Gadbois and 2 others reacted to mark31 for a topic
i have made a start one 1 wheel how it starts and after a time it looks like this Mark3 points -
hello all, all the parts glued together, it looks something like this the winch placed on the ship aft next extra detailling, then the diesel engine enjoy, Rammstein3 points
-
Thanks Dana, I sprayed them earlier, so making progress. Thanks Petr! Just wanted to share.....windscreen masking is off and no issues with paint leaking. I'm always worried about that occurring! Lost a bit of blue on the rear windows where the canopy will sit, but easy to fix. Nice to see the cockpit stayed together with all the handling these past months.3 points
-

Monogram '29 Ford Roadster Pickup
D.B. Andrus and one other reacted to LSP_K2 for a topic
After working for a time on an AMT '69 Chevelle SS 396 (and getting totally disgusted with it), I threw it back in the box and selected another favorite, the Monogram '29 Ford roadster pickup. This old Monogram kit has been a favorite of mine for many years. Box is a bit tattered, but kit itself is in more or less (more on that later) great shape. I'll most certainly be losing those funky farm tractor tires though, and replacing with some nice AMT versions, or similar, but keeping the wheels, as they're actually pretty neat. Naturally, my intent is to have this done for two shows here in September and October, assuming those events aren't cancelled.2 points -
what im building at the moment is the maserati 250F from MFH its a multi media kit so far the first 4 steps are done and the engine is ready next step will be the engine frame keep on building my friends Mark2 points
-
This is the Hasegawa kit: great engineering, fit, and detail. I added the following: HGW belts Scratchbuilt throttle Riveting Custom masks Engine wiring using EZ line. Tamiya and AJ Interactive paints If interested, I posted a WIP here: Cheers, Tom2 points
-

1/32 Trumpeter A7- Corsair
Loach Driver and one other reacted to miketippingmodels for a topic
1/32 A7- Corsair finished build complete, I used the verlinden navy carrier tractor, Reedoak’s figures and Eduard MK 84 bombs, along with resin electronics bays and wheel wheels, it’s a pain to build, but over come it and it’s a nice model, painted with MRP paints, this isn’t it’s true base she will join the F-14 Tomcat and F-4 on the carrier deck I built for a collector in London enjoy.2 points -
Just finished. I really enjoyed this build, and it allowed me another chance to use masks for the markings. Hats off to Hasegawa--an exceptionally well detailed and engineered kit. I will be posting more pics in the RFI section. Thanks for your comments and encouragement! Cheers, Tom2 points
-
Hasegwa Bf 109G-14/AS
Kahunaminor and one other reacted to monthebiff for a topic
Now that looks like really nice resin, detail will result pop under some colour. Regards. Andy2 points -

AMK Announced 1/32 US Missile Set
thierry laurent and one other reacted to blackbetty for a topic
yeah, what about a fencer or mig-25....2 points -
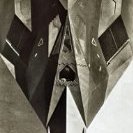
F-117A • Nighthawk
themongoose and one other reacted to Uilleann for a topic
HOLY. CRAP. That is all.2 points -
That would be a worthwhile outcome. Frankly, AMK should stick to Eastern European jets which they do marvellously and on time. I don't see the point of them trying to better the imminent Eduard Brassin Phoenix missiles... https://www.hannants.co.uk/product/ED632148?result-token=U2QUQ ...unless they include something useful like a missile trolley. Tony this will be edited to activate the link2 points
-
Excellent build and finish, the A-6 is my all time favourite aircraft, I also like the choice of markings and weapons load plus the addition of pilots - hats off!!! Lothar2 points
-
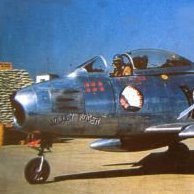
Tamiya 1/32 F4U-1 Birdcage Corsair - Done!
Brett M and one other reacted to JolleyRoger for a topic
Not only the model, but your photography skills as well is outstanding!2 points -
1/48 Eduard F6F-3 Hellcat Lt Vraciu, February 1944.
Gazzas and one other reacted to Kahunaminor for a topic
So progress on the cockpit saw the PE levers attached and a couple of extras added from scrap PE with Acrylic paint built up for handles: Then a Dullcote protective coat and when that was dry, some chipping and highlights with water colour pencils. The cockpit was then attached to the port side and held for a while with a clamp to ensure correct position: [/url The engine got fully assembled its PE cabling commenced: Next step is to close the fuselage and then continue with the engine. Regards,2 points -
1/32 Messerschmitt Bf 108 'Taifun' by Eduard
MikeC and one other reacted to hopkinspeter for a topic
Pretty sure that they didn't, I think it was a Pilatus P-2?2 points -

AMK Announced 1/32 US Missile Set
thierry laurent and one other reacted to Tony T for a topic
As long as all this frippery does not impede progress towards a 1/32 Flagon or Foxbat Or either of those in 1/48 by AMK, though 1/32 would be better Tony2 points -
Crazy (and good) news -- yesterday I ordered a new airbrush (Badger Crescendo 175), along with 8 new paints. The Badger from Rebell Hobby, and the paints from Alfahobby. Both packages arrived within 24 hours. I find this a little bit insane, haha! I've never had anything delivered so quickly before...2 points
-
I didn't see such a real Corsair. Beautiful.2 points
-
Hi all, Apparently the world is ending, so I thought I should get a move on and try and finish a model before it does! Outer gear doors finally painted. Fairly unexciting post but a momentous moment as it marks the end of the main painting stage. Matt2 points
-

Monogram '29 Ford Roadster Pickup
D.B. Andrus and one other reacted to LSP_K2 for a topic
Body prep work is now well underway. It appears I may have to grind some material off of the bottom of the bed portion to get it to mate properly with the frame, but that should be a snap.2 points -

FW190-A3 by PCM - My Christmas Raffle Build- FINISHED
Martinnfb and one other reacted to themongoose for a topic
I kinda held off on any updates till this round of dry fitting was thru. This set of shots shows the detail and fine engraved lines in the PCM kit. first off the wing profile seemed to benefit from some support on the back half of the cord. This brought the profile up to match the fuselage and if you grab it by the wings won’t stress the glue joint in the future. This is the wing with no weathering in the wells followed by some weathering. Could it benefit from a dark wash to tie it all together? Under a satin black primer the thin panel lines seem to POP. Before primer it seemed you could hardly see them. Something tells me to really go easy on the coats of paint to keep these strong. Fuselage is an easy assembly Now the engine is nice, unfortunately it is almost completely hidden on this model behind the fan blades and props. For that reason it’s simple dry brushing and some grease stains. So that brings this week’s session to a close. Off for a poker weekend with my buddies. Back again next week!2 points -
Time to stop whinging and get modelling! to paraphrase Victor Kiam, I was so impressed, I bought another one2 points
-

F-117A • Nighthawk
Madmax and one other reacted to F`s are my favs for a topic
Some edits of the cockpit: the IP cowling has PE stripes along the edges because they need to be straight and sharp; there is a small mod at the very front of the cowling too. Then all is painted with the main colors, no weathering, riveting, detailing or whatsoever so far; just the basic colors. The rear bulkhead is finally glued and now I can start with the opening/closing mechanism of the canopy. A couple of pics before: And after the painting:2 points


.thumb.jpg.5da8bff9741de420eb2e87addd8f2cf6.jpg)

