Leaderboard


Popular Content
Showing content with the highest reputation on 03/09/2020 in all areas
-
Thanks for all the generous comments and support, guys. I'll be around for a while longer yet, as I have a few long-standing plans for the website that I need to bring to fruition, and with my load here already becoming lighter, I hope to start working on those things soon. I've also still got a few reviews to do, so look out for those, too! As for modelling, a big part of my decision to step down is the realisation that I haven't finished an aircraft model in over 2 years now, and with my bench time having dwindled to zero, I've been reduced to being a bystander in a hobby I've worked so hard to support. Having found some time to build a Deadpool figure over the January holidays, I was struck by how emotionally satisfying it was to be building something again, and I certainly need that outlet in my life these days. So, once the dust settles, I do indeed hope to be seeing you all again in the WiP forum, but as an ordinary LSP citizen once again. Kev14 points
-

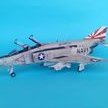
F-100D Thunderbirds SIX
Durangokid and 12 others reacted to themongoose for a topic
My latest Thunderbird in the series comes to you loaded down with aftermarket goodies. I had picked up quite a bit over time for it so decided I would have to do it wheels down. yes I know, an oddity for me. Then as I was building it and looking at reference pictures I only saw 2 with drop tanks on it. Hey there's an idea, if I am going to break up the Thunderbird graphic on the bottom let's load it up. The perfect theme came to mind, HEADING HOME. Trumpeter shows this smoke system on the box art but there's nothing in the box haha. So I made it up with piano wire and shrink tubing...just suttle heat affects on the exhaust. Most pics of the Thunderbirds show this area very shiny. The museum birds have been polished to death, I avoided doing those :-) Super fun build with lots of help from the forum. Check out my WIP for details. Thanks so much everyone!13 points -
evening folks thanks for that pic Antonio, I haven't seen it before - interesting it doesn't show the black tail - I assume that came later. Also very little exhaust staining so that will save me trying to do that badly thanks again - great find! Hey Juraj - no the canopy stays as is - i would need to start again and well I just don't want to (plus I only have one set of PE parts which would be destroyed trying to disasseble it.. And as for seeing it, yes if you are at Telford again, it will be there ..so, as I said before it's the bitty stage in trying to get around the airframe in a logical order and get it finished, ..I covered the whole model and sub assemblies in flory wash and wiped down to give some definition to the rivet & panel detail (especially on the painted wings).. I removed the decal stencils and replaced them with rub down ones I had custom made - £60 for an A5 sheet so not cheap, but then a great improvement over the unavoidable decal film on natural aluminium.. ..these gun panels will be weathered & chipped when it's on it's wheels.. ..this vent door was added, the larger rear one will follow when I have finished the landing gear & doors.. ..the cockpit sill was added and the canopy panel that hangs here finished.. ..massive moment - the landing gear legs were fixed with JB Weld - funny story, about an hour after fitting them when the model was in a jig, I walked past it and thought 'I will just check a photo to make sure it's right' - well I looked and I had mounted them the wrong way around with the torque links facing forwards! A mad panic ensued, but as JB Weld takes 5 hours to cure I could just re-do them correctly (Thank God..).. ..the inner gear door hinges were fabricated and added - they are the two black structures on the centre rib at the top of each end.. ..the corresponding lugs were added to the doors.. ..and the doors were hung... I know there is a debate about having these up or down on the ground, but I made them and everything under them so I want to be able to see it - so these are down ..you can also see the retracting link assembly on the right connected to the door and piston, and a cable with fixings on the left which I assume stops them opening too far (?) although they are loose like this in refs I have so maybe not.. ..outer doors next, and as I found I have a load of leave to take from my day job before April 1st, I hope to have it finshed by the end of the month TTFN Peter13 points
-

MWP Project: Mirage IIIC "Ça va sans dire!"
johncrow and 9 others reacted to aquatarkus10 for a topic
Hi to all we arrived at the final session of this wip after about a year (February 2019). I completed the coating of the hyperstainers by writing all the rivets and detailing the air brakes by building the flooring necessary to house the hydraulic mechanisms. I assembled the landing gears by combining the accessories of the Scale Aircraft Conversions and Eduard Brassin. I applied Berni's stencils and decals (optional) I opacified the front of the wing surfaces with the Flat Clear TS-80 Tamya to create the correct contrast and this is the final work I propose: Scale Aircraft Conversions white metal set: Eduard Brassin resin set: Bondic UV/lamp for landing ligts coating & writing of the rivets on mobile surfaces: and now......the final result: Dassault Mirage IIIc & SNECMA ATAR 9c : Dassault Mirage IIIc version : SPA 94 "Mort qui fauche" ECT02/ 002 côte d'or Dijon-Longvic 1970 Thanks for your attention George for more photos and info: http://www.adventurephotomodels.com10 points -

KH T-6/Harvard Kicked Up A Notch: Apr 14/20: Finished!
Greg W and 8 others reacted to chuck540z3 for a topic
March 8/20 Well I'm back from a bit of a break cruising the Caribbean in the Caribbean Princess, sister ship to the Grand Princess (California) and Diamond Princess (Japan) that have had the so-called COVID-19 virus outbreaks. My wife and I had a great time, but the thought of being stuck in quarantine makes me shudder, because it could just as easily been us. No more cruising for me until the world gets this bug under control. Scary times and yes I know the mortality rate is "only" about 3%. I just as soon not take the chance, especially at my ripe age of 65! A tiny update. I've also be procrastinating on just how to do this, now that the wings are assembled. Before assembly, this would have been super easy, so I had to think of a different approach. Here is what the fuel caps look like on each wing, which are perfectly flush. While some Texan/Harvards have them that way, they have been modified and most are as shown by Max above. First step is to cut a nice and smooth hole in the wing. To do this, I used progressively larger drill bits, then finished off the last third with circular files to keep the hole symetrical and smooth. I then cut some sprue rod to fit, drilling a hole in the top so that I had something to grab onto when inserted the rod in place. The rod was carefully measured, then glued into place at the bottom and top of the rod, leaving a significant depression in the wing, just like the real deal. I then fashioned a fuel cap out of a few bits of spare PE brass. These are only dry fit, because I will paint them red and glue them later at the end of painting. The other side, to show the depression in the wing. Pretty good- and much better than before. That's it for now, but I really must get going on this build before the weather starts to turn nice. Once it does, my modeling Mojo goes into almost complete hibernation, which will drag this build over the summer. Cheers, Chuck9 points -
The antenna mast - part 2 Well it's done and glued onto the canopy but its predecessor hasn't submerged. Here it is: The wire is made from elastic thread (Uschi's fine rigging thread). The insulators were done with a drop of superglue followed by a blob of white glue, which didn't adhere to the thread on its own. The cone was made from 0.2mm sheet smash moulded over a sharpened tooth pick. That's it from me - the next post will (finally) be in the RFI section. Cheers Joachim8 points
-
Small update here: I received a set of new landing gear legs from Damian last week, and I just completed them, and the barracuda wheels. These things are very nicely done, and are very stout, and that metal oleo is awesome!! Can't wait to get them mounted on the bird, but I have a lot to do yet!! Tim7 points
-
Small update. Haven't had as much bench time this weekend, and didn't get much done. Part of the problem is that I keep finding things that I don't like about the kit parts, and I want to fix them, like the cowl flaps and the landing flaps. I ordered a set of PE flaps, and decided to have a go at scratching the cowl flaps. I showed them next to the kit parts for comparison. I'm still working on the nose. The resin got more bubbles in it than I would like, and it has taken a while to fix them, so I'll post that later. Tim7 points
-
7 points
-
They had A few small side profiles shown at the US Nats for both the releases. Assuming nothing changed before release, early includes Voss F.1, Jasta 5’s Dr.1, and another I’m not familiar with. Late Dr.1 shows Udet among others.6 points
-

NLLSP- No Longer a Large Scary Project- finished
Alain Gadbois and 5 others reacted to chrish for a topic
I think most of the painting and chipping is done on the fuselage, now I can continue gluing parts together again for a while. Home made masks and painted on markings, It seems I go through a lot of masking tape on my builds. Thanks for looking6 points -
OK, some cockpit work completed. It's straight-up Mig21UM, but the dual pairs of identical instruments on the IP suggest a twin engine bird. That's my story and I'm sticking to it.5 points
-

PR.XI & Mk.Vc - Revell Mk.IXc & Mk.IIa kits
VW Chris 1969 and 4 others reacted to Wackyracer for a topic
Bit more sanding and filling...5 points -
I just needed to finish something after a bit of a break from 1/32 so this is out of the box. The kit is okay, but detail is lacking in some areas and the gear are super flimsy. Not my best work to be honest, but nice to have it done.4 points
-
Super cool! I do really like these off-beat type of air frames. I think the next unusual subject would be PERFECT for Infinity Models........................A PZL-104 Wilga! Or even better, a PZL-2000!4 points
-
The amount of work that Kev has put into the site over the years has been absolutely phenomenal - and from most members' perspective all you see is the tip of the iceberg above the surface - there's a huge amount more that goes on in the background that largely goes unseen, in order to keep everything functioning as it does. Really looking forward to seeing you building again Kev - some cracking projects in the past - especially taking and improving some of the older kits out there! Iain4 points
-
So back to the shop today to get 20% off!!!! I feel like Snoopy when he dances! How cool is this!!?? Look at how ugly it is!!! So ugly it is gorgeous. Only 10 % off on Eduard.4 points
-

1/35 KH MH-60L "Super 63"
dodgem37 and 3 others reacted to Hawkwrench for a topic
Started on the Robbie tank that will go inside Super 63 and added some extra detail using micromark rivet decals. You won't see it, but I know it's there. Top is before, and bottom is after. I also assembled the Live Resin miniguns. Man the detail on these is incredible! That's all for now Tim4 points -

What is the oldest original kit in your stash?
Troy Molitor and 3 others reacted to spacewolf for a topic
Found a few more in the stash.. sealed Aurora kits. Ahh.. 98 cent kits.. those were the days.. And Merit… the glue is dried up but the decals are perfect.. Fokker DR 14 points -
KH T-6/Harvard Kicked Up A Notch: Apr 14/20: Finished!
Anthony in NZ and 3 others reacted to chuck540z3 for a topic
Yes, if you can send me one! I don’t have such a part or anything like it, so I justify what I’ve done with this: The pic above of the real deal is taken from about 18”, while my pics of the model are taken at about 5”. At 1/32 scale, that’s about 0.5” equivalent and my pics are taken at 160” or 13 feet, so you would wouldn’t detect the corrugated edges of the cap anyway. Cheers, Chuck4 points -
My new airbrush arrived yesterday and I promptly put it to work marbling the wings: While letting the marbling on the wings dry, I masked the fuselage markings: I then marbled the rest of the model, waited a few hours then laid down the aluminum dope layer. There is some edge cleaning to do, and the port side white cross is a little uneven relative to the black cross. My plan is to carefully sand down the metallic layer to correct these issues.3 points
-
Latest from Toshihiko's Facebook page - best not look at what's happening with exchange rates though! Iain3 points
-
PR.XI & Mk.Vc - Revell Mk.IXc & Mk.IIa kits
VW Chris 1969 and 2 others reacted to Wackyracer for a topic
Primed and test fit Scratch built the storage rack for the extra oxygen bottles and stratched 2 more from sprue and plasticard. Beige one is from a hasegawa kit. Revell ones are only 75% round and hollow. Will add the tubes once installed and painted.3 points -
https://www.modelforum.cz/viewtopic.php?f=1&t=105045&p=2297488#p2297488 progrès on legendary czech plane - Z-37 ČMELÁK (Bumble-bee).3 points
-
Funny you guys should say this, because... Cockpit - straight kit - Airscale instruments: As posted at the beginning I wanted to see what I could do using just the kit parts - I will find and add some suitable seat straps - but I *may* finish with canopy closed... Won't win any prizes - but that's not the object of the exercise! And attached to the nose gun bay. I'm going to fit the cover closed - so no need to paint and detail. Kit provides a couple of metal weights that sit underneath this section to prevent the model being a tail-sitter. Really good design... Cockpit sides given a wash to pop a little detail for effect - I use Xtracrylix Night Black, thinned with tap water for this. Interior 'gubbins' in place in starboard fuselage half. Everything fits absolutely perfectly! And I couldn't resist dry assembling the fuselage halves - again, fit looks extremely good indeed! Now - if I can find my box of wheel weights (just to add a tiny bit more weight under the cockpit) - and do some tweaks to those auxiliary inlet doors - I can get the fuselage together this evening. Which means a complete airframe next few days and ready for paint - perhaps... Really enjoying this one, have fun! Iain3 points
-

Polikarpov I-153 ”Chaika” ICM 1/32
Paul in Napier and 2 others reacted to Phantom2 for a topic
Hi all! The Cockpit painted with WEM AMT-11 WWII VVS Interior Blue-Grey.... Wheels painted WEM WWII VVS Underside Blue… Some hatches and covers painted with the same color…. The inside of engine covers painted Alclad Aluminium and the gear doors painted with WEM VVS Interior Blue-Grey… The gun barrels and the sway braces painted with Alclad steel and the engine ignition ring (?) painted with Alclad Aluminium…. The engine painted with Alclad steel… More to come soon…. Stefan3 points -
Thanks a lot for keeping me company! I've got national markings and plane letters applied, I used a couple of shades of blue to (hopefully) vary the color of the national marking trying to bleach it out toward the top and painted the plane letters with Tamiya XF 19 gray adding a mix of white with it to vary the base color there too. Then did the chipping medium to the paint. I'll start working on the vertical fin next. Painted the F too far forward, had repaint remask and do over moved back; weathering in progress Thanks for looking3 points
-
In a country across the North Sea, many years ago this kit was purchased and started as well as adding some aftermarket goodies. I have trimmed the KMC cockpit to fit the fuselage and scribed most of the panel lines. Some parts are glued together and sanded, but there's a fair bit of work left as I want to add the open electronics bay, "hyd hatch" and resin wheel wells. Some scratchbuilding will be required as well to make the Aero 3 catamaran launchers, and I need some resin wheels and AIM-9Bs. Would this be OK for entry? In terms of theme, it doesn't get much more "Cold War" than a Norwegian Starfighter...:)3 points
-
MWP Project: Mirage IIIC "Ça va sans dire!"
Bil and 2 others reacted to aquatarkus10 for a topic
Hi to all this is the third update and in this thread I will tell you how I managed to finally close the Mirage IIIc fuselage Dassault Aviation Mirage IIIc version: SPA 94 "Mort qui fauche" ECT02/ 002 côte d'or Dijon-Longvic 1970 ( Final look) Image published exclusively for referential, technical and historical purposes Before closing the fuselage I covered the wings to correct the air brakes compartment which is closed and not opened as proposed by the Italeri kit MWP (Metal Work Panels) technique step by step: creation of an aluminum panel ready to be inserted in the covering area: Work gallery: After having grouted, sanded and polished the critical parts of the model (radome and afterburner compartment ) I have definitely closed the fuselage: the mockup: Application of optional decals (Berna decals) First look: and ....................................final (corrected) look: Dassault Aviation Mirage IIIc SPA 94 "Mort qui fauche" ECT02/ 002 Côte d'or Dijon-Longvic 1970 & SNECMA ATAR 9c For more info & pics :http://www.adventurephotomodels.com That is all for the moment. Thanks for the attention George3 points -
Hi Guys, This is my Revell/Monogram F-102. Engraved, Aires cockpit and wheel bays (fit is terrible), Reskit wheels, Master pitot, Fündekals. A lot of work to make it look decent. This plane was based in Langley during the late 50'. Cheers Tristan [/url] [/url] [/url] [/url] [/url]2 points
-

1/32 Hasegawa P-40N-1 Warhawk “Ruth A”
109 and one other reacted to Tolga ULGUR for a topic
This is 1/32 Hasegawa P-40N-1 flown by Lt.G.L.Walston, , 16th FS 51st FG, Kunming, China 1944. ( Note that the aircraft lacked the national insignia on the top of the left wing.) Base kit is 1/32 Hasegawa P-40M with some after market modifications. Cockpit modified by Eduard PE set. Exhaust stacks and wheels replaced with Eduard resins. Decals are from Eduard P-40N Warhawk kit. Paints :Gunze Sangyo acrylics. Happy modelling2 points -
Some more photos, or it didn't happen - right? Interior 'blanking' on auxiliary doors: Some additional weight - probably overkill... Fuselage has now been drying overnight in a warm place - and has now had all the joints sanded back - remarkably straightforward as the kit fits together so well: Intake ring and tail pipe fairing test fitted: Jet pipe fairing has had superglue applied to the visible internal joints (it's constructed from two halves) - this will be sanded back later and fitted to the fuselage. However - an earlier post on this thread and a few reviews of this kit when it was released have pointed out the internal shape of the intake ring can be improved: You can see the step in the above image that needs blending with the rear end of the intake ring. My plan (if I could find my Milliput) is to blend in some epoxy putty on either side of the ring - cover the intake section already on the fuselage with cling film - and push the intake ring into position - with the epoxy putty still soft. This should mean the main intake section acts as a mould so that the sculpted epoxy putty on the ring matches the top and bottom flats in the main intake section perfectly - at least that's the idea - *if* I could find my *@!&*+!! Milliput! Will remove the intake ring again after a few hours - as soon as the Epoxy Putty starts going off - but not hard. I'm confided I'll then need to do some more sanding and shaping - before fitting the intake ring to the fuselage. More soon - if I can find my Milliput... #frustration Iain2 points
-
The Jagdtiger is an excellent kit, and I am definitely jealous of that -152; one of my favorite heavy self-propelled guns, second only to the Jagdtiger.2 points
-
.thumb.png.84c5d3a464f2dd83f0ac37a5aac81ec8.png)
Hasegawa 1/32 Bf 109G-2/R6 (JG 5) "Yellow 3"
daHeld and one other reacted to Antonio Argudo for a topic
Thanks gents for your words! cheers wings are glued, also I increased the dihedral angle which is a bit flat on the Hasegawa 109s, with plasticard and sanding the wing inner reinforcement, cheers2 points -

Unique opportunity 1/32 Andover C1
Landrotten Highlander and one other reacted to Anthony in NZ for a topic
Heh yep, just when I got my money sorted LOL! Still cant wait though. That CAD is impressive!2 points -

Unique opportunity 1/32 Andover C1
Troy Molitor and one other reacted to Landrotten Highlander for a topic
in my opinion we committed on the quality of the kit, not the currency rate. Having said that, it would be nice if the yen dropped significantly when payment is due.....2 points -
Since there were no objections to my project in the LSP Discussion forums, I guess my progress is within the rules. So, the intention is to finish the model to represent a pre-1972 F-104G from 331 Sqn Royal Norwegian Air Force based in Bodø. Way back in 1984, the Luftforsvaret - as the RNoAF is known in Norway - celebrated their 40th anniversary, and a book to celebrate the occasion was released. The book was called "Fra Spitfire til F-16" (From Spitfire to F-16) and in that book was a photo of an F-104G that has had me wanting to build a model of it ever since. BTW, the photo is taken at Bardufoss, not 331 Sqn's home base. For more info on Norwegian Starfighters, I can recommend the website starfighter.no, but non-Norwegian speakers will need to use a web translator. Not planning to add the ladder, but you will notice the hatches for the electronics bay and the lower engine compartment are open. According to a Starfighter technician at 334 Sqn (when they were operating CF-104s) these were closed after engine startup, so I assume this is taken shortly before a mission. The "catamaran" (what the twin launcher on the belly was called) will need to be scratch built and the Sidewinders will be Eduard resin once I get my Hannants order in. According to the afore mentioned website, there were two basic intercept configurations; supersonic and subsonic. The configuration shown gave less supersonic drag, whereas mounting the launchers and missiles on the wing pylons gave less subsonic drag. My track record for groupbuilds is abysmal, but - like lottery wins - one day it might just happen:) Jens2 points
-
F-14B Hasegawa 1/48 VF-74
Darren Howie and one other reacted to viper-dc for a topic
Extras used: Fightertown Decals, Aires exhaust nozzles, Aires cockpit Paints and colors used: Gunze Mr.Color, Model Masters( Testors)2 points -

HB 1/48 Mig-31
Darren Howie and one other reacted to Mark M for a topic
well shes done hope you like her2 points -
Some great stuff here. A sealed Aurora square box Gotha. Nice I did acquire the Revell 22" USS Constitution. The box with her at anchor in the habah. ...and thanks Ron.2 points
-
What fish - I didn't give you any fish? Dude, you are truly one of the greats in the modelling world as you give so much to this community. This greatness can be measured by all the well wishes here. So for whatever reason for you needing to step back, a hearty thank you mate for all your efforts and I hope to catch up at Model Expo in June - that's if we all don't have the dreaded global lurgy going around! Cheers big ears! Adam2 points
-

F-117A • Nighthawk
Madmax and one other reacted to F`s are my favs for a topic
Some edits of the cockpit: the IP cowling has PE stripes along the edges because they need to be straight and sharp; there is a small mod at the very front of the cowling too. Then all is painted with the main colors, no weathering, riveting, detailing or whatsoever so far; just the basic colors. The rear bulkhead is finally glued and now I can start with the opening/closing mechanism of the canopy. A couple of pics before: And after the painting:2 points -
Coming along nicely. I'm also of the opinion that the model looks fine without modifying the length, and I didn't bother when I did mine. What I did do was remove the bottom of the oxygen bottles. This gives you a bit more room to add some nose weight. I'm using the adhesive stuff RC modellers use for ballast. I found about 15g and a little extra for luck proved sufficient, although you may need to file the odd corner off to fit the nose panels.2 points
-
Natural metal finish or grey. Only the CF-104s were green over grey. The Luftforsvaret also received a handful of Canadair-built F-104Gs which were overall ligth grey but with white wings. The CF-104s were purchased outright and tasked with anti-invasion defence (i.e. strike and groudn attack), whereas the F-104Gs were interceptors. When 331 Sqn (operating F-104Gs) were converting to F-16s, 334 Sqn with their CF-104s were tasked with intercept duties utnil 331 became operational on the Viper. Whether it will end up as natural metal or grey depends on how smooth I can make the surface.:)2 points
-
1/48 Tamiya, builds like a dream with no filler required.2 points
-
Some more work. The hardest part of the conversion to get right was going to be the two cannon ports, one either side of the nose. I found a good clear shot of the port to enable me to trace around it using the Sillhouette Studio software. The trace line is in red. I refined the shape and sized it up for the model. The shape was then cut using Oramask 810, and applied to some thick plastic card. I drilled and filed the shape out. I extended some panel lines to enable me to position the ports correctly on either side of the nose. I then used the inner part of the mask to assist with sizing and position of each port. Using my JLC razor saw, I cut the four sides of the part out. This looks a bit brutal, but it is a very quick and easy way to get accurate and straight lines through some thick plastic over curved surfaces. The extra cut lengths are easily filled. The new part was laid into position to check for fit. Some plastic tube cut at a fine angle and then bent to assist the port to follow the curve of the fuselage. Part of the Zacto nose cone had to be ground away to allow the combined port to be shoehorned into position. I allowed the front of each port to be slightly proud of the fuselage to allow me to sand it to shape. Filled and sanded. The NACA vent that I filled earlier has been exposed, behind the port. I used some 2 part epoxy filler to blend the part together by packing it into the front of the port and then using a cotton bud moistened with Mr thinner to smooth it in.2 points
-
Final wheatering stage I had one day completely dedicated to modelling yesterday and I can show you some progress (beaware: many pictures incoming). I started with the wheels. They recieved some MIG pigments which were blended with mineral spirit. And the outcome was....meh Those pigments worked fine as long as there was a tread but the smooth tyre looks weird. Tamiya buff to the rescue! Not 100% satisfied but a lot better than before. Onto the fuselage and wings. I wanted to do some subtle chipping (it's not a Spitfire afterall) where the crew would regularily stress the paint. That would be the handholds, the wingroot and the port rear canopy opening: And of course some panels on the wing especially around the oil and fuel ports. I used silver oil paint from Ammo and I'm quite happy with the result. Definitely more control than with acrylic paint and a sponge! The picture above brings me to the next part: fuel and oil stans/leaks. I added a dark filter using oils (umber and van-dyck-brown) to add a filthy shade followed by small hand painted streaks. The drop tanks saw some heavy wheatering - maybe not a 100% accurate but an eyecatcher nonetheless. Speaking of fuel and combustion - the Messerschmitt's DB engines aren't known for a clean exhaust gas (comparable to nowadays Volkswagen ) Therefore I went quite heavy and added more paint then usually. Using MRPs premixed paint for the first time, I have to say that I'm impressed. Nice flat apperance and for my taste a good ratio of thinner/clear/pigments and the colour comes close to my usual self mixed paint. The area close to the exhausts and their tips recieved some soot pigments for the extra dirty appearence! Afterwards I started pulling the masks and adding the small stuff and here we are: I'll start adding the antenna wires after the dreaded antenna mast is rebuilt. Maybe I can shoot the RFI pictures next weekend - stay tuned!2 points
-
2 points
-
hello all, thanks for the kind replies some more photos of the fire plugs, 2 made, 2 in progress installed on the LSM the last 2 will be placed on the deck aft enjoy, Rammstein2 points
-
hello all, today I have made one of 4 fire plugs, these are all the parts for making one all the parts together and one more in the making placed one on deck, some fine detailling still to do from above 2 more to go, still working on the bow doors, have to recast everything, the curve was not correct. enjoy, Rammstein2 points