Leaderboard

Popular Content
Showing content with the highest reputation on 03/02/2020 in all areas
-

1/35 Kitty Hawk HH-60G Pave Hawk
Loach Driver and 14 others reacted to oppenheimer for a topic
Here it is, finally i finished this kit, so far the best HH-60G kit in the market, figures are from Live Resin15 points -

1/32 Hasegawa P-40N-1 Warhawk “Ruth A”
109 and 11 others reacted to Tolga ULGUR for a topic
This is 1/32 Hasegawa P-40N-1 flown by Lt.G.L.Walston, , 16th FS 51st FG, Kunming, China 1944. ( Note that the aircraft lacked the national insignia on the top of the left wing.) Base kit is 1/32 Hasegawa P-40M with some after market modifications. Cockpit modified by Eduard PE set. Exhaust stacks and wheels replaced with Eduard resins. Decals are from Eduard P-40N Warhawk kit. Paints :Gunze Sangyo acrylics. Happy modelling12 points -
Thanks for looking and the encouragement I've begun spraying some paint, it's got 3 shades of olive drab on the top of the wing and 2 shades of gray on the bottom. I shot gloss black on the de-ice boot then punched tape discs to make masked spots (to look like patches on the boot) and then shot rubber black. The gloss black spots almost disappeared but can be seen in the right light, then the damage areas were scrubbed to get the aluminum color showing through. I made my own mask with circle cutter and tape for the star. Thank you for looking12 points
-

HH-60G Pavehawk Kitty Hawk 1/35 DONE!!
Harold and 10 others reacted to Pete Fleischmann for a topic
Hey all! another sanity check- need to make sure I accurately locate the flight engineer’s knees on the floor, so his hands line up with the cable to the rescue hoist.. cheers Pete11 points -
1/32 Hasegawa P-40N-1 Warhawk “Ruth A”
Starfighter and 10 others reacted to Tolga ULGUR for a topic
11 points -
afternoon all ..that is a superb idea - I did look at doing it with my Spitfire and could only find one place in Canada that did small run and it was very expensive. I will look again though and if anyone has any ideas please let me know ..bit more done this weekend.. ..the First Aid kit and gunsight pad were made from milliput and lead wire, with brass for the straps (as they are held taught and need to loom like it..) ..I am not good at organic things like this.. ..painted up and although not great, I think they will have to do.. ..then moved on to the side and upper windows - all the catches & latches were prepared and two tiny pins added so I can pin one to the other at the right angle.. it has been a fraught day as I HATE working with transparencies - the knife edge of a terminal ****-up being so easy to do just frays my nerves.. ..I had left the protective film on so it was fairly straightforward to prep them and paint them.. ..also weathered a bit by rubbing wire wool and scuffing them a bit.. ..and with the film removed - there is a flaw in the top canopy where it didn't like bending to shape that has only been seen now the covers are off, but it just looks like a small crack so I am going to have to live with it.. ..and pinned together.. ..a few more bits need adding like hinges and some rubbing pads, but this is pretty much done so a quick dry fit.. ..the First Aid kit looks ok I guess.. that's it for now.. TTFN Peter9 points
-
OK, this is a kind of place-holder for the moment since I’m in Turkey playing golf till 11 March, but my intention is to build the wonderful Echelon vacuform Lightning F6, courtesy of Lothar who so generously sent me the kit after a highly speculative post on the forum from me. After finishing my Gladiator I ok’d it with K1 to cut and sand the bits ready for assembly, so that’s done. Pictures of where I am with progress etc when I get back. Bye for now!8 points
-
HH-60G Pavehawk Kitty Hawk 1/35 DONE!!
Martinnfb and 7 others reacted to Pete Fleischmann for a topic
...more checking- an interesting construction challenge- cheers Pete8 points -
Hi all! I´ll jump in with this..... I know it can be a tough ride, but I just love this Aircraft! Stefan7 points
-
Here is the 1/32 Tamiya kit of Johnnie Houlton’s spitfire IX ....OU-V , ML407, seen as she would have appeared when he took delivery of her in April 1944, before the gyro mk II gunsight was fitted. His ‘pink elephant’ mascot was painted underneath the windscreen. For a description of why he chose this mascot you can read the story behind it in his book. The aircraft still flies today as OU-V , and is well known as the ‘Grace Spitfire’ in it’s two seater configuration. The kit had HGW seatbelts, wet stencil decals, Tamiya RAF paint sprays (developed for this kit), Yahu instrument panel, Barracuda cockpit parts, and G-factor brass main gear and tail wheel strut. The engine module is not glued in yet pending the wiring being added to the Merlin, hence the slight gap around the nose cowlings. Work continues on this area. Rexx exhausts have replaced the kit items. P-t7 points
-

1/32 ERA-3B Skywarrior - 3D printed / scratchbuilt
LSP_Paul and 6 others reacted to Starfighter for a topic
Progress is slow at the moment. I am still working on the CAD data for the cockpit components but managed to make a few test prints to check proportions on the actual model. This is how it looks at the moment.7 points -
And a start made - couple of hours this evening assembling sub sections ready for some paint. Have to say I'm mightily impressed with the fit and engineering on this kit so far - a quick neatening up of parts after removing from the sprue gates and they're just falling together beautifully. After recent projects from Special Hobby, Pacific Coast, fixing B-24 wings - and playing with a certain very large vac form - this is bliss! This is going to be my 'grown-up' version of Saturday pocket money builds as a teenager - not worrying about detail/accuracy - just focusing on a clean build and nice finish. We'll see where I get to... Have fun! Iain7 points
-

HPH FW 189 Eagle Owl.
dutik and 5 others reacted to Phartycr0c for a topic
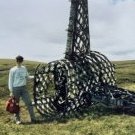
Once upon a time I had a Wessex HU5 in Royal Navy rescue colours with the Scalewarship rotor fold and exhaust upgrade. One day (this morning) the Wessex decided to attempt a power off autorotation as a result of its owner checking the alignment of the said rotor folds in somewhat of a rush. This result was one destroyed HU5 which looks like its been in a ground resonance incident, and on very annoyed owner, especially as it was supposed to make an appearance at the Cosford show in April. IMG_8792[1] Up to that point I had quite enjoyed the build! As a result the rebuild and damage assessment got shelved and an even greater challenge was pulled from the stash. Iv'e been chomping at the bit to have a go at this for a while, mainly as its a full resin kit and i haven't done one before, that and i like the unusual lines of the 189. This is an attempt to put this together before Telford, that said I am also undertaking operation Man shed and will be trying to establish a new build place so I will try and produce a build thread but as usual I can't promise anything. Anyone who is unfamiliar with HPH, they are full resin kits with all the trimmings you would require to build a superb model, including photo etch and brass barrels. I hope i can do this justice. It will be totally OOB. Off we go. IMG_8793[1] Kit contents IMG_8794[1] IMG_8795[1] IMG_8796[1] The eagle eyed amongst you may have noticed that the larger components such as wings etc are missing, thats becuse I got stuck straight in and the first step is the careful alignment of the upper wings with the centre section and wing spars. Everything and I mean everything relies on this alignment being correct. Cleanup of the wing parts was straightforward but messy (resin) so im using water to sand in order to keep the dust down. The parts were aligned and tacked with CA then then "welded" with HPH epoxy once i was happy. Detail In this kit is sublime. Here' s where I am as of tonight. IMG_8797[1] IMG_8800[1]6 points -
After the Milliput dries, I've dabbed on some Mr Surfacer 1000 and began the sanding process. So far so good as a preliminary shot of primer shows. The chin intake was glued in. There are some gaps that will need to be addressed with Milliput. The control surfaces for the wings have been finished and are awaiting the completion of the cowling cleanup for attachment. I've dabbed on some more Mr Surfacer 1000 on the cowling joints and I'm going to let it cure for TWO WEEKS to ensure no shrinkage. :wink: This will be last view of the G-6 that you'll have for awhile. Tomorrow, I'm leaving for a trip overseas. Will be back in a couple of weeks to resume.6 points
-

Polikarpov I-16 type 24
Dpgsbody55 and 5 others reacted to mgbooyv8 for a topic
And here is the I-16 on a ground plate: The model won a silver medal in the contest of last year's Euro Scale Modelling. I hope you like it. Cheers, Peter6 points -
Polikarpov I-16 type 24
Dpgsbody55 and 4 others reacted to mgbooyv8 for a topic
Hi Guys, Here is my Polikarpov I-16 Type 24 I build for our IPMS-NL magazine "Modelbouw in Plastic" (MIP). It features in the first issue of 2020. I choose to model "white 13" which has a nice two-tone camouflage of green AMT-4 and black AMT-6. The underside is light blue AMT-7. For the first time I used MRP lacquer paints and indeed, they are a joy to use, provided you use their own primer. As is well known by now, the ICM kit is very nice and will give a great result out of the box. However, I decided to dress it up a little bit. Aftermarked goodies used: Eduard "Zoom" set 33184 Eduard seat belts 33185 North Star Models PAK-1 gunsight set NS 32015 Aerocraft models brass landing gear Brengun resin RS82 rockets with launching rails, BRL32022 And some scratch enhancements in the cocpit. Here are the pictures: Some views of the interior in progress: Scratch additions, including continuation of the fuselage under the floor by pieces of card and strip: The instrument panel is build-up from several Eduard etched parts. Here it is all painted. The wires represent the undercarriage retraction cables, they were painted after the fuselage was closed The Eduard seat belts were not great. I had to lengthen the waist straps with masking tape to make them work and look like the drawing in the instructions. In the picture, the lengtening pieces are not yet painted and connected. The seat back was removed and later added after painting to ease masking. If you add rockets under the wing, you have to add a representation of metal plates on the under surface. Without them the linen wing cover would be set to fire during lanch of the rockets. I used thin plasticard for this: Here is the engine. I added an air scoop above the carburettor and an oil cooler below. I decided not to add any ignition and control cables. The model is still glossy. Next post will feature the Rata on a ground plate... Cheers, Peter5 points -

Make the others jealous
Rick Griewski and 4 others reacted to Fanes for a topic
I couldn't resist a good offer and had to add my first WnW kits to the stash5 points -
I just need to finish a lot that has been stored for too long already. All are resin kits of equipment you need to get a F-4D ready for take off. The kits come from videoavation and are very nice and easy to build. Once ready, it all goes into a diorama with the F-4D. AG42 Added the wire to the Air hose, (to simulate flex of the real deal) and the cables on top. The Generator was planned for a USAF F-4D so I need to cover the decal with US Air Force. Will see what comes up for an idea. Some more pictures. Wire is loose from the hose, so the spacing can be easily corrected. MHU-1 is next on my list to finally get the decals on. Until next time. Robert Jan5 points
-
facebook.com/ItaleriModelKit - Tornado GR.4 1:32 scale - Preview Part 2 That's looking great! Juraj5 points
-
Alittle light sanding this weekend - followed by a little filler (white areas): Area ahead of cockpit to be sanded back in next few days... Iain5 points
-
I love this. '..and with the film removed - there is a flaw in the top canopy where it didn't like bending to shape that has only been seen now the covers are off, but it just looks like a small crack so I am going to have to live with it..' Wet media acetate. Radu uses it for his Bf109K-4 canopy. I'm using it for the 1/32 Bf109F-4Z Trop I'm working on, found in my signature. Flexible. Won't yellow. If you're interested. Sincerely, Mark5 points
-

Me 262A-1a 9./KG(J) 6 Žatec , Czech Territory
levier and 3 others reacted to Miloslav1956 for a topic
1/32 Revell kit HGW wet transfers Eduard Look instrument panel, mask Barracuda wheels Eagle Cals #138 All colours MRP4 points -

1/32 Revell Mk IXc
scvrobeson and 3 others reacted to Subodai for a topic
Decided to have a go at post-shading/fading the panels a bit tonight, managed to make some time over the weekend as well... damn this fine airbrushing is tiring!! Got the Sky colour through so I'll mask that up tomorrow and get the band painted, then tidy the bottom up and get a clear coat on her before decals Then on to weathering and knocking back these highlights a bit! Not super loads of progress, but good to practice skills when I have the time Enjoying the MRP paints, really nice to work with Thanks for checking in Sub4 points -

1/18 P51C Mustang "Lopes Hope the 3rd"
daHeld and 3 others reacted to BlackCanopy for a topic
I foresee the introduction of a new category there: 'Only Pete can Compete' Otherwise, the contest will become awfully lopesided () and the competitors brutally 'demoralised'. I'm off... ;--) Cheers Joerg4 points -
Checking to see if the Barracuda spinner fits... Round 1 of the filling work is to shove Milliput into the gaps and then wipe away the excess with moist paper towel. And... the wings have been glued together!4 points
-
Thanks all. Hopefully it stays together and I don't mess up the end of the build. I don't consider weathering a strong point of mine. Wash is done, with some possible touch up here and there (thanks big photos). Overall, I think it's coming together well. I'll do some chipping (aluminum on a sponge) and then probably seal it with a flat/semi flat coat before salt weathering commences. More to come......darn 5 days a week working slows me down! Lighting isn't great today with the snow and overcast....so sorry if these look weird.4 points
-

F-100D Thunderbirds SIX Foiled Again - Finished!
Victor K2 and 3 others reacted to themongoose for a topic
Up on her spindly legs! Lesson learned, check the ground clearance when doing separate steps between the kit instructions and PE instructions lol. I had to close up the extension on the MLG doors...between interpreting the angle from the instructions poorly, shortening the main gear legs and weighted tires that to me seem a little low on air pressure the MLG doors turned into the landing gear haha. A little Ca glue debonder and light pressure realigned them but I still needed more angle than designed. Some touch up paint with the airbrush and good to go now. I got a ton of little touch ups done today. Made some stiffener plates from aluminum foil as well for the wing join and up along the fuselage. All the lights added but they need painted yet. I made a couple radio antennas and painted them.4 points -
Working on the rudder and elevators that I'd removed from the fuselage and tailplane mouldings before assembling. Edges trued up with my trusty T Bar and some 400 grit wet and dry, before adding strips of styrene to make new edges. These have been blended in and the edges rounded - now filing out the slots where the hinges will go: Really not keen on the Rotol prop (blades dry fitted) - but not sure I want to invest £20 on just a prop https://www.hannants.co.uk/product/EAR32070?result-token=czF7A Canopy comments earlier in the thread - this is where we're at after reducing the height of the windshield: Making progress - and that's what counts... Have fun! Iain3 points
-
OK, here is where i'm at-3 points
-
hi folks Hi Jay - as always thank you for the info - that drawing really helped and hopefully the positioning is right when the time comes! That is a fantastic film Torben thanks for posting - I actually took a few stills from it early on for things i didn't have photo's of. The only thing it shows that I won't be doing is the acid etch staining on a lot of the panel lines - it may be as it should be, but it is beyond me to do it and get it to look right Hey Geedub - now that is going to be hard - I wish i could actually blue the metal with a heat gun, but that would end disasterously! I haven't figured out how I will do it yet, but suspect I will just try standard airbrush & paints / powders, rather than go for the rainbow effect seen in the vid I find nearing the end of a build to be a tricky period - there are lots of little bits to do and the order of assembly is important as the model is quite large details can be added then damaged if appropriate planning is not done. I started to add some of the decals onto the airframe that cover all the little hatches etc and after a test, found the ones on the alclad wing went on with no visible film after setting solution so didn't bother with a gloss coat... I think it will look fine when weathered.. ..added the gun camera - no idea how I missed that.. ..for the stencils on bare metal I have no choice - I can't varnish the aluminium as over time it will degrade as the ali oxidises, so it is straight decal & setting solution.. I have to just accept it as is.. ...in most cases it's passable.. ...I decided to focuson getting as much on the top half done as possible, so there is less handling with all the gear & doors hanging out - the first part of this was finishing up the cockpit... ..I added the switch panel at the bottom right of the windscreen and made up the flourescent cockpit lamp.. ..on the other side, I added the throttle quadrant and control rods.. ..I have made a Gunsight pad and the first aid kit that hangs from the headrest from milluput, but won't show you that until it's finished (& if it's good enough..) ..otherwise, the cockpit is pretty much complete.. ..will probably start to sort out the rest of the glazing next - here a dry fit of the right cockpit windows... ..still lots to do, but it's all bitty stuff TTFN Peter3 points
-
I'll jump in with a Yak-28. Only minimal building has started, I'm going go shoehorn a modified MiG-21UM cockpit and engines into it. More to come shortly-2 points
-
I'm really bad at completing Group Builds - and at the moment very bad at finishing anything - but... Trying to get MoJo restored I figured a straight out of the box (maybe with a few minor tweaks) might be good 'therapy' and, from what I've seen/read the Hobbyboss F-84 kits are pretty straightforward builds. So, I'm in with this - don't expect anything amazing - and final scheme to be decided: I also have the F-84E boxing - so can swap the speed brakes to fix the errors in the respective kits where the styles have been transposed. Last F-84 I built was the Heller 1:72 kit - back in the early '80s - and I really enjoyed that one... Have fun! Iain2 points
-
Hello all, lurked for a little while and joined recently for inspiration and a push to keep my recently refound love for this hobby. It's been quite a few years since I've put paint to plastic so I'm hoping this isn't just another Hobby phase. We shall see... I attended the big model show in Telford and got 'the itch' bought a bunch of different paints to test and play with, as well as some btis and pieces that postage costs had made prohibitive to try... I've always pined over a whole bunch of 1/32nd Jets, in particular F-14s .. most Jets with twin tails seem to just do it for me.. But I've never had the cash or time to really get into it. Queue a nice bonus at work and decided to sploosh a bit on some kits, found a cheap seller in China on eBay and managed to get a nice little haul... However I don't trust myself and wanted to ease into it.. so picked up this thing quite cheap and have been quietly mulling away at it since Christmas. It's a pretty much OOB build, this is all just me getting used to the tools and paints and all the shiny new things that are available that were definitely NOT as easy to get hold of before. I don't think this will be anything like top notch show worthy and I'm not a rivet counter so accuracy on this kit isn't really that much of a thing for me, I just want to be happy with the end result. it's literally just dipping my toes in the water, seeing if I get the bite.. And giving me something to do that doesn't always involved using a computer or screen all the time (even if I am currently limited to my office desk). Anywho enough wafflin' have some photos! Getting down to business with the internals, attemping some basic stuff with weathering (never done that before, especially not with oils) Turned out okay Pit part-painted and test fitting, I used the kit provided decal for the dials, it wasn't super accurate in some places (mostly the dials on the right) but it gave me a chance to try microset and microsol for the first time.. WOW that stuff is magic. Pit now assembled, gloss coated, oil washed, and flat coated Micro Krystal clear added to some dials for depth, I'm aware it's too much now.. but hey ho.. Also realised I had bought the worlds most expensive PVA glue... lesson learned... Marrying up the wings after painting the wheel well and inner surfaces with the green called out in the instructions More parts setting up, also a view of the not-so-great paint on the inner fuselage, post oil-wash and such. FIrst time really having a proper go at deleting a seam and getting a nice finish, was pretty happy with the result. Definitely justifies how much I blew on sanders!! Fuselage setting up, yep, no pit.. I actually found it easier to get a nice bond without the pit fitted, got the plastic properly welded then slotted the pit in from underneath to give the fuselage the proper width to marry up with the wing roots, worked perfectly! A dry-fit of the main fuselage bottom engine cover and wings (glued and seams removed on all) Never done glazing masking before, so this was just after they were Krystal cleared in after cutting the masks and before filling the gaps First layer of paint on the glass frames to match the interior colour, after filling and smoothing out the gap in front of the main screen (seems to be the done thing, might not be the accurate colour though :S ) put FAR too much paint in the airbrush so used it as a way to check my seams.. all seems fine. Tried to rescribe a few lines with my dandy new Tamiya scribing tool... didn't go well... wibbly wobbly lol Realised I'd filled most of the rivet holes in the nose so had a bosh at trying to sand that back a bit and re-drill them (far too big and deep it would seem after later priming) Fuselage and wings now setting up Test fit of the bottom nose cowel.. thing after having sprayed the interior of it black (before realising it has a blanking piece inside that I missed DOH!). Also did a small amount of pre-painting to the inside of the radiators before fitting them. Radiators assembled and fitted required a little persuation on one of them for it to lay 'flat' but looks fine. Front cowel thing is now also attached And you'll have to forgive me, I missed a few steps between, but, this is now after being primed with Mr Surfacer 1500.. which is _amazing_ stuff. I've never used anything that gives such a silky smooth finish (after a super light pass with 600 grit). It did however, probably give me a little cancer as I grossly underestimated how much I would need, how long it would take and how much it would gas me out... Immediately ordered a Respirator and had a good root through for the power supply for my extractor (not been in use since we moved house a few years ago). And this is where I am still, I have since refilled, sanded and reprimed the way-overdone holes and used a Trumpeter rivet tool to re-do the rivets in the top covers but don't have a photo of that yet. I was waiting on the right colour paints, which after seeing someone elses Mosquito build, I picked up some of MRPs colours, but finding the right time to spray lacquer (the Mr Surfacer probably took a few years off my life) I just haven't had the time yet. Thanks if you got this far! (and sorry for the monolithic post) This is my first 'OP' here so if I've screwed up, missed something, or done a massive Faux Pa let me know. Cheers Mark2 points
-
mfy first 2020 kitb , enjoy :2 points
-
Still undecided... Meanwhile, first coat of 'Dulux' with some interior green: And some gloss black on the instrument panel, ready for some stickers: More when there's more! Iain2 points
-

1:32 De Havilland Tiger Moth
Anthony in NZ and one other reacted to williamj for a topic
2 points -

Any news on the Italeri Tornado GR4?
Royboy and one other reacted to blackbetty for a topic
wait for Revell to repop it, then it wil be £502 points -
Ikarus IK-2 + Rogožarski IK-3 - 1/48 AEROPOXY Old, early 2000's resin kits, out of production for a while. Quick build from stash. Both kits, IK-2 and IK-3 are out of production for a while, but just work on new remastered and retooled IK2 / IK-3 , using latest published research and data, printed in Kagero books, Thanx for looking.2 points
-
It took some finagling to hold the detail but we now have resin British cowling fasteners in 1/32 and 1/24. Apply under the paint. CLICK HERE for 1/32 CLICK HERE for 1/24 We've also expanded our exclusive line of fabric texture uniform patches in 1/35 and 1/16 so pass it on to your armor buddies. All of our new releases can be found on our HOME PAGE.2 points
-
1/32 HobbyBoss Spitfire Mk.Vb
Uncarina and one other reacted to Tolga ULGUR for a topic
This is 1/32 Spitfire Mk.Vb flown by Robert Wendell from RAF No 249 Squadron in Ta’Qali Malta, March 1942. I have used HpH correction set for windscreen, canopy and horizontal tails. Other modifications are: CMK resin seat & headrest Eduard instrument panels & seatbelts Quickboost exhausts Master #32018 Hispano 20mm cannons Barracudacast cockpit door Barracudacast wheels Quickboost propeller & spinner set Decals : DK Decals #32009 Paints : Gunze Sangyo acrylics Happy Modelling2 points -
Bf 110E-3/trop 2.(H)/14 North Africa - almost done
Wackyracer and one other reacted to Fanes for a topic
The antenna mast - a chapter of its own Well the vanished part hasn't magically reappeared, but the replacement from Revell arrived with miraculous speed. After spraying a thin black base the wooden part of the mast was brush painted with a sand colour. Afterwards I apllied a thin layer of burnt umber oil colour which was beforehand left to "bleed" on a cardboard palette. Using a stiff (read old) brush I added the grain. I'll let the oil colour cure for another day before the protective gloss coat will follow.2 points -
Wow....the aircrew look fantastic. This is going to be quite the HH-60 when complete.2 points
-
BRP-250 bombs in 1/32?
blackbetty and one other reacted to onosendai for a topic
I 'm a manufacturer, I would never sell my subjects printed directly from my 3D printer, others do, IMHO the surface quality often is not comparable with the average standards of the models on the market, I'm very pleased that someone said it, I speak for all resin caster who works hard on post-production to always offer the best quality.2 points -

Trumpeter 1/200 Titanic
jimbo and one other reacted to ringleheim for a topic
The trick with a project of this scale is to try to maintain the right mindset during the build. At absolutely no time can one think of the finish line or the 8 million steps required in order to be finished. It's all about being in the moment and just happily doing whatever your'e doing right now, with no thought of the finish line whatsoever. In time, it will come together and you'll be surprised to see it. The real trick is maintaining enthusiasm, energy, and passion for the same subject matter for as long as it will take to complete the build. Might need to break it up into multiple stints. But it's going to be spectacular when its done!2 points -
It is great that Ryan goes straight for a paint that best resembles FS 34201. I happen to be in full agreement with his interpretation of the colour that the Nakajima A6M2 was painted, but it would appear that not everyone is convinced by the evidence. It is a debate that may still linger for a while, although it does seem to be fizzling out. Much has been written about this subject, and if you are interested, you can glean some insight from the Aviation of Japan website. Here are two links: http://www.aviationofjapan.com/2008/03/zero-colour-conundrum-part-1.html , and http://www.aviationofjapan.com/2018/07/its-not-that-its-this-no-its-not-etc.html I have enjoyed reading the debates, and think I now have some insight into how the incorrect interpretations have come about. Originally, what was being seen of abandoned aircraft in the Pacific looked like this. This photo was apparently taken in 1943... The elements had made relatively quick work of oxidising the paintwork, and the image of pale grey Zero's took hold. In the intervening years, until entrepreneurs like Bob Diemert ventured onto the islands and into the steaming jungles of the Pacific War, many of the aircraft had been weathered down to their red-brown undercoats. It would take years before curious historians found relatively unexposed samples of paint, and buffed them back to their original lustre. Before this happened however, the movie Tora! Tora! Tora! was released, and its attack scenes re-enacted at airshows around the States until the public were convinced that Pearl Harbour had been attacked by white painted T-6's . Even the Diemert restored Zero that went to the then "Confederate Air Force" ended up being painted in a very pale grey. At least it's undercoat was a red-brown! Model aircraft box art hasn't helped correct this misconception, and even some very recent kits feature near white A6M2's. Here are some older examples. Even looking at photographs taken during the war, it is difficult to work out what the shade of grey actually was. This is why I was keen to model a Nakajima produced aircraft, since the white outline around the fuselage Hinomaru actually gives one a perfect way of comparing the shade of the aircraft paint to pure white! Here are two examples that show how dark the fuselage grey is compared to white: Pretty convincing in my mind. What is interesting to me is that despite evidence of the darker olive-grey paint, museums such as the National Museum of the US Air Force and the Pearl Harbor Aviation Museum chose to paint their Zero's in lighter shades. Amazing how strong the influence of repeated incorrect interpretation is. Here is the completed gunsight with its tinted glass folded flat, as well as a decal from the spares box and an electrical cable. The sliding canopy now has a handle for inside, as well as the aerodynamic lever to open it from the outside. Masking is happening (nobody's favourite surely)... And now I can get down to recreating this Hōkoku. Hope you are ready to plot Japanese characters Nick!2 points
-
G'day Everyone, Apologies for the rather intermittent nature of my posts but modelling time is so precious I find myself immersed in it once started and then forgetting 1 - to take pictures and then getting so engrossed I forget I should post. I thus apologise for the rather poor collection of WIP shots. I must express my gratitude or the kind comments from my last post. After 9 years the end is in sight I hope. The seat required finishing. A yellow life prserver was made from 2mm card and bent with the aid of steam to conform to the seat contour. texture was carved into plastic and the pins from small pin heads. The bead was from this stretched sprue. once painted yellow the stencilling of US ARMY AIR CORP was sprayed using a photo etched mask. Seat belts and buckles were from masking paper treated with acryllic paint and photo etch buckles and a hand made clasp/release lever. Seat is shown leaning against a ball point pen Once finished the seat could be mounted in the cockpit. Fitting the supporting brackets behind the seat was a bit tricky, like everything on this aircraft. However once it was all in place it sort of looked the ticket. Having moulded a canopy in plexiglass and constructed a brass frame for windscreen and reay portion it was necessary to do the radio tray and radio fitment. This proved a little problematic in that this was varied however i decide that as this is a L version and will have 1945 markings the SCR 522A would be the most appropriate fit based on everything I could find from various references. A metal radio tray was constructed as per the part's manual and the appropriate radio boxes were constructed from plastic card painted and mounted on the tray. The armour plate behind the pilot seat was also fitted and mounted. Wiring and sockets were from thin gauge copper wire and turned from Aluminium tube respectively. The following pic shows the result before rear canopy was added. Once this was completed the rear canopy could be attached. This was polished inside with Novus polish and then the outside masked off first of all to indicate the areas to be litho-plated and then reversed to prevent damage. Unfortunately i forgot to take pictures of the upper internal bracing which was quite distinctive but it will be seen once masking is removed. Masking the outline of the framing took considerable time on the multiple compound surface as it had to be absolutely correct otherwise it will show up like the proverbial. the next two photos show this and the start of the litho-plate framing. The rear was also riveted using 0.5mm aluminium rivets as per the original. I have removed some of the masking so this can be seen. These last two pics hopefully illustrate the rechnique. Detailing of the front frames is yet to be added as is the rear skinning of the canopy That's all for now but hopefully the canopy can be finished over the next week or two. I think the worst of that is over. The next phase is then the wing fillets. Cheers Kevin2 points
-
The last big hurdle as far as building goes, has been refining the fit of the canopy. The hope today, was that I might even be able to glue it in place. The canopy really is the worst thing about the kit and unfortunately, as I was working to perfect the fit, I saw some swirl marks in two places that travel through the clear plastic and can not be polished out. With all the work done to add interest to the cockpit, I want a much better piece to start with. A new kit is on the way (grand total of seven bucks) in the hope that the new canopy will not have such noticeable defects. I temporarily installed the tail pipes and intakes, along with the canopy in order to see if light is visible pouring through any gaps, into the interior of the Model. Didn't see any light creeping in so that's good. Only a couple more things to do before paint: a small amount of seem work and install the new canopy. Actually three, clean up the two missiles and pylons. The landing gear are ready for paint and will be installed when the painting is completed. You can see the overall lines of the model below, with the major components attached. The fisheye effect of my cellphone is really apparent in the view, showing the interior of the exhaust. I do like the way they turned out.2 points
-
F-100D Thunderbirds SIX Foiled Again - Finished!
Victor K2 and one other reacted to themongoose for a topic
Thanks Eric, your work has been a great inspiration! ...and here’s a teaser for this weekend’s finish goal ... for guys doing this build in the future this is one of the secrets to getting the PE slats to function. Learned this doing RC aircraft Every one of those arms has to be at the same angle. If not slats and flaps don’t work in real life or on a model Here they Are side by side. waiting on epoxy to dry solid on the gear. Should be on her legs by dinner, not going to rush it. Lots of little stuff to do. Will post some pics again later.2 points -
HH-60G Pavehawk Kitty Hawk 1/35 DONE!!
Harold and one other reacted to Pete Fleischmann for a topic
Hello all- got the cockpit overhead panel wrapped up...except for the map lights still to get mounted, calling this part done- cheers Pete2 points -

Mirage IIIE Italeri EC3/3 1:32
Rocat and one other reacted to Scalefighter for a topic
All in all, I enjoyed the kit and eventually will build a second one later in the future. A Mirage IIIE in an air defense setup of Colmar based EC13 or a Belgian AF Mirage 5BA conversion are Standing Right on top of my to do list in 1:32.2 points