Leaderboard


Popular Content
Showing content with the highest reputation on 02/29/2020 in all areas
-
hi folks Hi Jay - as always thank you for the info - that drawing really helped and hopefully the positioning is right when the time comes! That is a fantastic film Torben thanks for posting - I actually took a few stills from it early on for things i didn't have photo's of. The only thing it shows that I won't be doing is the acid etch staining on a lot of the panel lines - it may be as it should be, but it is beyond me to do it and get it to look right Hey Geedub - now that is going to be hard - I wish i could actually blue the metal with a heat gun, but that would end disasterously! I haven't figured out how I will do it yet, but suspect I will just try standard airbrush & paints / powders, rather than go for the rainbow effect seen in the vid I find nearing the end of a build to be a tricky period - there are lots of little bits to do and the order of assembly is important as the model is quite large details can be added then damaged if appropriate planning is not done. I started to add some of the decals onto the airframe that cover all the little hatches etc and after a test, found the ones on the alclad wing went on with no visible film after setting solution so didn't bother with a gloss coat... I think it will look fine when weathered.. ..added the gun camera - no idea how I missed that.. ..for the stencils on bare metal I have no choice - I can't varnish the aluminium as over time it will degrade as the ali oxidises, so it is straight decal & setting solution.. I have to just accept it as is.. ...in most cases it's passable.. ...I decided to focuson getting as much on the top half done as possible, so there is less handling with all the gear & doors hanging out - the first part of this was finishing up the cockpit... ..I added the switch panel at the bottom right of the windscreen and made up the flourescent cockpit lamp.. ..on the other side, I added the throttle quadrant and control rods.. ..I have made a Gunsight pad and the first aid kit that hangs from the headrest from milluput, but won't show you that until it's finished (& if it's good enough..) ..otherwise, the cockpit is pretty much complete.. ..will probably start to sort out the rest of the glazing next - here a dry fit of the right cockpit windows... ..still lots to do, but it's all bitty stuff TTFN Peter11 points
-

Tamiya 1/32 F-16C
themongoose and 7 others reacted to Whitey for a topic
After starting, and nearly finishing this kit about 4 years ago, I dragged it back to the bench, cleaned it up, repainted her with lovely MRP colours and finished her off this afternoon. Sealed with a mix of SMS clears to get a matt but not nearly flat finish. Tamiya's 1/32 F-16CJ Aires Seat, some Eduard bits in the cockpit and exterior, Master pitot and Angle of Attack probes, Wolfpack WAR HUD and Crossdelta stiffener plates. It seems to be a popular kit on LSP lately. Not much needs to be said about the kit, it is very good. Spot the missing part that is now installed. Minimal fading and weathering. Some Eduard bits in the kit jetpipes to add interest. Ready for the shelf. I hope you like her.8 points -

1/32 Revell Fw 190 F-8 & A-8: Working on the wheel wells!
Greg W and 7 others reacted to VintageEagle for a topic
Hi there, I am an extremely slow builder, but I finally made a little more progress and managed to install the windshield. Some putty was needed but finally all went well. On the real 190 there were some frames on the lower windshield that connected it with the fuselage. I have added self-adhesive paper strips. The advantage is that you get a nice panel line. I’ll add primer over the weekend. Next is riveting of the wings. Cheers, Roger8 points -

Stuka! Airfix's classic 1/24th scale kit
Loach Driver and 6 others reacted to tomprobert for a topic
I've just added the final touches to Airfix's classic 1/24th scale Stuka. This was actually the Heller boxing but the plastic is the same - @Erwingave me a great deal in this last year and I couldn't resist A great kit to build, and despite its age it's crammed full of detail, has some lovely surface detail and goes together really well. What you see here is as it comes in the box, with the only additions being some Eduard belts and a bit of extra plumbing in and around the engine. All paints were Xtracolour enamels. Ju-87 B-2 'Stuka' - 3/St.G2 - Northern France, August 1940 Picture 1 by Thomas Probert, on Flickr Picture 3 by Thomas Probert, on Flickr Picture 4 by Thomas Probert, on Flickr Picture 7 by Thomas Probert, on Flickr Picture 6 by Thomas Probert, on Flickr Picture 8 by Thomas Probert, on Flickr Picture 5 by Thomas Probert, on Flickr Picture 2 by Thomas Probert, on Flickr Picture 9 by Thomas Probert, on Flickr Happy modelling, folks! Tom7 points -

Tamiya 1/32 F4U-1 Birdcage Corsair - Done!
Starfighter and 6 others reacted to Brett M for a topic
Thanks all. I'm working on the tape sections now (as you'll see below). Working on a wash for panel lines and rivets using pastels, drop of soap and water. I'm going to go back and clean the tape lines up more, try to hide the lines/rivets so it looks like, well, tape. We'll see. I also did spray a bit of the MRP blue grey using those SBD pics as a guide. It's pretty subtle but you can see it the most near the gas filler and wing roots going up the side of the fuselage. I dunno, I think it looks better. Just wanted to share progress. More mud to wipe off, retouch, etc. as the day goes on. Let me know what you think! Panel lines and details definitely show more. Thankfully, not huge gaping trenches, just enough to help it look better. And, you can see where I had more paint lift on the first row of ammo compartments, and that was from decal film!7 points -
Hmm, your right another detail I need to add - Here's how far it is right now... Cheers: Kent6 points
-
mfy first 2020 kitb , enjoy :5 points
-
Hi Chrish, neither can I! I am indeed postponing this build quite a lot my my plan for a piece of carrier deck. But nevertheless making good progress: Put the lines on the deck and pre drilled the tie-down holes. tie downs have been printed by Shapeways in the mean time. The weld seams between deck plates were made with Vallejo putty: Then I used a yoghurt-like primer to glue tiles onto tiles. I had that stuff as left over some years ago, already then I saw how there is very fine sand particles in there and how its structure would make a good anti-slip coating. By combing it with a very fine comb I made the orientation as you see on carriers: structure is accross over the seems, and length wise on the rest of the plates. after a successful test I put the stuff on the piece of deck, half an hour later this was the result: anti-slip coating on the deck!5 points
-
The front half of the crank case has been machined from acrylic, and detailed. It was not as hard as the aft half, because the aft half had the intake manifold ports. Here: Combine this piece with the aft half and it begins to look like a crank case: It is now time to sprout its blossoms (the cylinders). During my days off, I could not stop the little gray cells cogitating the problems ahead, which are many. Some involve the curved and formed pipes that make up the intake manifolds, and the exhaust pipes. So I attempted a little tuffy - the P & W provided exhaust stack for the forward row of cylinders - this part: Note it is actually a tube within a tube perhaps with the outer tube as an insulator of sorts (?). The outer tube has a weld fin along its length, and a flange near where it attaches to the cylinder head. And it is the "S" shape that makes it so challenging. I am going to use .125 inch diameter solder to make all these parts. This stuff: Now - the main reason I am using solder is because it can be formed relatively easily. I say relatively. This stuff is pretty stiff, taking alot of force to bend it. But once formed or bent, it has no springback, and unlike a tube, it has no thin walls that can collapse during extreme forming. I used .117 inch diameter on the Thunderbolt a couple years ago - that stuff was easily found in hardware stores. The .125 inch stuff was harder to find, and more expensive. It is also the largest diameter I could find commercially, and it actually is not large enough. For instance, a typical exhaust pipe on the Corsair, per drawing, is 2 11/16 inch diameter, or .149 inch in 1/18 scale. Although I cannot find similar data on the intake manifold pipes, by scaling various engine related drawings for Corsair and Thunderbolt, the diameter appears to be about the same as the exhaust pipes. Well - I have to use the 1/8 inch stuff; I have no choice unless any of you have any bright ideas. So - for that little exhaust stack prototype, I created a robust fixture, or tool, and it has to be robust: This fixture assures a fairly exact and repeatable final shape of the part. The solder was first lined with .156 diameter plastic tube, reamed to .125 inch ID, because it has to be slightly larger diameter than the rest of the exhaust piping. And then forced into an "S" shape with the fixture. It took a couple of tries with modifications made to the fixture. But it seems to work OK. I was fairly amazed the plastic didn't just split apart - it did not want to be formed into that shape! I now hope the fixture is robust enough to do this 8 more times. Here is the finished prototype part, which I think is good enough to just use as is: OK - must keep my eye on the ball. It is now time to finish the cylinders, including the air deflector jackets. That is what you will see next post. Thanks.4 points
-
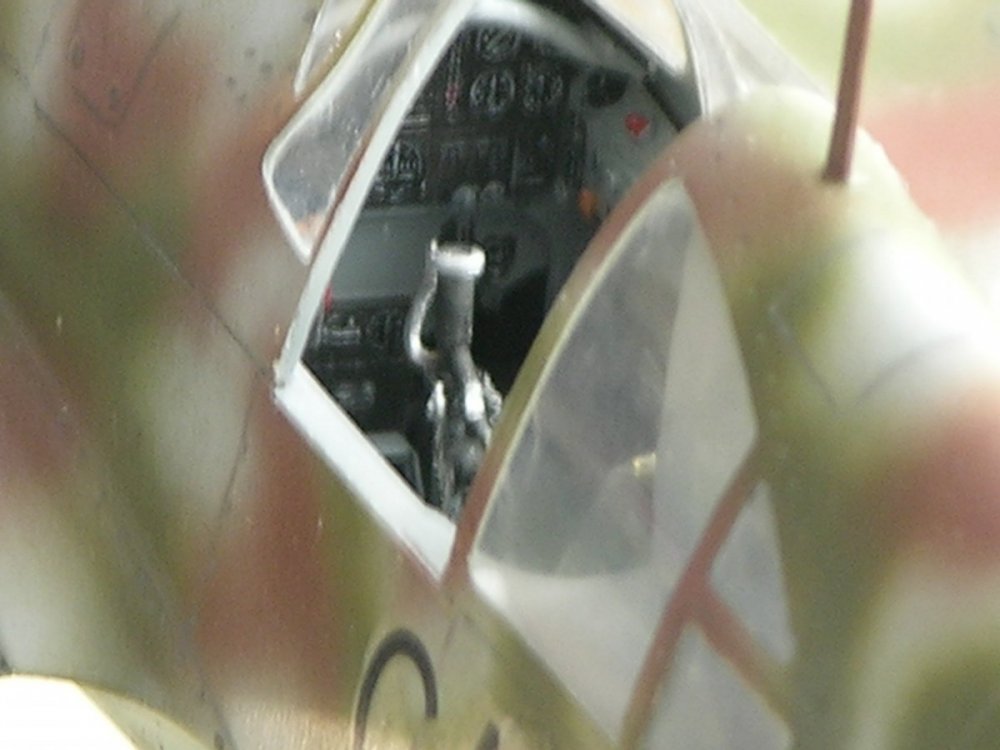
Tell me that's not a real cockpit - I dare you! Kev4 points
-

Forgotten War Mustang
R Palimaka and 2 others reacted to John1 for a topic
Spinner installed and final (I think) paintwork completed. Last open task is the canopy interior (anyone have any decent pics that show the inside, the Tamiya part seems much to barren) and adding a couple of antennas and I think this one will be done!3 points -

F-100D Thunderbirds SIX Foiled Again - Finished!
Victor K2 and 2 others reacted to themongoose for a topic
Thanks Eric, your work has been a great inspiration! ...and here’s a teaser for this weekend’s finish goal ... for guys doing this build in the future this is one of the secrets to getting the PE slats to function. Learned this doing RC aircraft Every one of those arms has to be at the same angle. If not slats and flaps don’t work in real life or on a model Here they Are side by side. waiting on epoxy to dry solid on the gear. Should be on her legs by dinner, not going to rush it. Lots of little stuff to do. Will post some pics again later.3 points -
Heres my new project.2 points
-

Mirage IIIE Italeri EC3/3 1:32
Buster99 and one other reacted to Scalefighter for a topic
Hello I am new here and will make my debut with a Mirage IIIE built from the Italeri kit in 1:32. The model took me more than 600 hours to build after some modifications, corrections and refinements were done. The italeri kit generally is a lot better, than the old Revell one, however the quality leaves something to be desired and it is not up to the standard of these days.2 points -

1/48 Eduard F6F-3 Hellcat Lt Vraciu, February 1944.
Martinnfb and one other reacted to Kahunaminor for a topic
In an attempt to break the deadlock on my bench I have started what in theory is a straight forward build, with a little twist. Eduard’s Hellcats are lauded as relatively simple to build with a good result. I intended to build with minimal AM, Ultracast prop and seat, to just have something on the go as everything else on the bench just doesn’t interest me and I wanted to do something quick and not Axis themed to redress the disparity ratios in the display cabinet: I started in the cockpit area and assembled and dry fit the main components. The kit seat back and base was reduced so the Ultracast seat fits a little better: I then turned my attention to the engine and the front and rear cylinder banks were joined. The Ultracast prop has an integral shaft, so the front of the kit shaft was removed. It will be drilled out at a later date. This allowed the magnetos to sit properly in the crankcase. Small holes were made in the cylinders to accept the PE wiring harness at a later date: So there it stood, almost but not quite. It was looking too simple so I added the wing fold kit from Wolfpack just to add some spice. A beautiful set that replaces the entire wings sections with resin: Keep tuned and thanks for looking!2 points -
F-16CJ, 91-0348, 77 FS/20 FW, SW, Operation Iraqi Freedom, 2003 (maternity base-SHAW AFB, North Caroline) Accessories Aires: cockpit, wheel bay, exhaust nozle Wheelland: Wheels Master: pitot tube Paint: Gunze C, MR Paint, Aero Master Wash: AK Interactive, Ammo Mig Foto: my frend Miloslav( thank you)2 points
-
I think it's time for me to take a break from the 'wood, wire & canvas' and work on something more 'streamlined'... Kent2 points
-
hello all, up-dating the 20mm tubs ,added cooling tube, stowage case and tool box enjoy, Rammstein2 points
-
That's it - I'm taking up knitting... Absolutely stunning Peter! Iain2 points
-
Hello. Maybe not the best pictures, but I made some shots from my load out for the F-4D.. For the centerline I'm still not decided. Options are a centerline tank, MER with 3 BLU-27s or a SUU-23, which has been finished also. I'm not sure on the AIM-7E. Was more of a decal practice update for me, certainly not my favorite part of the hobby. Sidewinders, same same, not decided yet on type, etc. Next week it is time for a new compressor, so see you next week with some more color on the F-4D. Kind regards, Robert Jan2 points
-

Operation Bodenplatte Decals
JerseyChris and one other reacted to D Bellis for a topic
The D-9 is period-correct, the A-5 not so much. You'll need an A-8 for Bodenplatte. Also, while I've never seen Bodenplatte specific decals, most any Luftwaffe markings dated late December would very likely be correct since virtually every operational fighter that could fly was thrown at the January 1st attack. HTH, D2 points -
Turned out great, Gaz!2 points
-
Some more work. I scratch built the small D shaped lump on the inside of each tank pylon. The pylon was sprayed with the light grey cam and then the dark green was applied approx. halfway along its length. I discovered that they were painted this way through viewing many photos. I have been experimenting with oil paints to add extra effects to the paint work. I added some blue spots to the uppermost panels of the burnt section, to simulate the reflection of the blue sky. This was blended in with a soft brush. It’s a very subtle effect but it’s there.2 points
-
Mirage IIIE Italeri EC3/3 1:32
daveculp and one other reacted to Scalefighter for a topic
The surface of the kit was almost completely redone by engraving new Panel lines and stitching rivets.2 points -
Mirage IIIE Italeri EC3/3 1:32
daveculp and one other reacted to Scalefighter for a topic
The model represents an aircraft of EC3/3, a Martel shooter in the air defense Suppression role.2 points -
2 points
-
Short Sunderland MkII
Starfighter reacted to tomprobert for a topic
Hi Kent, Maybe... since I last updated this I've done the detailing of the other interior side wall of the nose section but not much more. I was looking over the fuselage the other day actually, but I've got so many other projects on the go I didn't really have the motivation to get going on it again. However, having just rediscovered this thread after so long has got me thinking... Tom1 point -
Now that is unusual, but a very nice build. Cheers Dennis1 point
-

1/32 HobbyBoss Spitfire Mk.Vb
Landrotten Highlander reacted to Tolga ULGUR for a topic
DK decals are nice but a little sensitive. Though they are wet, they dry quickly and stick to the surface . So it needs carefully placement. HpH set works great and easy. It contains clear resin windscreen and canopy parts, windscreen base, corrected horizontal tails ,flaps etc.1 point -

Eduard 1:48 Bf109 F-4
mustang1989 reacted to matto21 for a topic
A bit of fiddly masking later... Matt1 point -

1/32 HobbyBoss Spitfire Mk.Vb
Tolga ULGUR reacted to P_Aybara for a topic
This is really impressive work!1 point -

Operation Bodenplatte Decals
Kagemusha reacted to Troy Molitor for a topic
I have a couple D-9’s from the decal sheet inside the book if interested, I’m not forcing any Anton on you. Its your choice not mine.1 point -
oh whens this start im planning a tornado build next1 point
-
BRP-250 bombs in 1/32?
wunwinglow reacted to onosendai for a topic
Holy words.....1 point -

Upcoming LSP Group Build - Cold War Jets.
Scotsman reacted to blackbetty for a topic
my Buc is waiting1 point -
1/32 HobbyBoss Spitfire Mk.Vb
LSP_Ray reacted to Tolga ULGUR for a topic
These are Gunze Sangyo acrylics as I mentioned in my first post. This is my favourite brand1 point -
Here is my latest build to be completed The Kit is a Revell 1/32 Hawk T1 with xtradecal markings(they required a lot of water to move around on the model) Starting this one in december and wrapped it up today. paint is Humbrol gloss black, the clear coat is Alclad Aqua gloss, with a final coat of Model master Lacquer gloss prior to decal i polished the paint with Tamiya Corse and Fine polishing compound. After the final lacquer gloss i used the Tamiya finish to smooth it all out. in the picture the pitot is missing, saw that later on and it is now installed. build thread can be found here1 point
-
Well, it's almost ready to try and make molds, as soon as I can get some new silicone ordered. Managed to actually model the pipes in Fusion and print them, so I'm pretty happy with that. I had some issues with the hollow rear end being too thin, but I corrected that by replacing it with a bit of copper tube. I'll try to take some better photos with the Canon this weekend, before I get to mold making. Tim1 point
-
Thanks So, I'm calling the ball turret a success. moving on and making some progress in the build again. Like Colonel John "Hannibal" Smith would say, "I love it when a plan comes together" Thanks for looking1 point
-

ICM I-16 Type 24: COMPLETED 3/12/2020
Azgaron reacted to Dennis7423 for a topic
Moving right along! I have a few rough spots of the fuselage paint to smooth out, and I am still working on getting a nice smooth transition between the fuselage and the upper fuselage insert. Slow and steady, right? 87668968_527102214579588_2060932630987145216_n by Dennis SAuter, on Flickr 87529547_866903240400560_2966052041786392576_n by Dennis SAuter, on Flickr I am using Vallego acrylics, and they are lovely. They go on much thicker than enamels, which takes some getting used to, but I am enjoying the color density and saturation. They are nice, lovely colors and I am looking forward to trying some more of them on some other projects. More to come! The finish line is in sight. - Dennis S. Thornton, CO USA1 point -

HH-60G Pavehawk Kitty Hawk 1/35 DONE!!
KiwiZac reacted to Pete Fleischmann for a topic
Ok so here are the map lights installed- these are scratch- and really friggin’ small! cheers Pete1 point -
HH-60G Pavehawk Kitty Hawk 1/35 DONE!!
Harold reacted to Pete Fleischmann for a topic
Hello all- got the cockpit overhead panel wrapped up...except for the map lights still to get mounted, calling this part done- cheers Pete1 point -
Mirage IIIE Italeri EC3/3 1:32
Rocat reacted to Scalefighter for a topic
All in all, I enjoyed the kit and eventually will build a second one later in the future. A Mirage IIIE in an air defense setup of Colmar based EC13 or a Belgian AF Mirage 5BA conversion are Standing Right on top of my to do list in 1:32.1 point -
Oh My Goodness Kent... Every new topic exceeds the last one! Truly Awesome work and Artisan too! Phil1 point
-

Painting AND THEN MASKING PE
Woody V reacted to thierry laurent for a topic
There are not many solutions. In all cases you need a mask with very low tack. The weirdest solution I have ever seen relies on wet paper masks! Cut the masks in paper, wet the paper with a little bit of water. Use the minimum amount of water to damp the mask. Locate cautiously the wet mask. Then use tissue paper to absorb any visible water. The idea is that the paper should be wet but no water should run anymore when you move it. When the mask is located, paint with your airbrush at low pressure. The two critical factors are the type of paper and the amount of water. This is not easy, asks for many tests but I saw guys making incredible things with that technique far before the arrival of low-tack masking tape or Frisket. Hth Thierry1 point -
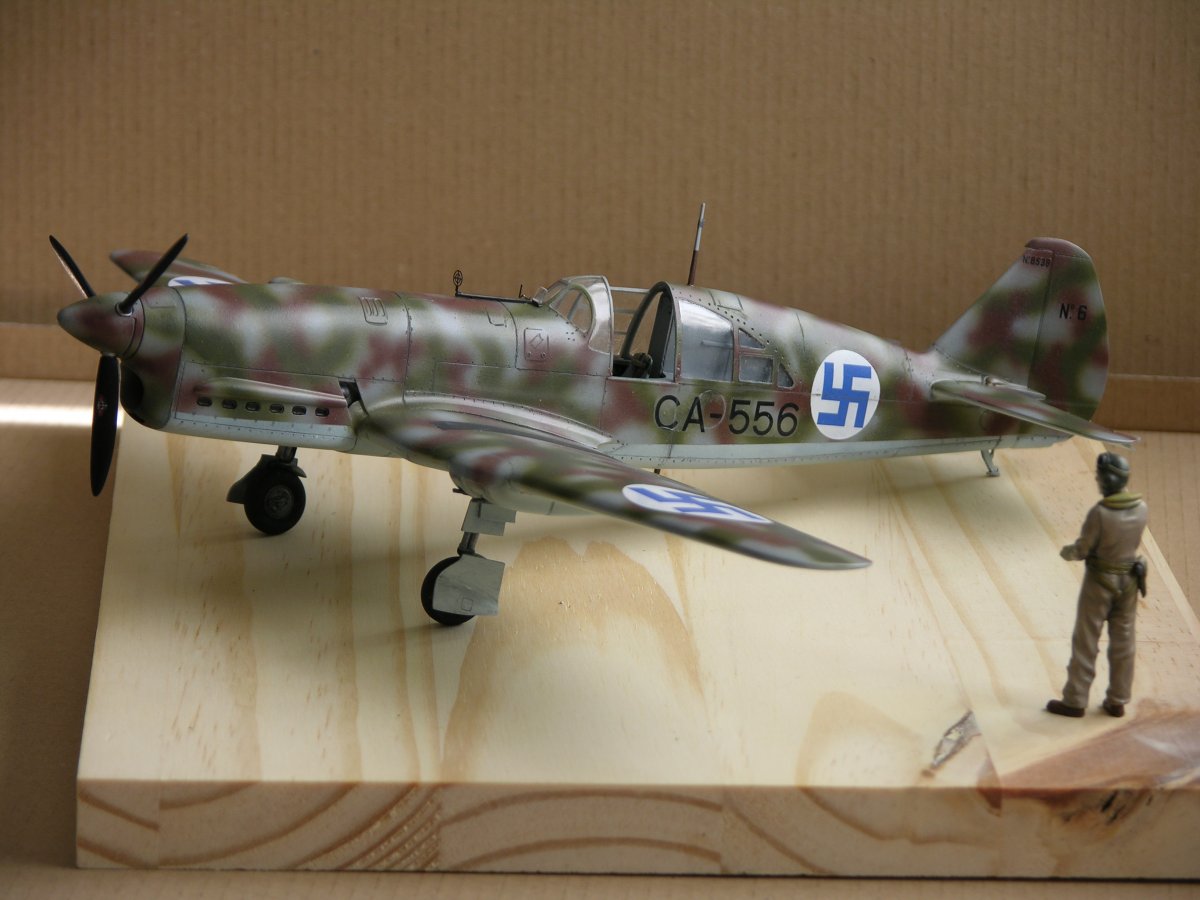
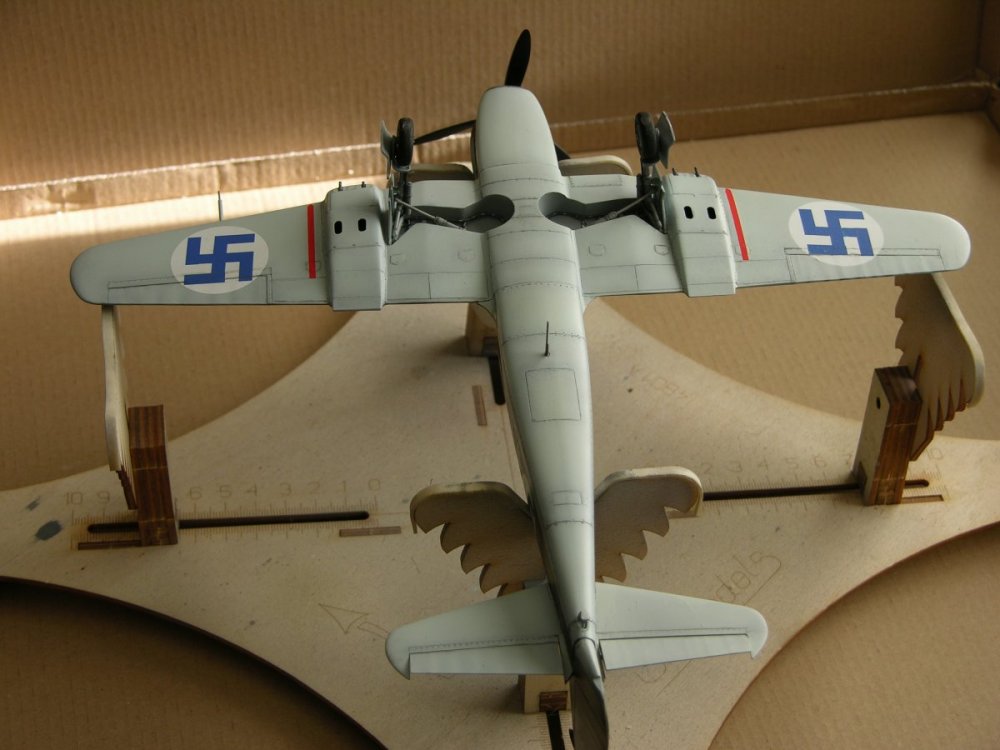
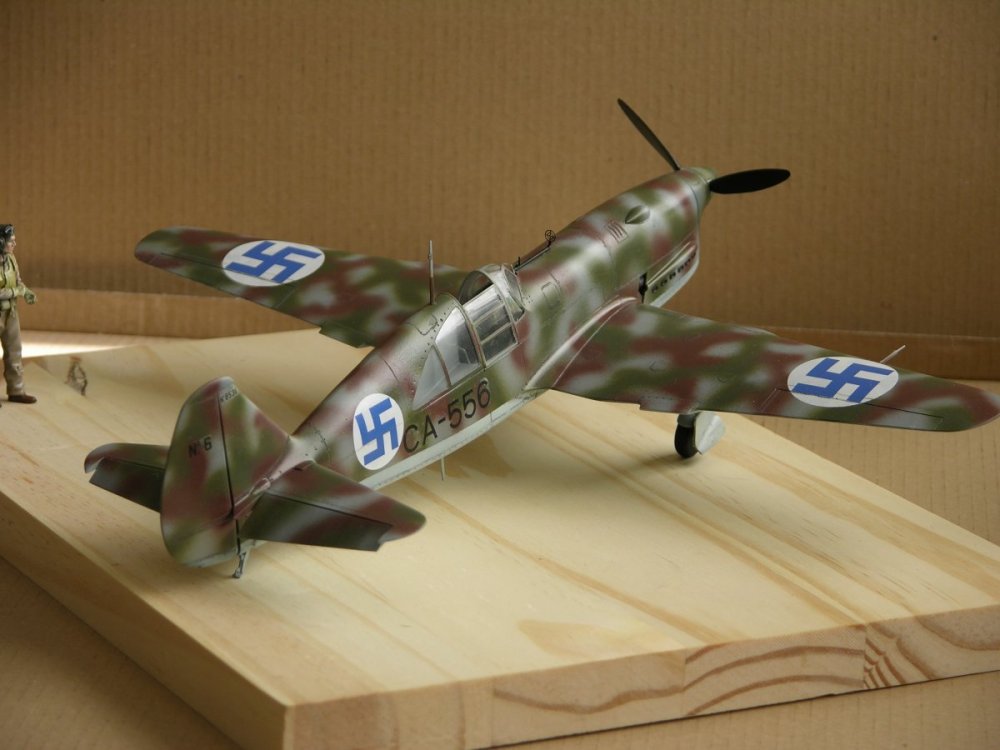
Finland has entered the gallery with Landrotten Highlander's Caudron C 714, something a little different. Well done mate. Link to build thread;


 1 point
 -

1/32 Tamiya F4U-1a Corsair - Boyington's 17740
Loach Driver reacted to Thunnus for a topic
Thank you Rod and Brett! Here are some more photos...1 point -
1/32 Revell Fw 190 F-8 & A-8: Working on the wheel wells!
Greg W reacted to VintageEagle for a topic
Finally, the cockpit has been married with the fuselage :-) The cover above the upper instrument panel was a bit tricky as it is not wide enough to fit into the slots on each fuselage side. I first tried to force it into place, but that did not really work and I then found out, the windshield would not have space anyways like that. The best way was to glue the front face to the backside of the gun compartment. It took me some glue and patience, but it did work finally. I'll be faster and more accurate with my 2nd Fw 190 that I am building. The rear part of the cockpit tub was a bit too short. I had another Eduard cockpit I used for test fitting and that one was a bit longer. I assume it is due to shrinking of the resin parts over time. Anyways, the good thing is that the gap in the rear will be completely covered by the canopy and not visible at all. I then started experimenting for the next part I am focusing on: the rudder. I was not happy with the way how Revell moulded the rudder and I sanded it to get a smooth surface. To add texture I used my Cricut machine to create masks. I tested it on a spare 190 fuselage. I applied the masks, then a layer of Mr. Surfacer, I then removed the masks and sanded the surface smooth. The original 190 rudder has some textile strips that were glued over the ribs. The surface is also a bit irregular along narrow stripes underneath the fabric covering (maybe glue?). I tested how 1) leaving the surface, 2) adding a decal stripe for some contour and 3) adding first a thin irregular line of putty (first masked the thin line, then added the putty) and on top of it a stripe of decals. I quite like the result and will go for it. The only thing I will do differently is to use a slightly thinner layer of Mr. Surfacer. Below are some photos I took with my smart phone. No fancy background. Cheers, Roger1 point