Leaderboard


Popular Content
Showing content with the highest reputation on 02/22/2020 in all areas
-

1/32 Zoukei-Mura Ta152H-0 White 7
Michael931080 and 9 others reacted to Thunnus for a topic
Thanks guys! Continuing the dry-fit session with the radiator cowling reminded me that the engine will need to be installed since it holds exhaust pipes. I snapped the engine into place to check the cowling fit. The engine assembly does not want to sit correctly on its own without glue. However the top cowling pushes the engine into the correct position. There is a possibility that I can perhaps glue ONE of the two engine side cowlings into place and have the other one removable. We'll just have to see when that time comes. The wing spar has been glued into the wing bottoms. I had to shave the back edge of the spar where it butts up against the PE flaps. I glued the upper flaps onto the upper wings using 2-part epoxy. The roof of the wheel wells have been painted and I've applied the contractor stamp decal from the Eagle Cal decal sheet.10 points -

USN Blue-Gray fading on SBD's
Alex and 6 others reacted to D.B. Andrus for a topic
A color shot of an A-24 in OD 41 & Med Green 42 Cheers, D.B.7 points -
T-45C Goshawk 1/32nd CAD...YOU CAN DOWNLOAD FOR FREE!!!!
Starfighter and 6 others reacted to Timmy! for a topic
Hello all, I have uploaded .stl files of each part I either printed to milled for my Goshawk conversion. Feel free to try the project yourself. T-45C Goshawk Part on Thingiverse In case you missed the plans thread go here for the drawings. T-45C Goshawk Plans Build articles can be found here...so you can figure out where the parts go. Build Articles7 points -
Belly weathering begun. Blending begu7 points
-
Hi Jari, I have seen that pic before and I would have loved to do that scheme as it has a Boomerang on the tail, a traditional aboriginal weapon well known by us Aussies. You do raise an interesting point about the weapons load though. I am still undecided about what will occupy the wing hard points. It will have to be an authentic load and one which Tom actually flew with. I have already asked him in a previous email and this was his reply. ‘ One of my most significant sorties was when I attacked and completely destroyed a large multi-story transshipment warehouse in near Vinh, North Vietnam. I hit it on two separate runs with large (1800#/810KG) Bullpup missiles (AGM-12B). It had a 1000#(440KG) warhead and flies at Mach 1.8 while you try to aim it with a small joystick on the left/forward console.’ We will work together to find a load out that both tells a story and showcases the load carrying ability of the aeroplane. Some more work. The E model has a large lump under the fuselage, which was not present on the A or B (I hope!) I removed it with a razor saw, very carefully in case I made a mistake and had to replace it! I glued some plastic card on the inside of the hole to act as a support and attached the part to the fuselage. Once it was set, I used some paper and sketched over the hole with a lead pencil, which left heavier deposits on the corners of the hole. I then glued the paper to some thick plastic card, and then cut out the shape, refining it with a sanding stick until it fit into the hole perfectly. This was then sanded smooth, ready for rescribing. Anyway, enough about the model, here are some more pics from Tom! Tom is the handsome guy in the middle, about to fly at an air show at Cecil field, Jacksonville Florida in 1968. Tom is the slot aircraft in this diamond formation. Tom taxiing in after the display. He told me his vertical stab charred was when he was flying in the slot in that diamond formation and got too close and too high, and burned the tail. But, the formation looked great! .7 points
-
I finally completed the base for the Albatros. It took a bit longer then usual because we have gotten a lot of rain the past several days meaning high humidity. So it took a lot longer for the various coats of stain and varnish to dry. Overall the build turned out ok. I made a few mistakes, most notably simulating the different shades of wood on the propeller, which I airbrushed far too straight. But overall the aircraft looks the part and the figure turned out pretty well. The scene could be entitled "Post flight", as it shows the mechanic facing away from the cockpit area with barograph in hand. I will be pausing my WWI aircraft builds, because I have decided to build the HGW Limited Edition of the Bf109 E-7. Based on the thread concerning HGWs wet transfers perhaps working best if one does not let them sit in storage too long I thought it best to get a move on and construct the kit. After I complete that project, I plan to build the WNW Pfalz DIIIa. I am going to try out the Gaspatch turnbuckles to see if I am able of using them to do a decent job making the rigging look better than I did with the DV and DVII. Enjoy the photos!5 points
-

Soviet Pin-Up
daveculp and 4 others reacted to ShelbyGT500 for a topic
Hello guys For a short break from flying birds, I build this birdy The model is resin GK, 1:9 scale, with a lot of re-works and scratches. The blue cap is from milliput, a lot of scratch-work for the pistol, bayonette and the aks-74u build from 2mm plastic sheet and photo-etched parts from spare box And here she is: Hope you will like her Thank you always for watching. Cheers friends.5 points -

The Revell Classic trilogy
Rick Griewski and 4 others reacted to Troy Molitor for a topic
The last two weeks I was reunited with my stash at my parents house. I moved my stash there while I relocated to Singapore for a few years. Recently, I moved back to the states and I was familiarizing myself with everything. I just ran across this! How cool is this box top!!!5 points -
So, first thoughts on the HGW wet transfers. MAKE SURE YOU BEND AN EDGE OF THE CARRIER FILM UP. Otherwise, good luck getting an edge to catch and peel up the film once it's dry. There are 1-2 that I couldn't grab an edge on, thankfully very small and I can blend them in. The carrier film is nice and thin at least? More work than a regular decal to ensure that the film stays up till it's dry enough.....then walk away, walk away! The transfers I added last night, need to see what else I can do to remove the adhesive. The film came off well this morning, but I can see exactly where the adhesive was. Any suggestions? Montex Reluctant Dragon decal.....went on perfectly and sucked into the rivets and fasteners with just Micro Set. One bubble in the film, stabbed with the #11 and some Micro Sol took care of it. This is all for now, just a quick snap from the Nikon. Now it's back to remodeling a bathroom for most of the day! You can see the carrier film sticking up in the air on some of the transfers.....gotta have that edge!5 points
-
With the work on my F-100D build coming to an end, I started my next jet project. I obtained the Trumpeter A-7E kit from a local second hand trader. The kit had a few parts removed from the sprue and some minor components had been glued together (only discovered after I had purchased it and got it home). This suited me fine however, as it fit within this years New Years resolution of only building stuff that I had already started... I have a few of these in my stash that’s for sure. I felt that with a project of this size, I would try and find a subject pilot, as this is my absolute favourite way of building a kit. There is nothing better than involving a person who once flew the aircraft that I am making a model of and trying as hard as I can to make it as authentic as I can to their memories of the aircraft. There are many stories that are untold, that sometimes a project like this can impart to many people. I am very interested in the Vietnam conflict and asked the question on one of the Facebook groups dedicated to the A-7 Corsair. I was pleased to report that one such individual answered my call and it is my pleasure to introduce him to you. I asked Tom to tell me a summary of his Naval Aviation career. I entered the navy in 1965 as a Naval Aviation Cadet (NAVCAD) and earned my Wings of Gold in 1967. I initially trained on the T-34B Mentor, T-2A Buckeye and F-9 Cougar before getting orders to one of the first A-7 squadrons in 1967. I flew 98 combat missions over North Vietnam and Laos flying off the USS America in 1968. I was flying the A-7A with VA-82 of which 49 of them were night missions. During my 31 years in the navy, the first 20 years I primarily flew the A-7A/B Corsair II, A-4L Skyhawk, and F-8L Crusader. People often ask me which one I liked best and I answer that it’s sort of like women, you like the one you are with at the time best. I never flew a navy plane that I didn’t absolutely love. I was also very interested in his aviation career after the military, being a fellow airline pilot. Here is what he had to say: After I got off active duty with the navy in 1969 and went back to college at Embry Riddle in Daytona (while flying the F-8s in Atlanta Reserve squadron, I got hired with a small commuter airline flying the Beech-99s. I then flew as a F/O on a Lear-23 before getting hired by Eastern Airlines in 1972. I was with Eastern for 18 years before moving to United Air Lines in 1990. I flew and instructed on the B-727 and B737 for United and worked in the training department as a Pilot Instructor. Eventually moving to flying the B-747-400, I stayed on the -400 for the rest of my career before retiring at age 60 as a B747 captain. I then went to work as a pilot instructor and check airman for Boeing on the B-747-400 training in Seattle and Denver and then I commuted to Seoul for 5 years teaching KAL pilots. I also taught a lot of 3rd party 737 pilots (Hong Kong Air, Mongolian International Air Transport (MIAT), Asiana. My last airline job was working for 5 years as a training check airman for Evergreen Air Lines on the Large Cargo Freighter (LCF) flying and training on the B747 LCF (Large Cargo Freighter). We transported the wings and fuselage for the B-787 inside the LCF from Italy and Japan back to the states for final assembly by Boeing. Here is a pic of Tom, on active duty in 1968 And his last aviation gig a decade or so ago: Here is an excerpt from the USS America CVN-66 1968 cruise book. Tom can be found on page 309, and his good mate Kenny Fields of ‘Sreetcar 304’ fame can be found on the previous page. https://www.navysite.de/cruisebooks/cv66-68/index_028.htm Tom has signed up as a member in this forum, (callsign BURNER) and will be contributing to this build in due course. Whilst researching the Corsairs efforts in Vietnam, I saw that the earlier versions were a little different to the E and D as offered by the Trumpeter kits. I was secretly hoping that the subject pilot would be one that flew an earlier version so that I could do a conversion and I was glad when Tom volunteered (I thought in the Navy you never volunteer for anything?) that he flew the A and B model. In fact, Tom picked up brand new A models from the Vought factory and flew them in Combat with the VA-82 Marauders during the types introduction into the war. One of the ones that Tom flew from the factory now resides at the Hickory Aviation Museum here: http://nebula.wsimg.com/3e256ab57f0d2d45d9854572ca5d2193?AccessKeyId=2158F2CB6BFA6619063B&disposition=0&alloworigin=1 Some work on the kit. I obtained a PDF copy if the A/B flight manual, which I am using as my reference for most of the changes in the cockpit. I used the Aires D model resin cockpit and as a lot of the panel will be changed, the type didn’t really matter. Here is the unmodified cockpit tub. Most of the changes in this part are restricted to the right side console. I carved out some of the panels and replaced them with plastic card. next up was the Aires main wheel bays. The fit of these is extremely poor, being far too undersized. I chose one of the sides of the bay as the reference side, glueing it into position with superglue, and then epoxying in the rest of the sides. The resulting gaps. The gaps were filled with thick plastic card which I left protruding front the sides of the fuselage and then sanded smooth. I will cover the small gap on the rear edge of the well with thin plastic card. The biggest aspect of the kit that will be changed is the removal of the single minigun port on the lower left fuselage and the addition of the cannon ports either side of the nose. The bulged fairing over the port was one of the small items glued in place by the previous owner of the kit. I removed the fairing, and then filled the inside of the oblong hole with plastic card, as well as the pilots folding ladder well. These were then sanded smooth.4 points
-
We take a look at ICM's excellent 1:32 Gloster Gladiator Mk.I... From what I've seen/heard this is proving to be quite a popular kit! Have fun, Iain4 points
-
thanks for the comments, how many years of modelling do we have between the 3 of us? and if we cant get the to work maybe its the product Anyway heres a few shots of Tamiya decals that are surprisingly good Panel line wash next, then matt coat with bit weathering4 points
-
I have the model ready for the final blend later this evening. I am aware how stark it appears now, but this is part of my "plan". I have begun weathering the belly. Wish me luck.4 points
-
Thanks, it takes a bit of work to get them mated up flush. I was extremely careful not to mess up that characteristic lower bulge when sanding, too. Jerry Rutman did a faithful job of mastering this conversion, and I did not want to lose any of the subtle detail he put so much effort into. A couple of other tricky spots to make note of: 1. The upper cowling piece that is molded into the D-13 upper nose piece from GMF was a bit warped downward on mine. It did not mate up with the top curve of the kit cowl very well, so I had to break it slightly at the panel line and bend it upward, holding it in alignment while gluing. Watch out for that on yours. I've circled it below: 2. The GMF fuse halves wound up a tad narrower than the kit tail assembly, and I did not notice it until I had glued the tail on. Make sure you check that before gluing the fuse halves together. It may require a bit of shimming between the halves to get them flush with the sides of the kit tail. I had to do a bunch of filling and sanding to fix mine, so void that if you can. See below: Tim4 points
-

How to scribe a panel: one solution to solve two difficult challenges!
Ryan and 2 others reacted to thierry laurent for a topic
Hi folks, I'm not going to discuss how to scribe or use tools or templates. There are already many posts about that. I will rather focus on two annoying issues: 1. How to scribe a specific panel that has a very weird shape 2. How to scribe a panel where you cannot use a template (e. g. on a wing fairing very close to the fuselage) I found a common solution to both problems! 1. Use a scale plan to get the dimensions of that panel and use a scriber and a standard template to engrave the panel in thin plasticard. If the shape is very weird, make a copy of the scale plan, cut the panel out of the paper, whiteglue it on the card sheet and scribe cautiously the perimeter. 2. Use a very thin scriber or scalpel blade to cut the panel and clean blemishes with files. 3. Glue the panel on the kit. Use either a very limited amount of CA glue or plastic glue. 4. Use a needle type scriber to cautiously engrave the panel perimeter (the panel will act as a reversed template). 5. Remove the glued panel with a blade and/or cautious sanding. Voilà! Hth Thierry3 points -
Thanks very much guys! Next up is the MG access door. The Tamiya part is a bit simplified and doesn't include the exterior locking levers (which should be extended when the door is open) and interior latches. Here's a pic that shows how the real thing looked. In addition to the door latches, there is a large handle next to the aft ammo feed. Also note the thin support rod on the right hand side of the door. I started off by carefully removing the recesses for the two exterior locking levers. When these are opened, you can see through this straight into the MG bay. I drilled a few holes with my pin vice and then used an X-acto knife to carefully remove the remaining material. I then used thin strips of PE to replicate the levers. As shown above, in the open position, they actually protrude through the opening into the inside of the door. One thing Tamiya does include is a nice decal that closely replicates the large loading instruction placard on the interior of the door. Here is how it looks from the frontal aspect. Sorry for the less than clear picture, I really need a better camera! Note that you can (barely) see all the way through the lever recesses. Also note the locking (I'm guessing) lever in the vertical position by the ammo feed tray. I replicated this from a piece of plastic card, carved, sanded and bent per the original. Also added some tiny bits of scrap PE and plastic for the mounting bracket. Here is how it looks on the backside. Note that the door is just press-fitted in place so the support rod is out of position. This will be in the proper spot once I glue it in permanently. Also note that I haven't done final touch-up painting and weathering. Sorry for the crappy pics but you can (barely) see the door's latching mechanisms. Also, one thing I neglected to mention before, later Mustangs (not sure if they came from the factory like this or were mod'ed later in life), had the fuel drain accumulator vent intake housing removed. In it's place was just the recess for the scoop and the drain opening. The Tamiya kit has the scoop molded to the fuselage (it will be interesting to see if they addressed this with their F-51D kit, the way the part is designed, I'm guessing they didn't). I carefully carved the scoops away (it's present on both sides) and drilled the drain openings. On some F-51D's, the recessed area was painted red, I'm not sure if my subject had this or not, still researching. Here is a nice reference for some late Mustang exterior mods. I'll be adding the g-suit opening and battery drain at the end of the build. And a final crappy picture. I'll try to post better pics later. As always, thanks for looking!3 points
-
Looking through factory drawings I found that all "Bubbletop" models had smooth floors, and the last one P-47 fitted with corrugated floor was D-23 Razorback. Below is the factory smooth floor drawing mark where we can clearly see that it was installed beginning from D-25 model. It was one of the feature of rearranged Bubbletop cockpit.3 points
-
1/32 Luftwaffe Oxygen Hose
BiggTim and 2 others reacted to thierry laurent for a topic
MDC makes them in black flexible resin.3 points -
FW190D-13 Yellow 10 conversion
Troy Molitor and 2 others reacted to Thunnus for a topic
Thanks Tim! I appreciate the tips... so helpful. I've got the Grey Matter D-13 conversion in hand and also the Real Model D-13 conversion. My plan is to use as little of the resin as possible. I'm going to try and sculpt the bulge onto the kit fuselage parts using the Grey Matter fuselage and my reference materials as a guide. But your work with the Grey Matter conversion is so seamless... it's giving me second thoughts!3 points -
1930s subject, and rigging-free ! It can't get better than that ! I really hope this kit does spectacularly well. Tony3 points
-
Thanks much guys! Just a small bit of progress, I completed the propeller. The blades are Quickboost "uncuffed" Hamilton Standard units, which seemed to be the most common ones used over there, although there are examples of the earlier cuffed blades and even a few Aeroproducts ones. Nothing particularly special about this assembly, given the poor conditions of the airfields, the blades would have been beaten up pretty good so I went heavy on the chipping and, (as is seen on many dirt airfields), I replicated most of the finish being worn off the back sides from the rocks and sand. That's it for today, as always, thanks for looking!3 points
-

75 Sqn RNZAF Mosquito Detailed Build
Bil and 2 others reacted to Anthony in NZ for a topic
Thanks guys, I just wish it wasn't so tediously long for you... I work on her most days, but finding time is an issue as always. However after many hours work I got the nacelles set at their correct angles (all the wing mods ment re-jigging the datums again). The resin carb intake got removed 3times before I was happy with the final sit and orientation. Now I have started detailing up the firewall. I cant finish this area until I finish detailing and painting the wheel well and then gluing the nacelle halves together. In the meantime here are a couple of pics to show where this nacelle is at. There will be a lot of detailing and plumbing in here as well as using a modified Merlin from the Airfix Hurricane as the powerplant. I can now however remove the nacelles and finish off all the surface detailing, especially on the lower wing. There are loads of panels, fasteners, drain holes to be added. Sorry the update is not very exciting and does not reflect the hours gone into this. Thanks for looking in Cheers Anthony3 points -

Tamiya F4U-1 Corsair as a FAA Corsair I, 5F JT 150.......FINISHED
MikeC and one other reacted to monthebiff for a topic
So a little more on the Corsair, I had originally sprayed the wheel wells in Salmon primer and was going to leave them that way but since back on the build decided to paint them white and then weather them a little. So with the u/c bay paint work complete I've mated the wing section to the fuselage and also added the tail feathers. Now need to get my ass in gear and work on the engine..... . Sad times as I hate engine build/ detail work!! Regards Andy2 points -

The Revell Classic trilogy
thierry laurent and one other reacted to ringleheim for a topic
I believe the Tony, George, and Jack molds were destroyed by the mold of an F-6F Hellcat.2 points -

Tamiya F-6D
Model_Monkey and one other reacted to SB20 for a topic
Heres my Tamiya F-6D. Nothing special, I just wanted to try Alclad and learn how to work with it for an upcoming build. I didn't forget the wing insignia, this aircraft didn't carry it.2 points -

Good source for lead wire
Dave Williams and one other reacted to Woody V for a topic
Excellent selection of various sizes of lead wire. Got these from Cabelas.com and also available from basspro.com. Under $25 with shipping.2 points -

T-45C Goshawk 1/32nd CAD...YOU CAN DOWNLOAD FOR FREE!!!!
Pete Fleischmann and one other reacted to easixpedro for a topic
Timmy! That is a very cool thing to do for the group! You’re on the cutting edge of all these incredible builds, so the fact that you’re willing to not only share your techniques, but the actual files to print goes above and beyond. A tip of the proverbial hat to you... Peter2 points -
This works. Alternatively, if you want a hollow tube you can use Tim's suggestion to create a coil with thin wire wound around a thicker gauge (or even a brush handle), then carefully remove it and adjust the distance between the coils by stretching or compressing it, depending on your needs. Next, wrap your coil in plumber's teflon tape, with the caveat that teflon being what it is obviously won't accept paint well. The better, more elegant solution is to cover the coil in masking fluid or even thinned PVA glue as the surface tension will bridge the gaps and will remain flexible once it dries, allowing you to bend the hose into whatever shape you need, not to mention actually taking paint. Your mileage may vary, of course, but with some practice you can get some pretty convincing results. Or you could always just use the bendy part of a bendy straw. Guitar strings are good too. By the way, I was under the impression that the Luftwaffe used mostly smooth hoses for their oxygen masks but just did a quick web search and only saw corrugated hoses in the period photos I found. Anyone have the full 411 on that?2 points
-
Correction 2.23.20: This is of a restored Bf109. See Radubs' post below. Maybe a guitar string? Maybe make your own out of wrapped wire? Maybe mold and cast a Tamiya 1/32 P-51D oxygen hose and adapt it? Sincerely, Mark2 points
-
? re Tamiyas F-4C/D raised panels
Tony T and one other reacted to thierry laurent for a topic
Exactly! This is why whereas I have nearly all the LSP Tamiya kits, I'm not waiting for anything from them. Any new kit is just a gift!2 points -
? re Tamiyas F-4C/D raised panels
Lothar and one other reacted to ringleheim for a topic
You take what you can get with Tamiya. They do whatever they feel like, and obviously 1/32 aircraft isn't a big cash cow for them. If it was, they would make more.2 points -
Beautiful work Tim! I agree about the cleanliness... you've got that Grey Matter resin fuselage perfectly integrated with the rest of the kit! I love this view since it shows very cowling bulge so clearly.2 points
-
I did get a little more done on the Harrier, mainly on the landing gear - adding some wire, removing the moulded on tie-downs and replacing them - and started painting the cockpit, I'll make some photos soon and post them. I have to say that I got a little bit side-tracked, because I started building a 1/32 Sea Vixen, based on Tigger's vacuform kit. As you can imagine, there is a massive amount of work to be done on that one, but so far, I've only been cutting up the plastic. The plan is to show it with wings folded, port engine bay open and engine next top the aircraft. Scratch-builder's heaven! Fortunately the plastic is thick enough to work on it. So, that'll be next. This weekend, I hope to work on the Harrier's avionics bay. I'll show the progress on it soon! Nic2 points
-
I am experimenting using only pencils and pastel chalk for weathering, no washes have been applied. All marks and scratches are copied directly from photos of in service Franks. The exhaust is too dark but I will tone it down after I finish playing drums.2 points
-
A bit more work this past weekend, this time on the cowl radiator flaps. The kit part is quite thick, and the D-13 had ALL of the flaps operable, including the one left closed on the kit part (a detail often missed on many of the builds I've seen online). I considered using the kit part with them closed, but in every photo I can find of the plane parked, they are open. Apparently they were mostly closed when the plane was airborne. With that idea shot down (pun intended), I cut all of the flaps off and made new ones out of brass sheet. I installed the actuator arms from the Eduard exterior detail set, which don't look too bad, despite being incredibly thin and fiddly, and will bend if you breath on them. More later, after I get it installed. Tim2 points
-
Nice and clean work. Congrat!1 point
-
Lead wire is used to make fishing lures, so you might consider checking major sporting goods stores in your country.1 point
-

Painting AND THEN MASKING PE
themongoose reacted to AlbertD for a topic
I've had good luck using brass black then primer then paint. The brass black seems to give some tooth to the surface.1 point -
I definitely want to see what you would do with one of these. There are some really great looking JASDF F-104 paint schemes too. I am going to pick up one of the 104 eggplanes for sure.1 point
-
Howdy folks, Andrew Birnie reviews another Airfix Hellcat update from Aerocraft: Aerocraft Models Hellcat F6F-5 (Early) Conversion with Decals for MINSI III Thanks, Andy! And thanks, too, to Aerocraft Models for the review sample. Kev1 point
-
Managed to get the cowl installed and primed last evening, so here she is all assembled and primed. Still some sanding to do and scribing to fix, then on to the canopy!! I like the the way the thin profile of the cowl flaps looks. So much happier with it than the kit part. I couldn't get the lighting right to show the actuator rods well. I'll try again this weekend.1 point
-
That looks amazing! The pilot looks like a non egg plane pilot. Really great work,.....I've got an F-104 and another egg plane in the stash to get to myself1 point
-
Greg we're all our worst critics as we are inevitably to close to the subject to be subjective. This forum has been a god send of support and encouragement. I love this "fun" builds, they're good stress breakers and in my case the only thing I can build atm. Cant wait to see this finished up, gonna be a real stunner!1 point
-
Lemkits 1/32 Me P.1099A & 1/72 Messerschmitt Me P.1100/1 - on sale https://www.ebay.com/itm/114119685606… https://www.ebay.com/itm/124087505422… http://lemkits.com/…/1-72-messerschmitt-me-p-1100-pre-orde…/ http://lemkits.com/…/1-32-messerschmitt-me-p-1099a-pre-ord…/1 point
-
Hi folks, Here are the latest pics of the Commander's Gun Station. The M2 is mounted and locked & loaded, T.U.S.K. 1 Armor Surround is installed as well as the Spot Light and M4 Carbine stowed. TAFN, Thanks for looking in! Barry1 point
-
For those that are interested, I've made a few tweaks to the weathering. Painted over some streaks that were too heavy, further worked on the upper wing USAF (additional chipping and then faded the markings a bit), and added some mud / dirt to the wing roots and areas around the MG bays. I also completed the bottom. A bit of additional weathering, removed some too heavy mud splatters on the aft tailplanes and added the underwing ID lights and pitot tube. I think I'm done on that portion of the model. Next up, I removed the masking. This is always a "hold your breath and hope for the best" type of event. More than once, I found some pretty bad paint spray that got onto the clear parts. This time around, it wasn't too bad. I had some light overspray, nothing that a very sharp toothpick couldn't remove. I'll hit the clear parts one last time with some polish at the end of the build. So here is where we are at: Still have some work to do on the upper surfaces. Next tasks that are up will be adding the latching mechanism to the canopy interior (strangely enough, Tamiya left this completely bare), adding details to the MG access door and completing the propellers (I just received Quickboost's cuffless Hamilton Standard props). As always, thanks for looking!1 point
-

Any gloss white under losenge decals?
Greif8 reacted to modelingbob for a topic
I generally do not like high contrast (like white) gloss undercoats for lozenge decals, because you often damage/crack/chip small pieces off of the decal whilst applying and it shows up like a sore thumb. And that requires a lot of work to correct. I much prefer a color of paint that is closer to one of the decal colors. That being said, some lozenge decals are meant to be applied over a white basecoat for color fidelity, so it really depends on the manufacturer instructions. I prefer lacquer paints (especially gloss) due to their quick dry/cure time and durability. I less prefer water based acrylic paints due to durability issues. I really dislike enamel paints due to the long dry/cure time. I don't like using Future alone as a basecoat as it doesn't really apply that smoothly over bare plastic for me. However, Future (or other gloss) over a coat of paint does work quite well if you can't find a gloss paint to match but have a flat/satin paint that does match. I haven't tried other gloss coats over bare plastic so I can't comment.1 point -

Tamiya F4U-1 Corsair as a FAA Corsair I, 5F JT 150.......FINISHED
monthebiff reacted to Wolf Buddee for a topic
Lookin’ good so far Andy. Don’t forget to bend the hardware at the ends of the shoulder harness straps 90 degrees. I’m wondering though if the FAA Corsairs were delivered with Sutton harness? Cheers, Wolf1 point -
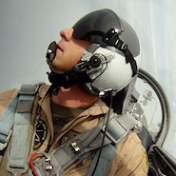
The initial colors are being blocked in on the pilot/seat, pictures taken after the first painting session. I've used Tamiya and Vallejo acrylics for the base painting. After the touch ups are finished, a acrylic clear flat will follow. Then, washes, dry brushing, detail painting and some Air Scale decals to finish.1 point


.thumb.jpg.cd22b958c9e88a898a21e18b862c523e.jpg)
