Leaderboard


Popular Content
Showing content with the highest reputation on 02/01/2020 in all areas
-
I'm having trouble motivating myself for this project because I do not like the properties of the black plastic. Not only is the color hard to work with, it has a consistency that I hate... soft and kinda rubbery, almost vinyl-like. Anyways, I went ahead and riveted the tail section.10 points
-
I have never seen it done like this before - thought it was brilliant... Peter9 points
-
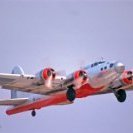
Thanks guys! Your comments are always appreciated! The epoxy on the wheels has cured so I attached the landing gear doors. A quick look up top with the prop in place and you can see that 740 is close to being done. But I'm hesitating on adding the fragile aerial array since that will signal the end of being able to work on the bottom.9 points
-
I have set the fuselage and interior aside thinking I would like to try "flak" and gun fire damage to the wings. I tied a few methods of determining where and how to put the damage on and finally came up with the idea of flicking tinted wet spatter on the wings from stiff a bristle brush in order to get random, or at least less concentrated injuries then, circling those spots and thinning the plastic from beneath to eventually tear out to match the markings on the outside surface....Makes sense? In my thinking, with damage coming from enemy action (and flack) the damage would be focused on trying to take out the engines. so most of the damage will be aimed in the engines directions. Left wing Right wing plastic thinned and starting to do the damage Thanks for looking9 points
-
This time F-5F Kitty Hawk, Kitty Hawk models aren't my favorites. However, the F-5F is a beautiful jet, so I had to have this plane in my collection.7 points
-
Thank you, Brothers. Put in a little more time. Performed a re-do and some original stuff. Removed the .015 rods. And replaced with .010 rods. .020 solder as hinges. Thought I would open up the storage bin. Non-regulation depth. Opened up the 'D' shaped space. The antenna wire enters into there. Apologies for the squiggly thing. Overall canopy work. Same. Canopy top structural wire connection. Drilled a hole through the canopy and the center structure to thread the antenna wire out the other side. Detail of pulley housing for antenna wire and canopy bottom structural wire connection. Canopy in place and slid back. Canopy 'glass' flexes and stays in position. Those familiar with the Fw190 canopy condition will understand. Thank you for looking and liking. Sincerely, Mark7 points
-
new pics of SB2C7 points
-

An oldie, but hopefully, a goody. Revells 1/32 AH-64.
Landrotten Highlander and 5 others reacted to Stokey Pete for a topic
With massive thanks to Dietmar/Knightofthesky, and the fact that he kept unused parts in a stash, I can now say that this project is coming down from the shelf of doom almost as quickly as it was placed up there. Much to the delight of my wife, it means another kit will get removed from the pile.6 points -

1/32 Messerschmitt Bf 108 'Taifun' by Eduard
Rick Griewski and 5 others reacted to Jan_G for a topic
and sprues review over on DSV https://www.detailscaleview.com/2020/01/eduard-32-bf108-taifun-sprues-review.html6 points -
I found my Dads old Navy Slides (CVA-66 USS America world Cruise 1968)
Coneheadff and 5 others reacted to JeepsGunsTanks for a topic
Ok, another big batch here, I think this is all the first batch of scans. I had scanned more, but then the scanner broke, and I saw how much better the new one was, I just put all the scanned slides back in the un-scanned stacks and started over. So now I will start scanning again, the fresh scans will be all the crossing the line stuff, and shots from some towns in I''m guessing Japan and the Philippines. An SH-2 Seasprite of HC-2 on one of Americas Elevators in what looks like Subic to me, but I'm no expert. Another SH-2 from HC-2, this one down on the hanger deck. A nice shot of an RA-5C Vigilante with RVAH-13. These were such neat looking planes. That looks like jungle back there to me so maybe Subic? I wonder why the jet blast shields are up? Another nice shot of 606, at sea, while on an UNREP it looks like. Nosecone is not fully in place I always wonder on things like this if it was up for normal preflight inspection or an easy fix or maybe it's waiting to go down to the flight deck for more extensive service and repair? It looks more worn in this pic too, the red on the front canopy from is almost gone. The nose of an RVAH-13 RA-5C, with some line crossing action going on. I wonder what the guy up on the Island with no shirt on is doing! Its very clean, but the warning stickers are worn. We have three A-7s, and a F-4J and a hill, with houses and a lot of jungle like trees! You can see the ship showing the ravages of the voyage in some of these shots. Well, this shot is looking aft, from just forward of the angle deck on the port side. No idea of the location here, having grown up on the west coast, I imagine the east coast could look like this, I mean, that looks like parts of the San Francisco Bay area, where I'm from. My dad and Mom both grew up in Hayward California. His Dad was a Navy Man, and was a Pearl Harbor Survivor. Anyway, my thoughts here are it could be the east coast right as the world Cruise was starting or one of the spots along the way. Those uniforms look pretty warm. This image looks like the temps might be a little hotter for the men on the flight deck. Looks like he is standing near the angle deck looking towards the Island when it was taken. I also wonder if that very boxy structure with the big windows and five lights or portals was an original part of the ships design or just put on later, it looks out of place. I like big Airplane Butts and I can not lie! Er uh, the tail end, of a VF-33 Phantom and VAQ-130 Sky warrior and the nose of another. Look aft at the arresting gear, it almost looks like there is a low spot in the deck if you follow the white like back from the two guys in red, Ordnance guys? Looking aft, some of the same aircraft parked on the right. I nice shot, i'm going to guess in the US on the east coast cause there seem to be women on the barge and the Officers in Black uniforms that look a little hot for the Philippines? another shot of my Dad working on a Martin Baker Ejection seat. I remember him telling me a story about the scariest thing he ever had to do, while in the Navy. While with VMF-121, the west coast Replacement Squadron for the Pacific fleet. Someone being given a right in the back seat of a Phantom, I don't remember exactly why, but as the plane was taxing, the person the in back panicked and grabbed the ejection seat handles above his head and pulled them just enough to blow the canopy off the plane. They called him out to put the safey pins back in the seat to disarm it, and he had to do it with the guy witting there and the system partially fired. It all worked out in the end since I'm around and it took place several years before I was born. Those look like some of the boxes in the earlier pics. I really think these two were taken towards the end of this time in. I do have a question though. His rank seems to be Petty Officer Second Class, two chevrons and the eagle, why does he have a Petty Officer Third pin on his hat? Just a random pic of a Sailor. This guys looks a lot older to me, and looks annoyed. I assume this is in a enlisted lounge of some sort. Ok and now another UNREP photo, and this one is really interesting, its another supply ship, and if you look, you can just make out a pair of SINGLE five in gun mounts on a Destroyer taking on supplies on the other side. Is that a Fletcher Class Destroyer? Not a super busy weekend so I should have lots of scan time, so more to come.6 points -

Other Nurmberg LSP notables...
Landrotten Highlander and 4 others reacted to Gazzas for a topic
Honestly, I've had a crappy few days. Got planes mixed up. Got forum threads mixed up. Tried to brush my teeth with Anti-fungal cream. After throwing away the tooth brush I considered googling "test for early onset of dementia".5 points -

1/32 Revell Supermarine Seafire Mk 1B
Alain Gadbois and 4 others reacted to kopterdoctor for a topic
Well first coat of RAF Blue Gray on FWD have. Been informed dinner will be ready in 10 min.5 points -
Greetings all; Finally I've had some free time lately to get back to work on the 'Vestal Virgin'. Still no major paint work yet, just lots of parts cleanup, wing assembly, and interior detailing. Here are a few photos of where I'm at: Wings coming together: Just can't resist posing it all together to get a feel for the size of this bird; biggest LSP I've worked on to date : Here are a couple of shots showing some detail work; the rear gun mounting is fairly nicely detailed out of the box, but there are connector link rods that relay the motion of the trigger grips to the gun mounts; due to molding restrictions, these are molded as lumps of plastic with no real detail. I've shaved them off and replaced them with styrene rod of an appropriate diameter; I neglected to take a "before" shot, so there's nothing to compare it to, but I think you will get the gist of it: And this assembly posed in a fuselage half, showing how this is quite prominent under the tail gunner glazing. I'll likely add some rib and stringer detail here as I did with the forward compartments; you can see my 'notes' to myself what and where: Next, a few shots of more interior detailing in the fuselage; I've borrowed a page from the playbook of a few other builds here and added some ribbing and stringer details using Evergeen styrene 'T' shaped stock and square stock. I just love this kind of work, it's actually relaxing for me . You can also see some of the Eduard etch parts in place. I may add some wiring bits and bobs, but we shall see. And, one of the pleasures of owning a laser cutter for my business is I get to do this - a quick CAD drawing and I'm cutting some ribs and structure for the interior of the escape hatch: And here are some of those parts in place, along with a floor and more rib and stringer detail to "busy" up the waist gunners compartment: So that's all I've got for today friends, thanks for checking in. I'm hoping to get to some painting real soon, stay tuned! Jimbo5 points
-

Ju-87B, 1:32, Trumpeter
dodgem37 and 4 others reacted to Hartmann52 for a topic
5 points -
Thanks for checking guys! I really appreciate the comments! The bottom has been dirtied up just a little bit more. I lost the clear light lens for the top of the fuselage. Took a couple of days to look for it but it didn't turn up. So I used clear UV epoxy and it turned pretty well. I was even able to replicate the tear-drop shape. Some details were added to the sliding canopy including the three rear-view mirrors. The tail wheel and doors have been glued into place. Quick set epoxy was used to attach the wheels, making sure that the flattened spots on the tires are correctly oriented.5 points
-
Progress, finally... Have got the wing done bar the flaps and slats... really happy with the finish, just a little bit of detail to scribe back in. Fit wasn't great, taken a lot to smooth it in as you can see by the large Mr.Surfacer areas. Light coat of primer to check it out and I can now move onto the fuselage and close it up.4 points
-
Thanks guys! Added some more chipping with a silver pencil...4 points
-

1/32 ZM Henschel Hs-129 B-2......FINISHED
Rockie Yarwood and 3 others reacted to monthebiff for a topic
I've now got the basic winter camouflage on. Time for some fun with the weathering process now! Regards Andy4 points -
yup, the way things have been going so far I tend to build the F too. Revell has announced if for October or so, I will surely be ready by that time. in the mean time I have finished the weathering: this is the underside. Might make that a bit dirtier still under the nose: at the air intakes, including patched up stains: lower wings: upper wing: on the walk ways. the black spine will remain glossy, after polishing I taped it off before the matt coat: then sealed everything with a final cote of gloss varnish. After drying I applied 3 thin layers of matt coat from Ammo MiG, left part are matt, right still glossy: you can easliy see the difference of the gloss with the matt layer weapons are matt now:4 points
-
So has someone started printing/making drop tanks, wheels, pylons, new nacelles and a fin extension? This is the one I would like to model.4 points
-
schemes included in kit http://www.kitreviewsonline.de/eduard-pressekonferenz-in-nuernberg/4 points
-
Hello Trying to catch up with some late 2019 built I did not shared yet with you guys. Here is the magnificent Tamyia mosquito. Pretty much everything as been said about this kit. I think it is close to perfection. I added some Barracuda decals in the cockpit, Master's metallic guns and rockets from Special Hobby with MDC mountings. Edit: it was also the opportunity to test the Tamyia customer support as the nose fairing was missing from the sprue when I opened the box. I contacted Tamyia europ and they were quite efficient in answering my request quickly and ordering the new part in Japan. I wish you all the best for 2020.4 points
-
The G6AS parts as being used by a VERY happy customer! :-) Fitting, at least for me, was challanging but it worked in the end... cheers Uwe4 points
-
On mine => (here) I used Special Hobby (I think they are initially intended for their tempest) rockets and rails and MDC mounting stubs. Requires a bit of DIY, nothing exceptional and you have a convincing result (at least to my opinion). cheers4 points
-
I can't even imagine how much time and effort that must take to do. I can't even seem to finish a freaking model the regular way. Tim4 points
-

F-100C & F box art at Nuremburg
Andrea Ferrari and 3 others reacted to LSP_K2 for a topic
I can still readily recall the happy days of my youth, slamming together whatever junk kit there were at the time, Hawk, Airfix, Aurora, Lindberg, etc., really not knowing (or caring) how inaccurate they may have been, and having just tons of fun doing it. Granted, some things have now changed since I've gotten older, but I still don't tend to obsess over the accuracy stuff too much, unless it's so whacked out that I just can't avoid it.4 points -
An oldie, but hopefully, a goody. Revells 1/32 AH-64.
Anthony in NZ and 3 others reacted to Knightofthesky for a topic
Here it is4 points -
A few shots of the finished Gladiator and gang. Please note, just for the record, there is no known picture of a 56 squadron Gladiator wearing the famous red and white chequerboard, this is supposition on my behalf!! (Looks pretty though ).3 points
-

F4U-1A Lt Cdr. Tom Blackburn
Joerg and 2 others reacted to Miloslav1956 for a topic
Hi all, Here is my another Corsair . Tamiya Model HGW wet transfers, seat belts, stencils Barracuda wheels Eduard instrument panel & All colours MRP3 points -

Ki-45 Kai Hei Toryu: 2nd Squadron, 4th Sentai
corsairlada and 2 others reacted to Uncarina for a topic
I finished the Zoukei Mura Ki-45 Kai Hei Toryu, depicting the aircraft flown by 2nd Lt. Sadamitsu Kimura of the 2nd Squadron, 4th Sentai Flight Regiment. This is my fifth completed ZM build, and I realized that these kits are probably the most engaging, educational, and fun to build that I've ever experienced. To be sure, I had some build challenges, but the way the kits are engineered, along with the extraordinary instructions, has resulted in very little stress and a lot of pleasure. Of these builds, I'd rank this up there with the Do-335 and the Ta-152H-0 in this respect. For this build, Brian Leitch (Out2gtcha) very kindly created a mask for me using his Silhouette Portrait that enabled me to add the eight B-29's that adorned the portside nose of this aircraft: In fact, his creation inspired me to purchase my own Portrait, and I used this to add the Hinomarus and squadron marking. I painted with Tamiya acrylics and weathered with pastels and oils. The only aftermarket were the ZM weighted wheels and Brengun photoetch crosshairs. I'm looking forward to the Hs.129 build! Cheers, Tom3 points -

XB-51 Dragon
themongoose and 2 others reacted to Dandiego for a topic
A little color for the seat and consoles.................... Dan3 points -
1/32 ZM Henschel Hs-129 B-2......FINISHED
Rocat and 2 others reacted to monthebiff for a topic
Definitely brush painted by hand John, here are a couple of shots out of Henschel Hs 129 in Romanian service volume by Horia Stoica, Dan Antoniu and Vasile Radu. As you can see, roughly applied with a large brush! Regards. Andy3 points -

HH-60G Pavehawk Kitty Hawk 1/35 DONE!!
Stalker6recon and 2 others reacted to Pete Fleischmann for a topic
Thanks G-dub and all for the encouraging words! Greatly appreciated friends! I needed a break from the ceiling work, so I thought I’d take a stab at the ALQ-144 IR disco light. First time using this Hasegawa irredentist film- It it was a little tricky to apply. It is adhesive backed and very thin, and somewhat stretchy..similar to BMF- cheers Pete3 points -
Just what I need a self building kit Cheers Dennis3 points
-

F-100C & F box art at Nuremburg
PhilB and 2 others reacted to Darren Howie for a topic
I think everyone grew up building kits with far larger problems than the Trumpeter F-100. Times change peoples tolerance for issues change. I used to obsess over errors buying tons if resin which made kits overly complex to build for very limited gain except my obsessed desire for accuracy. Guess what the number of kits finished plummeted and enjoyment degraded sweating issues only i worried about. These days a resin seat and some burners are generally enough...kits finished escalated, enjoyment returned. So bring on the F-100F and some stuff to do a Wild Weasel 1...and a gloriously shiny F-100C.3 points -

Need Bronze Landing Gear for ICM I-16 Kits
Rick Griewski and 2 others reacted to LSP_Kevin for a topic
https://aerocraftmodels.bigcartel.com/product/main-undercarriage-struts-for-polikarpov-i-16 Kev3 points -
Thanks Chuck! Greatly appreciate the comments! I don't think I would've started this one if I didn't consider the Corsair to be well on its way to completion. I think 1-2 ongoing builds is optimum for me. Here's the seat after modification...3 points
-
I'm pleased to present my Tamiya DH Mosquito Mk VI representing MM403, SB-V. 464 Squadron, RAAF, September 1944. The aircraft took part in Operation Jericho, the raid on Amiens Prison on 18th February 1944. The amazing Tamiya kit is a joy to build and I added HGW seatbelts, some resin wheels and tyres, EagleCal Decals, Barracuda Studios cockpit stencils and Master gun barrels to just go that bit extra to make it look swish. I used MRP paint for the exterior surfaces and SMS Interior Green inside the cockpit. My original idea was to keep the cockpit door open but I found that it ruined the fine lines of what is arguably the most beautiful aircraft from WWII, so I closed it up. You can still see plenty of detail through the crystal clear canopy and its exquisite canopy framing. I prefer my models to be complete so no engine detail was added and the cowls closed up after painting the undersides. I tried to represent some of the wear and dirt that this aircraft shows in some AWM photos of her. Burnt Umber and Dark Earth oils were used to stain panels and fuel stains at the filler inlets and to bring out some of the finer details and then dirt stains added using hard pastels scraped off onto a fine brush for exact workings and a wider soft brush for area type stains and dirt. The invasion stripes were carefully measured and masked off to ensure parallel lines and equal widths. Nothing was spared the dirt and grime. Upper surfaces camouflage pattern was sprayed free hand . Overall a fantastic kit of a beautiful that was a dream to build.2 points
-

NLLSP- No Longer a Large Scary Project- finished
chrish and one other reacted to Alain Gadbois for a topic
Great idea to get a random pattern of damage! Can't stand the sewing machine regular holes we see in movies! You are making very good progress! Alain2 points -

1:32 Douglas A-26 Invader from Trumpeter/Hobbyboss?
Alburymodeler and one other reacted to ChuckD for a topic
DISGUSTING. SO LIKE TRUMPY BOSS TO OVERLOOK SUCH GLARING FATAL FLAWS!!!!!! WHERE ARE THE AILERONS, HOBBY BOSS!?!??!?!?!?!?! THE 'E' TEAM CLEARLY MADE THIS POS. AWFUL. YOU COULDN'T PAY ME TO BUILD THIS GARBAGE.2 points -
Wow nice , Your Dad coulda been a photographer. I might if they could play MP3s2 points
-
Excellent.2 points
-
Ok ... More stuff for the RAAF Project(s) ... On Thursday the "Hornets Down Under" book turned up ... It looks like it might be ok as a reference but I haven't investigated it enough yet to be able to tell if theres any pointers to variant differences ... Dunno why they'd include a cutaway of a 'C' ... since we didn't use 'em???? Yesterday my order from Spruebrothers turned up ... An Academy F/A-18D to be converted to an RAAF B It has be pointed out to me that a "Must Have" in terms of AM for jets is seamless intakes where you can get 'em ... most of which are corrected if there are dimensional or shape issues ... so I grabbed this GT Resin gear in the order ... for the 3 "Legacy Hornets" and the F and G kits in my possession. Rog2 points
-
I am building the D at the moment. Using the tweak list as a guide, I am fixing most of the issues with very minimal effort. Don’t people want to use model building skills anymore?2 points
-
 And with that I call this session as DONE! OVER! FINISHED! Thats it buddy! Elvis has left the stage! Thanks a lot for the interest and for following on. I hope the flyout (if wanted) will follow soon! See you for the next project!2 points
 -

1/32 Zoukei-Mura Ki-45 Nick
Victor K2 and one other reacted to Bladerunner for a topic
Ok... so I skipped ahead on this one. I'm also having a terrible time with imgur... it keeps crashing on me. Anyone else have these issues with that photo site? I can easily say this is probably going to be the most detailed Nick we will ever see in regular kit form. Very good model overall. I was bogged down a bit at the end with the painting but it was worth it. I wrote up my build here Model Airplane Maker2 points -
Hey, I've found another one: Juraj2 points
-

1/32 Revell Bf109G-6/AS Hohenjager
Martinnfb and one other reacted to chuck540z3 for a topic
I don't know how you do it John. As a guy who has difficulty chewing gum and walking at the same time, I can't imagine working on more than one project at a time, much less 3! Like your other work, I'm sure this build will be stellar, so good luck and model on! Cheers, Chuck2 points -
This is for you Dave... As you can see, you were right, the Collishaw Naval Officer figure from the Sopwith Triplane kit, fits the Danish Naval theme perfectly! Thank you Dave for your generous donation to the H.M.I. build. Cheers: Kent2 points