Leaderboard

Popular Content
Showing content with the highest reputation on 01/23/2020 in all areas
-

1/32 ERA-3B Skywarrior - 3D printed / scratchbuilt
LSP_Paul and 8 others reacted to Starfighter for a topic
The cracks kept on re-appearing, so out came the heavy artillery. The grooves were filled with superglue and Microballs. After some additional puttying and sanding, I fitted the tail fin. I used aluminium profiles from Albion Alloys to ensure perfect fit and stability. Finally some visible progress!9 points -
Thank you, Brothers. 'Looks like some real Optivisor-level work there!' Indeed. I used to use a 10x watchmakers loupe I picked up from somewhere. But my nose kept getting in the way! Small update. The things you do for love . . . Not so focused. Oh well. Attempted to make the inner door retraction arm a bit more accurately. That's better. A nut will go on top of the brass eye. Still have to trim the rod-to-D ring connection. Udder side. Double-sided adhesive film as temporary fastener. Thanks for looking and liking. Sincerely, Mark8 points
-
F-16CJ, 91-0348, 77 FS/20 FW, SW, Operation Iraqi Freedom, 2003 (maternity base-SHAW AFB, North Caroline) Accessories Aires: cockpit, wheel bay, exhaust nozle Wheelland: Wheels Master: pitot tube Paint: Gunze C, MR Paint, Aero Master Wash: AK Interactive, Ammo Mig Foto: my frend Miloslav( thank you)7 points
-
I used the Aires wheel bays, but only for the front wheel.7 points
-
First sprues: www.facebook.com/DoraWings Juraj7 points
-

Buchon Scale Models - 1/32 scale HA-1109-1KL Tripala
Rick Griewski and 5 others reacted to Trak-Tor for a topic
aeroscale.kitmaker.net - Tripala Conversion Set Ready www.facebook.com/AttitudeAviationAs - Buchon Scale Models I can see some discrepancies in the labels there (HA-1109/HA-1112), but I'm sure the experts know... Cheers. Juraj6 points -
I still have to paint the black part behind the exhaust and the cannon.6 points
-
A new project! With my Corsair build on the downhill side and me struggling with the scribing work on the Ta152H, I wanted a change of pace and decided to start introduce a new build. I am going to convert the Revell Bf109G-6 kit into a Bf109G-6/AS. This conversion utilized the Daimler Benz DB605AS engine with improved high altitude performance. Physically the G-6/AS is characterized by a new smooth engine cowling that deleted the characteristic "beule" bulges over the MG131 cannons mounted on top of the engine. The genesis of this project is rooted in me having the G-6 as a donor kit for an older G-10 build. I needed to the smaller wing bulge parts but otherwise the kit was complete and I wanted to make use of it. When Alexey at AMUR Reaver produced his G-6/AS resin cowling, I thought this was a great opportunity to utilize a kit I already had. So.... I had swapped out the smaller wing bulge from the G-6 kit with the larger wing bulge from the G-10 so these would need to be replaced. I picked up a set of the smaller bulge wing parts from Barracuda Studios, which I hope is a drop-in replacement. The core of the conversion is the AMUR Reaver resin cowling. It is cast in a cream color, similar to the resin that Barracuda Studios uses. There is some discoloration in the casting but it does not seem to manifest itself in the smoothness of the surface. The cockpit will be replaced with Aires resin. I had very good experiences with the Aires resin cockpit for the Revell G-10 build and am crossing my fingers that this set will be similar in design and execution. Three different breeches for the gun firing through the prop spinner... does anyone know which one(s) would be appropriate for the G-6/AS? The kit prop and spinner features an awkward seam resulting from trapping the prop blades between the forward half and back half of the spinner. This design also makes painting of the spinner difficult. To alleviate these issues, I'm going to use Barracuda Studios resin prop and spinner. The kit wheels will be exchanged for a set of Barracuda Studios resin wheels. The kit exhausts are not hollow so I'm replacing them with a Barracuda Studios resin exhaust and supercharger intake set. And finally... another resin/metal prototype for the landing gear! To summarize the aftermarket add-ons for this build: 1. AMUR Reaver Bf109G-6/AS Engine Cowling (Resin) 2. Barracuda Bf109G Upper Wings with Small Wheel Bulges (Resin) 3. Aires Bf109G-6 Cockpit Set (Resin and Photoetch) 4. Barracuda Bf109F-4 thru G-14 Prop and Spinner (Resin) 5. Barracuda Bf109G Wheels (Resin) 6. Barracuda Bf109G-6 Intake and Exhaust Set6 points
-
I used only the Aires wheel bay for the Hobby Boss and the Eduards zoom set for a cockpit that was designed for a Hasegawa.6 points
-
Thanks for all of the comments! Establishing the preliminary fit of the AMUR Reaver cowling to the kit fuselage, I prepared the Barracuda resin spinner, added a prop shaft using a piece of plastic rod and mounted it to the cowling to check the fit. It looks ok at this point but things can change as parts are glued into place permanently. Since I was at this stage, I wanted to check the fit of the windscreen and canopy as well. The windscreen actually slides UNDER the cowling piece so the little bulges on the fuselage fairing in front of the windshield need to be trimmed away. The exterior fuselage components seem to be lining up fairly well. Next I'll have to see how the Aires resin cockpit factors into the fit equation.5 points
-
Continuation of the paintwork... Tamiya XF-83 Medium Sea Gray all over and taped ribs. Ewww, what is that? Masking of the wing roundels... Good old danish red & white roundel... Basic airbrush paintwork done... Cheers: Kent5 points
-
Wanting to take a brief break from the Corsair and Ta152H builds, I took a look at the AMUR Reaver resin cowling for the Bf109G-6/AS conversion. I removed the casting blocks from the parts with a razor saw. Interestingly, the casting block for the cowling piece had a nested set of small fairings which needed to protected. Fortunately the saw cut line did not put the small parts in harm's way. The panel lines were of irregular depth and consistency so I reinforced them with the scriber. Of course, my blade skipped a few times, which required some minor putty work. The required surgery on the kit fuselage parts is quite easy compared to the AMUR Reaver cowling replacement for the G-10 Erla. A few strategic cuts through relatively thin areas made it an easy exercise. A preliminary fitting of the resin engine cowling onto the fuselage. I had left some excess plastic on the top edge of the forward fuselage cut so I was able to square off that joint. Preliminary fit of the AMUR Reaver cowling is very encouraging.5 points
-

Revell 1/32 North American P-51D-5NA Mustang
Loach Driver and 3 others reacted to KitmodellerNZ for a topic
Hi guys, I have just completed Revell's 1/32 P-51D early Mustang. This was OOB with the exception of the HGW textile harnesses. I used Tamiya acrylics and lacquers, Vallejo Metal Color, Windsor & Newton oils and AK weathering products. I really enjoyed this build, fit issues aside. I decided to use the supplied decals rather than masks for this build. The quality of the decals is fantastic. I believe they're Cartograf. I used flat and semi-gloss clear coats to represent the sheen in the areas of the hotly debated 'was it blue or was it green?' topic.4 points -
Excellent AMK model, it's really a pleasure to work with such a good model.4 points
-

Macchi M-5
LSP_Ray and 3 others reacted to sandbagger for a topic
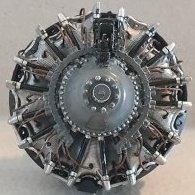
Hi all, I thought I'd explain why I'm attempting to detail the engine as much as I am. Normally if the engine is partly or totally covered by airframe or engine panels, there would be less reason to detail the engine as much. However the Macchi M.5, even with the engine under tray and side panels fitted, was mostly visible. The particular aircraft I'm attempting to model is 'FRANGAR NON FLECTAR’, Serial No.7288 as flown by Tenente DV Alberto Bartolozzo, Officer Commanding No.260a Squadriglla, operating from Venice during 1918. That particular aircraft did not have the engine side panels fitted and so the entire engine was fully exposed. The engine is a primary focal point for anyone looking at the model. Therefore I felt that it was important to rectify the apparent omissions and errors with the kit supplied engine. Mike4 points -

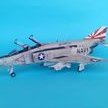
1/32 F/A-18C fully armed
Marcel111 and 3 others reacted to Mark Jackson for a topic
Back modelling after a few years off and one house move later - I am still in shock over the whole conveyancing process. It should be a straightforward and simple process and then solicitors get involved and cause you to hit the Valium pills and he was our solicitor! Mrs Jackson (Management) said, "Don't worry, where here now and this is the bungalow that you will probably die in." I'm still trying to figure out what she meant by this. The models, tools, paints and everything else survived the relocation and first to be back on the workbench is the Academy F/A-18c Hornet. The first bit of work was to start afresh on the engine nozzles as they looked poor. DSCF0002-LSP by Marc Jackson, on Flickr4 points -

KH T-6/Harvard Kicked Up A Notch: Apr 14/20: Finished!
R Palimaka and 3 others reacted to chuck540z3 for a topic
You are correct, but where I have put the gear leg is much better than where it was before. Here it is again, showing that once the tire is attached, it will likely protrude slightly over the wing rib on the outside (but barely), rather than just inside it like the pic you have provided above. The gear doors, which I'm not going to be using, can still be attached and will angle over those same ribs like the real deal. The gap between door and leg is narrower than it should be, but without doors it won't be noticeable. And here is why it is where it is. The new part I created is pretty strong, but is much stronger when glued to the original part as reinforcement. All of the weight of the model will be on these locations, so strength is very important. To get the location as accurate as possible, I would need to cut this part out, which I don't want to do. In summary, without trying to be too defensive, there's not a lot about this model that is perfect to begin with, so if the landing gear is out a few inches when compared to the real deal, I'm OK with that. Cheers, Chuck4 points -
F-14B Hasegawa 1/48 VF-74
Darren Howie and 2 others reacted to viper-dc for a topic
Extras used: Fightertown Decals, Aires exhaust nozzles, Aires cockpit Paints and colors used: Gunze Mr.Color, Model Masters( Testors)3 points -

Revell IXc built as a FR.IXc Holland 1944
Loach Driver and 2 others reacted to Wackyracer for a topic
Eduard PE and exhausts. Scratch built camera and bay. Custom paint mix for the camotint pink. Markings all sprayed from custom masks.3 points -
I used the accessories: -Fightertown decals -Crossdelta walkways -Master pitot -Eduard cockpit (excellent) -Eduard wheels -Quickboost chin pod with ECM / TCS equipment -Quickboost tail reinforcement plates -Quickboost beaver tail3 points
-

XB-51 Dragon
themongoose and 2 others reacted to Dandiego for a topic
Before I can start working on the cockpit I thought that I should come up with a seat so that I could design the cockpit around the seat. So what kind of seat did the B-51 use.......................................Exactly, I don't know either. And you will only be able to see the top half through the small canopy, so.................. I think that if I build a "kinda" representative 1950's seat no one will be able to call me out on it. So here is what I have. Cobbled together from several sources. Small refinements and extra details to follow. Dan3 points -
XB-51 Dragon
R Palimaka and 2 others reacted to Dandiego for a topic
As promised in my last post here are some pics of the metal supports. In the second picture you can see the plastic spreader bar that keeps both sides firmly in place. I will be adding 2 more spreader bars. Now on to the cockpit assembly. Dan3 points -

KH T-6/Harvard Kicked Up A Notch: Apr 14/20: Finished!
chuck540z3 and 2 others reacted to MikeMaben for a topic
3 points -

Kitty Hawk 1/32 Mirage 2000B/C/D & N
Christoffer Lindelav and 2 others reacted to LSP_Ray for a topic
Unless the 45g is way overkill, the weight will not sit on the nose gear, but on the main gear as it is supposed to offset the weight in the rear of the aircraft. So if 45g is needed to just slightly make it a nose sitter, you can estimate around 85g - 90g on the main gear and around 5g on the nose gear.3 points -
Major progress today. After weeks of thinking about how I was going to attach the engine pods I actually cut some plastic today. Basically I have 3 metal tabs which will attach the pods to the fuselage. One goes all the way through the fuselage and connects the rear of the pods. The other 2 support the front of the pods but do not go all the way through from pod to pod. The front tabs are bent at an angle and go up the inside of the fuselage along the outer skin. I will take more pictures later. I just wanted to show the pods in place. Also I have installed the tubes into the nose of the aircraft that will represent the cannon ports. Tubes cut down and puttied. Dan3 points
-

1/32 Thomas Morse S4C scratchbuild
Rockie Yarwood and 2 others reacted to kensar for a topic
Just a brief update after a break for the holidays. Added longerons to the fuse bottom, as they are visible through the cockpit opening.3 points -
Forgotten War Mustang
Madmax and 2 others reacted to JolleyRoger for a topic
Might have been a standard colour? Great build by the way.3 points -
Thank you, thank you, thank you., and thank you! I really appreciate your good words. Details from yesteryear: Thank you for looking and liking. Sincerely, Mark3 points
-
Thank you, Brothers. Finished up the Cockpit and Engine Mount Compartment. A couple of squashed solder balls as fasteners. Black electrical junction box, wire, and tape clasp. Added a switch and crank. Finished up the firewall and roughed in some piping. Empty slots will receive yellow and red wiring. Engine Mount to Firewall mounting connection made up. Another view. Luckily it fit. Another test fit. Vent hardware. Added cabling. It will go through the pulley in the next photo. Pulley. Drilled hole a top to thread the cable. Hole across from pulley is an ERROR, ERROR, ERROR, WILL ROBINSON! Or is it DANGER!? The other hole will accept the three wires from above. Center Engine Mount support structure. Bunch of rods and handle around the canopy crank. Fitted. Thanks for looking. Sincerely, Mark3 points
-

Spitfire Mk.XVIe - 1/32 Tamyia
chuck540z3 and one other reacted to Mazi for a topic
Hi everybody I´m a new member and I´m from Czech Republic. Thank you for joining the LSP group and here is my first 1/32 scale model. Spitfire Mk.XVIe - WO Murray Lind, No.485 squadron, Fassberg, Germany 1945 HGW WET TRANSFER Wheels: Barracuda Paints: MRP and Gunze Cockpit´s door: Quickboost Mask: homemade Photos my friend Miloslav - thank you.2 points -
I made a model directly from the box.2 points
-
This time something with Polish insignia. One of the most interesting cold war jets. MiG-23MF with side number 122. Model Trumpeter 1:32 scale, model made straight out of the box + Techmod decals.2 points
-
KH T-6/Harvard Kicked Up A Notch: Apr 14/20: Finished!
R Palimaka and one other reacted to chuck540z3 for a topic
I thought of that too, which presents two other problems. First, in order to get the film to stick, I will need to use Microsol, which will likely conform to the raised rivet detail and leave it totally exposed with just decal film on either side of it, which achieves nothing. Second, and one that I'm not that proud to admit, is that I'm afraid some contest judge will look at my work in the future and think that I did a crappy job of applying the Archer decal rivets, because decal film is always an issue with this product. And before someone chimes in and says, "You should build for yourself!", I freely admit that I don't always do that and when I enter a model at a contest, my goal is to win my category. There, I said it. I like to win. Raised rivets may not look as accurate as covered ones, but exposed decal film could be considered a deduction. Cheers, Chuck2 points -
 Alright, fits just about right I think ..... And most importantly ... it sits at the right spot now!!!2 points
 -
Doooooooone! (well .... the canopy that is - finaly!)2 points
-
KH T-6/Harvard Kicked Up A Notch: Apr 14/20: Finished!
MikeMaben and one other reacted to chuck540z3 for a topic
Thanks for the suggestion. Last night I tried a number of things to add a tape-like cover to my Archer rivets to try and replicate the close-up pics of the orange Texan/Harvard below, including thin self adhesive foil. While it did look a bit like the real deal, it didn't for scale. This pic is taken from, say, 3 feet away, so at 1/32 it would be close to only 1 inch away. At 6 feet away you can barely tell there is a tape like surface, but you can see a clear lumpy ridge. With foil, cigarette paper and a number of other thin coverings on this model, you can easily see the cover from 1 foot away, which is the equivalent of 32 feet away, which is distracting rather than an enhancement. While plain Archer rivets aren't accurate either, they still look better than the big ridges on the kit parts, just like the position of the landing gear being a bit off. Thanks for that schematic drawing, which has some interesting tips like the color of the landing lights in the wing, which I'm about to paint before assembling the wings. Cheers, Chuck2 points -
As if the whole thing wasn't difficult enough, in addition, the pipes are also "dented". Aaaw maaaaaan, does that have to be ?! Well, we don't want this project to be boring after all hihihi. A couple of shaped and bent plastic rots and some wire should do the trick, I hope:2 points
-
After I finished painting the cockpit, the windshield was finally glued. The whole thing now looks like this:2 points
-
I’ve never seen that on a zeke drop tank before....Lacking any corroborating evidence, I’d remove it. Tamiya’a drop tank doesn’t have that on it.2 points
-
I just bought the Revell boxing. This kit may be my next build. (Although I really want to build a jet! ) The kit looks so good.2 points
-
listed on Hannants as future releases (resin kits) https://www.hannants.co.uk/futurereleases?search_direction=asc&scale_id=953 Marsh Models / Aerotech Macchi M.67 Messerschmitt Me-209 Savoia-Marchetti S.65 Italian racing seaplane built for the 1929 Schneider Trophy race jan2 points
-
Thx for your comments guys . Much appreciated.2 points
-

Sponsors & Prizes
BloorwestSiR and one other reacted to Robthepom for a topic
oh no, i never ever win anything2 points -

F7F-3 Tigercat - BuNo 80405 - VMF 312 MCAS - El Toro, CA 1946
Anthony in NZ and one other reacted to Out2gtcha for a topic
She is still strapped upside down, staring at me longingly from her place resting on my photobooth table. I'm slowly getting my MoJo back......I have a feeling after this current ZM kit I'm working on, she very well may be up next...........stay tuned!2 points -
Strips of foil would work too.2 points
-
nice project! you need to get your friend's landing gear to market!!2 points
-
I see your point, Tolga and you may be right about a spinner swap. I have some video stills from a color film showing some Burma Banshees P-40Ns. A former P-40N-1 type can be seen there and her spinner is red. She also displays the "pair of dices" on her wheel hubs: https://burmabansheesblog.blogspot.com/2014/10/burma-banshees-p-40-line-up.html If I ever build the 1/32 P-40N I have, that will be "Dikam Death" flown by Bob Gale but the tail number isn't confirmed by any pic (yet)...2 points
-

Fw-190 1/18
TAG and one other reacted to Daniel Iscold for a topic
Dear Friends After some weeks gattering information about Fw-190 we finally put our hands to work!! Yesterday by night we try to make a new control stick. The one made by Hobbyboss is far from a Fw-190 control stick, in fact is far from any air plane control stick. Using internet images as reference, we both try to hand carve a new one from a piece of sprue. Using files, dremel bits, sand paper, x acto knive blade tips... well, at the end Thiago won!!! After this I suggested him to replace the trigger at the top of the handle. This part is not finished yet there is some refinement work to do on the part and some missing details like some wires runing through the control colum. The plan for next week is to move foward with the pilots seat and side consoles. For now, a big thanks to Rogerio Marczak, who send us a vast source of information about the A versions of bucther birds. Thanks Rato!!!! Hope you like it2 points -
Thank you! I'm definitely open to suggestions, I may remove molded kit skin and add thin sheet plastic and/ or foil to the areas I plan on perforating. I've also been experimenting with tissue (flying balsa model tissue, not the blow your nose tissue) for shredded fabric. Here's a couple of my earlier attempts at wrecks from a few years ago (almost 18 years ago now...time flies!) These are all from my early days of returning to modelling 1:32 Hasegawa kits ; Fw 190 A...? Inspired from the cover of a Luftwaffe im focus Fw 190 d-9 Inspired by a web image, the actual aircraft was an A-8 A6M52C...I think....imagination Please excuse the dust, spider webs and hair in the pictures, these models have been faithfully collecting dust for almost 2 decades2 points
-
This should help, and perhaps these?2 points