Leaderboard
Popular Content
Showing content with the highest reputation on 01/09/2020 in all areas
-
aeroscale.kitmaker.net - Whirlwind Nacelle Mould Slowly they are getting there... Juraj12 points
-

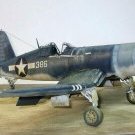
MH 60 Academy SeaHawk. 1/35 scale.
Dart_Schatten and 9 others reacted to shark64 for a topic
10 points -

1/32 ZM Henschel Hs-129 B-2......FINISHED
Jan_G and 9 others reacted to monthebiff for a topic
Last bits added to the fuselage this evening prior to undercoat, control surfaces added followed by radiators, all an excellent fit. The inner control surfaces are made from two parts which need a big seam line filling which is a real pain. and after a couple of filling and sanding sessions A few rough areas need sorting during final prep before an undercoat but very happy all in all. Regards. Andy10 points -
"I say my man, do be a good chap and hurry up, I want to get this kite up in the air!"9 points
-
Thank you for looking I put on the few decals the version I'm building has and attached a few more parts. That's all I've got for now.9 points
-
Thanks guys! I've been too busy to do anything significant but have been moving forward on assembling the various bits from the photoetch set. The set uses various layers of brass to help break up the typical flatness that characterizes most photoetch additions. The seat back is supposed to feature vertical adjustment rollers comprised of tiny discs mounted to the brackets. I decided to save myself from that labor since the seat back is all but invisible once its mounted and the harnesses are draped. I'm not sure what to do about that missing panel on the left side console. I know that's how the cockpit on the NASM Ta152H-0 looks like but I have doubts that this was the norm. Very un-Luftwaffe like, IMO. I may elect to close it up.8 points
-
.thumb.png.84c5d3a464f2dd83f0ac37a5aac81ec8.png)
1/32 Tamiya P-51D-5 NA Mustang "Ferocious Frankie"
Greg W and 7 others reacted to Antonio Argudo for a topic
Thanks Tom, gotta love Mustangs mate, on the verge of insanity added some Archer rivets on this part cheers8 points -
1/32 Tamiya P-51D-5 NA Mustang "Ferocious Frankie"
Greg W and 7 others reacted to Antonio Argudo for a topic
Thanks Misha, I'm glad you like it, cheers small progres from today, gotta love Barracuda's pedals with NAA logo Added with milliput the attach buttons of the control column fabric missing in the kit started with one of the tank pipes and a clear plastic for the little jar some more elements just for a visual view8 points -

Fa330 Bachsteize (Wagtail)
Loach Driver and 6 others reacted to Rick K for a topic
A few detail shots.7 points -
The Fa330 Bachsteize (Wagtail) always interested me as a unique aircraft with an equally unique mission. This was towed aloft to about 400ft (120m) by the U-Boat so the pilot could see beyond the horizon view (25 nautical miles) and report any enemy activity. Stored in 2 water tight compartments by the conning tower a team of 3 can assemble and disassemble the Fa330 in about 20 minutes. U-boat commanders disliked the Fa330 as the prolonged time on surface make their boat venerable to an air strike or detection by enemy ships. The Fa330 was abandoned in the North Atlantic due to allied air superiority but continued use in the South Atlantic and Indian Ocean. The only recorded successful use of the Fa330 was 5 August 1943 by U-177 on the Indian Ocean off the coast east of Madagascar. Greek merchant ship Efthalia Mari was observed by U-177's Fa330. U-177 proceeded to intercept the Efthalia Mari and sink her with 2 torpedoes. Efthalia Mari lost 1 crew of 43. U-177 did not survive the war and was sunk 6 February 1944 in Atlantic west of Ascension Island by an American P4BY-1 Liberator. U-177 lost 50 crew of 65. Not a easy build as there was plenty of angst and head scratching moments. This build also gave me an opportunity to practice rigging as a WNW bird will be landing on my bench soon. WIP link here. Build Details Replaced over a dozen tubes with styrene rod .5mm .4mm .3mm Scratch All Grab Handles on frame and underside rotors Cleats on skids Parachute Pack and all straps Turnbuckles on Outriggers on top of rotor hub Pitot Tube and mount Instrument Panel mounts Foot Pedal and Straps Rigging & Cables INFINI Medium 110 (.121mm) Black Lycra thread EZ Line Medium ANYZ Black .5mm Braided thread Brown .4mm Braided thread RB Productions P32023 Turnbuckles GasPatch Rigging eyelets Albion Aluminum Slide Fit Tubes .3mm .5mm .7mm Gunze RLM 66 RLM 76 RLM 81 Vallejo 306 Dark Rubber Tamiya XF86 Flat Clear MiG Washes Dark Wash Decals MDC Luftwaffe Instrument Dial HGW Luftwaffe Textile Belts Thank you all for your encouragement and support during this build. I don't get many opportunities to follow and respond to many of the awesome builds on this site. I wish I had the time to as there and many exceptional projects going on here at any given moment.6 points
-

Bf 109 F4 in Regia Aeronautica service
daHeld and 5 others reacted to AceofClubs for a topic
Hi All. Here some wip pics of cockpit. Hope you like Ciao Filippo.6 points -
Hi there, I did not do as much modeling as I was hoping for during the holidays but I did make some progress. I am almost ready to close the fuselage. So far it is a problem free build everything fits well and it's a well engineered kit. The engine will never see the light of day so I just painted it but did not bother with any weathering. The IP is eduard photoetch and the seatbels are HGW. Till next time, thanks for following this build. Cheers, David6 points
-
1/32 Tamiya P-51D-5 NA Mustang "Ferocious Frankie"
Greg W and 5 others reacted to Antonio Argudo for a topic
Thanks a lot Brett and John for your words, cheers I represented the Dynamotor for the SCR-522-A and the thin wall between the seat and tank although it won't be any visible at all once the rest of the elements will be installed6 points -
This is, I believe, my final wheel design. I finally got a decent spoke pattern into the hub. Dan5 points
-
1/32 Tamiya P-51D-5 NA Mustang "Ferocious Frankie"
Greg W and 4 others reacted to Antonio Argudo for a topic
starting with the fuselage tank, gave it some texture with putty5 points -
1/32 Tamiya P-51D-5 NA Mustang "Ferocious Frankie"
Greg W and 3 others reacted to Antonio Argudo for a topic
Hello everyone, going to build this bird flown by Ace Wallace Hopkins of the 361st Fighter Group, here some reference pictures of "Ferocious Frankie" as I'm intended to represent, "Ferocious Frankie”, named in honour of his wife Frankie, coded B7 H of the 374th Fighter Squadron, 361st Fighter Group. Wallace Hopkins was born in Washington, Georgia and flew a total of 76 combat missions with the 361st where he flew as Operations Officer. He was an ACE credited with 8 victories and 1.5 damaged. His decorations include the Air Medal and Distinguished Flying Cross both with Oak Leaf Clusters and the French Croix de Guerre, one of four awarded to members of the 361st. A native of Washington, Georgia, “Hop” Hopkins enlisted in the US Army Air Corps in 1939 and a year later entered pilot school. After graduation on July 1941, he flew P-39s, P-40s, and P-47s with the 8th Pursuit Group at Mitchell Field, New York. Reassigned to the 361st Fighter Group in 1943, Major Hopkins was appointed Group Operations Officer and flew P-47D, P-51B, P-51D and P-51K aircraft on bomber escort and ground attack missions from Bottisham and little Walden in England, St Dizier, France and Chievrers, Belguim. Having been promoted to Lt. Col. In 1944, Hopkins was appointed Deputy Group Commander in April1945. During the Korean War, Col. Hopkins served as Deputy Wing Commander, 8th Fighter Bomber Wing, flying F-80s. He retired on February 1968. Colonel Wallace E. Hopkins, USAF (Retired), died on 26th April 1992 at the age of 74. Victory Credits 29th May 1944 2 Fw 190’s destroyed (Air) Vicinity Pitka, Poland 29th June 1944 4 Fw 190’s destroyed (Gnd) 1.5 Fw 109’s damaged (Gnd) Oschersleben A/D, Germany 8th August 1944 2 Fw 190’s Destroyed (Air) Vicinity Evreux, France cheers4 points -
Hi guys! Im a LSP modeller, but sometimes i try some different scale.. hope you enjoy.. cheers Shep4 points
-
I have cut out the metal inserts for the wings. First is the insert from the top. It will be epoxied to the plastic blank. From the underside. The protruding tab will be bent to lay flat against the bottom of the blank. Later, Dan4 points
-
Hi all, Not much in advance because I had problems with the MRP painting, I had to strip and to begin again several pieces. I think I've wasted enough time with this product and I'm going back to the Gunze. As half is already done it was a bit complicated to make a mixture of several shades of Gunze to have a similar hue for the other half of the cockpit. The reconstructed pipes. Sweety4 points
-
1/32 ZM Henschel Hs-129 B-2......FINISHED
Jan_G and 3 others reacted to monthebiff for a topic
Some more progress made on the Henschel with the various gaps etc filled and cleaned up around the nose followed by fitting the engines, nacelles and cowls. The engine cowls are superbly moulded with a little filler at the bottom but a perfect seam on the top which disappears with a few swipes with the sanding stick. Regards. Andy4 points -
work 2019
Loach Driver and 2 others reacted to pascal JMW for a topic
Hello my work 2019 P40B 1/32 Trumpeter + cutting edge cockpit resin and wheels , master metal gun's P40 P47D Razorback 1/32 Trumpeter Eduard photo etched cockpit , resin wheels and pilot resin , marking Montex stencils F100D 1/32 Trumepter corrected nose resin zactomodels , seat cutting edge , wheels resin, and pods resin renaissance , decals renaissance , pitot master FW190D 9 Hasegawa eduard cockpit , resin wheels , marking Montex stencils P40F 1/32 Trumpeter Eduard cockpit , resin wheels , Berna decals bye3 points -

F 35
D.B. Andrus and 2 others reacted to panzerrob for a topic
Hi all, Here is my finished F35, hope you like it. I build 1/32 jets as a side step wjhen I'm bored with 1/16 panzers so jet building is something I am stil learning! So I noticed that I didn't paint enough at the rear of the cockpit and a few other things. I used a Dutch Decal set, and a PJ Productions F16 pilot. With regards, Rob P.S. Sorry for the crappy photo's!3 points -

1/32 Buccaneer S2B - Icelandic Fine Arts
Stevepd and 2 others reacted to Phartycr0c for a topic
Nigel has indicated that that will be the case.3 points -
1/32 Buccaneer S2B - Icelandic Fine Arts
Chek and 2 others reacted to Phartycr0c for a topic
OK decal update, Nigel has just sent me these images of the first upscaled sheet that will become available with more on the way! I will pop these on as I am sent them. The bad news? each set consisting of 3x A5 sheets will cost £34.99 rather than the £25 first advertised. This first sheet is an upscale of this https://www.kitsworld.co.uk/index.php?CATEGORY=5&SUB=23&THISPAGE=1&RADIOSORT=4&PICFILE=433&STKNR=433&STRH=3808&ORDN=2585&RNZ=2386743 points -

Caudron C.714, Azur, 1:32 - FINISHED
red baron and 2 others reacted to Landrotten Highlander for a topic
I improved the seat belt with a thing string of paper, and added the 5th one scratchd using part of the PE support frame. I also made some alterations to the IP as this was too flat to me: My home made throttle stick, added a selection switch at the bottom part, a pixture and carb-heater switch on the RH side, and a series of fuses as a bottom row on the IP panel. Not an exact copy of the aircraft, but close enough for my purposes. I might scratch build the office in a larger scale at a later date, and that one will be an as faithful reproduction as possible. There as still some additional items I need to add, but this will be done while gluing the floor, firewall and armour plate to the fuselage halves. But in order to do that I need to get everything painted. Got my delivery of a new spray gun, and obtained a second-hand small compressor, so will be playing around with this first. Until next time3 points -
Caudron C.714, Azur, 1:32 - FINISHED
red baron and 2 others reacted to Landrotten Highlander for a topic
So, finally got me camera working, and got some primer from Halfords too. As all kits I worked on so far, we start working on the office. The kit is very basic, so even though I wanted to build OOB, I will have to make some alterations. These 5 components make up the tub: . Th cockpit floor (bit on the left) has 14 small pieces fitted to it (including the PE pedals and cover just before the stick and a resin control stick), while the IP consists out of 3 pieces as per kit instructions. The armour plate, seat and fire wall make up the rest. There was supposed to be another resin handle on the IP panel but the carpet monster got it - I big feat, as I do not havee a carpet Closer up view of the cockpit floor: I found the joystick too bare, so added some cabling using a 0.5mm copper wire (bit too thick) and 2 threads from the sowing kit. Added the seat, the seatbelts are included in the kit. However, they are wrong based on my information: the seatbelt installed in this aircraft was a 5-point seat belt, and the 2 that went over the shoulder had a cross-piece, which is not represented by the kit. I also thinned down the edges of the seat, as I felt the kit one was too thick. Looks better now.3 points -
hello all, Polerus,binnacle platform placed, also 2 signal man's platform placed enjoy, Rammstein3 points
-
P40F trumpeter 1/32
KUROK and 2 others reacted to pascal JMW for a topic
hello the last one for this year just finish , P40 F trump + photo etched Eduard for the cockpit and resin wheels , Berna decal , painting Mig ,AK,Gunze and Tamiya 8 white p'ti Quinquin escadrille Lafayette 1943 unknown serial best regard Pascal and happy new year !3 points -
Yep, sorry to burst the Aires bubble, but the kit is so finely engineered that the AM bays create far more issues and engineering head-scratching problems than I thought was worth in the end. Look, the detail in the Aires bays are far superior to what the Tamiya kit has, but if I had to do it again, I would go the route above and just modify/detail the kit bays to an acceptable standard. The AM bays and the wings of the kit themselves had to have so much resin and styrene sanded/scraped off that I could literally see through them. Then there's the issue of engineering the gear legs to fit into the AM bay - you can't add them at the end and hope there's enough mating surface on that delicate resin to hold them properly - I ended up building blocks inside the wings to hold a pin which I attached to the gear legs - so I had the legs attached before I mated the upper and lower wing halves, but could swing the legs inside the bays for painting, etc, then right at the end CA'ed them in place at the pivot point. Another issue is the retraction arms for the inner gear doors, those need to be put in before you mate the upper and lower wing halves, as well as those for the little covers at the gear legs. The AM bays (even after all that sanding) create a bit of fit issues at the wing root/fuselage join. I suppose if you really want the Aires bays in then you can work around it (I did and I'm by no means as good a modeller as some of the people here), but IMO I don't think its worth the issues involved. I wouldn't again.....3 points
-
1/32 Zoukei-Mura Ta152H-0 White 7
Alain Gadbois and 2 others reacted to Antonio Argudo for a topic
looking nice that seat, maybe some comfy lumbar cushions? cheers3 points -
Sean, you are working at a good pace, I'll try to keep up with my detail postings. The four images below look at the wheel wells and some of their plumbing. I think all the comments on the attachments are self-explanatory. I'll try to post the LG strut and wheel well cover later tonight. I'm disappointed to hear that the Aires wheel wells are a problem. I have a set of them and had hoped to make things easier for myself by using them instead of reworking the kit details. But at least I now am forewarned before I start chopping into the kit. Ryan Note that the drawing below is of an A6M5 wheel well.3 points
-
Old build I did at the beginning of 2019.2 points
-
Not all LSP so I will post here. I made an effort to clear the shelf of doom and managed to get these completed. Nick2 points
-
And the fun continues. After the last time I cleaned off the table for dinner/company, I managed to lose a huge box of hobby supplies, which (naturally enough), included my Micro Set and Micro Sol. Fortunately, there’s another huge box in the basement (actually several) of hobby supplies, wherein I at least found my Champ and Solvaset solutions, so I was finally able to add the Cartograf instruments. Two odd things, the instructions make no mention whatsoever of the instrumentation decals or their placement, though figuring it out isn’t difficult at all, and the decals themselves are not designed to match the dials that are actually molded onto the ‘pit components. Whoever orchestrated this “new to old” operation, was definitely asleep on the job. A few blobs of paint color here and there, and I’ll be ready to install in fuselage, and I’m very much looking forward to that.2 points
-

ICM Gladiator slow build. Finished!
Paul in Napier and one other reacted to quang for a topic
Thank you Michael! And the build goes on ... The fuselage is closed. The fit is excellent except for the underside triangle which needs a bit of tweaking and putty to restore the canvas texture. A nice detail: the oil tank ahead of the cockpit. It’s countersunk. Don’t try to make it level with the rest of the fuselage Explorer Max warned us about the fragile tailwheel and the equally unstable horizontal stabs, argually some of the few weak spots of the kit. They were duly fixed before going further. The tailwheel join was made stronger by the addition of a length of guitar string. The two horizontal stabs are joined by a single metal rod for extra stability. The cooling mat is installed. A final detail: a hole on the right cowling with a curved tubing protruding The fuselage is now ready for the paint shop to-morrow. That's it folks. Comments and questions are welcomed. Until next time, Cheers, Quang2 points -
Excellent work Andy! That seam on the flap is a head scratcher. In return, I hope that Z-M provided a sharp trailing edge for your troubles!2 points
-
35€ at plastmodel poland....2 points
-

Rules of the Road
Alain Gadbois and one other reacted to Azgaron for a topic
Struggling a bit, trying to figure what I can build. I have an old Revell Bf110C-4 that I thought of building in the multi engine gb. Then yesterday when checking my stash, I found a Fw190A-8 (also old Revell) with markings for SG 4 and 10 in 1944-45. I checked and those squadrons seems to have flewn in the eastern front at that time. Still unsure though if they did that late. I don't think I have anything russian in 32nd or larger for that time period. Have to check my stash again, as I'm thinking 1/24th would be nice. Have a few old Airfix or Heller. Håkan2 points -

my 2019 kits
Loach Driver and one other reacted to red baron for a topic
Revell 1/32 Miniart 1/35 William boss 1/32 Tamiya 1/32 Hobbyboss 1/32 Hasegawa 1/32 Azur1/32 Hasegawa 1/32 Tumpeter1/32 Spécial hobby 1/32 Hasegawa 1/32 Spécial hobby 1/32 Hasegawa 1/32 Hasegawa 1/32 Hasegawa 1/32 Spécial hobby 1/32 Spécial hobby 1/32 Hasegawa 1/32 Azur 1/32 trumpeter 1/32 trumpeter 1/322 points -
Gloster Gladiator.....finished :)
Paul in Napier and one other reacted to quang for a topic
The join lines are minimal, Max. At least to me. Just found out the prop makes a good prop for the pilot2 points -
Gloster Gladiator.....finished :)
Paul in Napier and one other reacted to quang for a topic
I guess ICM couldn’t mould the prop in one piece because the central boss is too voluminous compared to the blades. In plastic injection process, it’s best to have more or less the same thickness all over to avoid the dreaded sink holes. I had no problem with my prop. Just a little bit of soul-searching before reaching for the glue.2 points -

Gloster Gladiator.....finished :)
Paul in Napier and one other reacted to mozart for a topic
I'm not quite sure what ICM were thinking about when they made the construction of the prop with these two pieces C1 as separate items rather than having the whole thing moulded as one. They weren't a great fit and despite trimming and lots of test fitting I was still left with filling and sanding: It's been primed and has a top coating of Ocean Grey: I'm trying to get some kind of interpretation of this 56 squadron Gladiator: I think it's going to be something along these lines:2 points -

Revel 1/32 Tornado GR1 - FINISHED
themongoose and one other reacted to Stokey Pete for a topic
The end is drawing ever closer. The airframe is just about complete, flat coated, and the canopy peeled and polished. Just the exhausts and weapons to finish off.2 points -
Hi themongoose, I sanded down the resin until light shone through it and also thinned the inside of the wing surface down as well. Now that I have the OV-10 finished, I am able to move on with the F-100. I painted the equipment under the windshield, in preparation for installing the clear part. I was going to use the nice resin refuelling probe by Quickboost, but it hangs out too far for me to trust it not to be broken. I cut off the tip and the flange of the resin parts and made them fit some brass tube of appropriate diameter. To save the tube from kinking too much when it was bent, I inserted brass rod inside it. there is a small kink that I will fill and sand later. I glued some brass tube into the refueling point that the new probe fits into. I squeezed it slightly into an oblong shape so that it holds firmly onto the probe. Here is the new probe fitted. I can remove it for transport and now have much greater confidence if someones camera strap catches on it at a show.2 points
-
ICM Gladiator slow build. Finished!
Paul in Napier and one other reacted to quang for a topic
Back to the build: THE COCKPIT The interior can be finished in a variety of ways: aluminium-dope overall, grey-green overall or a mix of the two. I chose to do mine with the skeleton armature in aluminium and the rest in grey-green as I find the contrast interesting. Left side Paints are decanted Tamiya AS12 and Vallejo acrylic Green. All details in Vallejo acrylics. Right side The side door is glued in closed position. Seat and cockpit 'floor'. RB Productions Sutton harness prior to be installed Interior installed in right fuselage half, dry-fitted and stuck in position. Black goo under the cockpit after-deck is 2-part epoxy glue Everything in place with IP in situ Some other views That's it, folks. Hope you like it. Have a good day, Quang2 points -
hello all, @ scratchbuilder place is not an issue, I have a storeroom of about 200m² I have been rebuilding my dockyard, looks better now table is 122cm x 305 cm will start soon on the details. Happy 2020 to all of you Rammstein2 points
-

Polikarpov I-153 ”Chaika” ICM 1/32
Paul in Napier and one other reacted to Phantom2 for a topic
Hi All! Yes, this kit is a real gem! I will get the Gladiator and I hope for many small aircrafts to come from ICM the next few years... Now we have a brand we can hope for Tiger Moth, DH Chipmunk, Bristol Bulldog, YaK´s, and many other small aircrafts from. This build starts in the cockpit as most builds do and a really spartan cockpit it is… The fuselage is round as a little barrell… The fit is perfect and the canvas imitation on the sides are really well done, fine and restraint…. The wings went together just as fine and the canvas are just as well done here too. These frames are VERY fine and very, very fragile and easy to break if you are careless when removing them from the sprue. I started with cutting off large pieces of the sprue to avoid putting any stress on the parts. These parts are molded very close to the sprue so I could not use my trusted sprue cutter, I used a scalpel with a new blade. It took a while carefully cutting the parts from the sprue and then cleaning up the parts…. The frame glued together and mounted on the cockpit base plate… Extremly fine parts with very small contact surfaces but the perfect fit makes the job easy. More to come soon…. Stefan2 points -

IL-2M3 Sturmovik FINISHED
themongoose reacted to Dukie99 for a topic
I will participate to this GB with the Hobbyboss IL-2M3. This has been in the stash for a while and I have a fair amount of aftermarket for it. I plan to build a version sporting the 37mm gun pods and pretty much nothing else in terms of loadout. I have the excellent Yefim Gordon Il2 book as reference. Box shot and aftermarket resin wheels Reference I have started by filling all the rivets and panel lines on the tail. As per the Gordon book, the Hobbyboss kit is not necessarily wrong, some Il-2 had a metal tail, but I like the smooth look so I filled the rivets using MRP liquid putty. I will let it dry thoroughly and will then sand it down. More progress soon hopefully. Cheers, David1 point -

Trumpeter MiG-3
coogrfan reacted to Dave Williams for a topic
I’ll be giving it a go with the Trumpeter MiG-3 with some extras: Aires cockpit QB seat and exhausts Eduard PE Komplekt Zip prop and control surfaces Leaning toward one of the white winter birds.1 point -
 The small push-through panel on the starboard side is also interesting and although Revell has captured almost all of the panels correctly here (apart from the large, prominent avionics panel, of course), the one or other panel line is not set correctly:1 point