Leaderboard


Popular Content
Showing content with the highest reputation on 01/02/2020 in Posts
-

ICM Gloster Gladiator —— new pictures !
Loach Driver and 9 others reacted to reconspit for a topic
Hello, happy new year to everyone... This is my first 2020 build..., well, I finished it today... ICM Gloster Gladiator, out of the box, with PJ Productions Pilot and rigging from EZ Line.... I‘ll post some more pictures in daylight tomorrow...—— DONE I was so surprised by this kit, now real flaws, very easy to build.... Hope you like it...10 points -
Thanks guys! The fiddly work continued with the RB Productions photo etch stuff. I folded up the foot pedals... The upper and lower instrument panels have been assembled. 18 parts for the upper panel and 22 for the lower... must be some kind of record. Taking Radu's specific advice, the smaller bits were attached using Future. Not the most "binding" of adhesives but it worked out ok. Some of the larger attachments were secured using CA glue. Again, per Radu's advice, the instrument panels were coated with Mr Metal Primer and then painted in RLM 66 Dark Grey (Mr Hobby Aqueous). Various details were brush painted and the panels were given a flat coat to seal. I then populated each of the instruments using Airscale decals and then topped off each gauge with a punched piece of clear acetate. Since the RB Productions set doesn't include a Revi 16 gun sight, I'll have to dig into my spares box to see if I can drum something up. If the search comes up empty, I'll have to take a look at the kit part to see if it is usable.9 points
-

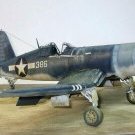
F4u-1D Tamyia 1/32
Loach Driver and 7 others reacted to discus for a topic
Hello My last built of 2019. Finished just in time before starting the christmas break. It is my second Corsair from Tam so no surpises (if it is even possible to have surprises with Tam). Just one slight negative for me: the decals: they are always very thick. So cutting out all the clear support film is a must to avoid silvering especially on the big numbers on the fuselage side. Then I made good use of the microset/microsol. I just replaced the wheels by Eduard resin's. Anything else is oob. For the paint, I miraculously managed to find a tin of Humbrol 181 (the famous Glossy sea blue that is out of prod since years..) Used it for the first gloss layer. They I dry brushed the matt version of the sea blue (Hu 77) either strait from the can or mixed with few drops of white. On the radiators area on the top wing I also brushed some yellow zinchromat (81) and some alu 56 here and there. Then panel liners: clear (white-grey) then brownish. Some pigment here and there (mainly exhaust and gun ports)8 points -
Time to crack open the 2020 season with a new build... I've decided to continue with part two of 'The Duellists' the Hansa-Brandenburg W.29. It's the only Wingnut Wings kit of a plane used extensively by the Royal Danish Air force. In July 1919 The Royal Danish Navy bought 1 Hansa-Brandenburg W.29 from Hansa- & Brandenburgische Flugzeugwerke GmbH. The first year the Danish Navy had the aircraft, it was tested thoroughly and it was found that it in every way exceeded the planes that had been operated before. When the aircraft was inspected at the Navy aeroplane workshops, it was measured and plans were drawn. In the following years no fewer than 15 aircraft of the type were built under license, at the shipyard's aeroplane workshops. H.M.I No. 20-30 (No's 21, 22, 23, 24 & 26 were used twice) They served from 1920 until the last two (20 and 29) were written off due to age in the spring of 1931. In the autumn of 1921, installations were built on board the two armored ships 'Olfert Fischer' and 'Peder Skram' so that in the future they could carry the H.M.I. In 1927 the armament was dismantled for weight reasons. H.M.I.'s lined up at the naval base in Copenhagen 'Margretheholm'. Initially, the planes were painted "navy" (medium gray) with white numbers. Later they were all silver doped with black numbers. I have actually been looking forward to begin this for a very long time and I think it will be i nice change, from the 'hairy' Aeromarine build, to an hopefully almost OOB experience... Cheers: Kent7 points
-

1/32 ZM Henschel Hs-129 B-2......FINISHED
Gazzas and 6 others reacted to monthebiff for a topic
Next thing to concentrate on was getting the rear fuselage bulkhead complete so this was painted followed by adding a couple of belt anchors as well as a couple of Bob's Buckles eyelets in readiness for the armoured headrest restraints With this sorted I fitted the cockpit tub in to place Now this is where things are getting a bit interesting in the fit side of things as the tub is connected to the fuselage by not a lot and very springy. Next I added the canopy rails and the lower fuselage tub sections Lots of room for play here including lots of room to make a mess of things, need to have a think about it now as the upper nose section fits perfectly at the moment So my thinking is to add the upper nose section and then close the gaps slowly around. Regards Andy7 points -

My 2019 builds
USMC Herc and 5 others reacted to Tolga ULGUR for a topic
Here are my completed models in 2019 1- 1/32 Hasegawa Junkers Ju-87D5 2- 1/48 ProModeler A-26B Invader 3- 1/48 ProModeler F-102A 4- 1/32 Hasegawa Focke Wulf Fw190 A9 5- 1/32 Hasegawa P-40K Warhawk 6- 1/32 Hasegawa Spitfire Mk.1 7- 1/32 Tamiya P-51D Mustang 8- 1/32 Hasegawa Bf 109G10 9- 1/32 Hasegawa Fw-190 F8 10- 1/32 Hasegawa Bf-109K4 11- 1/32 Hasegawa P-40E Warhawk 12- 1/32 Tamiya Spitfire Mk.XVIe 13- 1/48 Hasegawa J-35D Draken 14- 1/32 PCM Hawker Hurricane Mk.1 Early 15- 1/32 Hasegawa Bf-109G14 AS 16- 1/32 Hasegawa/Montex FW -190A46 points -
Thanks for keeping me company mates! I'm calling this one finished. Please excuse the poor pictures. Thanks for looking in Going through the stash looking for another project now...5 points
-
Hello guys, I bring more progress on the Ju 87G. Flaps glued (this would come to hunt mw several times down the road). RLM 70 painted: RLM 71 painted: And, today's update, RLM 65 and RLM 04 painted on the wingtips and fuselage band.5 points
-
Happy 2020 and have a healthy, prosperous year with plenty of bench time.5 points
-

Heinkel 111 interior bomber aimer part2 vacuumform
USMC Herc and 4 others reacted to lievenwynants for a topic
to all, a happy new year with good vibes on largescaleplanes forum i post some photo's from my bomber aimer figure i did scratch a lofte7 and almost finished my aimerbed i hope like it5 points -
The September 1939 campaign in Poland made it clear to the Dutch that they are completely unprepared for the conditions of modern war. They needed fighters. However, the queue with orders for the fighter aircraft was already long. France, Great Britain did not have much to offer for sale, they were in need themselves and bought them in emergency mode. The United States became the natural direction, where at the last moment Dutch managed to buy 24 Curtiss H-75 in the A7 version, for which the base was the A4, equipped with a powerful and light, yet capricious, Wright Cyclone engine - but also the fastest version of the P-36. They were produced in parallel with machines for France. However, before they reached their destination - the Netherlands fell under the attack of the Third Reich. The Hawks was therefore sent to the Dutch East Indies, to Andir (near Bandung), where they arrived in May 1940. After being assembled, flown and painted, they were sent to Madiun (East Java), where they were to defend the Surabaya naval base. The Dutch Hawks' service was short and lacking in success. After the Japanese attack on December 7, 1941, the aircraft were sent to Sumatra. They were flown from there without successes, but with victims, one of which was the pilot of the plane that you see in the gallery. On December 21, 1941, two Hawks collided during the take-off to the combat action over Western Malaya. Sergeant Paulus Casper van Breen, then a 24-year-old ML-KNIL pilot, sat behind the controls of one of them, with the serial number C329. He died on the spot. Source: https://oorlogsgravenstichting.nl/persoon/20084/paulus-casper-van-breen After the fall of Sumatra, at the beginning of February 1942, the aircraft were re-directed to Madiun, where they unsuccessfully tried to stop the Japanese air raids on Surabaya, which, however, in fights with the Zeros only resulted in the loss of five more machines and further casualties. Other planes were grounded due to defective engines and lack of spare parts, and after the Japanese invasion of Java, destroyed by the Dutch in early March 1942. The Special Hobby's kit is well worth the manufacturer's brand. Special in every aspect: quality of the molds, fit, level of details, accuracy. And isn't our hobby (inter alia) a struggle against the efforts of producers, how to do something wrong, if it could be good. So everything is all right. If you are interested in details and have strong nerves, please look for the workshop thread. The construction process was marked by numerous problems, caused by myself. First the fuselage broke twice where it was connected to the engine cowling, then after assembling the airframe and painting, I dropped it on the desk and the instrument panel inside fell off ... reinstalling it perfectly did not succeed, poor access, but I didn't want to make such a large step back and brake the fuselage into halves. Decals were too transparent, had to overpaint them. I broke one leg of the landing gear, lost one gear leg cover (the one in the front of the gear nacelle, finally I made them both of an aluminium sheet obtained from a tin of Felix peanuts), I lost the fuel filler cap too, replaced with a scratch-built one. At the end I unfortunately grabbed it with dirty fingers and the marks had to be removed ... But finally, here it is. Here it is and it proves that even with medium abilities and skills in the use of putty and file, this model can be put together. And this is probably the most important thing. Few things added: rivets, missing panel lines, modification of armament in the wings, antenna mountings on the wings, vertical stabilizer and fuselage, 0.2 mm Uschi van der Rosten antenna cables with insulators made of hygienic stick stretched over fire (does anyone use them for any other purpose, btw?), wheel well covers from CMK resin, barrels from Master. The rest - straight from the box. Painted with MRP Paints. Colors according to the AJ-Press monograph: old leaves - early US Olive Drab, young leaves - early US Medium Green, underside of wings and horizontal fins painted silver, with upper surface color over the leading edge. In combination with the orange markings - it looks very nice and different, I think. Hope you like it :). Best regards and Happy New Year! Hubert4 points
-
How can I help You. Just send me some photos and we will do my best . M4 points
-
Mirek from HPH has mentioned on Modelforum.cz that they will maybe release Porco Rosso as IM kit https://www.modelforum.cz/viewtopic.php?f=57&t=1312464 points
-
Started working on the interior wood parts... Deck tan and some preshading in the corners. Added some wood grain details with a color pencil to the fuselage halves Wood added using oils. To be continued... Kent4 points
-
Thank you both of you. That was exactly the motivation I needed to get back on the bench to try to progress on the project Much appreciated More work on the starboard flaps: The 2 part moveable flaps have been assembled. These are initially designed for the trumpeter kits but modification to fit the airfix kit is minimal. Most of the mods are needed around the area where the flap go through the wing and opens a small door when they are down. Here are the flaps assembled The rods are still too long and the hinges aren't glued yet And a dry fit on the wing, the inner small flap doesn't fit perfectly but this is very easy to fix. The inner flap has no wall and it's normal to see inside the fuselage, but it seems I didn't plan for that when I scratchbuilt the cockpit walls and I'll need to make them fit better before attaching the flaps. Happy to see some real progress rather than rivetting and panel line. Still have to do the port flaps and rivets on the fuselage. Thank for looking4 points
-

Hurricane MK.IID of
109 and 3 others reacted to gmctaggart for a topic
Alain, I am hoping it will be interesting in a good way and not the car accident you see happening from a mile away . So a bit more work. I focused some effort on the fire wall; drilling out the various holes for the pipes and wires that pass through. On the opposite side I also added the flange that secures the emergency gas tank to the wall. In addition I ran a thin piece of plastic around the perimeter the fire wall to show the flange that supports the body panels. I will be adding some texture in a bit as I assume this is likely asbestos or some other other fire proof material. I also applied the same flange to the bulkhead opposite the fuel tank. Feeling brave I also started working on the engine support structure, adding in the missing braces and wires. Still bunch to go on this but a reasonable start. Finally I started to look at the fantasy version of the Merlin XX that Trumpeter has in the kit. I am hoping this is something I can save but currently not confident in that. That will be a battle for another day. Would appreciate any of those that can tell the differences between a Packard Merlin which I assume the picture below shows and an XX. Should I be using my reference photos to bring reality to this engine? Appreciate the thoughts. If it looks weird, let me know. Gord4 points -

F-100D Thunderbirds SIX Foiled Again - Finished!
TorbenD and 3 others reacted to themongoose for a topic
These turned out sooo good I had to grab a picture in the paint booth! Since I had to paint the inside of the Zacto intake I decided to keep going once the booth was set up. Now i can finish the nose and the tail, make the joints up and start foiling the middle. It may seem out of order but i found taping over foil somewhat tenuous when i did the F-84G so going to mix it up this time. Back to work tomorrow so probably nothing happening till next weekend. Happy New Year LSP!4 points -
Hello Trying to catch up with some late 2019 built I did not shared yet with you guys. Here is the magnificent Tamyia mosquito. Pretty much everything as been said about this kit. I think it is close to perfection. I added some Barracuda decals in the cockpit, Master's metallic guns and rockets from Special Hobby with MDC mountings. Edit: it was also the opportunity to test the Tamyia customer support as the nose fairing was missing from the sprue when I opened the box. I contacted Tamyia europ and they were quite efficient in answering my request quickly and ordering the new part in Japan. I wish you all the best for 2020.3 points
-
P40F trumpeter 1/32
KUROK and 2 others reacted to pascal JMW for a topic
hello the last one for this year just finish , P40 F trump + photo etched Eduard for the cockpit and resin wheels , Berna decal , painting Mig ,AK,Gunze and Tamiya 8 white p'ti Quinquin escadrille Lafayette 1943 unknown serial best regard Pascal and happy new year !3 points -

Why Doesn't Eduard Make LSPs?
esarmstrong and 2 others reacted to nmayhew for a topic
Why? because they massively snowflaked when people dared to criticise their previous 1/32 efforts (same with their foray into 1/35 armour btw), and they are too scared to come back and play in manscale. commercially, I can understand why they just want to continue printing money in PE... But it’s disappointing that they don’t have the balls to come back and say ‘yes we can do this and prove you all wrong’, and instead make models in 1/48 where the standards of critique are significantly lower.3 points -
Funnily enough Dave the same thought occurred to me, flying upside down sorts it! I’ve done the correction without too much hassle, just an hour’s work, pictures soon hopefully! Do think about a Silhouette cutter, it really is worth every penny! Hmmm, twinge of guilt there, I bought it for my wife for her card making hobby but she hasn’t had a chance to use it yet!3 points
-
I have the original release , 1974 . Planning to build mine in flight.3 points
-
There has definitely been a "Shift" in the market since I started back into the hobby in about 2007-8 ... I remember when things slowed down a little - post GFC - and there were doom and gloom posts everywhere about every company pulling out of anything Large scale and that the Hobby was dead and/or in the process of dying. In reality nothing could have been further from the truth ... The amount of product released in the years 2008 - 2015 is staggering. Most people forget to include the Chinese market in their calculations also - at nearly 20% of world population. Dragon were the primary producer of LSA's chuffing out about 3-6 new releases per MONTH ... while either Trumpeter or Hobbyboss dominated LSP production (among other things) at that time releasing several new LSP kits per year ... averaging at least 1 per month at one point. China has been the last of the world markets to slow down economically and it shows ... It has to remembered that the primary reason for any cut back in production - from anywhere - will be a waning of demand (measured through sales statistics) ... Also the larger the company - the greater demand will have an influence on economies of scale. I believe this is why the smaller to medium newer companies - birthed around that post GFC time - are doing reasonably well now (Zoukei-Mura, Wingnut Wings, Hong Kong Models, Takom, Meng, Rye Field Model) etc ... Trumpeter, Hobbyboss, Dragon, Revell, Tamiya etc have still been pumping out product ... yet it's been in less quantities over time - as the pipeline (development to production) has dried out ... The bigger the modelling wing of the company ... the sharper the decline - especially as company rationalisation kicks in ... although it's interesting to note that they haven't given up completely ... Tamiya is releasing a (re-box?) of a Mustang this year ... Revell is releasing re-pops of their own and other companies products, the Chinese based companies are releasing new moulded kits (just a LOT less of them) ... They're just holding off on development at the moment. I think that when worldwide demand increases again, you'll find these bigger companies will reemerge with something new. Rog3 points
-
I finished the IP. The decals I tried to use for the instruments cracked up as I tried to apply them, so back to old techniques and a fine paint brush. Fortunately not much will be seen behind the pilot’s legs. I also added a bit on the seat. And all painted up and closed. Cheers Nick3 points
-
Hi everyone and Happy New Year 2020, The bottom of the cockpit. The pipes removed. Une couche d’AK pour le chipping. Une couche d’AK pour le chipping. Painting and ready to receive the new pipes. See you soon Sweety Last year I was on the brink but this year I will take a big step forward3 points
-
I've started to look at the kit a little closer. The cockpit parts are not overly impressive. It's not bad but I wouldn't call it good either. Fairly soft details and noticeably short of state-of-the-art. That's what aftermarket is for, I guess. I would prefer a resin cockpit but I'll have to settle for a bunch of photoetch instead. This is the RB Productions Ta152H cockpit set, comprised of a single fret of brass. As you can see, it has some fairly big components such as the seat back, the side consoles and the instrument panel components. It's also got a ton of tiny bits and pieces, of which I'm sure I'll be losing or electing not to use. As a warm-up, I decided to see if I could get the seat back assembled. This is designed to augment the kit seat not replace it, so I'll have to chop up the kit part if I want to use it. When I'm fairly confident that I can make this work, I cut the seat back off of the kit seat. I've deviated from the instructions by leaving the little platform at the back of the seat and seeing if I can utilize that plastic to serve as a base for the brass seat back. Here is what the new seat looks like compared to the kit seat (with molded harnesses). The phototech set has an elaborate set of parts to mimic the adjustable height mounting frame for the seat. I'll probably simplify this as much as possible since it will be largely unseen anyway. I just want to establish a positive connection between the seat and the rear cockpit bulkhead. Having wet my feet with the seat, I decided to tackle the upper instrument panel. Pretty fiddly work... the upper IP alone has EIGHTEEN parts! The price for an upgrade here is pretty steep but hopefully it'll look noticeably better than the kit part, which I'll shoot with paint for a comparison when I get further along. This episode emptied my gas tank and I'll have to re-gather my energy/patience for more fun with brass tomorrow.3 points
-
Figured it's time to post some pics of plastic instead of yet more questions! I've got the fuselage mostly buttoned up. Just a tad of filler here and there but aside from that, everything fits nice and tight! I simply glued the rudder and elevators in place. One major dislike I have with this kit is all the work that Tamiya wants you to go through to make the kit into a toy with retractable landing gear, movable flaps, control surfaces, etc. I have no need for any of those "features". Moving on, I've done some additional work on the landing gear wheel wheels. Lots of fun color options here. For some reason, later Mustangs often had one bay with unfinished aluminum roofs (actually, the underside of the upper wing) while the other was GZC. In addition, the rear bulkhead (which was actually the wing spard), was usually YZC. That's the scheme I went with, I think it adds some nice color. Not a lot of corrective work is needed in this area, Tamiya did a good job. Only thing I did was drill out the holes in the oleo calipers and also removed the solid plastic backing for the hydraulic cylinders mounted to the aft bulkhead. Couple of notes - I just received the Fundekals P-51 stencil set. Very nice, as is all of Jenning's stuff. It even includes the stamped markings that were applied to sheet aluminum at the mills! In retrospect, I should have applied these decals before I added the ribs, etc but of course, I was in a rush and as a result, it took twice as long to shoe-horn these small decals into place. IMO, they really add quite a bit to the look. I also added some decals to the landing gear but since my photo skills are awful and today was a pretty cloudy day, it's tough to see these. Also note - I haven't added any additional details to this area. I'm going to add some hydraulic and electrical lines to busy things up but unlike the Corsair I did last, where I slavishly added every line, this area on the Mustang is packed with tiny lines and fittings. I'll add some but there is no way I can add everything. Would have been nice to have an aftermarket outfit take a shot at this area. I obviously will be weathering this once I'm complete. That's it for now, thanks for looking!3 points
-
Hello all I managed to finish my third LSP this year, truly great result for me. This one was long enough on a shelf of doom, started this one three or four years ago and I just somehow stalled on it. So after I finished last 109 decided to give this one a second chance. Now I know lots of you guys consider this one to be one of the best Trumpeter models which it is but it just decided to battle with me. I used Model Master Authentic Enamels RLM81/83/76 ( it should be 81/82 but MM somehow mixed 82 and 83 )and Valejo varnishes Also used is mix of kit and Kagero decals, missing wnr for tail but hope to find them in future, as I was very keen to this paint scheme. I did not want to over done weathering effect, it is there but not so prominent on pictures. Kit represent mount of Gruppenadjutant Oblt. Gunther Wegmann, Stab III./JG7 Gunther Wegmann scored seven victories flying Me262 and 14 in total. So here are some pictures hope u guys like it2 points
-
Happy Holidays Everyone. I have finished up the major assembly, now getting ready for paint. The build was pretty smooth overall, but my biggest challenge was fitting the engine and nacelles to the wings. Naturally I deviated from the instructions when I probably shouldn't have: 1) I fitted each firewall to the wing/landing gear bays. Four struts need to be mated, and the upper two slot into holes which are buried from view, so this was tricky; I wiggled them into place. The lower two struts were much easier, and actually attach to the upper part of the landing gear. 2) I thought I was being smart by completely assembling the nacelles separately to ensure the best fit. Turns out this meant that three cooler vents on the inside of the top nacelle panel would not clear the engine; these had to be removed. Not a big deal since they cannot be seen, but I know they're not there! 3) I dry-fitted the engines to the firewall, then the nacelles over these. This meant the engines protruded to far forward, and the nacelles would not fully meet the cowl flaps and wing/landing gear bays. I finally cut back the centers of the firewalls (E-1 and E-16), and this solved the issue. I am excited to start on the camouflage! Cheers, Tom2 points
-

Fa330 Fock Achgelis
themongoose and one other reacted to Rick K for a topic
One of my biggest issues with any short run injection kit is lack of locator holes or pins. Fly's Fa330 is no different. To get the correct rotor angle I enlarged the top view profile drawing on the last page of the instructions. I drilled .5mm holes on the rotor hub for the 3 outriggers. Then with a small drop of CA glue the hub to the enlarged profile view of rotors. Carefully drill a .5mm in each outrigger. Inserting a .5mm brass rod with just about 2mm exposed will give enough for the brass rod to align and keep the outrigger in place while epoxy cures. Prior to inserting the brass rod I decided to create the turnbuckle for the rigging. Using a .5mm aluminum tube and Ultra Wire extra small I created turn buckles. The aluminum tube will bend very easy and that's a good thing. Turnbuckle is inserted and secured with epoxy. After epoxy cure (i gave it 3 days) you can carefully bend the turn buckle to the proper angle. *Outrigger and rotor blade are dry fitted. Take photo etch piece #18 and carefully align with the outriggers. This is where you very carefully bend each outrigger to align with #18. Once in place secure with epoxy and let cure for a few days. After outriggers are cured it's now time to glue the rotor blades to the rotor hub. Using LEGO pieces come in handy to give the rotor blades desired pitch. Make sure the rotor blade shaft ends are clean of any paint. Same goes for the mount holes on the rotor hub. If they are not clear the possibility the epoxy will not hold. While epoxy is setting align rotor blade and place the Lego piece to give desired angle. I've seen varying degrees of angles on actual photos and a real Fa330. All ranging from Droopy to Neutral to Upward. I elected to go with a neutral with a slight rise. It's up to the builder. *15 minute epoxy will afford plenty of time for fine adjustments. Once satisfied...walk away for 2 days. Let the epoxy cure.2 points -
Thanks a bunch Kev, works fine again Lothar2 points
-
The Invision support site has confirmed the existence of the bug (triggered by a hard-coded cookie expiration date, set for - you guessed it - 2020), and as mentioned by Lothar, has allegedly released an update that fixes it. The problem is, I'm not seeing it! I'll pursue it further, and hopefully we'll have it sorted soon. Kev2 points
-
Works again on another site (BM) after an update has been released today. Lothar2 points
-

Looks like the Academy Sufa has been reissued.
Alain Gadbois and one other reacted to ScottsGT for a topic
OK Jens. That was pretty impressive!! I probably used a few of the wrong parts, but no one will probably catch it in his medical office! Two other minor changes. There is a vent that needs to be removed on the fuselage. And on the tail there is a scoop that needs to be removed and a blank filler panel in its place. Sorry no image of that. But here's the finished product before delivery. The real thing2 points -
Thanks John! The clear punched discs are a tight fit into the instrument bezels. So I just add a drop of Future on the instrument decal and then press the clear disc in with a wood cocktail stick. Thank you Kent! I believe I do have some of those Quickboost Revi sights in my spares box!2 points
-

Cross Kit General Lee......ish-Completed-01/16
Gazzas and one other reacted to mustang1989 for a topic
Engine is ready for the assembly process (which I've already started): I've already got one of these same 440 engines painted up for use in my sons 1970 Superbird. Everything looks like it'll fit fine in there:2 points -
Primer or base coat for very lite top colour
Wackyracer and one other reacted to nmayhew for a topic
i would still start with black primer - no reason why you can't black base pink in fact it's probably even more reason to black base if you have a single colour camo - you need something to add depth and interest and stop it looking bland / toy-like in my view2 points -
.thumb.jpg.f23b2dc356f90ead35d25aa5e3609a95.jpg)
1/35 Bronco U-boot type XXIII (RFI)
USMC Herc and one other reacted to Dart_Schatten for a topic
Hi, friends! Let me to show something different - it's a submarine! Not yellow but she is really big! I've made some scratchbuild things. The sailors made from Master Box, unknown company and some milliput. I've used Akan, Tamiya and Mr.hobby paints for my U-boot. Thank you! Regards, Sergey Budyansky.2 points -

Looks like the Academy Sufa has been reissued.
Alain Gadbois and one other reacted to jenshb for a topic
I have the Sufa kit, and it gives you pretty much all the parts in the box for a regular D with the wide wheels (no "flat" main undercarriage doors included, so only possible to make a Block 40 and above) - the instructions show a long list of parts not for use. You can build it with either a GE or P&W engine as both types of intakes and exhausts are provided, though I would recommend the Zactomodels corrected intake for either as they are a great improvement (check out the Zactomodels website) and an Aires GE F110 exhaust. I think the wheels for the Sufa are unique to that variant, so you may want to source aftermarket wheels for a regular D. Res-Kit have announced F-16 wheels in 1:32; the early A/B wheels, current AM/BM wheels, Block 40-52 and the Sufa wheels. The Block 40-52 and the Sufa wheels look identical to me, and unfortunately they don't seem to cover the earlier Block 40 wheels that look similar to the JASDF F-2. If I have missed anything out or wrong, feel free to correct, but these are the steps to make a USAF D: Step 1-4 - the kit only gives you the ACES II seats with the fixed pitot tubes on the headrest so you may want to modify these if your subject has the later/current flip-out type. Step 5 - this shows the Normal Shock Inlet (NSI) that is applicable to all P&W engined and early GE powered aircraft. The latter would require the "flat" gear doors however. If your subject has the MCID (aka "BIg mouth") intake, use the corresponding parts on the runners, or the Zactomodels improved parts. Omit part K28, and if applicable replace with part D37. Step 6-8 - build as per kit. However, the compressor, part H1, looks more like a GE F110 to me rather than the P&W F100, part no C65. Step 9 - the raised spine is not needed, so replace that with the fairing, part K17. Use part K53 to plug the hole as per the instructions. Step 10 - do not fit the conformal fuel tanks, but fit K35 - the gun panel. Step 11 - open the holes inside the nose if your subject has the IFF aerials (aka "bird slicers") fitted. And join the upper and lower fuselage, trapping the cockpit. Step 12-14 - undercarriage, no change there. Step 15 - omit parts K7 - K12. The instructions will have you fill the exhaust outlet in front of the port main gear well. Don't. Fit part C55 instead. Step 16 and 17 - This builds up the P&W exhaust and fits it to the fuselage. Omit the photoetched parts as well as K36. Choose closed or open speedbrakes. Step 18 - Assemble the wings - remove the "beer can" antennas from the leading edge of the wing if not applicable to your subject. The static dischargers (parts B13) are better off to be added a lot later in the build. Step 19-20 - assemble wings , flaperons and stabs to the fuselage. Step 21 - replace the Sufa tailfin with parts B11 and B12 that has the complete tailfin. Add the rear parts B7 and B8 as USAF vipers don't use the parabrake housing, parts B1 and B2. The outlets, parts B14 and B15 must be added to the tailfin base in front of the blisters - their location are marked on the fin with pegs. Step 22 - radar if you fancy showing that off. Step 23 - instrument panel glare shield for front and rear cockpits. Add K5, K29 and L17 if your subject has the HUD repeater box. Step 24 - build as per kit, but replace parts M18 and M19 with D49. Step 25 - add the ladder if you want. Step 26 - add the "bird slicers" if you opened up the holes in step 11. Omit parts M11, M17 and PE4. Do not use parts M20-M23, but use parts L18 instead. Step 27 - Add the LAU-128 wing tip launchers (part F29). The kit provides two of the older style launchers (parts J46) as an alternative. Don't know if the USAF is mixing these launchers, so check your references. The legal load when mixing AMRAAMS and Sidewinders is AMRAAMs on the wingtips, and that requires the LAU-129 launcher on the wingtip. Step 28 - The USAF does not use the 600 gallon tanks, only the 370 gallon tanks. The kit provides the later/current style pylon for stations 3 and 7, but not the PIDS/ECIPS. They don't seem to be a common fit to USAF Vipers anyway. Step 29 - add air to ground munitions if you feel like it. Step 30 - assemble fuel tanks, but save the 600 gallon tanks for another day. The AN/AXQ-14 pod is a guidance pod for the AGM-130 I believe. Step 31 and 32 - the instructions show the AIM-120B, but you can build the AIM-120C by using the smaller fins also on the runners (parts F16,17 front and F47, 48 rear). The USAF does not use the Python AAM, but 2x AIM-9L/M are on the runners too. Step 33 - this adds the Litening II targeting pod and the AN/AAQ-13 LANTIRN navigation pod. The LANTIRN targeting pod (parts E26, 27, 31, 32, 39, 40, 43, 44 as well as the Sniper pod (parts K4, K6, K13-16 and L20) are included in the kit too. Step 34 - adding pilots And then it is just a matter of painting and finishing your model. Jens2 points -
What is GFC? Global Financial Crisis?2 points
-
After a couple of coats of hairspray had dried, I sprayed Zinc Chromate Yellow (Tamiya) onto the top of the wing. A few hours later, I started working a wet brush over the ZC and it started coming off in large bunches. I immediately stopped and decided to let the ZC paint dry even further but when I got back to it, I had the same results. The water was acting like paint thinner and taking way too much of the Zinc Chromate. So much so that I was able to completely remove it with water with the Tamiya AS-12 completely intact. So back to square one...2 points
-

New year, will we learn of any new LSPs from “quiet” manufacturers?
Jeff and one other reacted to BloorwestSiR for a topic
Tamiya has an F-51D variant of their Mustang coming sometime this year. It's listed on Lucky Model as well as TamiyaBlog.com. So they haven't given up on the scale completely. Carl2 points -
Thanks for the kind words! The folks here are very friendly and encouraging! I spent the last night (while people with lives were out celebrating the new year) putting decals on and a little more paint on the 109. masking the spinner for paint. painted and chipped; back side, I may have overdone a couple of blades... Thank you for looking2 points
-
First off, a very Happy New Year to y’all. My work on this plane is quite the love/hate relationship- just about every time I finish a step, I have to put this thing away for a day and forget it. In any event, here’s the latest observations as I plod along, bearing in mind that none of this has been puttied yet. The nose, glass, rudder, and exhaust are just press-fit into place for these photos. Overall, it looks like a Mirage... The fit of the intake assembly to the fuselage is way better than it is on the Italeri Mirage III: The nose fits pretty well, but I think it sits slightly proud of the fuselage: And the resin exhaust: To finish up, the infamous intakes without intake ramps: After looking at the directions and studying the parts, if anyone can explain where part G49 fits into everything in Step 45, please let me know, and post a photo.2 points
-
I added an ignition harness to the engine. I know the BMW 801 has two spark plug leads per cylinder but since I will build mine with the cowling closed ,not much will be seen behind the fan anyway. Just a bit more to add a bit of interest. The engine is pretty good out of the box and possibly the best radial I have seen. The Tamiya Corsair is probably better but I have not had eyes on one. And painted Cheers Nick2 points
-

Arcane Mosquito Question
MikeC and one other reacted to Anthony in NZ for a topic
My memory was a little grainy...here is an actual photo. Cant remember if it is mine or Avspecs credit, sorry2 points -

Due in late Feb.....
MikeMaben and one other reacted to Dave Morrissette for a topic
Completely correct. In my case, could care less about accuracy so bring it on. Looks like the plane so I am good. Got over my AMS years ago Dave2 points -

1/32 F7F Tigercat or ME410
Rick Griewski and one other reacted to Artful69 for a topic
I wouldn't at all be surprised if HpH head down that road with them at some point ... they're doing the SB2C that way and they kitted that one up in resin 1st. Rog2 points -
1/32 ZM Henschel Hs-129 B-2......FINISHED
Gazzas and one other reacted to monthebiff for a topic
So finally managed to sit down and get some bench time today, been a little frustrating being off on holiday but no chance to get any meaningful modelling done for over a week. Anyway, HGW belts added from a Ju-88 set I have been using on a few builds. Instrument panel fitted And side panels going on. Pretty happy with how it all turned out, a note for anyone building this is to make sure you choose a set of seat belts which the shoulder harness can be built quite long so they can reach the rear fuselage bulkhead. Regards. Andy2 points -
1/32 ZM Henschel Hs-129 B-2......FINISHED
Daniel460 and one other reacted to monthebiff for a topic
After another full on week at work but not withstanding a couple of really nice chilled days away in York with the wife I managed to get some more done on the Henschel over the last couple of evenings and managed to get the engine sub assemblies painted and assembled. Straight out of the box and decided not to go overboard on them as not much will be seen. The most difficult part of the engine assembly are the cradles. Three parts only but so fiddly to align, I decided the best way to keep them aligned while the glue dried was to mount them to the engine firewalls Also have the internals of the engine nacelles painted and ready for installation With the Christmas holidays around the corner now I'm hoping for some serious progress over the next week or so. Regards. Andy2 points