Leaderboard
Popular Content
Showing content with the highest reputation on 11/27/2019 in all areas
-

1/32 Tamiya F-4D 'Terrible Tyke'
USMC Herc and 9 others reacted to David Mooney for a topic
Hello all, I have been rather busy working of late but I have found time between working with real aircraft to finish my F-4D. Im sure many are aware that the Tamiya kit is a dream to build and goes together very well, I used Mr Colour paint which I believe are the best on the market at the moment, the colours I used were 303 (FS34102), 310 ((FS 30219) and 320 (Dark Green)……….and black for the bottom :-) Sadly the decals were in a poor state and fragmented as soon as they hit the water, so I purchased the Warbirds Decals set (32009) which were superb and set well on the aircraft and into any details very well and recommended. I didn't like the fit of the intakes to the ducting, so I thought it a far better idea to use the Quickboost (QB 32089) set of intake covers. The seats are aftermarket, but I cant tell you who made them as they came free with the kit (from a certain auction site) All the weapon pylons are removable, this is done using small earth magnets in the wings and pylon locations. I hope you like it, it is certainly my best build so far. All comments are welcome, thanks for looking10 points -
www.icm.com.ua/news - Kits on sale - December Looks nice! Juraj9 points
-

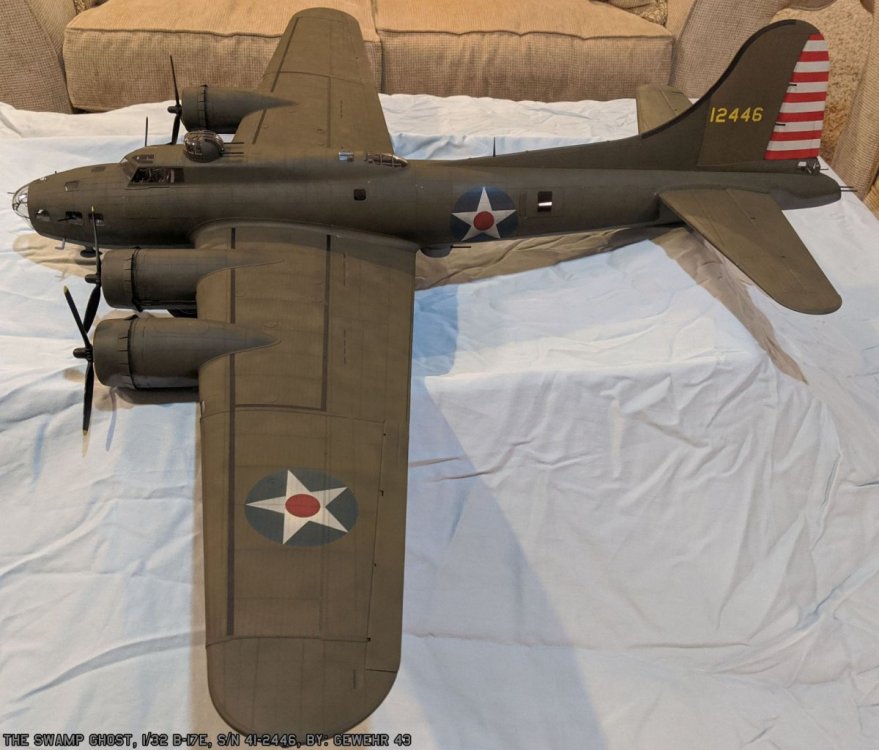
B-17E, 41-2446 - The Swamp Ghost
mywifehatesmodels and 6 others reacted to ChuckD for a topic
Here she is at long last. It's been 1008 days since cracking the box (Feb 19, 2017) that this model has come to fruition, but in the end, I'm very happy with the result. This is The Swamp Ghost In early 1942, B-17E 41-2446 was ferried across the Pacific and arrived in Townsville, Australia on February 20th. In the early morning hours of February 23rd, with pilot Fred Eaton at the controls, she took off as part of a nine ship group that was to bomb Japanese positions on Rabaul. This historic first offensive use of American heavy bombers in the Pacific saw the fledgling group separated by night and bad weather, so that when Eaton arrived over Rabaul, he and his crew were alone. The bombs failed to drop on the first run, so Eaton swung around and tried again. This time the bombs released and he sped away towards New Guinea with Japanese fighters hot on his tail. Shot up and leaking fuel, he knew he didn't have enough gas to clear the Owen Stanley mountains on New Guinea, so he decided to put the aircraft down in a field. The field turned out to be a festering swamp full of 8' tall kunai grass, snakes, spiders, and crocodiles. He and his crew abandoned the bomber, slogged for days through the thick razor grass, and finally met up with friendly natives who were able to get them home over the course of several months. For decades, the bomber lay undisturbed. Finally, in 2004, she was plucked from the swamp and made her way to the Pacific Aviation Museum in Pearl Harbor, HI where she is on display today in her original state. This is my rendition of the aircraft as she would have appeared during her brief stay in Australia prior to her loss. As mentioned in the build thread, the biggest issue was that I had to scratch build the remotely operated belly turret, as the HKM kit only includes the far more common ball turret. I'm not much of a scratch builder, so this was a challenge for me. In the end, I feel it came out pretty well. I was able to use a lot of parts straight from the kit in order to fashion the remote turret. I did throw some Eduard PE at it, though in the end, I'm not sure it was totally worth it. The pre-painted stuff just isn't all that impressive to me, but to each their own. There are no known pictures of the aircraft prior to her loss, so some creative license was taken here and there. I made some assumptions based on pictures of aircraft from the same unit or around the same timeframe. Wherever possible, I referenced photos of the actual aircraft both in the swamp and after her recovery. It was painted primarily with Tamiya paints. The tail numbers were a custom stencil I printed and hand cut. The insignia stencils were custom ordered from Maketar. As it was essentially new when it was lost, I went very easy on the weathering. Kit fit was okay. Seam cleanup was a bear and I ended up having to re-rivet a good chunk of... everything. The turtle deck doesn't like to fit well, but in the end things came out okay. Anyway, enough blabbering. Hope you enjoy. It's been a great ride.7 points -

MiG-29A "111" Polish Air Force Trumpeter 1:32
Durangokid and 5 others reacted to Koralik for a topic
This time in my opinion ofcourse, one of the most beautiful combat aircraft in the world. I mean only aesthetic values especially during the flight. MiG-29A with the side number 111 of the Polish Air Force. Model is Trumpeter 1:32 scale made straight from the box. I must admit that the Trumpeter model is quite well made and doesn't cause problems. Decals are made to order ModelMaker, I add that the position and aplikation of the wheel requires a lot of patience. I hope you enjoy watching this model.6 points -

Tamiya 1/32 P-51D Mustang
LSP_Kevin and 5 others reacted to curiouslysophie for a topic
Sorry for the long delay! I finally got some paint on the Mustang after a few false starts. I’ve never done a NMF finish before. It didn’t come out as metallic as I would have liked, but it’s not a bad try I gloss blacked it with Mr Color gloss black and used MRP super silver on the wings and MRP white aluminium on the fuselage. hopefully I can do a better job on the Thunderbolt I have on the go.6 points -
Thanks guys! Great information about the handholds. Like I mentioned, I'm going with the single just because its easier for me having had a hard time making two match. Thanks Mark! The wheel wells are a photoetch set from RB Productions (Radu). They fit very well and I highly recommend them, if anyone is interested in using them. I've heard mention of a landing gear indicator on the top of the wings but have not seen an references so that would be very helpful! The gun cowling over the engine has been glued into place. A glue joint that occurs on a panel line can be a delicate situation. Unless you pull it off perfectly, there is usually a bit of excess glue and plastic to clean up. The oil cooler intake below the engine was also glued into place. I'll have to do some minor filling and clean up here still. Time to hit the lightbox and see the model with wings and stabilizers dry-fitted. Starting to look like a Messerschmitt now.5 points
-
Woohooo ...5 points
-

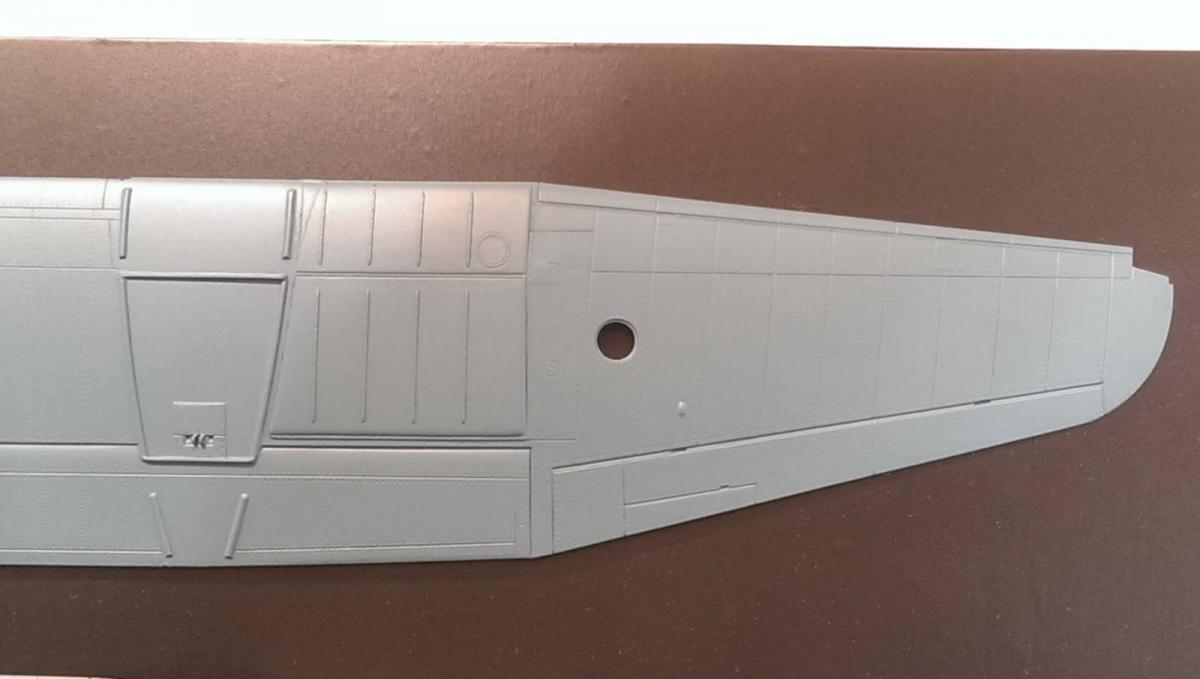
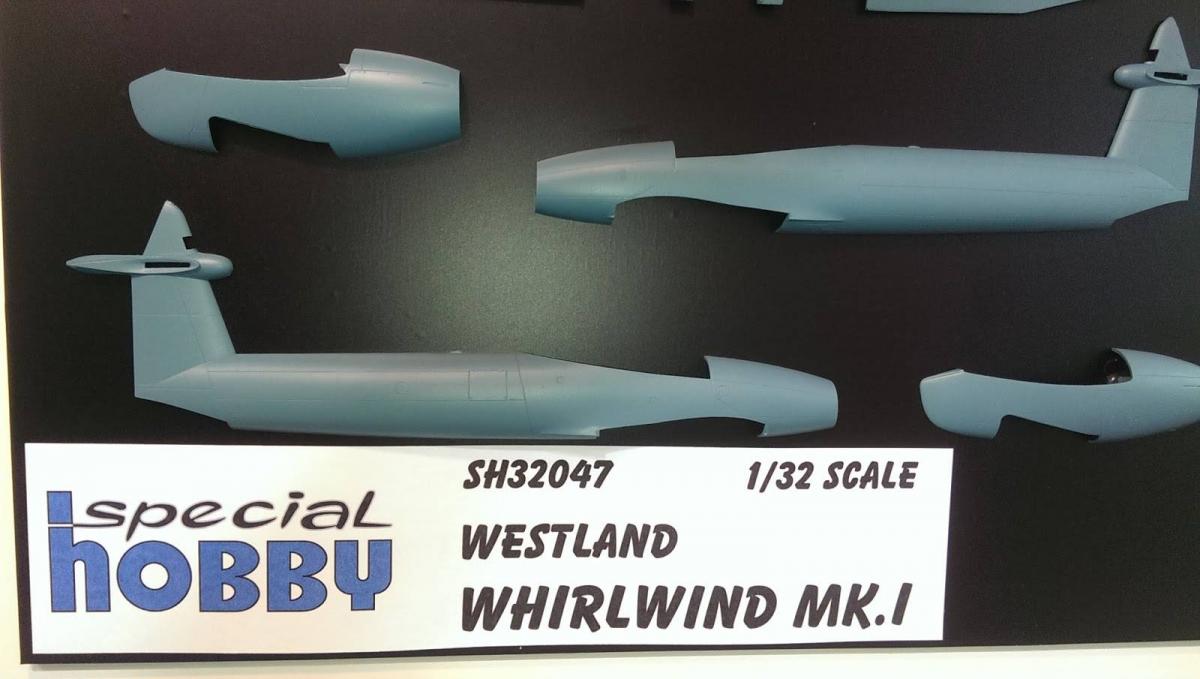
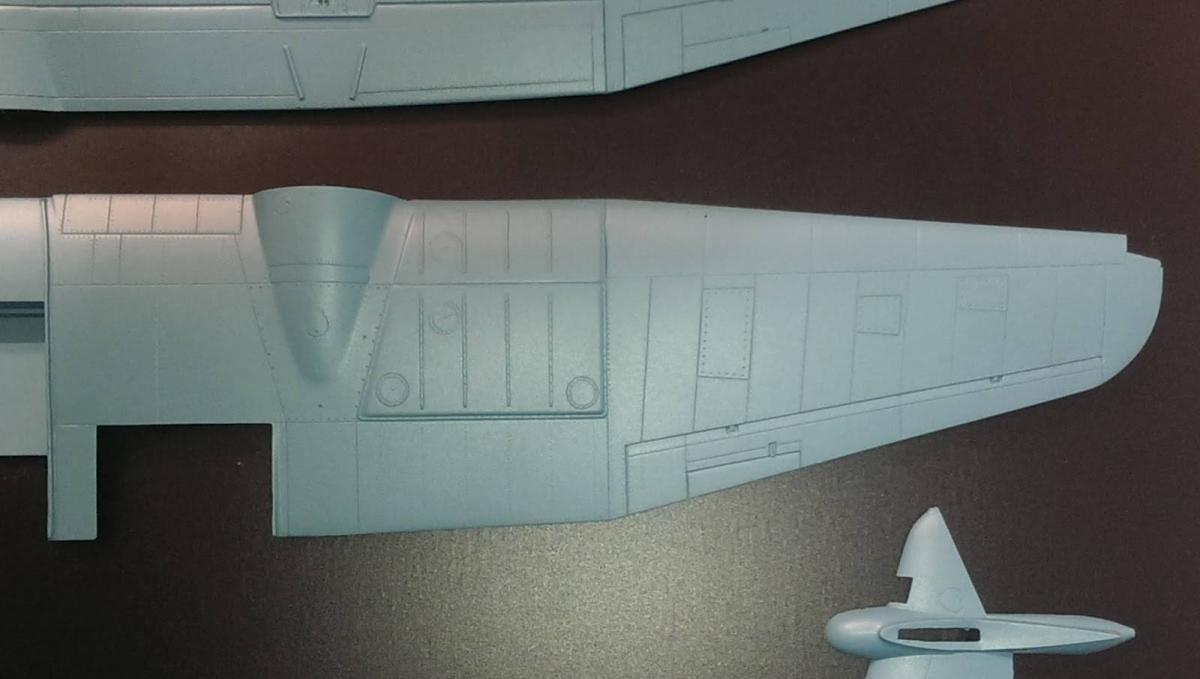
Special Hobby Westland Whirlwind Mk 1
VW Chris 1969 and 4 others reacted to Jan_G for a topic
first test sprues on SH site http://www.specialhobby.net/2019/11/sh32047-westland-whirlwind-mki-zkusebni.html5 points -

HK Models Avro Lancaster Mk.I WIP: Canopy Attached 3/31/2021
KiwiZac and 3 others reacted to Dennis7423 for a topic
All- Happy Thanksgiving to those that are celebrating tomorrow. I hope it is a great time of fellowship with your families, both blood and chosen! When I left you last, I was completing some upgrades/corrections to the cockpit. I have since completed some of those, and wanted to share the progress with you. The pilot's pedestal has been lowered, and the support framework has been added. The control wheel has been upgraded with the brake lever and the center cap, and I boxed in the column itself. I also added the control cables for the control wheel below the pedestal, as these will be visible from the nose to the keen eye that looks inside: 76978619_423979045215840_7982335116347179008_n by Dennis SAuter, on Flickr 77006274_2839194226114116_6833098152514420736_n by Dennis SAuter, on Flickr 76726111_473347983567332_3309174719911034880_n by Dennis SAuter, on Flickr The conversion of the pilot's seat has been completed as well. I extended the rear seat pad at the bottom to better represent a full cushion once the lower pad was removed from the kit part: 72985956_2823751524336486_3125124599499456512_n by Dennis SAuter, on Flickr And here it's blue-tac'd in place on the pedestal. Pretty pleased with the result: 76686426_1015083235501409_6044080808761753600_n by Dennis SAuter, on Flickr 76779594_2509705899127561_5003582568503705600_n by Dennis SAuter, on Flickr That's all for today. I will have more to post on the turrets next time, as work has continued on them. Hoping for some bench time tomorrow with the holiday! As always, comments and critiques are welcome. Thanks folks! - Dennis S. Thornton, CO USA4 points -

EA-18G Growler- Completed
Starfighter and 3 others reacted to chrish for a topic
Thanks for looking...hope I'm not boring you. I joined the lower forward and upper forward fuselage halves today/ tonight, I had a bit of trouble here and there (I glued the plastic fuselage right side to the resin intake trunking but didn't get the seam tight and didn't notice till after I'd hit it with accelerator! dumb!!) some fidgeting, filling sanding and it's actually not looking too bad now. the wad of Tamiya filler can be seen at the base of the wing4 points -

1:8 Scale 2001 Space Odyssey EVA Pod
Tony T and 3 others reacted to patricksparks for a topic
Inching a little closer to the finish line, put all the decals on the main body, still have to paint some details here and there and put the clear lenses on the headlights. Still have to finish the "EAR MUFFS" for the 2 sides, just taking my time on this one.4 points -
This is always good news!3 points
-
pictures below. The kit looks raw in those photos but it is actually much much more refined. Some areas look like they have dents but the reality is the fiber shell is smooth as glass, the areas that look like dents is where the color dye hasn’t spread during the molding process. HPH had to delay the molding because of the heat during summer 2018 in Czech Republic. The molding is through the vertical axis of the aircraft so you are left with a protrusion that needs to be sanded out. The “kit” comes with all the resin goodies in three massive tupperware type boxes. Very nicely detailed bays, cockpit is an excellent base for superdetailing, paint masks, two vac form canopies and the stencils to make a french armée de l’air machine in two tone gray. i am ready to roll on that one once i figure out how i am going to cut the shell to insert the gear bay areas and the cockpit as the shell is a solid continuous surface, albeit hollow. In one of the photos i have placed a wingnut wings Junkers D.1 for size comparison. if this beast is built up to a high standard and you take your time on it it will turn into an epic showstopper! Karim3 points
-

1/32 Icelandic Fine Arts Buccaneer - Detail Shots
Chek and 2 others reacted to thierry laurent for a topic
By the way it is far easier to recreate the twisted blades with thick aluminium foil. One quite easy technique is to mark a circle of the fan face diameter on a sheet, make regularly spaced cuts from the circle perimeter up to close to the center (1 to 2mm far) to separate the blades, glue the turbofan face cone on the center circle and cut cautiously the circle from the sheet to finally twist each blade. With that technique, no problem of spacing and easily twisted blades plus no need to paint anything except the cone!3 points -

Sprue Brothers Black Week Sale Now In Progress!
Eagle Driver and one other reacted to spruebrothers for a topic
Black Week Sale Now In Progress! - Additional 20% Off All Model Kits with Your Order Over US$30.00 From now until 11:59pm US Central Time Sunday December 1, 2019, receive an additional 20% off our everyday discounted price on all in stock model kits* on any orders over US$30.00. No coupon required - just add to cart and discount will be automatically applied once your order reaches US$30.01. If you were a newsletter subscriber, you would have received one day advance notice of this sale to allow you to have first opportunity to make your selections. To subscribe, go to: http://eepurl.com/3Vuxz Discount applies only to orders placed during the discount period, to in stock items (pre-orders are not included in the sale), and on individual orders only. Also, please be aware that due to the overwhelming response, we will not be combining multiple orders for shipment that are placed between now through December 7 - all orders will be shipped individually as originally received. Note - this sale started with 35,194 different items that are IN STOCK which is the largest in stock selection under one roof (not at our suppliers' warehouse) in North America. * items that are listed in any of our model kit categories2 points -

Hong Kong Models B-25J bomber 'Peggy Lou'
Anthony in NZ and one other reacted to Thomas Lund for a topic
sooo... since last time, I've been sorting seams on the fuselage - quite a task - and rescribing and riveting. I've painted the wings first time I've been working on the nose interior BUT... picking up the clear part frame, I notice this... a nasty crack in the top nose clear part - dont know when it happened. I guess that effectively ends the group build for me - at least I wont be able to make it within the deadline... Pretty devastated over it. Will try to fix and try to get a new one from HK (is that possible?)... I think I need a beer2 points -
They were early F-5E's, so pointed nose, short LERX, no RWR, flare dispensers, etc. Here's a photo, or two.2 points
-
Ive always used the old standby of a sturdy cardboard box to align the wings. Seems to work well, even when the outer wing struts dont have much to hold onto, and/or they are not connected for support. Its super simple, and normally when used it perfectly aligns the two wings without doing much of anything, except setting the model down on the box. Just have to use a very stout glue or epoxy for the most strength.2 points
-
Here have a NY strip instead2 points
-
... still no fillet2 points
-
If this makes it into Hobby Lobby, I will have a squadron in no time,2 points
-
I'm going knots... Richard2 points
-

Airfix 1/24 Ju-87 Stuka
Anthony in NZ and one other reacted to Gisbod for a topic
Hello all, Here’s my 45(ish) year old classic Airfix Stuka. Considering it’s age, it’s a pretty decent kit. At the time it must have been seriously cutting edge. The engine is particularly good and apart from lots & lots of flash, not bad detail generally. Build thread here: And her 1/72 grandchild: Thanks for looking in, back to the 1/18 Fw190.. Guy2 points -
EA-18G Growler- Completed
Starfighter and one other reacted to chrish for a topic
finally worked up the nerve to tackle the pe. seat belts, (took about 3 hours to bend and fit them) fill in the gun bay vents and fit the cockpit, the top of the ip. is as yet unpainted pending the heads up display frame and reflector. I painted the black parts with Tamiya semi gloss but thinned with Mr levelling thinner, when dry everything supposed to be satin was gloss, I repainted but with the same result, said oh well and shot the whole issue with Vallejo satin. Looks better now. Thanks for looking2 points -
Hi All! A tiny gap appeared on the topside of the right nacelle, I used some CASCO wooden glue as filler… ---but then I had This major gap on the bottom …. My favorite method how to handle larger gaps; first fill with pieces of plasticard and then lots of liquid glue… Not pretty… But after a few days I can shave/cut off the excessive plastic…. …and it looks already MUCH better…. Stefan2 points
-

1/32 Tamiya F-4D 'Terrible Tyke'
David Mooney and one other reacted to Old Dog for a topic
WOW ! For a minute I thought I was looking at the real deal, excellent !2 points -
Awesome! I just received this in the mail, a kit I've been wanting for quite a while now. Chock full of goodies too! Thanks, Bill, I'll be in touch, you can count on that.2 points
-

HKM Meteor, with T7 Conversion
LSP_Kevin and one other reacted to Dpgsbody55 for a topic
The bulk of the painting is now done. I still have to paint the wheel wells and touch up a few details but that's a ways off at the moment. First up, masking. Here's a picture of the plane with the canopy masked. How on earth the student pilot and instructor were supposed to see out of this while flying is a mystery to me, especially as the British aviation industry could make an appropriate single piece canopy as on the later Meteor NF14. Cost cutting gone mad!! Here we are with the cockpit masked and the first colour on. This is Mr Color flouro red (171) airbrushed on. It took quite a bit of painting too, so as to build up the colour properly. Half the bottle was used. Lastly, a couple of pictures with the second colour on. The flouro red (dayglo, as it was known) was masked off which took quite a bit of time, especially around the curve on each nacelle, as well as making both sides symetrical. Then the model was sprayed with Tamiya rattle can gloss black. Brass undercarriage arrived, but needs a little fettling. I'm using the kit plastic undercarriage temporarily to keep the painted model clean, and the kit parts are standing up to the abuse quite well. My previous "Meatbox" is still fine after more than 2 years on the plastic legs, so I'm wondering if they're really needed, and I live in a hot climate. However, having bought them, I will use the brass legs. As you can see, this will be an eye catcher!! Next up is to apply a coat of gloss varnish then apply the markings before another coat of gloss. More at that point. Cheers, Michael2 points -

1/32 F-4J Phantom (Complete)
Fanes and one other reacted to gmctaggart for a topic
A bit more layering now. Added some light deck tan, white and sky gray in selective areas. Slowly layering and creating depth while keeping sharp recessed lines. And then too bring it together another pass of insignia white. After applying I think I should have thinned it more as it seemed wipe out a bit of the colouration from the other steps. I may added a bit more colour back in but for the most part, the underside is complete. I only had the one shot as my camera battery died before I could take more. Again thanks for reading and your kind words. Gord2 points -
HKM Meteor, with T7 Conversion
Christoffer Lindelav and one other reacted to Dpgsbody55 for a topic
Progress has been a bit quicker than I thought. I've managed to spend a bit more time at the bench and I've now reached a point where I can see what this thing is going to look like, which is very pleasing. At long last, I get to do some serious plastic work instead of resin and CA glue!! Very soon after the last update, I got the engine mounted in the right hand nacelle. The rear jet pipe and front intake were added as soon as the engine was firmly in place. On both wings, I used the top wing to ensure fitment and alignment before gluing the top wing and aileron in place. Once this was dry, I spent some time cleaning up all the joints, but thanks to good fitment of the HKM kit pieces, this didn't take too long with very little filler required. While waiting for the filler to dry, I added a little bit of plastic back to the cut surface of the lower wing, as the resin T7 forward fuselage isn't quite straight. This is the white strip you can see on the lower fuselage/wing joint above. I also cut the HKM kit fuselage down in preparation for the conversion. At this point, the fuselage has not been glued, but simply taped together. I've never done this sort of thing before, so a lot of time was spent thinking about making this cut. I used a hand held razor saw and took my time. I'm very happy with the result as it's needed very little adjustment. Before gluing the shortened fuselage halves together, I added some extra alignment tabs made from part numbers from the kit sprues. The upper fuselage joint in particular is very long and there's not many alignment pins. I remembered from my Mk 4 build that this can be a slightly wavy joint, so this has helped reduce the amount of cleaning up and filler needed. The next shots show the assembled fuselage and almost completed wing ready to go together. I painted the rudder mostly so that I could be sure the rudder spine was properly painted. I've also added a spreader bar in the front of the fuselage to make up for the distortion caused by the loss of the forward fuselage, as well as adding some spacer to the wheel well to help with fuselage/wing alignment. On testing, I found that the cut down fuselage sat a little too low in the wing. Next up is the wing and tail plane going together. The engine covers are taped in place to protect the engines. I've wondered if this is what the actual T7 prototype looked like during construction, as it was built by Glosters as a private venture from the remains of their Mk 4 demonstrator that had been crashed while Glosters were attempting to sell the plane to the Belgians in 1948. After cleaning up the tape residue and the tail plane joint, I added the elevators. The wing and tail plane joints on this need very little cleaning. After cleaning up the excess glue, all that was needed was a touch of Mr Surfacer 500. This was also used to fill a small sink mark on each side of the wing fillet. On this kit, I've decided to clean up each of the major component joints before the next is added and have found this a better way to go. Late this afternoon, I added the T7 conversion, so now it looks like a plane and you can see how this is likely to look as a finished model. I had spent a while checking the vertical and horizontal alignment and added a couple of filler pieces from strip plastic, but much of this has been filed away and the joint is reasonably tight. The ruler starts to give you an idea as to how big it is. The Mk 4 I built two years back is 395mm long and 355mm in wingspan, but the T7 conversion makes the model 425mm in length. It's also noticeably heavier than my Mk 4 which has the standard plastic undercarriage legs under it. These have survived well but this model has the extra weight of two engines instead of one, as well as the extra weight of the T7 resin conversion and the nose weights. So I've ordered some brass undercarriage legs from Hobbylink USA on Sunday so I hope they show up soon. I certainly hope so, given the cost of postage from the USA to Aus (more than the cost of the parts....). So that's it at this stage. Next up will be to clean up the resin/plastic joint and fair it in to the plastic part of the fuselage. The left side has a gap caused by a variance in the profile of the resin fuselage to the plastic fuselage on that side, so the issue lies with the resin as all panel joints line up and the components also line up properly. I'm going to take my time with this as a rush job will ruin the completed model. Then I'll complete the the cockpit. The instructions for the conversion kit say to do it this way, so that's what I'll be doing. There is a back wall to go into the rear cockpit, which serves to position a fairing at the back of the canopy. This fairing will also bridge the joint making it stronger. After that, I can put the rear cockpit seat in and both sets of shoulder harnesses. I also have to decide about the gun sight provided in the conversion kit, as to the best of my knowledge, T7's were unarmed so no gun sight would be fitted. Then it's painting, markings and final assembly. The canopy is complex so I suspect this will also slow me down some. Cheers, Michael2 points -
Westland Whirlwind Mk. 1 patterns on display on the Special Hobby stand at the Nuremberg show - from the Special Hobby Facebook Page: <want> Iain

 1 point
 -
HKM Meteor, with T7 Conversion
Tony T reacted to Dpgsbody55 for a topic
Just less than a year ago, I was all set to start my next project, the HKM Meteor 4 with the Fisher Model & Pattern T7 conversion kit. I thought I'd tinker with it for a while then enter it into the Multi Engine group build. Unfortunately, real life hit hard in October last year when I took my little brother off to hospital as he looked ghastly. I quickly got the news that he had terminal cancer, so modelling got hastily put aside while I looked after him and his affairs until he passed in May. I'm still trying to wrap up his estate, but at least now I can clear the modelling desk of his affairs and take up the very welcome distraction of model building again. Life sucks at times. So here's the model, which (if I don't run out of talent ) will be converted to a Mk7 Trainer. And once again, I'll have another crack at the Profimodeller engine as I wasn't entirely happy with my previous result. There will, I hope, be 2 engines this time, so fingers crossed it all goes well. I've never done a conversion like this, so wish me luck. Cheers, Michael1 point -
I love the aircraft to, it’s just soviet coolness. Excellent modelling. Those exhausts are very convincing1 point
-
Great work Dennis! Good to get bench time before the tryptophan chain reaction kicks in tomorrow.1 point
-
it does look pretty cool but i really would hoped for a more creative solution to the wing spars they are all separate with no underlying structure providing automatic alignment and fit that will make a for a pretty precarious addition of the top wing onto the kit no? it's giving me shivers thinking of old Matchbox and Airfix biplanes i built in 1/72 when I was a kid - in many many kits and possibly a hundred plus spars, I don't think a single one was actually in proper alignment1 point
-

Proper Black Friday is coming!
Lothar reacted to Proper Plane for a topic
Hi there! Today we are getting to start our "Black Friday" sales! You can get a discount up to 10%. The offer is valid until November 30. Let's go! Clear prop! www.ProperPlane.com1 point -

Tamiya 1/32 P-51D Mustang
curiouslysophie reacted to MikeMaben for a topic
It'll look better once you get more color/markings on.1 point -

Multi-Engine Group Build Gallery
Hartmann352 reacted to BradG for a topic
Another big bomber cross the finish line, this time Gewehr 43's Boeing B-17E Flying Fortress. Very nice mate. Link to build thread;


 1 point
 -

1/32 ZM Henschel Hs-129 B-2......FINISHED
Rick Griewski reacted to monthebiff for a topic
This is my second ZM kit Tom, In general I really like the fit of them, however some of the design and build process I find just over the top and unnecessary........pistons in the engine assembly I ask you!! ZM most definitely have their own way of going about things and some of it I like and some I really don't but hey, the subject matter is brilliant so I'll suck up some of the bits I dont like. Regarding the instructions they are very good but initially I found them very confusing until I had a good read through and understood the way they work. Regards. Andy1 point -
Already made my purchase, one new Tamiya Lightning and 1 new Spitfire MKI, they may not be LSP’s but it is Jennings fault. I already have his Spitfire MKI sheet and he has the P-38 sheet on the way. How can I stop myself when they release all those increadible decal options.1 point
-
.thumb.png.84c5d3a464f2dd83f0ac37a5aac81ec8.png)
1/32 Hasegawa Bf109K-4 Weisse 8
daHeld reacted to Antonio Argudo for a topic
it is kind hard to find period pics that show that area, that relic posted early is the only prove I know, I've seen many inaccurate drawings out there, the factory drawings don't depict that detail, some pics of a "K" model from the Arsenal 45 guys cheers1 point -
hi I am eagerly waiting for this kit , for a while, as every French modelers I hope that details are here , especially in the wheel wells ( not only ) , I have D Hawkins's book too , if you take a look to the gear bays pictures ,and if you like tiny details , these pictures "would frighten" you ... very "busy" area Alain1 point
-
Colour is on! Between moving my stuff, work and other distractions there was a small window of oppurtunity to spray some paint. All masks were placed over the insignia and the edges were sealed with liquid mask. Painitng started with the underside - RLM78 from MRP. I let the pictures speak for themselves and I'll save my words for later. As you can see the lower cowl didn't recieve any RLM78. The reason is that I discovered something during painting. I was looking on some photos to determine the demarcaton between RLM78 and 79 and suddenly realized that there was another colour on the lower cowl. I guess it's the typical yellow. What do you guys think? And since I'm already at it: the spinner seems to be in two different colours. One is white and the other one could be red or anything else... I'm looking for pictures of other planes from 2.(H)/14 - maybe there's some information hidden. That's it so far Joachim1 point
-
Thanks for more great insights, Antonio! I don't think I'll attempt the rivet pattern on the bottom but I can fill in one of the hand holders easily enough. I've gone ahead and made my first attempt at painting the spinner. First comes a coat of white. I digitized some spirals off decal sheets and made masks using the Silhouette cutter. For some reason, the DXF files that I export from AutoCAD resolve my spirals (which are comprised of compound curves) into a bunch of straight lines. So the spiral came out a bit choppy in some areas. Using bits of Tamiya plastic tape, I cleaned up the spiral as best as I could. The prop hub was painted too. A preview of the spinner mounted on the fuselage! I'm not 100% sold on my spinner spiral attempt. I'm hoping I can get all of the kinks out with some more touch-ups. Here is the tailwheel after I've sanded a flat spot on it to represent weight on the wheel. The wings have been glued together. Finally, we have the gun cowling with the gun barrels glued into place. I'll have to paint these at the end but it should be easy since I made sure they don't touch the gun troughs.1 point
-

1/32 Icelandic Fine Arts Buccaneer - Detail Shots
reconspit reacted to blackbetty for a topic
YAY!!! the gearlegs seem pretty sturdy dont know why i have four main wings...1 point -
The leading edge doesn't look so good. Some sanding took care of that. Forgot to take a picture though. Getting the wings in place, was a bit of a struggle. I think Revell made the tabs far too short to hold the wings. So I decided to try using tubes in different sizes to strenghten the wing joints. So off with the tabs! When cutting the inner tube, I accidently shot away half the tube, and for some reason couldn't find it. I solved that problem by using a bit of sprue, that fit quite good into the large tube. I first added rods/tubes to one of the wings to see how things did fit, but drilling out holes in the fuselage turned out to be a bit of a problem, as the wall inside was in the way for the rear hole. After using my Dremel wannabe, I could fit a shorter lenght of tube into the rear hole. After some adjustment I could glue the first wing onto the fuselage. Some filling to do, and then the underside looks like this! Quite a gap to sort. Much of it can be solved with CA and some mild violonce. After some more work I got the other wing in place. I got some filling and sanding to do. Håkan1 point
-
ICM Gloster Gladiator
Kagemusha reacted to thierry laurent for a topic
Possibly but I seriously doubt so many different schemes will be included in the first release. Looking at prior ICM releases it is obvious they will milk the cow with multiple boxings: RAF Gladiators, Sea Gladiators, Gladiators in the North with skis, other foreign versions, etc.1 point -

Revell's 1/32 Spitfire IX - Too cheap?
Model_Monkey reacted to Grunticus for a topic
After my initial euphoria about my masterfull modelling skills I woke up to something bad. The lower enige cover had shifted to one side, most probably under the pressure of the rubber bands holding it in place while drying. While one side looked good (enough), the other side showed a "ledge" large enough for ground personell to sit on and smoke one (or, at least in my mind when I first saw it). Not too bad: Not too good: Now what? Oh well, no getting around it. I removed the shell halves with moderately brute force, luckily without any damage and then sanded away about two millimiters lengthwise, along the seam, making the parts slightly narrower. The I glued them back to the fuselage without glueing the middle seam, and now it looks a lot better. I will have to take cate of those gaps but I think I can manage that. The toothpick was used as a spreader to get even outer seams. Bad side now much better: Good side still good (enough): On to the flaps. If you glue them in per instructions there is a remaining gap not there on the real Spit with retracted flaps. To get them closed one needs to remove this inner ribbing on the flap, then it will fit in the fully shut position: Closed flaps, still need cleaning up. I want my Spit to be clean in configuration to radiate as much of it's natural elegancy we all admire so much (plus the Merlin sound IRL) To finish for today, a few nostalgia shots taken in the earliest days of the resurrection of the Dutch air force after WWII (or LSK as it was known, "Lucht StrijdKrachten"). Early rounded and later style clipped wingtips. I am still trying to find out if MK632 had clipped wings or not. If I can't find proof I will use the rounded tips. MK632 was at one time also flown by William Thomas Klersy, an RCAF ace. It had at least two victories to it's name, one over a Do-217 (his), and one Me-109. Still happy1 point -
HKM Meteor, with T7 Conversion
Tony T reacted to Dpgsbody55 for a topic
I've almost finished the front cockpit. All that remains is the pilot's shoulder harness. Here's a few images as I put it together. Cockpit right side. Left side and floor. Completed cockpit tub. Please excuse my rubbish photography. Looking at these images, I appear to have forgotten how to use a camera . It's a new camera too, so I have that excuse. That's it for now. The cockpit tub is now installed in the front fuselage half. Next stage is to add the nose weight and glue the fuselage halves together. The built up rear cockpit is inserted into the completed front fuselage once I've built it. No cutting of the kit parts has happened yet and I haven't touched a part in the kit at this stage, other than the front undercarriage mount. So if I screw this up, I can still build a Mk4 again. Cheers, Michael1 point -

Iranian F-4D 3-6712, 71st TFS, '' DONE''.......
Tony T reacted to Daniel Leduc for a topic
Thanks guys for your encouragemen, I know, that's part of the game.... So right back on the saddle, here's part 2.... overall with Tamiya XF-69 Under surface with Gunze H311, went very well. Gonna let it rest for a day or two, window sealing and walkway.. before putting Enamel paint on. That will give me time to finallize my colors choice. Thanks for watching and have fun, Dan.1 point