Leaderboard


Popular Content
Showing content with the highest reputation on 11/06/2019 in all areas
-
I just got a 1/32 Hasegawa F-5E with the RAF Alconbury decals for $41! I'm stoked! Now I have somewhere to install that Black Box F-5E cockpit I've been hoarding for 10+ years11 points
-
I have a week of leave and we are visiting family of my wife. There is not much for me to do, so I was allowed to bring a model along. No, I could not believe it myself!! Maybe she is going soft on me at old age. Anyway I jumped at the chance. Only problem l could not take along a compressor and paint. So what could I do with the time. A model l have in the stash which I knew was an easy and quick build was the F-16 from Tamiya. I had build this previously just as it was released and what a pleasant and quick build it was. It was done in Chilean markings with the Two Bob decals. As I had two more in the stash I decided to do one more. I had planned to do a F-16A all along, so l ordered the additional spruces of the Thunderbirds kit when that was released, and when Tamiya still had the spruces. I will need to change the assembly order slightly as I can only paint when I get home. So lots of dry fitting needed but at least I can get the “ Donkey work” as my friend Joe calls it done. So here goes an interesting almost OOB build. Nick8 points
-
Hi Guy's - After finishing the 'skeletal' Fokker Dr.I - I've been working on a Fokker 'dreidekker' triple... Three of Jagdstaffel 11 (Richthofen's) 'triplanes' - They will later become part of a diorama counterpart for the '74th Squadron' S.e.5a. Fokker Dr.I's 477/17 - 502/17 - 588/17. I've taken some 'artistic' liberty's in displaying all three 'Fokker's with early German Crosses. A little list of what was done to 'fix' the Roden Fokker Triplanes... External corrections: Tailplane contur corrected Depression in stabilzer's removed Front decking corrrected with filler holes Gun blast protection plates Fuel tank and filler caps Engine push rods and spark plugs and wire Engine access hatch - scratched Inspection window in upper wing moved Viewable ZAK stamp and Werk nr. Axle wing corrected Wheel openings detailed Rib tape added to all wings Internal corrections: Machine gun boxes scratched Fuselage plywood sections scratched Pilots seat reworked with seat cushion Bulkhead reworked with string Linen cover for shoulder belts Machine gun and throttle cables Map case scratched Internal rigging Magneto + instruments Fuel pump Aftermarket parts: Aviattic rudder Aviattic cowling Eduard photo etch set Eduard Linen stiching Rigging: Monofilament fishing line for the rigging Infini Black Aero Rigging for control cables 0,12 mm steel wire for eyelets 0,5 mm brass tube Painting: Fokker bleached linen (homebrew) Fokker Turquoise Tamiya XF-23 Streaking camouflage: Windsor & Newton Oil. Raw Umber Green shade. Richthofen 'red' - Vallejo Cavalry Brown. Cheers: Kent7 points
-
Trying to get the tail struts done... Again, they have to be scratched, none of kit struts are of the correct size, so I had to come up with a solution, adding some strength to the struts... Here are the different stages, brass rod on the left, some added styrene to the right. Cheers: Kent7 points
-

1/32 Hurricane need help.
Rick Griewski and 5 others reacted to Phartycr0c for a topic
I built the fly kit and it turns into a lovely model when built, although it is far from "shake and bake". It is a mix of resin and injection moulding. The main issue in my book is the thickness of the wheel well casting which is one piece. when inslalled it has a tendency to push up into the cockpit space and fouls the other rudder pedal and control rod details. very careful sanding and lots of dry fitting is the order of the day. I had to sand this part until a bright light was just visible through the resin. IIRC there are no locator pins for the fuselage so time needs to be spent in construction. Other than that its a great kit as long as you take your time.6 points -

HKM Meteor, with T7 Conversion
Christoffer Lindelav and 4 others reacted to Dpgsbody55 for a topic
Progress has been a bit quicker than I thought. I've managed to spend a bit more time at the bench and I've now reached a point where I can see what this thing is going to look like, which is very pleasing. At long last, I get to do some serious plastic work instead of resin and CA glue!! Very soon after the last update, I got the engine mounted in the right hand nacelle. The rear jet pipe and front intake were added as soon as the engine was firmly in place. On both wings, I used the top wing to ensure fitment and alignment before gluing the top wing and aileron in place. Once this was dry, I spent some time cleaning up all the joints, but thanks to good fitment of the HKM kit pieces, this didn't take too long with very little filler required. While waiting for the filler to dry, I added a little bit of plastic back to the cut surface of the lower wing, as the resin T7 forward fuselage isn't quite straight. This is the white strip you can see on the lower fuselage/wing joint above. I also cut the HKM kit fuselage down in preparation for the conversion. At this point, the fuselage has not been glued, but simply taped together. I've never done this sort of thing before, so a lot of time was spent thinking about making this cut. I used a hand held razor saw and took my time. I'm very happy with the result as it's needed very little adjustment. Before gluing the shortened fuselage halves together, I added some extra alignment tabs made from part numbers from the kit sprues. The upper fuselage joint in particular is very long and there's not many alignment pins. I remembered from my Mk 4 build that this can be a slightly wavy joint, so this has helped reduce the amount of cleaning up and filler needed. The next shots show the assembled fuselage and almost completed wing ready to go together. I painted the rudder mostly so that I could be sure the rudder spine was properly painted. I've also added a spreader bar in the front of the fuselage to make up for the distortion caused by the loss of the forward fuselage, as well as adding some spacer to the wheel well to help with fuselage/wing alignment. On testing, I found that the cut down fuselage sat a little too low in the wing. Next up is the wing and tail plane going together. The engine covers are taped in place to protect the engines. I've wondered if this is what the actual T7 prototype looked like during construction, as it was built by Glosters as a private venture from the remains of their Mk 4 demonstrator that had been crashed while Glosters were attempting to sell the plane to the Belgians in 1948. After cleaning up the tape residue and the tail plane joint, I added the elevators. The wing and tail plane joints on this need very little cleaning. After cleaning up the excess glue, all that was needed was a touch of Mr Surfacer 500. This was also used to fill a small sink mark on each side of the wing fillet. On this kit, I've decided to clean up each of the major component joints before the next is added and have found this a better way to go. Late this afternoon, I added the T7 conversion, so now it looks like a plane and you can see how this is likely to look as a finished model. I had spent a while checking the vertical and horizontal alignment and added a couple of filler pieces from strip plastic, but much of this has been filed away and the joint is reasonably tight. The ruler starts to give you an idea as to how big it is. The Mk 4 I built two years back is 395mm long and 355mm in wingspan, but the T7 conversion makes the model 425mm in length. It's also noticeably heavier than my Mk 4 which has the standard plastic undercarriage legs under it. These have survived well but this model has the extra weight of two engines instead of one, as well as the extra weight of the T7 resin conversion and the nose weights. So I've ordered some brass undercarriage legs from Hobbylink USA on Sunday so I hope they show up soon. I certainly hope so, given the cost of postage from the USA to Aus (more than the cost of the parts....). So that's it at this stage. Next up will be to clean up the resin/plastic joint and fair it in to the plastic part of the fuselage. The left side has a gap caused by a variance in the profile of the resin fuselage to the plastic fuselage on that side, so the issue lies with the resin as all panel joints line up and the components also line up properly. I'm going to take my time with this as a rush job will ruin the completed model. Then I'll complete the the cockpit. The instructions for the conversion kit say to do it this way, so that's what I'll be doing. There is a back wall to go into the rear cockpit, which serves to position a fairing at the back of the canopy. This fairing will also bridge the joint making it stronger. After that, I can put the rear cockpit seat in and both sets of shoulder harnesses. I also have to decide about the gun sight provided in the conversion kit, as to the best of my knowledge, T7's were unarmed so no gun sight would be fitted. Then it's painting, markings and final assembly. The canopy is complex so I suspect this will also slow me down some. Cheers, Michael5 points -
OK people , change of plan. I have been feeling that the fun has been disappearing from my modelling. I think the main reason is obsessing over details. This normally means hours spent on extra detail , that to be honest nobody other than me is going to see , or i the case of some areas not even see. With that in mind i have decided to start a new kit. and only use whats in the box. If its the wrong shape , or appears to need more details added....tough luck , straight from the box rubber tyres and all! Let the fun begin Right new kit5 points
-

WNW Pfalz DXII in Aviattic and Pheon decals.
mywifehatesmodels and 3 others reacted to DrDave for a topic
DB lacquers and gaspatch4 points -
TELFORD 2019
Rick Griewski and 3 others reacted to Phartycr0c for a topic
good idea mike, although predominantly i have a face for radio. I will try and get a few videos of the event over the weekend.4 points -

TELFORD 2019
Rick Griewski and 3 others reacted to MikeMaben for a topic
Maybe those of you who have smartphones can interview each other, say hello and video some of the action ... and models, so the rest of us can feel like we were there.4 points -
Started the Avenger with a crapload of PE....mix of soldering parts and CA.3 points
-

Mil Mi-24 Hind Tiger Meet
private_hell and 2 others reacted to BloorwestSiR for a topic
Thanks everyone! It took much longer than. I expected to finish this build. Part of that was having to order a replacement pitot tube. That arrived about a month ago. I was then into a different build and got that finished before the Hind would make a return visit. Unfortunately two weeks ago I had a heart attack while dropping my boys off at school. That led to triple bypass surgery a week ago. I've been home since Sat and finally ventured down to the bench. The pitot is on as well as the chin gun and before I stress out any further, I think I'm going to call this one done. I know there's still the wipers and a step to add so maybe one day I'll get to those.3 points -
It was that.3 points
-

Aviatik 'Berg' D.I
chukw and 2 others reacted to sandbagger for a topic
Hi All, The 'Aviattic' CDL decals have been applied to the under surfaces. Weathering still needs to be applied, Mike3 points -

1/32 Eduard/ Alley Cat Messerschmitt Bf 109B Condor Legion
Landrotten Highlander and 2 others reacted to monthebiff for a topic
Cockpit assembly and painting completed this afternoon. Pretty happy with how things turned out but with some of the added extras its going to be a bit of a careful squeeze getting the three sub assemblies together. Regards. Andy3 points -
To get back on track here is a thread from Britmodeller on the IX/XVI. https://www.britmodeller.com/forums/index.php?/topic/234956022-spitfire-mk-ix-to-xvi/ And on on High back and low back differences https://www.britmodeller.com/forums/index.php?/topic/234947633-differences-spitfire-mkixe-vs-a-high-back-mkxvi/ Cheers Dennis3 points
-
For a BoB display, I can't see the wheel wells are going to be important, or interior detail for that matter. Richard3 points
-

1/32 OV-10D Bronco by Kitty Hawk
Cheetah11 and 2 others reacted to spyrosjzmichos for a topic
Hi all! In addition to the kit I also spent some time working on a figure to accompany the model. In this case I went with Reedoak's amazing 3D printed USMC 70s-80s era pilot with APH-6C helmet. This is my second only ever figure since my Corsair build and tried my hand at highlighting and shadowing with oils. I admit that the face looks a bit grainy in the pics but in reality you really need to look extremely close to see that. At this stage, I'm pretty happy with the outcome but will definitely be practising with more figures in the future.3 points -
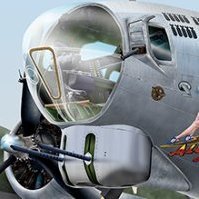
Ol' Scrapiron, these photo's are much appreciated - great to get a feel for the skin and rivets around the cockpit! I have sadly not seen the Zero at Duxford (yet), but I love the way they decided to display it, pretty much as one would discover it as a wreck. The museum guys found a dried lotus flower in the fuselage during the renovation, which was presumably a good luck charm. Funny how little discoveries like that add to one's appreciation of the aircraft and the conflict it represents. Talking of discoveries, thanks to Ryan's caution about serial numbers from the Diemert recoveries, I ended up watching this: https://www.dailymotion.com/video/xbiaf5 Good heavens. There is some great footage of Lefty Gardner taking Diemert's handiwork into the air for the first time at about 40 minutes into the video. What a moment that must have been! I have managed to do a little more work on the model. Whilst staring at pictures of the firewall and back of the engine, I discovered this interesting piece of engineering. In the old Royal Air Force Manuals (AP 3456) the authors loved using the term: "...a suitable system of levers and linkages..." Well this is one of those to transfer the throttle inputs to the engine, and for fun I have tried to replicate it from the limited views I can get from various photographs. The ancillaries are nicely moulded and pretty accurate, but benefit from quite a lot of plumbing. This may all be invisible at the end, but it is a lot of fun, and since I doubt I will ever get to restore a Zero for real...3 points
-
...Don't we all Dave ?3 points
-
As I said before, only going Sunday but would love to catch up with a few people. Will have my camera with me as usual, so I will try and get as much as I can in on the day!3 points
-

TELFORD 2019
MikeC and 2 others reacted to tomprobert for a topic
I’m travelling up on Friday to help with my club set up and will then be there both days. Can’t wait! Will hopefully catch some of you around the 32SIG stand. Tom3 points -
Progress is being made albeit on the most tedious part of the build. Having done lozenge decals in the past I guess I knew what I was getting into. All of the undersides are covered and I've started on the upper coverings. I decided to try a new technique for applying the decals by using Walthers Solvaset. It worked reasonably well but I found my previous technique of using Micro-sol and a hair dryer worked much better. Solvaset is still my go to for small decals but it just doesn't seem to work well with large decals. A night or two more of work and I should be ready to put on the rib tapes (another tedious process!). A few minor touch-ups on the wing root of this piece. Shouldn't be too much of an issue. At this point the fuselage is more or less prepped for paint. I installed the horizontal tail and had to do quite a bit of work to keep it level. All in all I'm happy with it. One thing that has me a bit worried is getting the appearance of the all black fuselage correct. As I've never painted anything solid black I'm just hoping I don't get the shade of black to overpowering. I'm going to try some preshading with blacks and greys to try to get a nice final product. As always thanks for looking3 points
-
Now just a minute... The standards that were in use at the time were British Standard Whitworth (BSW) for coarse threads and British Standard Fine (BSF), both based on the diameter of the bolt. BSW, named after Joseph Whitworth was the world's first standardisation for threads - previously nuts and bolts from different manufacturers wouldn't interchange WW2 forced standardisation between the US and the UK, so Unified National Coarse (UNC) and Unified National Fine (UNF) were created and parts could be interchanged. WWII is where things had to change, for some threads the Whit/BSF threads are interchangeable with UNC/UNF This is the every day reality in my workshop where I'm regularly working with BSW/BSF/BA/UNC/UNF/BSP/Metric depending on what comes in That's the lovely thing about standards, there are so many to choose from Richard And at least we had an Empire to lose!3 points
-

1/32 Trumpeter Sukhoi Su-25 Frogfoot *Completed*
Landrotten Highlander and 2 others reacted to BradG for a topic
Phew, finished her off this morning. One of the largest models I've ever built. I do like the air intake covers, they look nice. Also a nice touch from Trumpeter are the clear seeker heads for the missiles, which fit perfectly. Now I just need to find room to display it.3 points -
Back to work on the TBM. Interior painted...3 points
-

WNW Sopwith Triplane "Black Maria'
TorbenD and 2 others reacted to Bobs Buckles for a topic
Thanks for your kind words. Here are the rest of the images. I hope you like. Cheers, von B3 points -
Hey guys & gals, So I've been lurking here for longer than I'd like to admit, it took me years to even create a profile, much less comment and post. Mine is a common story, mid-40's guy who modeled into his teens and rediscovered the hobby once life becomes a little more settled. I've always had a passion for history and my dream as a kid was to be a fighter pilot (dashed by my poor eyesight). Once I realized that wasn't going to work out I ended up getting my kicks elsewhere, working professionally in snowboarding and skateboarding for almost 20 years. But that passion for history, most notably the air war in WWII, regardless of theater, was merely laying dormant. Cue to about a year ago, when life finally got out of the way enough that I managed to start pulling together some basic modeling tools so I could get myself back into the hobby. It's been slow going, as life still gets in the way more often than not, but I now have all the basic stuff I need, and then some. I even have a modest stash of about 4 kits, 2 of which are LSP's (Hasegawa P-47D and Revell P-51D-5). Sadly, I haven't gotten around to them yet, as I wanted to re-hone my skills on some cheaper, smaller kits before committing fully to "manscale". So far I've built three kits, popped my cherry with a Tamiya Mk. Vb Spit in 1/48, followed by an ancient Hasegawa P-38 in 1/72 that I found in my parents' attic after 30+ years and now this 1/48 Tamiya F4U-1A, which I built for my dad seeing as it's his favorite plane. Just wrapped this thing a couple of days ago, this whole project entailed a number of firsts for me: first time scratch-building, first time using the hairspray technique, first time black basing, first time wiring up a radial, and so it's only fitting this is my first time ever posting one of my models anywhere. Needless to say, considering the talent at hand on this site, I hope my work is up to par. So without further ado here's Big Hog, Tommy Blackburn's machine during his time as CO of Fighting-17, based on Ondonga, November 1943. Hope you guys like it, can't wait to get my grubby mitts on an LSP in the near future! More pics in the next post...2 points
-
WNW Sopwith Triplane "Black Maria'
Model_Monkey and one other reacted to Bobs Buckles for a topic
Hello my friends, I have been quietly sitting in the background working away on my Sopwith Tripe. Well, today, she is complete (is a model ever complete?) and sitting in the case. I have this one image for now, but more will follow. I've been super busy of late and finding spare time to think, let alone modelling, is a blessing! More pics soooooon. Cheers, Von Buckles2 points -

1/32 Trumpeter A-1H Skyraider South Vietnam
Starfighter and one other reacted to pouikpouik for a topic
I finally finnished my 1 of 2 A-1H Skyraider Trumpeter, so here are a few shots and this one I chose the SEA camouflage theme. The 2nd one, I pretend to paint in Navy gray color, it's much more simple and I hope that could go fast with it. This Trumpeter kit is cheaper than the ZM's one and less complicated, I had no real problems assembling the kit. All of my most-of-time doing is rescribe the rivets and panel lines. The origin is narrow and we don't see effectively the shading technique. I also scratched the cover for extraction system with tissue paper. The kit was painted with Mr.Color and washed with oil paints. One last thing, many thanks to AOA decals who give us good quality and accurate decal sheets. Here enjoy with me and I hope you will like it. Hà PHAM.2 points -
Back to the original question, you'll need sprue LL from the XVI kit, and use the early type cannons LL4, and early undercarriage bay interior AA20, basically if you follow the instructions for options A/B you'll be fine. There's these decals.2 points
-
This is the image from the Britmodeller thread that Photobucket has blurred. Cheers Dennis2 points
-
Oh yeah in the past , about four kits in one stomping. It was incredibly satisfying!2 points
-

1/32 Hurricane need help.
Phartycr0c and one other reacted to LSP_Mike for a topic
My takeaway from this is that the overall least expensive, "looks like a Hurricane" display type kit is the original Revell kit with the original boxart D○TA. That is the original mold, warts and all. For a museum piece, prolly enough. Dress up the 'pit a wee bit, careful paint, and she will sit in a case. No one will notice the details we've discussed; they will look at it, and go to the next display, 30 seconds or so.2 points -
WNW Sopwith Triplane "Black Maria'
Uncarina and one other reacted to Bobs Buckles for a topic
Hello all, I've got a couple of the 'Office' shots for you to spy out. Once again, thanks for all the great comments!2 points -
Matchbox 1/32 Westland Lysander: Engine weathering starts..
MikeC and one other reacted to Ol' Scrapiron for a topic
You already have some great reference pics of the engine, but I'll toss up some pics the I have taken in case something helps out. Westland Lysander IIIA; Udvar-Hazy 2015 Westland Lysander III; RAF Museum London 2008 - Westland Lysander IIIA; Imperial War Museum Duxford 2008 Hope these are of some assistance... (had to re-load after my original website changed domains to www.447bg.org))2 points -

TELFORD 2019
Rick Griewski and one other reacted to airscale for a topic
I am getting twitchy & excited now - everything is packed up and ready except the Spitfire which I will do on the day.. I will try and do what I did last year and once set-up on the Friday, just fly about taking pics of anything interesting I see & will pop them in here Peter2 points -
 Count me in for multiples of all the above, and add the 1/24 P-51D cowl, K-14 and wheel wells to that list as well. Thanks for all you do for us! D2 points
 -

ICM Gloster Gladiator
Uncarina and one other reacted to Troy Molitor for a topic
I have two Silver wings example but I have to tell you. The ICM I-153 almost built itself in a couple evening sessions. If it fits like the I-153 I can only imagine the Gladiator will sell. Such a cool looking aircraft. Can’t wait for this one too. ICM if your listening, there are some Russian WWII aircraft we’re really looking forward to seeing in injected moldings. Please!?2 points -
I seem to be having some trouble with linking Google Photos. I posted some photos on Facebook, see them at this link: Please keep in mind that these are only test shots, the moulds were further polished in the meantime. Radu2 points
-

Lancia 037 rally car 1/12
Out2gtcha and one other reacted to ringleheim for a topic
Looks great so far. Love that engine detail! If you find your inspiration lacking at some point, watch this video! One of my favorite cars.2 points -

1/32 Hurricane need help.
ringleheim reacted to Ryan for a topic
I also made these half circle tabs (in white) to aid in locating the cage to the sidewalls. Hurri Mk II by The 3rd Placer, on Flickr1 point -
Good for you man, it’s a great feeling to finally score something you have been searching for. I searched for a long time before I found a copy of the Model Air book on the F-4EJ, it was quite a rush when I finally located one.1 point
-

Airfix 1/24 Mustang wheel wells
BaldEagle reacted to R Palimaka for a topic
According to Steve from ModelMonkey, the wheelwell was designed using dimensions from North American Aviation drawings, and then tweaked and adjusted to fit in the Airfix wing. It should fit just fine...and it looks simply amazing. No way I could scratch build that! As for timing, yeah, I could have used this a couple years ago too. Just means I'll have to build another one using all the ModelMonkey 1/24 Mustang correction parts. Richard1 point -
TELFORD 2019
Nick32 reacted to Phartycr0c for a topic
Nice work Juraj, With only a few days to go, tension is mounting. Please, those who are attending, feel free to say hi, lighten the load and ill secure any purchases at my house......erm i mean at the stand. Myself Roy and Mike will be only to happy to see you. We are just up the road from the yellow and blue Wonderland models pitch and we have secured 24 ft of goodness. p.s, ther will be another lanc on display!1 point -

LSP Group Builds for 2020...
Rick Griewski reacted to Lothar for a topic
Owed to the popularity of the "Trainer GB" I would have loved to see this happen earlier than September 1, 2020 - but that's ok. I fancy a certain F/A-18B which has been itching me for long. Can't wait. Lothar1 point -

B-17G + all detail sets from Eduard
Dpgsbody55 reacted to Miloslav1956 for a topic
Today update.1 point -
Thanks for the nice comments guys. NOW WITH BETTER PICTURES So far my building of models has focused on just that, the build process. But since I have enjoyed documenting them here I can't deny that the cell phone pictures, good as they are don't really do justice to the process. So I grudgingly drug out the real camera and was shocked at how I forgot just how good and versatile old Nikon gear can be. I've taken many landscape shots over the years with the 60mm 2.8D lens and I totally forgot just how close that lens can focus. And it's without a doubt one of the sharpest they ever made. Who says a 30 year old lens is outdated! Pair that with a D750 and a decent flash pointed at the ceiling and the picture quality is much much better. And since its been a few years since I've messed with the camera I looked for an alternative to Adobe Lightroom. I found an open source program called Darktable and while it might not be as polished as lightroom it certainly works and its FREE. In any event the pictures should be much better going forward. At this point the engine is done and due to the design of the albatross I should be able to bag it up and not have to touch it until the end of the build. Once again the parts from Taurus Models really were worth the effort. Adding the oil return line wasn't easy but certainly worth it since it is so prominent at the front of the plane. Just need to paint the spark advance lever's handle and this panel can go into the cockpit. Test fit of the cockpit and engine mount looks pretty good. Time to close it up and start painting I think. I finally got a nice image of the wood grain effect. By no means is it as good as some of the work I see on the forums but I'm pretty happy with it. Always learning as they say1 point
-
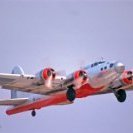
OK, consider these two well used warhorses: then these: and this, one of my favourite Lancaster pictures and I would suggest fairly typical of your "average" condition: Winter in Bomber County:1 point
-
And the KA-6D cockpit photos, emphasizing the seldom seen aspects... To sum it up, the Intruder cockpit is "busy" - a three dimensional maze of consoles, switches, circuit breakers, wire bundles, and air conditioning conduits. It's a super detailer's dream...or nightmare, depending on your perspective. That's all for now...back to the workbench. Rich1 point


.thumb.jpg.174cdcc09687ac8381b7989a64fbe821.jpg)


