Leaderboard


Popular Content
Showing content with the highest reputation on 08/21/2019 in all areas
-
More.... Thank you for looking! Gaz8 points
-
This is my Tamiya P-51 converted into the Reno racer "Bardahl Special". I scratch built the rear cockpit removing all surplus equipment including the fuel tank. I also removed all armament, and used a propeller from a Bearcat to create a P-51H propeller as used on this airframe. AMS resin drop tanks are used for the 150 gallon tanks that Bardahl carried during the race to Reno. Decals are from Draw Decals. I have another set of racer decals reroute since I enjoyed this build so much.7 points
-
Thank you everyone for your kind words and support: Here are pics of the finals steps: The PE Oil Cooler and Radiators look nice! I didn't even glue the large radiator in... it's held in place by friction alone. One of the final build steps was to add the seat and all of it's PE belts. Personally I've developed a love affair with HGW belts. Finally the cowl and prop and spinner. I believe the spiral is the best design ever added to a spinner. As the spiral decal was meant to terminate at the aperture for the 30mm cannon, it doesn't end in the middle of the spinner. Here she bathes in glorious Aussie sunshine. You can see more photos at the RFI Section. Happy modelling! Gaz7 points
-
So the build is complete! I added some lux with Gaspatch guns, Proper Plane wooden prop and a Rexx exhaust. I highly recommend these items!! I knocked up a quick base and added one of the excellent Wings Cockpit Figures. I will add better pictures in RFI when I get around to it but for now here are some quick phone camera pics. Thanks for taking the time to look in and for the supportive comments!!7 points
-
Hi Everybody, This is my Raffle Prize, PCM's Ta-152C. As it never reached factory production, I decided I would make it into a racing plane instead of doing the only historical paint scheme. I had a lot of fun trying to make it pretty and learned quite a bit about painting as I went. It also gave me a chance to try MRP's line of lacquer paints. There are a lot of photos, so I'll keep the words sparse. If you're interested in the building steps, the build log is Here! More to come....6 points
-

F-105D Polish Glider Trumpeter 1:32
Hartmann52 and 4 others reacted to Koralik for a topic
Something with a Polish accent this time. F-105D Polish Glider Set: Trumpeter 1:32 scale, model made as always straight from the box. The model is not simple to build.5 points -
Hi there guys! All done!........well not actually the whole B17 but I have finished the Radio room section and all 3 sections have now been attached. Getting the nose/cockpit section to line up with the bomb bay was a real nightmare but managed it in the end! ....and it's BIG!!......well it would be at 1:20 scale!.....in fact so far it is just over 2 feet and 2 inches long (66cm).....and of course I haven't started on the rear section yet! When all 3 sections were secured together I had to touch up the joints the best I could because originally this project was going to be built in separate sections but realized ...too late to be honest....that it would look so much better if it was one complete fuselage. This in turn caused me no end of problems lining everything up and trying to lose at least 1.7 cm in the length. In fact in the end it will be about 5mm too long but I can live with that! When I start with the rear section I will build it as just one section right back to the rear gunner position this will just give me the one join onto the radio room! I managed to modify the display stands I originally built for each section and have made 2 stands which can take the weight of the model so far! I am going to have a rest from this build now and come back to start on the rear section in a few months time. So here are photographs of just over half the fuselage of "Fuddy Duddy" .........unfortunately taking photos of her being so big half of my house and garden get in on the act!....really difficult!!!!....WARNING! PHOTO HEAVY! I have temporally attached the bomb bay doors on to see the effect....these will be attached permanently when the whole B17 is finished!....here are a few shots...... So there you have it guys! As I said I need a break from this now but of course not a break from Scratch building!.....I want to maybe have a go at scratch building a jet....something I haven't done before but would like to have a crack and see if I can do it!....I really like the late 40s/50s jet era and have been looking at the the Lockheed P.80 Shooting Star....I have always liked the look of that aircraft....so maybe I will give it a go! Last thing before I depart......can one of you guys tell me how you change the title of the Thread....eg...I want to continue this thread when I build the last section without having to start a new thread if you know what I mean....I have seen it done on other threads but can't work it out! Cheers for looking in and I will be back to finish this beast off...and in the mean time I will post a few pics of the Shooting Star (If I actually do it!!) on another thread All the best guys Fozzy5 points
-

Forgotten War Mustang
Coneheadff and 4 others reacted to John1 for a topic
Made a bit more progress. Added most of the decals to the port sidewall, also added the pilot's O2 hose and emergency canopy jettison handle to the starboard side. They add a bit of color to break up the overall black. Next up will be the dullcoat and final weathering. Still have some small parts to add to the sidewalls but I'm holding off until the cockpit is complete. Much too easy to break them off during the final assembly. Thanks for looking!5 points -
Some poor prep work led to a bit of paint coming off with the mask on the left side and caused a bit of clean up work. I was going to just paint the flaky parts silver and weather them to go with worn and torn but it kind of goes against the shiny paint motif. Anyway, a little dissapointed with myself but here's where it sits today.5 points
-

Eduard/Roden 1/48 Gloster Gladiator
Phantom2 and 2 others reacted to Pastor John for a topic
Just finished my 1/48 Gladiator. For those of you who are interested the following aftermarket products were used in this build of the Eduard/Roden kit. Eduard PE set (in addition to the Eduard PE in the kit) My AIMS bracing wires PE My AIMS hatches and latches PE (for missing gun pod plates) SBS engine/cowl Quickboost gun pods Quickboost red fuselage nav light (unable to use wing tip lights as way over-size - perhaps designed for Merit kit) Master Browning 303 barrels. Rob Taurus Vac form canopy Finished in Mr Paint Silver with Exhaust/collector ring in Alclad Jet exhaust followed by Pale Burnt Metal. Figure and dog from ICM. Thanks.3 points -
Finale: Build thread here:3 points
-

What will be Airfix's next 1:24?
JerseyChris and 2 others reacted to Rob Colvin for a topic
24th Sabre Jet.3 points -
1:18 Hobbyboss AV-8B Harrier
A-10LOADER and 2 others reacted to TwoHands for a topic
A little??? HAHAHA!3 points -
My Take: "I look at the photos of the real thing and then look at the parts you make. Then I realize they are both photos of the model." Insane workmanship...3 points
-

Revell Bf 110 and Fw 190 Sturmbock in at Sprue Bros.
MikeMaben and 2 others reacted to Dave Williams for a topic
The specs are wrong. It’s the Dragon plastic, unmodified, with fixed control surfaces. You can see the instructions, including the sprue layout here: https://stage.revell.de/fileadmin/import/images/bau/04961_%23BAU_MESSERSCHMITT_BF110C2_C-7.PDF3 points -

Panavia Tornado P.12 XZ630 1978
Loach Driver and one other reacted to Stevepd for a topic
Hi folks I’ve finished this tonight and have taken photo’s in the garage under LED lighting as it’s way too gusty outside. The story of this started for me as a kid spotting at Boscombe Down during any holiday. I vividly remember the Tornado there and it flying locally and over the ranges at Larkhill. Fast forward to modern times and information becomes available that the aircraft I was watching was XZ630. This was the 12th pre-production aircraft so wasn’t the final build standard. These aircraft were given “P” numbers and thus was known as P.12. The kit - I really only build 1/32 kits so when Revell released the kit, the spark happened. I gathered the Airies pit, Airbrake housing and Paragon flaps and slats, finally Paragons access ladder. I started this kit just under a year ago with a 4 month break to do a commission build of a 212. The cockpit was constructed but back dated by removing some switches and putting blank panels in. The ejection seat straps on the front seat were placed over the headbox waiting for an engineer to dive in and start her up. The resin airbrake housing was fitted by cutting out the kit part and fitting the resin replacement. A weather seal was added around the airbrake housing as I noticed it in reference photo’s. The resin exhaust were constructed and fitted but it looks like Airies didn’t plan on you using both as there is interference and the cans needs cut down and moved aft of the airbrake housing. The fin was modified as you’ll notice the lack of fillet below the rudder. The vortex generators were removed as it was clean but later they were retrofitted. I did learn that the RWR housing are different shapes for each country. The kit ones are flared outwards at the extreme tips which are for German aircraft, so these were thinned down for an RAF version. The tailplane leading edges were straightened removing the kink and reprofiling the leading edge. The intakes were modified in that there is a hump profile on the upper surface which was removed on production aircraft. There are also 3 visible vertical struts on the rear of the intake outlet. I scratch built the open panels for the ground power and comms on the lower side, down near the gun ports which you’ll notice have been flushed as this aircraft at the time didn’t have them fitted. The wing glove was a poor fit and the Paragon wasn’t brilliant, so I put backing plastic and on the inside, filled it with Plasto filler and pressed the kit part onto the wet filler. Once it was tacky I used a scalpel and created the groove and let it set. I wanted something different so I wanted to try Engine ground run guards. So through help on here I managed to get a couple of photo’s and ordered some mesh from “the mesh company”. With my bending tool and purely by eye I knocked up these, which look ok. I then added the strengthening ribs and sprayed then red. The period of the aircraft dictated wrap around camo with the tri-country roundels on the fin. The Antenna colours on the fin are a mottled brown colour which was actually quite easy to replicate. The Fin staining was Tamiya weathering pastels, the Green/Grey is Xtracrylix which was Windsor and Newton gloss varnished then decals applied and then Matt W&N varnished. The artistic license bit is the refuelling probe. This can be fitted with the guards but I couldn’t find a photo of it extended, but I wanted to add that key bit of detail. Photography is not my thing and there’s not much more to be said!. C65C9732-232F-4C09-824F-5F2DD69EF3F4 by Stephen Priestley-Dean, on Flickr 07A2E7B2-7E3F-4959-BA7E-E437194D5C05 by Stephen Priestley-Dean, on Flickr D71BFE01-ED62-4B60-A5F4-BED2580249B2 by Stephen Priestley-Dean, on Flickr D957F858-FCC5-4536-94CB-F4EF74AD2915 by Stephen Priestley-Dean, on Flickr BC196558-7E01-4A0A-97C1-CE2E61D21B8C by Stephen Priestley-Dean, on Flickr 1A87F4B5-1FF1-4B69-9F04-9FE6CFE70B78 by Stephen Priestley-Dean, on Flickr D6330E9C-DBB8-46E6-87F5-72DC24FB40FB by Stephen Priestley-Dean, on Flickr 46F17DB6-85E6-424F-B5A7-60A02E455FA9 by Stephen Priestley-Dean, on Flickr 8947E4B8-7DF6-47E7-94E2-2B1622143BD5 by Stephen Priestley-Dean, on Flickr B57C25D2-1685-4EB3-8242-55B6D1528EFB by Stephen Priestley-Dean, on Flickr F4345F25-BB41-42F7-A355-107049E56782 by Stephen Priestley-Dean, on Flickr 34EF27F8-221D-49D7-BBDF-F379E5923D18 by Stephen Priestley-Dean, on Flickr 70D0A82E-928E-4E7D-A6AE-A35773B37C2D by Stephen Priestley-Dean, on Flickr AFDCB954-6B56-44E7-AF7F-39E9CB21CA5D by Stephen Priestley-Dean, on Flickr 7F6598C3-BBA6-4B22-8963-9834923A6009 by Stephen Priestley-Dean, on Flickr F5EDCE22-EF2F-4266-9192-56C40188FD5A by Stephen Priestley-Dean, on Flickr 28D4A7DC-0280-41FB-888E-4163154CA787 by Stephen Priestley-Dean, on Flickr ABC9C2AD-0FB0-4285-8060-936C6989DE94 by Stephen Priestley-Dean, on Flickr Any questions please get in touch. The kit is going to the Boscombe Down Museum in a couple of weeks. Steve.2 points -

New kit releases
Marcel111 and one other reacted to Markjames1968 for a topic
In keeping with the current trend of companies announcing kits after deciding to start designing the CAD , AFTER THEY HAVE COMPLETED THE LAST 2 KITS THEY ANNOUNCED 5 YEARS AGO , and companies generally announcing vapourware, i thought i would announce the new kits my company will be releasing, after i form the company, which will require me winning 5 million quid on the lottery.. 1 year after i win the lottery and form my new company i will release in 1/24 Sea Fury Swordfish Corsair In 1/32, Invader marauder Stirling anyway, something for you to look forward too, ................they should be out sometime before a few of the current in development kits.......2 points -
evening you fine fellows thanks for stopping by & chiming in - makes my day to see people like my model Umm planet Aircorps Kev - I spend so much time buried in drawings on their website trying to understand stuff I might as well live there... Hi Craig - the metal box is basically a cube of ali cut from a bit of scrap I had lying around - so no seams I would love to see any pics you have from Oshkosh, I don't have many of the finished aircraft, mine are mainly the resto shots.. Don't laugh, I nearly did, then thankfully I saw a picture of it wired up - ergo no label Thanks Jay, it's so nice to have someone who has done all this before as my wingman I did start thinking I would vacform it, but after my usual failings I did almost what you said - pane of glass by pane of glass as will be seen in a minute ..I made up a new master plug to correct some shortcomings including not leaving overhangs at the back as can be seen sat on the wing - I used one of the pulls to just fill in some of where I have been chopping the fuselage about as I was starting to lose my bearings.. this is simply plumbers ali tape on the cockpit glass and a bit of litho to force the P40 filler into a nice profile of the fuselage.. ..I then used the mould/plug as a basis to just form the windshield panels out of PETG one at a time. The method was to immerse in boiling water and once soft put on a 2 inch thick bit of foam and just press down until it hardened again. Without moving I then scribed the reference of some of the straight parts of the mould so I knew exactly how it sat on the mould.. ..these blobs are soon turned into the panels themselves as can be seen at the bottom - i removed a tiny strip of the protective covering around the edges so I can assemble it, but still protect it - the fact there is virtually no aggressive heat in this process means they will be crystal clear ..sides are on the mould and the other parts coming together... the black sharpie edging means when you assemble it there is a visible trick where the thickness of the plastic just disappears.. ..CA was carefully wicked into joints as it was held on the mould and presto, a windshield... I also formed the rear former from brass around the mould and with a bit of brute force & ignorance.. ..as this bit starts to come together, I need to drop in the instrument panel so I can build up the coaming around it and ultimately the windshield - as such the parts were assembled .... dummy instruments & bits were added to the back to keep it three dimensional.. ..and dry fitted in place... ..I have also started to form the coaming - tricky as it is inside the windshield so needs to almost touch it all the way round, but also be a rigid shape to go around the panel - you might be able to just see it here.. thats it for now, take care y'all TTFN Peter2 points
-
I'd love a Fairey Firefly, I love the design of this aircraft, even though paint schemes and markings are limited. But it would make a great dispaly on any show table. Lothar2 points
-
WNW Dr.1 engine - is it Rhone or is it an Oberursel?
coogrfan and one other reacted to 19squadron for a topic
Yes and I wonder if that is in fact true? and not a myth? and in fact that most Dr.1's had a Oberursel copy of the Rhone 9Ja and pilots prized not a genuine Rhone but an Oberursel copy of a Rhone 9Jb, such as the one in Berlin with an Oberursel maker's plate, or the recovered Oberursel copy of a 9Jb from Richthofen's downed Dr.1 which was falsly credited as being a Le Rhone engine in april 1918 and is famously and mistakenly phgographed with a hand written sign saying "Richthofen's Le Rhone" -- and that both the Oberursel copy of the Rhone 9Ja and Rhone 9Jb are called UR.II's despite them looking completely different. If that is not the case, very few Fokker E.v's and Dr.1's were in fact Oberursel engined, they were in fact Le Rhone engined, which would imply that there were a hell of a lot of recovered Rhone engines that went into German aircraft.......at the factory! the WNW site for Le Rhone/UR.II engine sprue photo archive illustrates the point. http://www.wingnutwings.com/ww/productdetail?productid=3169&cat=12 points -
I've decided I'm going to win the eurolottery this Friday, first kit release will be a 1/32 Harrier GR.3, followed by a Sea Harrier FRS.1, then a T.4, and finally a GR.1/AV-8A.2 points
-
Report post Posted yesterday at 03:39 PM This thinner is for Mr Hobby Color the water (ish) based one. The lacquer based Mr Color Use the deep blue Mr Color Thinners or yellow Mr Color Levelling Thinner the mix ratio is important not to thick or your airbrush thinks your spiderman Bob2 points
-
2 points
-
Hi guys, Ooh, already a month has passed! Time flies, I have several "biggies" on the go now. Some of them will only get a RFI. Anyway, some things have been done with the F-35. I've sprayed some clear decal sheet with my light grey RAM paint mix: It will be cut into strips to decorate the inner edges of weapon- and wheelbay doors. The ejection seat got some attention. As moulded by Italeri, it is appropriate for an early version of the F-35. In the mean time, the box behind the headrest has been changed and that version is installed in the RNethAF F-35. The kit seat was assembled and the headrest box was modified with card and strip: The etched metal seat belts were annealed first before thew were attached to the seat: The seat belts are pretty representative. Note that the central locker should stand upright as it is fixed to a fairly rigid strap. This was altered after the picture was taken. Also, when not in use, the shoulder belts are neatly hanged on a small hook at the side of the headrest. I choose to ignore that. Fifty shades of gray paint later results in this: Well, makro shots are always a little harsh for your work... Anyway, it is now ready to be installed in the cockpit. To be continued! Cheers, Peter2 points
-
Nice work. Certainly an interesting aircraft that’s for sure.2 points
-

1:18 Hobbyboss AV-8B Harrier
Starfighter and one other reacted to patricksparks for a topic
Had to use a little freindly pursuasion on the forward fuselage to get it closed up snuggly.2 points -
Alrighty then ... It's been a while since I posted anything in this thread ... for a couple of reasons. The first was the demise of Photobucket and the lack of a decent amount of time to start learning about something else to use to post pics. The second was that, by that time I actually had most of the kits that I started out planning to get ... and new stuff was coming through in trickle feed ... so, add to that the experience of a couple of let downs with trusting other humans ... and I decided to focus my attentions elsewhere for a season. Anyhow ... since then more than a few items have dropped ... I have set up a new picture thingy ... so, time to play 'show-n-tell' again. First up ... Here's a present my Girlfriend gave me before I left the Philippines ... They have their own fast-food chain over there called "Jollibee" ... and a 5-6ft statue of this guy is usually parked outside Pretty much as soon as I got back ... Richard advises his book is ready for distribution ... so I put the order through ... I've been chasing the Classics Publications one for yonks and always seem to get pipped by a sniper on eBay ... though given how this has turned out - looks like I dodged a bullet!! The Ju.88 Classics book has been used as a comparison for size. So about a week or two after I put through the order with Rich ... I started putting up a list on the whiteboard - so I could put through some other orders. 3 boxes arrived today ... In box number 1 ... All the way from Sprue Brothers in USA ... Was this ... And this: Bought mainly for collection reasons ... as ZM has discontinued making the original boxings of each now - they are collectables ... A little note and gift was left to say "Thank You" ... although I have no idea what it is ... In box number 2 from Frontline Hobbies in NSW we have: and ... While the one from Sprue Brothers is a collectable ... this one is for building at some point (and apparently there's not a lot of wrestling needed with it!) and the final kit in this box ... Just noting that its weird that the box art on this edition is night-time while the other one is daytime ... as this is the non-nightfighter edition without the upward firing cannon?!? Box number 3 comes from Metro Hobbies in VIC: This first kit holds no special interest to me other than its a ZM kit for the collection ... I'm pretty sure the only 3 kits in 32' I DON'T have now are the 2 Skyraiders and the Do.335A-12. Since I still haven't decided whether to go HKM or buy my first EVER Wingnut Wings kit of the Mk.I-III Lanc' ... I'm holding off on pulling the trigger ... for now ... I DID, however, decide that I wanted one of these ... I'm guessing that these 'special build' Lanc's came to the squadron new and that panel 'oil canning' wouldn't have really had a chance to set in before Operation Chastise ... So I figured I'd go with the clean look. They also had one of these in stock. I'd been meaning to grab one when they were released ... but when it came out, it was getting into that period of 'trickle feed' for me so I elected to hold off until there were other items to get at the same time ... Tamiya are stamping out fresh batches of this stuff all the time, so I knew I could always grab one. So ... Having compared Johns AIMS turned antennae (supplied by Master) for his Bf.110.G-4 to the plastic usually supplied in the kit for such exercises ... I decided to grab a little extra AM ... And Finally ... Even though I'm SOOOOO not a Jet guy ... I've been thinking about doing some RAAF stuff for years ... and watching through Eric's Mirage build ... I knew I'd have to get one at some point!! So ... But wait! ... probably because i spent so much money with them ... I got this ... ... I wish they made whiskey ... I'd much rather a good bourbon or scotch. Cheers, Rog2 points
-
I am going only as a "visitor" this year, no RB Productions stand (but I will be wearing the RB Productions shirt :-) ) I will try to call to the LSP stand and meet ye all. Radu2 points
-
Thanks Greg The goal for Sunday night was to close the fuselage … but before getting there, I took some final shots of the coskpit assembly and sidewalls. Most of these will now be hidden forever the sidewalls were lighly weathered and the Airscale decals put to good use. Final shot of the IP And the Ip positionned in place on the right fuselage. I deliberatly cheated on the position of the rudder as I wanted details to come Under the seat rather than having a visible gap when viewed from above. The control column is from the trumpeter kit. Compass and fuel ON/OFF panel were completely remade2 points
-

HK Models 1/32 Avro Lancaster
jgrease and one other reacted to richardchapman5 for a topic
Got some more work done on my Lancaster. Nearly finished the Port wing. Just need some parts added then weathering and its done. The engines still need fitting. Added the red surround where the life raft is place. That's all for now and thanks for looking2 points -
So I popped a capillary in my right eye. Blood is floating inside that looks like somebody splashed some motor oil in my eye. Doctor says I'm lucky cuz the capillary that opened has plugged itself so there's no more bleeding. The big mess in my eyeball will dissipate over time so now all I have to do is wait. Could be days, could be weeks, could be months Anyway, I've found it very difficult to do any modeling with this mess so I'll be slowed down at the least. ( yeah like I was a modeling whirlwind before ). Poor me1 point
-
Owing to the fact that I could not find the needed decals (assuming I actually have them here at all), I went ahead and grabbed the needed Kagero book, just for the decals. Unlike the earlier iteration of this book, which contained the decals and "masking film", this later version has not only the decals, but a nifty set of 20MM cannon barrels, in 1:72, 1:48 and 1:32 scales;... pretty nifty.1 point
-

New MRP bottles?
Out2gtcha reacted to ringleheim for a topic
They are both marked 30 ML.1 point -
New MRP bottles?
Out2gtcha reacted to ringleheim for a topic
No. I have one of each in front of me as I type. The new one with cap and lid closed is slightly taller, and a little bit skinnier (smaller in diameter) overall.1 point -
I mean as long as they did/are doing the Camel and Dr.1, why not a SPAD now? The Roden SPADs are getting harder to find, and as has previously been pointed out, as decent as the kit is, a WnW SPAD would be a large magnitude better.1 point
-
Wow, that is really great work! The paint and weathering are really right up my ally1 point
-

Zvezda Star Destroyer - a new detailing project
Uilleann reacted to The Madhatter for a topic
yeah me too, but that will be a long long way away yet1 point -
Quite cool SB1 point
-

Make the others jealous
Rick Griewski reacted to rigor for a topic
Wow nice haul1 point -
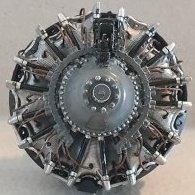
I have been reviewing the excellent tweak list as mentioned earlier. There is a mention of the mistake that Trumpeter made with the drag chute cable run panel that they doubled up on the right side of the fuselage. I filled this with a mix of superglue and talc and sanded it smooth. These ‘Trumpeterisms’ whilst slightly annoying are actually sorta fun to find and correct! I then turned my attention to the tail skid area. The skid was deployed when the gear was down and needs to be boxed in. I made up a small rectangle box from plastic card. I then glued it into place inside the skid bay. Whilst in this area, I refined the panel lines that depict the drag chute bay doors, adding hinge lines and further rivets on the doors. I feel that this will allow an observer to see that this is an actual working area, rather than a vaguely defined area of panel lines. Whilst I was doing some work to the cowling fasteners on the Bronco, I used the same tool to engrave the small circular buttons under the bottom of the cockpit on the fuselage that are there to open and close the canopy. Before: After: I mounted some aluminium tube across the fuselage to act as a spar for the wings. There is not much plastic to attach the wings on this kit so it could do with some beefing up. Once the wings were on, I wanted to check out the stance of the kit ASAP to determine if was going to have to modify it, and if so, where. I have seen a couple of these built up and to my eye they look a bit flat, lacking the characteristic tail sit of the real thing. It doesn’t look too bad but could do with a couple of mm’s taken from the length of the main undercarriage. I have used the master turned aluminium pitot tube, an essential item IMO. I have also used the Armory resin wheels, which also feature weighted tyres, something I am always looking for when I see whether a modeller is paying attention at the end of a build or not.1 point
-

RAAF FAC OV-10A Finished!
Starfighter reacted to ericg for a topic
Whilst meeting with Graham the other day, I was able to get him to sign a book that I have had since I was working on Mac Cottrells O-1 Birddog. The book is ‘Hit my Smoke’ and is well worth a read for anyone interested in FAC’s in Vietnam. It contains personal accounts written by 22 of the 36 RAAF pilots that served in that capacity during the war. Some very interesting stories indeed. The cover of the book is an edited version of Graham’s original photo of him rocketing an abandoned ship for practice, looking over his shoulder. The interesting detail for me is the Kangaroo painted on Graham’s helmet, reflected in the rear view mirrors. As the OV-10 that I am making was not adorned with a Kangaroo, as was the frowned upon practice, I will incorporate his helmet into the build somehow. I believe the painting of the iconic Kangaroo on Aussie flown aircraft was a cat and mouse game, pilots painting them on the noses of all 3 of the main FAC aircraft and Crew Chiefs painting over them when they were rotated through major bases during servicing. I have found the kit is a little light on in some of the detail which I have started to fix. One of the things that has stuck in my mind that Graham mentioned is the more challenging aspect of the FAC’s sortie, and that was to manage the multitude of radios that communicated to the many different aspects of the mission at hand. It is of great importance to me that I try as hard as I can to incorporate this important part of the aircraft into this model. Firstly, the instrument panel coaming has these 3 small blobs of plastic that are expected to be mounted to it. Nothing special about them at all! The gunsight and selector panel/compass has been done as a rather flat and awkward looking combined part. I wanted something a bit better from all of these parts and decided to fix them. I was lucky enough to be sent a copy of the Illustrated parts catalogue (Thanks a lot Mark) which enabled me to get a really good appreciation of how everything fits together. If someone goes to the trouble to send me stuff like this I will always try and reciprocate by detailing the parts as much as I can. I split up the gunsight and selector panel, and ditched the compass. drilled out the gunsight to enable a clear lense to be fitted later on. I made up some boxes to mock up how everything has going to fit together The small radio selector boxes made up with a couple of different diameters if brass tube to simulate switches and knobs. Copper to do the wiring. Fitted, with the map box made from plastic card and flap from Tamiya tape. The newly separated gunsight and selector panel. I have beefed up the gunsight a bit and lowered it a fair bit from where it would have been. The selector panel, has been made from a section of thick plastic card and brass. Painted. The compass and mirrors will be the next things to be added to this area. The next thing to be fixed was the missing fuel tank filler panel in the centre of the wing. Like the 5th step, this has been completely forgotten about by Kittyhawk. As it is right on top, it will be highly visible. I scribed a new panel and screws using a sewing needle mounted in a pin vice and a combination of a few different photo etch scribing templates. Whilst I was in this area, I scribed the also missing push in hand grip panel. (Right wing only) The next challenge will be to depict the fuel tank filler caps which are present in the larger of the two circles on each of the 5 fuel tank locations. Kittyhawk have not depicted them on these panels. You can just see them in these 2 pics of the Australian War Memorials example that is under restoration.1 point -
B-17 Historians Question
Out2gtcha reacted to ringleheim for a topic
1 point -
Nice problem-solving and execution. Good work on the windshield master, a complicated shape, and pull. Good luck with the hatch. Sincerely, Mark1 point
-
I'm running out of superlatives, this is just so good Lothar1 point
-

TELFORD 2019
Phartycr0c reacted to Ryan for a topic
Heading back in 2020 if all works out.1 point -

TELFORD 2019
Phartycr0c reacted to BiggTim for a topic
Anyone in the Telford area into metal detecting? I'd sure love to do a bit of that if I ever get to come over. Probably not a selling point to my wife, but it would sure motivate me!!1 point -
Thanks for the congrats guys! I was pleased, the last Nats I entered was in '93. I was really surprised to win 1st in the 1/32nd, as there was some excellent builds there. My 1/32 US/British 1st place was my Special Hobby Tempest Mk.V. My 3rd place in the biplanes was my Albatros D.V, Jasta 17. I have both of these posted here in the RFI. Larry1 point
-

1/32 Bomb Trolley with 8000lb 'Cookie' Blockbuster
Michael931080 reacted to GrahamF for a topic
Still working on it but occasionally I have to launch an interim kit for Oxygen( Cash) the DB Tractor will be the end of the month and the Tallboy end of September. If anyone knows how to get the message out there I'm all ears. Graham1 point -
Thanks for sharing the journey with me and to those who are going to get one of these I simply can't wait to see what you do !! Cheers Vaughn1 point
-

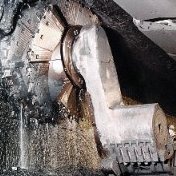
Spitfire MkVb to MkIX conversion 1/24 349 sqn
Starfighter reacted to red Dog for a topic
The MkIX conversion adds another big radiator under the wing. Both radiators are provided in resin but the bottom wing need to be adapted for fitting the second radiator. I started by marking the position of the resin part and then milled a layer of plastic to insert the new radiator. The panels were all closed on the top and bottom wing. As you can see from the picture below, I decided to cut the flaps to display them out. the flap Indicator panel was also opened from the top wing. The second gun is not installed and the gun ejector has been filled.1 point