Leaderboard


Popular Content
Showing content with the highest reputation on 07/17/2019 in all areas
-
After 7 months of work, the Albatros D.Va (OAW) is finally complete...The build is based on the Wingnut Wings kit and finished as Hans Von Gössel's flying skull, circa mid 1918. The kit was extensively modified in order to make the small details more accurate. Additions were Bo Monroe's 3D printed wing radiator and Fuel tank, HGW Models textile harnesses and Yahu photoetch instruments. I completely scratchbuilt the air valve assembly behind the starboard instrument panel and linked the piping based on the NASM plans for the restored Albatros (the restoration book was of tremendous help with the plans and detail photos). The kit received a new windcreen made from thermoformed clear acetate to thin it to scale, and the coaming was modified to add wrinkles and retaining washers for the leather. Master brass jackets were used for the Spandaus. For the engine, i had run out of Taurus resin overhead cam so i just scratchbuilt the valve springs, the induction manifold was wrapped with teflon tape and the heat shields were made from lead sheet and MENG styrene bolts. Taurus resin spark plugs were used and everything wired using Modelkasten rubber thread. Rexx metal exhaust attached. The Niendorf propeller was my first hand carved propeller and i used different veneer sheets and then coated it with MR. Paint clear. The wooden fuselage is finished with Knotless decals from Uschi van der Rosten and a few filters. The decals are just flawless in their application and in the result you get. I initially had the rigging attachment points 3D designed and printed by my friend and ALM Studios team mate Imad Bouantoun, but they turned out too big due to their hollow nature and limitations on SLA printing so i ended up scratchbuilding those using styrene and thermoforming the domes with styrene sheet to be able to use the Gaspatch Models albatros specific turnbuckles. Rigging tubing is from Bob's Buckles and rigging is done with EZ-Line thin. The lozenge linen is Aviattic and is superb as are all the linen decal series from that manufacturer... Alot of additions and scratchbuilt items which would be too long for me to itemize here, or which i might have forgotten over the period of time since. The figure is to give a sense of scale and was painted by my friend and ALM Studios team mate Bernard Bassous. You can find all the juicy details in the build log . Id like to thank everyone who encouraged me to push the envelope so to speak. As i mentioned on the wip log, it looks like the stars were aligned for this one! Thanks again, Stay safe and happy modeling! Karim9 points
-
Latest completion is the Trumpeter 1/32 P-47N Thunderbolt "2 Big and To Heavy/Short Snorter" of 333rd FS/318th FG, April 1945, Le Shima, Ryukyu Islands. Used Zotz Decals, AMS Resin wheels, Master Model gun barrels and Eduard seat belts. Otherwise OOB. Jerry9 points
-
Hi Everyone, A lot of work, but not a lot of progress. Trying to get a faultless surface is well... trying! I fill, I sand, I check, and recheck... and you know how it goes... The tiniest flaw demands fixing. And I did get to try out my new MRP Lacquers. Got to say that these paints are dangerously nice. Dangerously nice because they are the kind of paints that make you want to replace all of your airbrushing paints. Ready to spray, and they atomize perfectly. I don't know how they are for touching up with the brush, but I reckon I'll find out. Now for the pics: Because I'm not doing a historical scheme, I'm not tied to RLM paints. I"ve gone for a bare metal or silver painted metal look. All hydraulic cylinders are covered with foil. The tires and hubs are black on black with light weathering on the tires with pastels. I'm not going to make flat spots until I have the lie of the LG figured out. The tailwheel is a 2 part afair with the wheel molded to the metal parts of the gear. The hole for the 30mm cannon was filled in with CA and sanded smooth. The clear parts were polished with Meguire's buffing compound and polished with Meguire's Plasto plastic polish. And then dipped in Future diluted with 25% Glass cleaner. There are PE radiators and oil coolers that line the cowl ahead of the motor. I've decided to leave these for last to avoid over spray, and my other friend: clumsiness. I hate it when I knock off PE! You can't see them under the primer, but there are formation lights on the wing tips. Somehow, I manged to lose the originals so had to make new ones from sprue. They are quite tiny on the FW, and not completely flush with the surrounding metal areas. The wing roots have been the area demanding the most attention. Replacing lost detail is always tough, either because I make tiny errors, or because my scribed detail just ain't pretty. I had to fabricate the taillight, too. The masks are programmed into my Silhouette software and ready for cutting. I hope to lay some paint this weekend. Thanks for looking! Gaz6 points
-

Putty delivery system
coogrfan and 4 others reacted to Kahunaminor for a topic
If like me, you like the properties of PPP but struggle with a delivery system and are always on the lookout for modelling hacks, try this. If you know someone in the medical game, or even a friendly chemist, ask for a small syringe (5ml should be fine) and a blunt “drawing” needle. Decant (if that is the correct word) some PPP into the syringe and apply. The needle cap should keep it fresh and you don’t need to fill the syringe, which can be washed in water after use if you wish. Saves wastage and clean up. Regards5 points -

Tempest Mk.V Special Hobby 1:32
chuck540z3 and 4 others reacted to Koralik for a topic
After a few models of heavily tired aircraft. This time the model of the aircraft without strong weathering. Tempest Mk.V Special Hobby 1:32 Scale The model is not very easy to build, so I don't recommend it to less experienced modelers.5 points -
Kai Ko/Hei version should be available at Nationals https://www.facebook.com/volksusascale/ boxart jan5 points
-
Hi guys, The Fuji FA-200 is the third of the Nichimo 1/20 general aviation kits and just as rare. This kit has a story. I know my retired flight instructor for a longer time as a modeller than as a flight instructor. When I started to take flying lessons in 1993 at what was called at the time "Martinair Vliegschool" at Lelystad Airport, I met him there and thus found out he was a flight instructor! The previous year Martinair had replaced their Fuji's with brand new American General AG-5B Tigers on which I learned to fly. One of our members of the flying club bought the Nichimo kit to build the plane he learned to fly on. Not being a modeller he stalled and gave the model to my flight instructor. He kept it for years in the stash but did not came around to build it properly. So last year, with permission of the previous owner, he sold it to me for a nice price. And I'm going to build it! First I had to dismantle it. Being the start of the build according to the instructions, only the wings, fuselage and tailplanes had been glued together, I'm afraid not very expertly. Luckily, nothing had been done with the interior, engine and the clear parts! The trick of putting the glued parts in the freezer helped to disassemble the wings, fuselage and landing gear. For tailplane - and control surface halves, other drastic measures had to be taken, but that's for a next post. Here's the box top: And here are the box contents after disassembly of the kit and a little ordering of the parts in small bags: That's it for now. In the next post (maybe tomorrow if I have time) I will show the sprues and the parts, as I think you would like to see what this kit looks like. Cheers, Peter4 points
-

Little Boy, Gen. V
spacewolf and 3 others reacted to D.B. Andrus for a topic
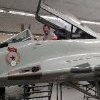
A photo of my latest 1:1 Little Boy, Generation V (5th production), in progress: Completed and in place at The Stafford Air & Space Museum in Weatherford, Oklahoma. (At the moment it's under the wing of an F-16 - something you don't see every day!) Photo by Chaney Larsen Cheers, D.B.4 points -
1/32 Kittyhawk F-84F Thunderstreak & RF-84F Thunderflash !
scvrobeson and 3 others reacted to KAGNEW for a topic
WE are back, later Kitty Hawk4 points -
Thanks so much, my friends! Here's the latest progress at last- cheers!4 points
-

1/48th Boeing B-52H Stratofortress
JesniF-16 and 3 others reacted to tomprobert for a topic
The BUFF has had some more work done on the engines - I've sanded and shaped the home-made upper, over-wing parts of the pylons and all look good under some primer: DSC_0186 by Thomas Probert, on Flickr DSC_0187 by Thomas Probert, on Flickr DSC_0190 by Thomas Probert, on Flickr Shaping the pylons on the underside was a lot more tricky as they are all molded identical, but of course the inner pylons have a very different shape due to the change in shape as you travel down the length of the wing: DSC_0201 by Thomas Probert, on Flickr I've also finished detailing the rear of the bypass sections: DSC_0195 by Thomas Probert, on Flickr DSC_0199 by Thomas Probert, on Flickr It was a bit of a faff opening these up but worth the effort. And we now have something really taking on the form of the venerable BUFF: DSC_0205 by Thomas Probert, on Flickr DSC_0192 by Thomas Probert, on Flickr As you can see, however, the tail feathers are conspicuous by their absence... better get sanding! Until next time, Tom4 points -
Hi All, i remember when Airfix first announced a new 1/24 kit was on the way and all of the speculation started.. maybe a p51b, a gloster gladiator, A Corsair (how awesome would that be!). Or even a P38!! So when the hellcat was announced I was a bit disappointed and a little underwhelmed! That didn’t last long and as more and more details of the kit emerged I came around to the idea and nearing release I couldn’t wait to get my hands on it! I’m not disappointed, what a great kit, the plastic is great to work with, the detail is brilliant. And the finished model will have real presence in any collection. I’ve made a start on the cockpit and engine. The plan is to have all the panels open like my bubble top typhoon. And if I’m brave I may also fold both wings but may end up with one out. cheers Matt3 points
-

Polikarpov UTI-4
KiwiZac and 2 others reacted to Alain Gadbois for a topic
Wow it's been 4 months since the last update! I've been busy with life but still managed to move forward a bit on different aspects of the build. I've opened up the prop openings in the spinner so it sits lower in a correct position. The prop was sanded quite a bit to smooth out the surface. Funny thing I noticed! I was looking through my Hase. P-12E kit and noticed the prop in the kit looked strangely familiar to the one in the I-16 kit!!! Some work in the rear cockpit: The half round detail corresponds to the foot hold found on the two seater. I added supports for the landing gear winch and other items. I previously showed the difference between this kit's wheels and the ICM ones. I decided to copy one ICM wheel for this project. Here's the small silicone mold and one cast set (at top on a sprue) and the originals. Thanks for watching! Alain3 points -
My Raffle Prize: Final Update 21/Aug/19
Bruce_Crosby and 2 others reacted to Alain Gadbois for a topic
Hi Gaz! Nice progress! I'm looking forward for that bare metal look! Plus some bright color areas in places perhaps? Here for your information are the 1/48 louvre details. I highlighted the separation between panels with a fine felt pen. Starting from top right side: Lower. The bottom left louvre overlaps both adjoining sections. Line indicates the vertical axis. Top left side:3 points -
Thanks! I'm humbled. No one's ever used masterpiece in the same sentence as my models. Thank you very much. :) Paint is done. Now it's on to weathering proper. Once she's done, I'll take proper pictures, but for now, my phone will have to do.3 points
-

Tamiya 1/32 Spitfire MkVIII - FINISHED!
MikeC and 2 others reacted to BloorwestSiR for a topic
I did one a couple years ago. The hardest part was making the deeper fixed canopy section. Yours is coming along really nicely. Carl3 points -
I did the same thing in my D-9 kit. but in a different way. as vinil could be a pain with the time passing and could peel itself, i did the masks inversed. I used the intenal parts of the masks and applied putty to the parts. Then I sanded the putty and removed the masks. The results is that I obtained the recess in the control surfaces in a permanent way, and with the surfae smooth, as it needed. Here, the part of the mask removed: Here, with putty applyed: Here with the masks removed: Cheers, Paulo.3 points
-
HI everyone, I've finally joined the fuselage to wings. It's been a bit of a struggle to get the surfaces as clean as I like, but I feel I've got much done. Here's some pics: I've filled the upper fuselage gun troughs, and replaced the hitherto closed radiator flaps with new flaps made of card. With all of the control surfaces at neutral...or closed, I felt this was a change needed to make the model more engaging to the eye. The original radiator flaps had only 8 external and 8 internal flaps represented in the molding. It took me quite a while to find a useful picture because all of the surviving TA-152's and FW 190D's use the Jumo 213 engine whilst the TA-152 utilizes the DB 603 engine. I found some pictures of the radiator arrangement on the Heinkel 219 Uhu which also utilizes the DB 603 engine. After a lot of looking, I finally decided that twelve inner and twelve outer flaps were required. I also just remembered that I need to make 12 pushrods for the flaps... All of the trailing edges needed a bit of work to make acceptably sharp. It actually took up a fair bit of time. Of course, that meant that I lost all of the raised detail on the control surfaces. Never fear... Silhouette Portrait is here: I found a drawing of the FW 190's framework online and imported it into my Silhouette software. After cleaning it up a bit, I cut the masks and used a few thick coats of Tamiya Matte Red to give me back the raised detail. There's a bit of overspray to remove.... I'm going to have to pin the stabilizers, too. I was going to show them dry-fitted, but they looked a bit too droopy that way. Thanks for looking! Gaz3 points
-
Welcome back again, everyone! I spent some time painting up the innards (such as they are) for this bird. Nothing exciting though I do like the Eduard PE IP. There were PE Rudder panels, and later when I insert the seat, there'll be PE belts. One little detail to glue to the starboard inner wall. I needn't have worried about the wing dihedral. There was a stub spar which to mold the wing. I gave it overnight with clamps on to dry. There were a few erroneous (and non-erroneous) cartridge ejector holes to fill, and I got rid of the upper wing bulges for the MG 151's. I braced them at the back with card and then filled them with CA and baking soda. After checking my work with gloss black paint, I filled the tiny errors with Mr. Surfacer. Thanks for looking! Gaz3 points
-

Ju-87B, 1:32, Trumpeter
dodgem37 and one other reacted to Hartmann52 for a topic
Ju-87B (Trump) + BigEd + ...2 points -

Bf 109 G-10 Erla/type 110, Hasegawa 1/32
109 and one other reacted to French frog models for a topic
Here it is finally finished ... the paintings ak real are great to use ... a little rest and zou it will be necessary that I finish the other 109! A huge thank you to Vincent Kermorgan and jean-claude Mermet for their invaluable help! See more on my FB's page: https://www.facebook.com/125768474675320/posts/431152264136938/2 points -
I've seen modelers using black primer, but I didn't know the real thing has black primer: Here's the link to the article: https://strategypage.com/military_photos/military_photos_20190713153130.aspx2 points
-

1/48 Hasegawa Arado 234 "Blitz"-After 3 Years...Completed
LSP_K2 and one other reacted to mustang1989 for a topic
I started up on the engine paint up this morning. I have really come to like these macro shots as I use them as a tool to go back and fix certain things that either I miss or made a mistake on. Found a couple of areas that need some attention in the shot below. Anyways....after a base coat, a very light wash just to bring the details out and a little bit of detail painting this is the latest progress:2 points -
While we do welcome you aboard, there is nothing in your product line-up that qualifies for the Vendors Board, so I've moved your post here to General Discussion, where it more appropriately belongs. If you ever get around to providing detail sets for aircraft or helicopters in 1/35 scale or above, we'd love to hear from you about them! Kev2 points
-

SB2C
D.B. Andrus and one other reacted to Out2gtcha for a topic
I have many HpH kits, including the Tigercat and the infamous Walrus and unfortunately IMHO Deans assessment is spot on. The kits are wonderful looking as to surface detail and inclusions in the kit, those are facts. The details cant be beat, and you really dont need to add much of anything to their kits, and that includes PE. Their new hard copy manuals are really a nice bump up, and the new IP decal process they have is really ground breaking and works to a tee. Plus generally their kits are very accurate (to my knowledge anyway) and you get kits that no one else is putting out. However.......................... When you have a $300 + kit that has issues, and I dont mean small fit issues, I mean a complete mis-mold at the factory issues to where panels on the upper and lower halves of wings dont line up. Im not talking off by .003mm or anything, Im talking off by more than 2mm or 3mm. Then things like one (random, sometimes both) nacelle filled at the tip completely with resin. Or having to drill two 1/8th" holes directly through a completed fuselage full of details you just put in. Then when engaging the manufacturer (respectfully) about a replacement or possible fix to basically be told "that's the way it is" tends to put one off a small bit. Every manufacturer has some issues with their kits, but honestly if you have ever attempted to build an HpH kit all the way to fruition, you know even without any major issues that should have been taken care of at the factory, the kits really tend to sap ones "modeling will". The practice of putting a trillion and one very tiny parts, all on sections of resin "pool" sheets really makes for parts that may (or many not) be accurate in height or width, depending on which end is situated in the resin pool. The pool sheets are indeed very thin, but the act of taking off, sanding, shaping, filling and more sanding on the engine cylinders alone (40 in total with 4 extra as you needed them as is natural with resin, some mis-formed) on my F7F was about enough to drive me round the bend. And I have more desire/passion for that airframe than ANY other too. This is not meant to be disparaging to nor meant as a slight at HPH as a manufacturer, its simply my personal experience.2 points -
Polikarpov UTI-4
Kagemusha and one other reacted to Alain Gadbois for a topic
The image is from " Le Polikarpov I-16", Collection Profils Avions #4. You can see it in my first post, with the I-16 attacking a He111. A very good reference. The type 10 is very tempting of course! But my favorite is still the Type 5...2 points -
Hey Guys, Jack Mathews, a master modeler and fellow member of Seattle-IPMS and NorthWest Scale Modelers, has written a very nice article explaining the assembly and use of his biplane assembly jig. This thing is ingenious and easily scalable for 1/32 big-boy biplanes Here's the link: https://modelpaintsol.com/guides/a-brilliantly-simple-biplane-assembly-jig Thanks! --John2 points
-

1/32 MENG KOMET BIRD WITH A LOT OF BITS AND BITES
shepard and one other reacted to SCRATCH BUILDER for a topic
.............................................had to go get another bag2 points -
Thanks for the compliments Let's see what the final product of the Mirage 2000 comes out like. Injection molding does have some limitations. Anyway, my full time job has been hectic for the past week, leaving me with very little time for building models. The basic shape for the new JL-100 pods are done, and looks very different from the kit parts. Now I can start marking and cutting out the 6 x blast vents, and adding detail to them. Cheers2 points
-
I figured this was a good time to check the rear cowl fit, and sure enough there are some serious fit issues. Here the gun tray is set temporarily in place. A little grinding here and there of the cowl interior and guns, makes for an almost perfect fit.2 points
-
BTW, they show a lot of interesting stuff there: That's not a childrens toy - it's a flight simulator! And the control unit: Guess you know what this is: German too: Ruhrstahl Fritz X glide bomb: The rudder of the Letov S-16 that made a 12.000 km flight from Prague to Beijing, showing all the landing places en route: The fuselage of a Saro Cloud: Interesting story behind this: Used by Czech Airways before WW2. Scrapped, the fuselage used after the war as a houseboat for decades. So it survived and got recovered from the museums team. The L-159 ALCA light attack aircraft. See it in Iraq - or Prague. Your choice They even have a Gloster Meteor, a Yak-23, an Iskra, a Su-25, both czech made towed aerial targets KT-03 and KT-04, a wing and engine of a Skoda-Kauba SK 257 and much more. Not to mention the plethora of replicas of czech interwar aircraft. Added to my collection a good number of detail photos of the Letov S-2 (kit by HPH) and for other LSP kits in my stash. Enjoy! - dutik2 points
-

Dragon Bf 109E-4B
R Palimaka and one other reacted to LSP_K2 for a topic
Here the IP has now had some paint slopped on and is awaiting clear coat and Airscale decals. Admittedly not the best bit of painting, but I think I can live with it.2 points -
Revell He 111P with HPH cutaway conversion.
BradG and one other reacted to Kahunaminor for a topic
Well it’s in. The old adage about a plan not working after the first shot is true. After fiddling for two hours with my planned install, I went with the front first then the roof and rear pieces put together and shuffled into place. The sides were then put in but it cost me some details and some alignment issues. This was mainly caused by not having the forward piece at as close to 90 degrees as you can. If it is out it will throw it all out. Styrene strips and card will fix the errors with some putty. If I ever build another, I shall ignore the instructions and put the MLG in place before joining the wings: Regards,2 points -

HPH F7F Tigercat
KUROK and one other reacted to b757captain for a topic
More pics: Thanks for looking! Mark2 points -
Thank you for your kind replies everyone! Thank you for the demonstration. I have to admit that I've come to dislike putty or anything that makes me wait. I find myself turning to CA and baking soda or CA and accelerator to help me get through things quickly. I don't think I've used putty for my last 6 builds. It's funny... I hate CA as a glue. I find myself backing it up with white glue quite often. But as a filler, I like it best. Gaz2 points
-

Gulf War Tornado
Alain Gadbois and one other reacted to Cheetah11 for a topic
Fuselage is now together and primed, ready for painting. I had a bit of difficulty getting the right shade of Barley Grey. Humbrol makes the right color as a satin color , but try as I might I could not get a smooth finish with the types of thinners I used(I tried everything I could source including Humbrol.) In the end I used Tamiya lacquer but had to mix the colors, using the Humbrol tin lid as a reference. I hope the color looks right but at least it is super smooth. I tested it by doing the stabs and it looks right to my eye. I also tested my preferred method of weathering by using pastels to create darker areas around panel lines. I know it is a personal preference but even black lines on real aircraft lose the sharpness when viewing them at typical modeling distances. The NO STEP stencil was as small as I could cut with the Sillouette, so I hope the size is not too big. The two colors on the stab is only shadow when photographing. Nick2 points -
Been away for a bit getting hitched (pics later) but am back at home now, just perusing the forums. Jeez, ya go away for a bit and all sorts of cool and interesting things pop up! Kinda depressing being back in the high heat and humidity after a week at 11,000 ft + temps! Looking forward to getting back in the fold ladies and gents!1 point
-

Tempest Mk.V Special Hobby 1:32
Koralik reacted to wingman777 for a topic
One of my favorite aircraft, you did it justice.1 point -
Anyone wanting the counter weight, I can send it to you in an envelope for $6 shipped.1 point
-
I just noticed that Freetime hobbies has in stock most the recent Revell releases. Example the 1/32 Me-110. Hopefully they will get this kit in also Their pricing on the kits is very reasonable. Paul C1 point
-

SB2C
Out2gtcha reacted to EvilCarrot for a topic
I'm willing to believe that HPH are doing their best, but watching Brian's struggle with the Tigercat really put me off of that kit. Reading about their other releases it seems that these types of issues are not uncommon in HPH kits. Comparing that to the test build I've just seen of the Iconicair Spiteful it clearly shows that with a little more effort these kits can be put out at a more affordable price point AND without said issues. Maybe the HPH kits are more complex with some more internal details, I don't know. I do know that if I had to choose which one I'd rather build, the choice would be obvious. (might even put in an order at some point, also quite curious about those plastic kits. But then again I already have way too much stuff...)1 point -
Looking good! Make sure you glue the engine in the fuselage before you glue in the gun cover, otherwise it will be a PITA to get the engine mounts into the firewall.1 point
-
Very nice, Jerry!1 point
-

Airfix 1/24 P-51K Main Wing Spar Template
Model_Monkey reacted to Dave T for a topic
RAAF sperry auto pilot nose bulge by any chance ?1 point -
Some Polikarpov I-16 questions.
wunwinglow reacted to Alain Gadbois for a topic
Hi Ade, To answer your questions: The seat belts. The left and right shoulder belts are attached together at the top. These are then fixed to a leather coated wire that runs across (and in front of) the armored seat back and is attached to the sides of the rear bulkhead (kit part 37) at the level of the top of the cockpit hatches. The armored seat back has indeed a cushion at the back. The head rest padding is a bit thicker than the rest and is split in three by two vertical creases. Color is very dark, probably black. Cockpit floor is metal. The main interior color is a light blue, not grey. I hope this helps! Alain1 point -
Nice. but... check photos of real plane... RAM palels grey goes over the edges of bombbay doors to the inside....1 point
-
awesome work, I have the 152H-1, so I will be watching closely.1 point
-
Nice work, Gaz!1 point
-
Tamiya F-4J finished in the colors of VF-143 Pukin' Dogs: Taproom 102, USS Enterprise The right/starboard side is the 1971-72 cruise; the left/port side is the 1972-73 cruise with the late CDR Harley Hall adorning the canopy frame. Outstanding AOA Decals. Paint is Testors MM Gloss Gull Gray FS16440 and Gloss White. Radome is Testors Gloss Black, brushed on, no streaks at all, so shiny.1 point