Leaderboard


Popular Content
Showing content with the highest reputation on 06/12/2019 in all areas
-
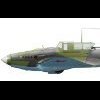
I have had a thing for this machine for longer than i cam remember! I was planning to upgrade the old Revell kit when along came Dragon & AIMS. The AIMS set is an absolute dream to use. All the parts are designed to be "drop in" with no surgery is required, the parts needed to modify the 110 to a G4 just replace the kit parts. The Master turned brass aerials are included in the set along with a very extensive etched set. I didn't use the etched seat belts, instead I used a set from HGW. Initially the set came with a vac form rear canopy, but AIMS now do a clear resin part which is very nicely cast. I used Xtracolor RLM matched paints for the colour scheme. Thanks for looking, Angelo15 points
-
Finally have a first test casting of the trimmer pedestal. The seat is still in the works.7 points
-
Just a brief update today. I was expecting to receive my order of styrene rod by now, so that I could resume work on the cockpit. Sadly, it didn't arrive, so I continued to focus on the prop. I started by removing the prop boss from its casting block: You can see the moulded-in slots for the blades to slide in to. They have sloping sides to lock the blades in place, and as far as I can tell, what you see in the photo above is the correct orientation to accept the blades, so that they produce a propeller that rotates to the right when seen from the cockpit. The instructions are unclear on this point, so please let me know if I've got it wrong! It's not too late to change it, even though I've already glued the blades in place. I mentioned in a previous post that the propeller blades needed to be rounded off to suit the aircraft I'm building. Rather than sweat getting them to look exactly like Hamilton Standard units, I just eyeballed it and gave them a few swipes with the sanding stick. The photo below shows a comparison with an unaltered blade: And finally, the full set, ready to be attached to the hub: How well the blades slot into their respective cut-outs in the hub is really down to how well you remove and clean up the casting blocks, as they go right over the top of this area on each blade. I ended up with a so-so fit, and a bit of filling to do around the area, but it has the potential to be better than I managed if you're more exacting than I was. OK, that's it for now! I did try to snap some photos of my photography set up, but they didn't turn out well at all (oh, the irony!), so I'll have to try again later. Kev6 points
-
Thanks, Brian! The gloss that spilled did level out pretty well by itself and doesn't look too bad. I took a cloth polishing pad on my Dremel to it, and that seemed to smooth out the bad spots pretty well. It is, as they say, good enough for government work, and I'm calling it done! I'll try to take some better pictures for a RFI post later.5 points
-

Resin wheels on Tamiya's F-15 kits
AnthonyWan and 3 others reacted to ghatherly for a topic
Her is the results of my research a few years back: Parts R us wheels are resin copies of the Revell F-15 kit wheel. The are to small in diameter and to narrow. RES-IM wheels are for a C/D. A/B wheels are different. Tires markings are to large and not accurate for the actual tires used. NorthStar F-15E wheel are much to large in profile and diameter and the wheel lightening holes are the wrong size. F-15 E's use two styles of wheels, one with small and one will large holes. GT Resin wheels are made from CAD drawings based on input from the manufacturers drawings and the actual wheels and tires. Both Michelin "Aviator" tires and Goodyear tires are available. Wheels, brakes, and tires are separate for ease of assembly and painting. You can also drill a hole in the brake drum and id a screw to attached them to the main gear just like the kit gear. They are a little more expensive, but the look is worth it even is I am a little biased. Chuck Sawyer used the GT Resin set on his F-15C build a year or so back. Several others have used them on their builds. the oval holes I the Wheels are designed to be easily removed so you get the realistic look of the brake drum behind it. Pics are courtesy of Chuck Sawyer form his build thread. Hope this helps.4 points -

Seafire Mk 47 conversion
wunwinglow and 3 others reacted to GrahamF for a topic
I'd just wait a while.4 points -

1/32 Marauder
brahman104 and 3 others reacted to AlexM for a topic
Thanks guys, very encouraging. While I really like creating larger parts like a fuselage, and to see how the shape starts to resemble more and more the one of the real aircarft from step to step, creating all those tiny interior details is pretty laborious, especially when there are no plans/blueprints, so that I have to rely on photos, with my interpreations and good (or bad ) guesses about size, dimentions and overall shape of the various things. Talking about interior details, I plan to purchase the Hobby Boss B-24D, once it is out, and wonder if the upper fuselage turret of this kit is good? (I whish there would be an after market turret I could use for this project)4 points -

The Dreaded RLM 81 Braunviolet...
MikeMaben and 3 others reacted to BarryWilliams for a topic
I dont think it is a problem. Towards the latter stages of the war there were a lot of colour variations due to supply and manufacturing issues. Given, as well, how colours weather in different ways we can get overly concerned about the exact shade. No-one can really tell you what manufacturer got it right, if any has, so you make your choice based on your favourite paint brand.4 points -
I also printed the instrument panel. I plan to use instrument dial decals, which Peter (Airscale) kindly sent me:4 points
-

Su-27 "Arctic Flanker" Trumpeter 1/32
Loach Driver and 2 others reacted to Memir for a topic
Trumpeter Su-27 1/32 finally finished... I tried to build heavy weathered Flanker based above polar circle with units called “ Guardians of the North”. I used Zacto intakes, nosecone, missiles and pylons. Aires Cockpit, wheel wells and exhausts. Armory resin wheels. Front windshield is a scratch build as kit part was really bad in shape. Colors - MRP paint including silver primer, transparent paints and metalizers. Tamiya panel liners and weathering Masters used. WIP here:3 points -
1:32 Bomb Trolley with 12000lb 'Cookie' Blockbuster
Model_Monkey and 2 others reacted to GrahamF for a topic
While I wait for the flood waters to subside in my village I thought I would test the decals on my latest kit before they all go out tomorrow as I've been struggling to find a good decal paper, thankfully I've found it through a railway model manufacturing friend. Graham Iconicair RAF Bomb Trolley + 12000lb Cookie 005 by uniquenarrowgauge, on Flickr Iconicair RAF Bomb Trolley + 12000lb Cookie 004 by uniquenarrowgauge, on Flickr3 points -

'Skeletal' Fokker D.VII
chuck540z3 and 2 others reacted to sandbagger for a topic
Hi all, I thought you might like to see my 18th 1:32 scale build - the German Fokker D.VII fighter. The major airframe components are 3D printed from the ‘Shapeways’ web site. The airframe structural components were designed by ‘Aviattic’ and engine parts by ‘Bob Monroe’. Other components for the model were ‘donated’ from the ‘Wingnut Wing’ kit of the Fokker D.VII (OAW built) (Kit No: 32030). This model, with associated figures, will eventually be part of a dual Fokker D.VII display. I know I don't often reply to your generous comments, but rest assured they are very much appreciated, Mike The basic list of modifications and additions to the model are as follows: ‘Taurus Models’ engine intake manifold lock rings (3211), ‘Taurus Models’ engine fuel priming cups (3219), ‘Taurus Models’ engine complete timing gear - conical valve springs (3209), ‘Eduard’ Swordfish hinge and panel set (32204), ‘RB Productions’ British wire terminals (RB-P32013). Spark plugs. Cylinder fuel primers. Valve springs. Ignition lead support tubes. Gun synchronization mechanism. Ignition leads. Oil reservoir sight glass. Hydraulic pipes. Intake manifold lock rings. Sump oil tube. ‘Flugzeugwerke’ (Bob Monroe) (printed by ‘Shapeways’) Mercedes D.III Oil Pump, Mercedes D.IIIa Cylinders (hollow), Mercedes D.IIIa Crankcase and engine block, German Aircraft Magnetos, Mercedes Cylinder clamps, ‘Aviattic’ (printed by ‘Shapeways’) Rear fuselage frame. Tail plane. Rudder. Elevator. Ailerons. Fin. Upper wing (3 sections) (scratch bracing tapes, leading edge ‘saw tooth’ fairings). Lower wing (two sections) (scratch bracing tapes, leading edge ‘saw tooth’ fairings). Tail skid (with scratch made suspension cables and springs). Wings leading edge ‘stacking pads’. Rear fuselage decking panel. Cockpit padded surround. ‘Aviattic’ Fokker seat. Undercarriage assembly – scratch built including brass struts. Fuel, oil and coolant pipes, Engine controls – throttle, magneto, alternator, spark advance, hand throttle. ‘REXx exhaust. ‘Proper Plane’ Heine propeller (wood). ‘GasPatch’ Spandau machine guns. Gun installations. Cockpit control cables – rudder, ailerons and elevator. Cockpit cross bracing lines. Gun firing cables. Gun synchronization mechanism. Engine controls. Instrument leads/cables. Fuel pressure pump pipe. Seat harness. Rigging points. External flight control lines. ‘Steve Robson’ handmade wheels and tyres. Photo-etch radiator. Radiator shutter and control cable/pulley. All internal cross bracing cables. Aileron control cables with associated pulleys. As usual I've created a downloadable build log in Adobe PDF format, for those who might want to refer to it for reference or build details. It contains full step by step descriptions of the model build, its modifications/changes and is also supported with illustrations and photographs. If viewed in Adobe Reader, each build log has book marked chapters/headings for easier navigation through the log. My model website has the gallery page, so to view any model, go to the gallery and select it. If it has a PDF build log, it will be available to download using the 'PDF' icon on that models photo's page. For any photograph, just click the photo to enlarge or reduce the viewing size. http://igavh2.xara.hosting3 points -

KH 1/48 F-101B Voodoo
Out2gtcha and 2 others reacted to b757captain for a topic
Hi gents, Here's the second half of my foray into the F-101 family, the -B. I built this one alongside the RF-101C. Most of the kits are the same, with separate sprues for each of the different variants. KH did not change the intake/wing sections for the RF but they are correct for the -B (at least to my eye). Built OOB, the only AM was the Eduard cockpit set because KH only provided instrument and side panel decals for one cockpit! Little slip-up there. The Eduard set looks a little better even though their pre-printed panel color is a little light to me. Paint is a custom mix of Tamiya for FS16473 (ADC Gray) and Mr. Color for all the rest of the bits and pieces. The decals were a disappointment - I have gotten used to KH decals, wonderfully thin, maddeningly hard to work with but usually they look good in the end. On this kit the decals were thick, took forever to release from the backing paper and very hard to get to settle down. It took multiple applications of softener and in a few spots I resorted to dabs of thinner to get them to conform. After all that, I elected to play harda** crewchief where there was no way my bird was going to have a speck of dust on it so no weathering. All in all, an ok build and it looks good next to her sister on the shelf, so to me that's a win! Thanks for looking! Mark3 points -

Revell He 111P with HPH cutaway conversion.
MikeC and 2 others reacted to Kahunaminor for a topic
Welcome back, I have removed all the internal moulded detail of the fuselage as per the HPH instructions. The injector pin marks will be filled, the wing concealment fitted and putties before it is all sanded: The lower wing cutouts for the fuel cell appear to be suitable. My only concern is the inner face of the insert may extend to far inboard and impinge on the false fuselage wall I have to add to hide the wing area: I have sanded the inner face of the resin almost as far as I dare. I will have to dry fit the wing conceal to see how I go: The HPH instructions require careful reading in conjunction with the kit and the Eduard instructions. The HPH ones appear to jump around a little, with some sections of Eduard PE having been fitted prior to the resin installation of the HPH set. The bomb bay area is a case in point with the PE inserts in the lower openings fitted before the resin internals. I have attempted to thin the plastic to scale in the fuel cell openings in the upper wing. The internal is okay and surely a better scale thickness, however in doing so I have butchered the round openings: I shall pause to consider but I believe the fix may be removal of the entire upper panel area and replacement with styrene sheet, drilled and scribed with the resin attached to the new skin. Regards,3 points -
'How do you guys that have built em feel?' I've built 2, and am finishing up 3 from the Shelf of Doom. Parts fit, the fidelity of the detail that is there is clean and crisp, having sharp edges and corners. Parts count is low. Construction is simple and easy. Building and painting instructions are easy to read. Decals are applied easily. Open to After Market detail and correction sets. I like the kit. Hasegawas' kits follow the Keep It Simple Stupid philosophy. Unlike Tamiya. Sincerely, Mark3 points
-
KH 1/48 F-101B Voodoo
Out2gtcha and 2 others reacted to b757captain for a topic
More pics: Cheers, Mark3 points -

Hasegawa 109 Accuracy: is it?
MikeMaben and 2 others reacted to tucohoward for a topic
Hi Gaz, being a 109 guy I have built all of them and for the F/G/K models I much prefer Hasegawa. Probably more AM available for this kit than any other ever made. Still looks like a 109 without any of it though. Very simple build.. Jay3 points -
This is modeling stamina times three. First you have to model it in the digital world, then print it, then model it. Wow. Stunned3 points
-
Another brief update. I'm continuing to work on all the nose pieces, with the next step being to install the photo-etched radiator face into the lower piece: Fit here is almost exact, so placement has to be equally so, or it just won't go. It's important to position the two upper ends below the moulded ribs at the sides; this ensures good alignment and fit, but unfortunately it's not made clear in the instructions. In fact, the quality of the instructions is my only beef about this conversion set, as they trail badly behind the exceedingly high quality of everything else. Note that the radiator grille is very see-through, so you can either put a bulkhead behind it somewhere, or paint all the internals black. I haven't decided which way I'll go yet, but the latter option is definitely the simplest! I opted to install the front lower piece to the main nose section first, rather than attaching it to the main lower piece: I think this allows for a better and more accurate fit, since it locks into place better this way, and the other piece sits very neatly behind it: Note that I've also installed the plate that sits behind the spinner (not sure what it's called). As you can see, everything fits really well, and a lick of Mr. Surfacer will take care of any wider gaps. Speaking of the spinner, I've removed, cleaned up, and test fitted those parts too: Still a bit of work to do there, as the prop boss and blades are all separate pieces, and the blades themselves need to be modified in tip shape to be appropriate for this build. Unfortunately, no template or specific instructions are given for this, other than make them resemble Hamilton Standard units. Kev3 points
-
OK, time for another update! Progress has been slower than I'd hoped, but I've had word from Espen that he's sending me the missing wingtip parts, along with some other minor bits that come as a separate pack to build the military service version. I'd also stalled on the cockpit, as I didn't have the required size of styrene rod to form an axle for the trim wheels. I've ordered some, and they should arrive by mid-week. Instead, I've been pushing forward with getting all the nose parts prepared. The new resin nose actually comprises several pieces, and it's important to pay attention to the assembly sequence, lest you leave something out that you can longer put in! The first task is to add the radiator exit ramp to the lower nose piece: In the process of gluing it in place, I've discovered that my go-to bottles of CA are past their best, and I should have ordered some more when I ordered the styrene rod. Oops! I did eventually find a new tube of ZAP CA gel hidden away in one of my drawers, so that will suffice in the interim. I'm off to a show tomorrow, so hopefully I can pick up some fresh CA there. Another thing you must attend to before closing everything up is to fit the new exhaust stacks. The resin units are wonderfully detailed and superbly cast, and my photos don't do them justice: There's a bit of resin flash to clean up between each pipe, but it's otherwise a simple matter of sawing off the casting blocks, and you're good to go. Each stack has the lower portion of its associated external fairing moulded into place, and this mates with the upper half of the fairing moulded into the nose piece: There's a bit of a gap there, but the angle of the photo above is hiding it. As far as I can tell, it should be a panel line, so I'll fill it enough to leave an impression of a line, rather than attempt to eliminate it completely. I used to be a paint-then-glue guy, but in recent years I've evolved a more nuanced approach, and I'm quite happy these days taking a glue-then-paint approach, so these exhausts will be painted and weathered once all the main painting is done (I like to do well bays this way too these days). With the exhausts out of the way, I could test-fit the rest of the nose components: For a loose, unglued fit, I think that's pretty good. There'll be some gaps, but a lick of Mr. Surfacer or similar will take care of them nicely. They should mostly be panel lines anyway, so you'll want to leave some indication of such. OK, that's it for now! Thanks for checking in. Kev3 points
-
Hello Here is my last built: Hasegawa P-40N reboxed byEduard. Nice kit. Easy built I used guns from Masters and tried the eduard Look dashboard. Markings are a bit of what if as I screwed up the decal sheet with fat spills from cooking.... stupid... Anyway, with some leftover from previous kits I managed to figure something convincing. (or so I think)2 points
-
This is really nice- great work.2 points
-

Bf-110G4 Night Fighter.
AceofClubs and one other reacted to Out2gtcha for a topic
Great result Angelo! I like the paint and weathering a lot. I have an AIMS G4 set to do myself.2 points -

HK's B-17F - 21/9 the photon steps up
sandokan and one other reacted to brahman104 for a topic
G'day Ben, thanks for looking in! As you can appreciate with the amazing work you do, it's no small task to work out what's wrong, but it's somewhat satisfying getting to grips with the problem The pesky #4 bulkhead As you know from my previous posts, the STA #4 bulkhead is essentially where I believe the crux of the matter lies, well at least in beginning the corrective process. I feel if I can get this bit right, then the rest of the nose job should actually flow relatively easily from here (famous last words.... ) For such an important bulkhead, frustratingly the drawing of it is split over three sheets, which meant scaling and importing into Rhino would be a nightmare, as you can only import 1 background image per plane per time..... I decided the best way forward was to print the sheets out, work out a suitable overlap to join them and then scan them at the highest resolution I could.... For those following with their own drawings, I actually used sheet Z57, as it appeared clearer. Taped carefully together, I then rescanned the sheet... It was also time to remove the section marked '2' on the kit. The reason for this is two-fold. Firstly, it gives more surface area for the printed correction to bond to the kit and secondly, I believe to get the correct shape/taper just under the cockpit windows, the section back to #4 may not be parallel/concentric with the section forward of the leading edge. Time will tell! Now that I had a complete drawing of STA #4, I had to work out its correct size in respect to the HK fuselage. This wasn't quite as easy as just measuring the kit STA #4, as there's wall thickness in the kit to contend with and the real #4 doesn't include the upper turtledeck coaming, that's a separate part. Also, I had to establish the true width of the kit's #4 by scaling the drawing to suit. In any case, this is what I worked out.... Note* This is not the kit measurement - this is pre scaled. The corrected height is 74.4mm Using that, I then finally was able to scale the STA #4 drawing and derive the true kit width at the fuselage centreline.... Easy right? Man for something that seems simple, that took a lot of head scratching! Next up, I'll be establishing the true kit horizontal profile from STA #4 all the way to STA #1 - Quite a big moment! Cheers, Craig2 points -

Hasegawa 109 Accuracy: is it?
AlanG and one other reacted to thierry laurent for a topic
The cyber hobby Emil is indeed the only 109 that has the combination of easy assembly, accurate details and the lack of any dimensional issue. No other large scale 109 kit is similar regarding such a combination. The engine area is indeed a common issue but it is not comparable to the Eduard one that is noticeably more difficult to solve. The Hasegawa G6-14 is easy to assemble but has the details of a 1/48th kit and has some dimensional issues in the nose area (too rounded spinner and Beule location because of length issue). The G10/K4 is noticeably worse (fat spine). Unfortunately, there is (still) no final late 109! The last Hasegawa release - the Friedrich- is the best 109 they produced (correct nose length and accurately shaped propeller). I made detailed reviews of most 109s. Just have a look in the tweak list section of the articles tab on the LSP website. Hth Thierry2 points -

1/32 Marauder
brahman104 and one other reacted to Starfighter for a topic
You are absolutely right - most people seem to forget this when you say a part or an entire model were 3D printed.2 points -
Looks VERY promising.2 points
-

Hasegawa 109 Accuracy: is it?
MikeC and one other reacted to Darren Howie for a topic
Easy to build, some great aftermarket generally pretty accurate with niggles only serious 109 guys will notice. Nice kit even 16 or 17 years after release just dont expect a hyper detailed beast.2 points -

Hasegawa 109 Accuracy: is it?
Rick Griewski and one other reacted to LSP_K2 for a topic
I reviewed the G-6 (here), and while perhaps not as photo heavy as some reviews might be, certainly seems to cover the majority of the bases, I think.2 points -

Miniart 1/35 Focke-Wulf Triebflugel interceptor - Nachtjager version announced
Reuben L. Hernandez and one other reacted to seiran01 for a topic
$68.98 after postage, bought from an eBay seller in Ukraine on May 27th. I may have overpaid after shipping compared to whatever the US retail will be but I wanted it fast2 points -
Well it’s finally finished! Overall a really enjoyable build. A great kit with some fit issues but excellent detail and brilliant value for money. I had to work quite hard on the scratch building and re scribing some panel details as I’m not a natural builder. Aftermarket was obviously the engine and also brass machine gun barrels. I should probably have used resin wheels. And I think Andy (monthebiff) mentioned seat belts and I regret not putting them in now but at the time I was pushing the build on and didn’t have any to hand and didn’t want to wait. What next? Well the airfix hellcat is only a week away! cheers Matt2 points
-

1:18 Hobbyboss AV-8B Harrier
Harold and one other reacted to patricksparks for a topic
Started to re-build the outrigger landing gear for the wings, using K & S brass rod and square tubing and some photo-etched nuts and washers. Using Harold's/AMS Resin Wheels.2 points -
1/32 Marauder
Coneheadff and one other reacted to AlexM for a topic
Small update: I printed some stuff for the radio operator section. For the seats, I tested two ways to print them in different angels. Both versions turned out OK. All based on from what I see on photos, so no guarranty for accuracy Here's a quick arrangement to give you an idea (blame on the mechanic for not screwing tight the radios): Maybe the seat is a little bit too high in relation to the radio-shelf Cheers Alex2 points -

1/32 Kitty Hawk F-5E Kicked Up A Notch. Oct 3/19. Finished!
Out2gtcha and one other reacted to chuck540z3 for a topic
Hi Paulo, My F-15C coincidentally came in second to a very nice F-15I built by a very friendly guy who introduced himself as Yuri, who apparently follows my builds and knows about all of them. Now THAT was Gold to me! Congrats again Yuri if you read this post. As an aside, Fine Scale Modeler will be publishing the F-15C build in a book or special issue this fall, while I think the Spitfire will be in a regular magazine issue about the same time. Back to the current build. I’m getting really excited because I’m going to be painting soon. Painting the sub assemblies is re-teaching me how to paint Gloss Black. Have a super smooth finish to begin with and expect lots of crap to stick to the paint, which is very frustrating no matter what I do to avoid it. Glossy finishes create static electricity, which attract anything in the air, especially in our dry climate. I also just painted the landing gear. For all the pain of this kit, the landing gear is superb, with the usual pin mark and seam issues. Cheers, Chuck2 points -
F-4G Wild Weasel Tamiya Kit & GT Resin Conversion
Kilroy Was Here and one other reacted to ghatherly for a topic
More Pics:2 points -

P-47D-30-RE Lt. Willy Lyke, 57th FG
daveculp reacted to Miloslav1956 for a topic
1/32 Hasegawa kits HGW rivet set, wet transfers Barracuda wheels Eagle Cals #104 Aires wheel bay, engine, gun barrels Avionix cockpit All colours MRP1 point -

The Dreaded RLM 81 Braunviolet...
Isar 30/07 reacted to RBrown for a topic
Remember that the RLM stated that delivery of color charts for RLM shades 81 and 82 was not possible and consequently there would be no acceptance inspection of the paint's shade. The RLM never gave the either shade a descriptive name, but only referred to the shade by its number designation. Messerschmitt used Braunviolet to describe RLM 81, Dornier called it Dunkelgrün and Bloom and Voss used Olivbraun. Here is a photo of an Erla built G in the late war greens. RLM 81 can be seen forward of the fuselage cross. Here is a Do 335 with the late war greens. and Fw 190s...1 point -

Seafire Mk 47 conversion
Troy Molitor reacted to Alburymodeler for a topic
Yes, but even the control stick needs tossing. We really, really need a current standard Spitfire 22/24/Seafire 47 kit.1 point -
Good point actually Ron, when you think of it that way, it really gets deep.1 point
-
I've built the same kit K2 reviewed and really enjoyed it.1 point
-
Not super detailed ... but accurate enough in outline and restrained external detail. There's enough there for the average modeller ... ... Plenty of AM going around to fill in any extra detail if you would like to go further. As long as it's NOT the Bf.109E kit of nightmares you should be good to go. Rog1 point
-

1/32 Marauder
AlexM reacted to SCRATCH BUILDER for a topic
Good job Alex!1 point -
This thread is a god-send. I am planning to do a Flanker B in Russian Knights colours. Granted it's in 1/48 (HobbyBoss) at the moment but it'll be a learning curve for when i get the Trummpy kit1 point
-
Once again, amazing work on this Marauder! Regards, Jason1 point
-

RF-8G Trumpeter & Fisher Model
David Hansen reacted to EricF for a topic
Thanks Brian I changed my mind concerning the windows. Instead of inserting them one by one as I intended to do, I think I will be easer to mask them on a one piece of plexiglass. I think that I will save time on finishing work.1 point -
Gloss black base is on and it's showing the model is going to need more sanding and a polish before I can proceed with the Alclad lacquer. Not completely unexpected...1 point
-

Su-27 "Arctic Flanker" Trumpeter 1/32
AceofClubs reacted to crobinsonh for a topic
That is the best SU-27 build I have seen - the weathering is incredible. Do you have an WIP you can share on how you achieved your weathering?1 point -
Total focus on trying to get the cockpit finished. The Airfix kit doesn't include the pilot's relief contraption so I fashioned one out of a bit of sprue and some lead wire wrapped around a wire core. It sat in a sling assembly on the pilot's seat....don't know how the poor navigator coped Starboard cockpit side next. Again, the plastic wiring has been replaced with real wires. The dials are drybrushed in aluminium and the faces filled with gloss varnish to give a lens effect On the port side I've added some wiring taken from reference photos of the NF Mk 11(there aren't many) and added some Airscale cockpit placards and some little aluminium tubes painted black and some lead wire glued inside. The then look like the lamps found on many Allied aircraft. Sequins look just like the anchor points on the wooden fuselage. More lead wire wrapped around a soft wire core gives the pilot's oxygen pipe Now for the bit I've been dreading, fitting the Sutton harnesses. Not normally a problem if you're not fitting the crew in there but, in this case, I am! I like to drill through to get the anchor points for the leg straps then use wire loops through the eyelet of the strap to give realistic anchorage. I got them fitted and took the opportunity to do a little rusty chipping on the seat armour plate. I've weathered the belts with a mix of burnt umber and lamp black oil paints let down to a wash with turpentine Now for the good bit I'm no expert at figures but they're painted, surprise expressions and all and I've got to try and get the harnesses around them. The navigator was a no go. There was simply no way I could make it fit so I've worked on the premise that he's constantly out from his perch looking in the RADAR for targets so he can't do that with is harness on. Therefore it's to the sides of him ready if needed. Pilot wise I had a little more success and even managed to get the pin & post arrangement in there too. I've taken several snaps from different angles to try and show the fittings I downloaded a few authentic WW2 charts from the web and shrunk them to size to busy up the office a little That's about it for now. Next is the reall job, getting the thing in the fuselage and making it all fit! As always, thanks for looking1 point
-
So, after attending a weekend workshop on figure painting at our local scale modelling club, I put some of what i learned to use... Cheers: Kent1 point
-
I am still preparing all the main parts of the air frame. The main challenge of this build will be on the junction between the Fisher Model and the Trumpeter half fuselages. Since each part having a landing gear, if the alignment is not perfect right now, the aircraft will have a twisted looking once on its legs and when we see the hight of the fin, it would be preferable to put attention on the preparation of the parts. But take a look on the pics ..... no comment on the adjustment. Well done Mr Fisher To reach this, I just put the fuselage under hot water for the resins recovering its original shape. But honestly it was really minor distortion. Then I sanded each half fuselage on the sand paper sheet over a glass table. To make sure to have a perfect symmetry, I will glue the fore and aft parts together first. I will recover two half fuselages like on a conventional kit afterwards.1 point