Leaderboard


Popular Content
Showing content with the highest reputation on 04/13/2019 in all areas
-
It's the Tamiya 1/32 kit with the Eduard Brassin port engine, Xtracolor paints and Aviaeology decals. The aircraft represents one flown by Squadron Leader Vic Cherry, a Texan who flew with the RCAF's 418 Squadron.13 points
-
Finally got a coat of primer on but there were problems, of course. One I gotta’ own myself because the model sat on the bench for a couple weeks and picked up dust. No big deal, I’ll just wipe it down with some IPA and use a paper towel that someone told me is “lint free”. Long story short, It's not and I didn’t realize how much lint was on it until I started priming. So I had to stop and tediously remove all the lint I could fine, which went okay. THEN! My completely clean airbrush started clogging and spit out a few chunks. At this point I’m like “the hell with it” and soldiered on clearing the occasional clog. I knew the airbrush was clean so just to see what would happen I filtered some with an ancient filter funnel I’ve had for 40 years and sure enough the primer has chunks in it. Lesson learned. It could have been a lot worse but now I have to do some sanding to get rid of the problem areas. See those five dots in the filter screen? Those are chunks of primer and they do not pass harmlessly through an airbrush. I guess I’ll be filtering my paint from now on. Enough whining, this is what everyone seems to be waiting for. Comments and critiques are always welcome. Don’t be shy - an honest critique is a catalyst for improvement.8 points
-
Howdy folks, I've just published my review of the new Real Colours book from AKI: AK Interactive Real Colors of WWII: Aircraft Thanks to AK Interactive for the review sample. Enjoy! Kev5 points
-
I've picked up my Harvard build again over the past couple of weeks, a few update pictures and brief comments where necessary: Work on the cockpit and pilot figure: The KH kit lacks the horns on the rudder for the linkages: so some work on this: The fit of the aft panel isn't great on the KH kit, I'm not sure why they planned it as a separate item instead of moulded as part of the fuselage halves, so filling and sanding necessary: Another area needing work is KH's attempt at portraying the underlying metal structure of the fabric covered empennage. As can be seen on the Harvard photograph, it's not that obvious: so the lines were sanded off: and lines of Archer rivets applied - not strictly accurate either I know but an improvement to my eyes: I've done a little work on the air intake on the port front cowling. The kit version is just a flat blank so I drilled that out, thinned down a BF109 radiator grille and cut it to shape for the intake: Another area needing a little detailing is the refuelling points. KH's mouldings drilled out and replaced with better looking versions: The IPs supplied are wrong for an RAF WW2 vintage Harvard, so these are being addressed. I've taken a rather lazy approach I'm afraid in just putting Airscale dials straight onto the plastic surface, I may put the bezels in front....hmmm? The large white lump on the inside of the top nose panel is additional anchorage for the tall radio aerial, mine snapped off on my first build when the aerial was stretched. And finally, Mustang wheels were ordered to replace the flimsy KH ones. The Harvard is going to be in-flight, but possibly flaps down and uncart being lowered....... that's where "it's at" folks. More later I hope!5 points
-
More added each day... trying to build different style temples to go with the wide variety of 'faiths' that permeated the ' Holy City'.... I felt that there should be a street or two that merged into a broad avenue for parades and religious processions ....so the buildings had to form that... Wrapping around the temple mount... And finally a beauty shot looking across the city... I was getting bogged down so when Jimi suggested again we add some of the mountain top I was ready for a change.. so off to the model shop I went for milliput..... Tune in next week to see what silliness I'm hoping to get into !! Cheers Vaughn5 points
-

Copper state N17 in Printscale soviet colours.
Bill Cross and 3 others reacted to DrDave for a topic
4 points -
Actually these massive canons positioned in the front, before the air opening nose part caused too many problems to Soviets. If Soviets keep sticks to original sketch plans of Focke Wulf J.P. 011 they won’t have so much troubles. As the reports says opening fire on 7000m by all 3 guns BMW engines (get choked ) and literally stop working. Even opening fire over then 3000m caused many troubles with engines, so it was strictly forbidden to the pilots to open fire from all guns at ones. Shooting with the 37-мм gun was allowed not higher then 3000m. “Большие проблемы возникали при стрельбе. При открытии огня на высоте более 3000 м силовая установка вела себя нестабильно (менялись обороты, температура газов, возникал помпаж), а во время залпа из трех пушек на высоте более 7000 м двигатели просто останавливались. Виновником отказов были пороховые газы, которые пушки в большом количестве отправляли прямо в воздухозаборник.” Для устранения этого серьезного недостатка от использования 57-мм орудия отказались и перешли на 37-мм калибр. Actually finally Mig’s engineers find the better gun position but it was too late, because Mig-15 rise.4 points
-

New Weathering Pencils from AK Interactive
scvrobeson and 2 others reacted to JamesHatch for a topic
Got the new complete set and can't wait to give them a try.3 points -

Revell 1/32 F4U-1 Corsair
themongoose and 2 others reacted to BradG for a topic
Tail and outer wings are now glued on. I only managed to screw up a little bit here, so that's good. The engine and cowling are also glued. The latter clipped on nicely.3 points -
hi Mark M, yes this is no Tamiya but having started the Heller/Airfix E-3 Sentry in 1:72 until I started this one, I must say that this is an easier build, I am enjoying this one really. Once you overcome the stupidity of the inner parts 1 mm higher than its outer skin, then it something that can be solved. Thanks Markjames for the encouragement, I have to agree that once completed, the gear bay is the most elaborate of any kit I ever built. having put also the sides onto the structure, I wish I had sanded the sides of the front and rear faces of the wheel bays a bit more to ease the mounting of these plates, but in the end it has come together: around the wheel bay there is now just a small gap to deal with: also the bottom plate between the intakes now almost fits without a step, I think just a little more sanding of the surfaces of the intakes will solve this.3 points
-

1/32 Kitty Hawk F-5E Kicked Up A Notch. Oct 3/19. Finished!
scvrobeson and 2 others reacted to shark64 for a topic
Chuck. you are in my book one of the most talented modeler I've ever came across. Thanks for the tutorial.3 points -
I started cutting up bits of scrap plastic I had laying around and adding buildings made from squares and various shapes... I was puzzling it out as I went along, no city planning involved. To rest my eyes (and nerves) I read a lot of the thinking and 'history' of the Jedi, Jedha city and the 'religion' of the Force... there were many different offshoots as with any 'faith' and I wanted to give the city a variety of flavors.. but the center piece was Jedha and the temple/ temple mount.. so it had to be held special.. so a wide ramp was built and various temples and spires added.. At the other end of the city more buildings and temples were rising.. some had up to 8 parts..... I averaged about a square inch a day before my eyes and nerves gave out... streets, temples, buildings... from the SD's viewpoint it looks orderly... But from an oblique angle......3 points
-
hi mark, indeed it seems that this kit has the 1 mm issue over the whole length of the body, and not just the engine compartment. I will show photo's later but they confirm your statement. after having built up the intake duct it is time to mount the bottom plate. in order to fit it, the inner structure needs to be cut through, otherwise the hinges of the wheel doors on the wheel bay will foul! the front plate of the bottom needs to go in between the intake plates. the picture below shows why this is so difficult to align afterwards: by aligning the intake walls to the rest of the structure first, I managed to solve this fit issue. after the mounting of the wheel bays the assembly looks like this. by sliding the bottom plate from the aircraft's back to front I managed to maneuver the plate in between the hinges. notice how the intake insides do not connect to the bottom plate yet. it requires some stress and glue to align them: between the wheel wells all fits well: now everything must be glued. the clamps look more dramatic than it is, just a little force needed to be applied. glue everything from the back to the front: an hour later and everything is fixed, now the intakes can be clamped and glued against the bottom plate:3 points
-

1/32 Kitty Hawk F-5E Kicked Up A Notch. Oct 3/19. Finished!
jgrease and 2 others reacted to chuck540z3 for a topic
April 8/19 I’ve been a bit distracted lately, but I did get a chance to work on the wings. Like much of the kit parts, they are a bit lumpy, the surface is slightly rough and the rivet detail is shallow and bit wide. Without adding a dark wash, it’s hard to photograph, so you’ll just have to take my word for it. After giving the wings the same “Chuck” treatment I’ve given the rest of the model, the detail is much better and smoother. This will be critical later for a smooth gloss black finish. Also, rivet patterns were added according to references, top and bottom. The bottom of the wings are a lot more complicated. Here are the key things you should do if you follow my lead. 1 The outer join does not exist, so it should be filled and sanded smooth, then a nose-like panel line scribed across it as shown. 2 The other join on the LEX is OK and should stay, but be re-scribed. 3 The gear bay walls should be glued securely to the top of the wing, because that’s all that’s holding on to the very weak landing gear legs. 4 If you aren’t using the inner pylons, do not open the holes as shown in the instructions in Step #19, while the outer pylon holes- which are already open- should be filled if you’re not using them. Rather than just fill them with CA glue, I used styrene rod to create pylon anchor points or plugs with more detail, as found on the real deal. And this is all that’s holding the gear legs in place: Two tiny slots. Yikes! While fairly accurate, they are fairly weak. All the more reason to put them on at the very end of the build, like I usually do anyway. The wing to fuselage join isn’t horrible, but it’s not plug and play either. While a chore to fix, this is more common in modeling than it’s not, so no big deal. Again, a lot of those crooked ghost panel lines should disappear after a coat of paint (fingers crossed). Cheers, Chuck3 points -

Rapid Black Basing... using a Scotch Brite
Landrotten Highlander and one other reacted to KitmodellerNZ for a topic
IMO, airbrushing a squiggle pattern randomly over a kit still looks too uniform, regardless of how ‘random’ you try to make it. … And it takes too bloody long on a large kit such as a 1/32 Ju-88! Enter the Scotch Brite masking technique which came about after I had been looking at pro airbrushing stencils online and thinking there must be a cheaper way. Firstly some prep is required before using your Scotch Brite. Because these types of pads are dense, you must prepare them by tearing, pulling and reducing the thickness by tearing them in half carefully along their horizontal axis. Here is an example of the Scotch Brite in action on Revell’s 1/32 Ju-88. Airbrushing Tamiya XF-54 Neutral Grey through a Scotch Brite; I completed the entire underside in approximately 40 minutes. The result; Close up; I applied further mistings of neutral grey to reduce the contrast; Where possible, I mix my own colours with Tamiya Acrylics mixed with 50% Tamiya Lacquer Thinner. For RLM 65 I mixed up equal parts of XF-23 and XF-2 thinned as per above. In the airbrush cup I added this mix and then added the same amount of thinner to make it highly diluted. This allows the topcoat to be built up gradually. This makes it hard to overdo it and destroy the effect if you get heavy handed with the trigger. The result so far;2 points -
Ok I couldn't resist any longer..Im in! Ive wanted to build this kit for a while and there are a bunch of great markings so this group build is the perfect excuse. First impressions are its no Tamiya Mosquito, but then again it is 1/3 the price. You do get lots for your money, the cockpit is lovely and i think it will build up into a very impressive model. i have made a start and built the cockpit which is now ready for paint. i have also decided to modify the kit a little, the kit has no engines but i have decided to graft a resin one onto one wing. its not exactly the right engine but looks sufficiently like a jumo 211 to be good enough when I've finished...I hope! Cheers Matt2 points
-
WNW airco DH9
tucohoward and one other reacted to DrDave for a topic
Irish free state air arm, Fermoy 1923.2 points -
Too big for Tamiya. More of a HK Models type of project. The Americans really need to start a model company to make their favourite LSPs, or lobby the Chinese. I can say the same thing about the SAAB J.35 Draken series. It's about time a European company such as Revell did it in 1/32. Waaaay overdue. FLY, at least, are releasing the quite peculiar but welcomed Tunnan, and Italeri are apparently making a new tool PANAVIA Tornado. ICM are the heroes right now: Gloster Gladiator. Shizuoka is the big reveal, seeing if there'll be anything other than motorbikes and R/C stuff under the Tamiya mystery shroud. I'm also hoping Hasegawa might soon add another indigenous 1/32 prop to its range. Tony2 points
-
Let's get to know each other a little better. Show a photo of your
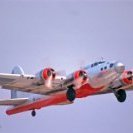
Starfighter and one other reacted to Radders for a topic
Me in 2019... i'm learning to skydive, doing my AFF Level 1-8 and then A License allowing me to jump anywhere in the world.. And what I'm jumping from... I thought this might be a new aircraft for me, but D-ISCO is ex- HA-ACO which I jumped exactly 13 years ago to this month also! Not a bad thing, good to be reunited!2 points -

New Weathering Pencils from AK Interactive
Gazzas and one other reacted to monthebiff for a topic
Well, I decided to take the plunge with these as they seem like a good idea and liked the AK products I've purchased before, these arrived yesterday and I'm quite impressed with the colours included. Keen to try these out on a 190 I have which is nearly complete! Regards. Andy2 points -

Fokker pair 2
Greg W and one other reacted to sandbagger for a topic
Hi all, The final on-engine control linkage has been added, which is the spark advance (ignition timing) for bottom magnetos. For now the engine will be put to one side so I can make a start on the cockpit, Mike2 points -

IMAM Ro43 1/32 scratch-built
Model_Monkey and one other reacted to baffozac for a topic
Relics of Ro-37 at Kabul Airport. There is a lot of differences beetween the Ro-37 and the Ro-43, not only the floats. Stefano, before I started this scratch, I asked to Special Hobby if they had planned to do this kit as they did in 1/48. I always wait their answer.......I hope to finish mine before someone else does. Ciao !!!!2 points -
IMAM Ro43 1/32 scratch-built
Model_Monkey and one other reacted to Stefano for a topic
Troy, The relics found at Bagram were Ro-37 and - yes! - one of those has been restored and it is currently displayed at Vigna di Valle. The Gruppo Amici Velivoli Storici (GAVS), a private enthusiasts group, is currently restoring a Ro-41 basic trainer. The floatplane Ro-43 is also displayed in its full glory at VdV. I am nudging some resin model manufacturers to consider releasing a 1:32 model of one of those, not having Baffozac's scratchbuilding skills. Historical subjects, simple design and forms to mould, originals available for measuring, plenty of data and gorgeous painting options. Keep trying! Some photos of the restored Ro-37, Ro-43 and Ro-41 under restoration below. Enjoy! Ro-37 206BC015-7C90-4098-B568-A00304E295CA by Stefano Salvati, su Flickr BBFDE1B5-8DA6-45E9-8824-CF45DFE7DD62 by Stefano Salvati, su Flickr 8E9F56BC-37C3-4083-A5C5-2971E4CB73BE by Stefano Salvati, su Flickr 0364C6DD-6ED0-4A1E-BB47-24C469763F10 by Stefano Salvati, su Flickr 8CDFE9B5-B014-47D0-B25D-2D5711983E75 by Stefano Salvati, su Flickr Ro-41 under restoration C6E248C0-679E-49A0-A76E-D8CDE18CC441 by Stefano Salvati, su Flickr A47F7C11-FE69-49B6-BF1D-1DAED9BC358D by Stefano Salvati, su Flickr A2DB63AD-2B88-41F7-B13F-02ABF8D70519 by Stefano Salvati, su Flickr C2C553EE-63CF-420B-8179-7960830C74B5 by Stefano Salvati, su Flickr D9F10457-535D-4755-A2EE-6A538F01672E by Stefano Salvati, su Flickr D86FECDF-3340-448A-8A14-381D8017C18E by Stefano Salvati, su Flickr 09069427-2220-4167-BEDE-7F73C8A112A2 by Stefano Salvati, su Flickr B1D50A5A-D2CB-4A92-A0D0-4018B319705E by Stefano Salvati, su Flickr Happy Modelling ... and crossing fingers to having one of those in 1:32 scale one day!2 points -

AK Interactive Real Colors of WWII: Aircraft
scvrobeson and one other reacted to Mebo for a topic
x2 This is really one of the missing pieces of info needed when modelling WW2 subjects.2 points -

New Japanese Aggressor Eagles decals
dmthamade and one other reacted to thierry laurent for a topic
Hi, DXM should release soon one 1/32 set covering two-seater and single-seater JSDAF F-15s. Even if I already have the Two Bobs set, I will get that one as it will be far more comprehensive. For instance, the special markings used on some fuel tanks will be included! Thierry2 points -

AM seat for Revell Bf109 G6?
Rick Griewski and one other reacted to Wackyracer for a topic
I sanded the belts off then replaced with a Radub set.2 points -
A little update. After almost two weeks in applying putty and sanding the intakes to get a decent shape, finally I think that I get the job done. Or almost done, as with the picture, I could find a little defect in one of the intakes. I needed this correction as at least in the Brazilian F-5s the intake tube is bare metal, with no kind of painting, to avoid to get any paint scrap to be sucked by the turbine. And the only way to get this kind of color is painting the interior of the tube with alluminiun paint, who are known as a paint who shows any defects. The planes are ready to continue. The problem is that I'm still waiting the PE sets to arrive here, to close the cockpits and continue the kits. The noses and the gun compartments are ready to be glued in the rest of the plane. Soon I will post pictures of them. More to come. Paulo.2 points
-
I personally don't like rubber tires on models, they are tough to weather and age. I also don't like exaggerated bulged tires. Flattened contact patches are definitely a must for me though2 points
-

LEM Mig -9 FINISHED
daveculp and one other reacted to blackbetty for a topic
some more paint and decals. the lightning bolt and number are self made. the stars are from the kit sheet. it would have been nice to know that these are printd on a solid sheet and have to be cut out. i damaged one because i had to cut the wet decal.2 points -
Well, I think Tamiya is nearing the end of its run2 points
-

1/48th Boeing B-52H Stratofortress
daveculp and one other reacted to tomprobert for a topic
The fuselage is now joined - lots of tabs were added along the mating surfaces and on the whole, I've got a pretty good join. Considering the size of the parts, they matched well. As this picture shows, there'll still be quite a bit of filler needed (par for the course with these sorts of kits) but nothing of real concern: IMG_0906 by Thomas Probert, on Flickr The H-model tail turret has also been added to the rear fuselage: IMG_0907 by Thomas Probert, on Flickr I've also lined the openings for the undercarriage bays so they are more representative of the real aircraft: IMG_0908 by Thomas Probert, on Flickr IMG_0909 by Thomas Probert, on Flickr IMG_0910 by Thomas Probert, on Flickr So now it's out with the filler... Until next time, Tom2 points -

1/16 scale scratch built AT-38B Talon-The Smurf jet is back!
scvrobeson and one other reacted to Pete Fleischmann for a topic
Hi Guys- not dead...I promise. More soon- Cheers Pete2 points -
MH 60 Academy SeaHawk. 1/35 scale.
Michael931080 and one other reacted to shark64 for a topic
been a while, heres the latest. slow progress because of work schedule..2 points -
Hello everbody! Big update today. I have finally finished the forward section of the aircraft. The parts you see represent the "base" layer of detail as these are to be cast parts. Hence the "completed...mostly" comment. A ton of work went into the surface, seams and joints to give this puppy a least a chance of producing good castings. I would be so much further along is I was not building and having to worry about making copies. More explanation here: http://www.timmystech.com/jaguar-fuselage-masters How's about some photos?: Here's a shot of the next bit to come. As always thanks for checking in! More later, Timmy!2 points
-

New Weathering Pencils from AK Interactive
Jan_G reacted to ringleheim for a topic
1 point -
1/32 P-38....from a reliable source.1 point
-

LEM Mig -9 FINISHED
Martinnfb reacted to Troy Molitor for a topic
Wow this looks awesome as usual Karl. Just getting caught up on all your recent efforts. I certainly agree with the LEM kits. The fit is amazing and the close tolerance fit for a resin kit is a joy to work on. Your MiG is looking so late 40’s -50’s straight wing jet like. I saw saw one of these beast in the Chinese Aviation museum outside of Beijing. The massive cannons sticking out of the engine inlet will look the part soon enough. Thanks for sharing this with us. Regards Troy.1 point -
Got my kit today, it's very nice. Some of the best surface detail I've ever seen. I'd like to have seen a little better cockpit detail, especially the seats. But overall this kit is truly great. Now, never being satisfied, hope they'll be some nice aftermarket and decals. Chuck1 point
-
That is some beautiful paint work! You are doing very taking account the desert elements. Very nice!1 point
-
A little more work. Fit of the center wing to fuselage is nice, just a little clean up needed. Outer wings are drying, so far so good.1 point
-

Messerschmitt Bf109G-8, 1/32, Finnish Air Force (G-6 HASEGAWA)
F-4Phanwell reacted to Hartmann52 for a topic
So: "Sergey aka Suomi says - finish! The prototype is the Messerschmitt-109, my favorite! Option: Suomen Ilmavoimat, 3 / HLeLv24, 06/30/1944, Lappeenranta. Pilot: MSgt Nils Katajainen, total victories 35.5, Messerschmitts - 18, on this machine - 7 (06/29/44 - Il-2; 06/30/44 - Pe-2; 07/01/04 - Air Cobra; 03/07/04 - 2xYak -9, 2хИл-2), Mannegreim 2nd Class Cross - 12/21/1944. About aftermarket in this model: Aires cockpit, main gear - RB, used about 20% of BigEd on 109G-6 from Eduard, exaust pipes - REXX (pilot version), the others - out of the box"(c).1 point -

HB B24 discussion: AM and fixes
D.B. Andrus reacted to Jan_G for a topic
pitot tube by Profimodeller for B-24J available http://www.profimodeller.com/detail/1:32-1/p32365-b-24-pitot-tube/ and barrels http://www.profimodeller.com/detail/1:32-1/p32364-b-24j-barrels/ and based on their FB post more AMs for B-24 will come + first set dedicated to cockpit from Eduard planned for May 2019 jan1 point -
Messerschmitt Bf109G-8, 1/32, Finnish Air Force (G-6 HASEGAWA)
F-4Phanwell reacted to Hartmann52 for a topic
"Suomi" continues Weathering finished, final assembly begins1 point -
Actually, with my penchant for seaplanes, I could get by without a WnW Dr.1 or Spad for a while.......... I think I found Sir Peters next kit (I can only hope) The Hansa-Brandenburg CC Or even the early version without the outer cabanes:1 point
-
Thanks for looking in on me through this build...I'm calling the 295 finished as of now and going for a nice adult celebratory drink, and then start the next project, or finish one that's been hanging on in the pattern waiting for me to get back to it.1 point
-

1/32 MH-53E Sea Dragon - 3D printed / scratchbuilt
A-10LOADER reacted to Starfighter for a topic
The plan is to build a full interior and maybe to open up the third engine compartment... we'll see. A full interior is a must as the windows are so big.1 point -
1/32 MH-53E Sea Dragon - 3D printed / scratchbuilt
F-4Phanwell reacted to Starfighter for a topic
More progress - some details were added to the IP and sanding of the fuselage continues. This will keep me busy for a few more weeks.1 point -
MH 60 Academy SeaHawk. 1/35 scale.
A-10LOADER reacted to shark64 for a topic
Gun is done. AVAILABLE ON WERNERS WINGS ANY DAY NOW.1 point


