Leaderboard

Popular Content
Showing content with the highest reputation on 04/11/2019 in Posts
-
Well, I think Tamiya is nearing the end of its run7 points
-

IMAM Ro43 1/32 scratch-built
Model_Monkey and 5 others reacted to baffozac for a topic
Hi, I'm lucky, I got this light wave effect. In some points, I put to much plastic glue and I have to fill them. The lighty wave effect on the wings compared to the fuselage more pronounced. The wing is light but rather solid to do that. The dihedral remains flat. Don't forget, it's just a game !6 points -
so this morning it was calligraphy workshop still according to the profiles and photos of the 109, I tried to reproduce the scriptures that were on the bestio !! That's what happens we will let it dry, and then a good coat of varnish to protect all that I also benefited while I was there, retouching the number 1 to paste there too close to the real plane and this is what gives it ... before: after [/url There you go ... yves6 points
-
Last week I managed to do some things again. I checked some of the outer panels without the wheel bays built up. It turns out that everything fits quite well without any of the internal parts causing conflicts (of course after having taken 0.5 mm off of the tops of the bulkheads as well as the ECS internals on top of the engine). So for those who want to build this model with the wheels up, you might as well leave all the wheel bay parts out. After the base coat I spayed the intakes and the parts of the wheel bays white, followed by a Flory Models grime wash. Because I had been warned already about the bulkhead sticking out from the nose wheel bay, possibly conflicting with the canopy, I tried to dry fit the parts. As it turns out, if you sand all parts square and true, and shave just a bit off the diagonal sides of the bulkhead, everything fits again. the same goed for the air intakes: I fitted everything up front and sanded the glue surfaces square and I was pretty much okay. After some alu on the first fan blades and some gunmetal on the exhaust, I was ready to assemble the lot together. The part with the last fan blades needed some sanding of the outer surfaces, otherwise they would not with into their slots. other than that, the intake tunnel came together without gaps. The hole pattern in the intakes have been completely filled and sanded, I am thinking about making a decal to replicate this. The whole pattern was in the wrong orientation anyway. The grey separation has been taped off here, I needed some photo's to figure it out since Revell does not give any guidance here. intake tunnel right before close up: engines dry brushed with alu: and with some clamps and glue the intake tunnel is assembled, without gaps!6 points
-
Ok I couldn't resist any longer..Im in! Ive wanted to build this kit for a while and there are a bunch of great markings so this group build is the perfect excuse. First impressions are its no Tamiya Mosquito, but then again it is 1/3 the price. You do get lots for your money, the cockpit is lovely and i think it will build up into a very impressive model. i have made a start and built the cockpit which is now ready for paint. i have also decided to modify the kit a little, the kit has no engines but i have decided to graft a resin one onto one wing. its not exactly the right engine but looks sufficiently like a jumo 211 to be good enough when I've finished...I hope! Cheers Matt5 points
-
I have spent the past hour or so reading and digesting this thread, and believe it is an uncomplicated way to fix a glaring oversight. Iain, thank you for the time and effort spent determining a great way to go about this fix. The solution is brilliant. If you produce a kit of wing formers, I too would be interested in it. In a former life, I was a US Air Force Officer assigned as a launch officer to the 742 Strategic Missile Squadron commanding Minuteman III ICBMs during the Cold War. My Squadron's heritage was directly linked to that of the 455th Bomb Group, 742nd Bomb Squadron which flew B-24 H/J aircraft out of Italy, 1943-1945. My plan is to build one of the 742nd BS aircraft, although I haven't chosen the particular plane. The 455th BG commanded the 740, 741, 742, and 743rd Squadrons. Senator George McGovern (and Presidential candidate) from South Dakota was a pilot in the 741st BS. I may even do the plane he flew most. I am just getting into the forum adventure, and look forward to more posts from all of you Wizards and Plastic Kit Phenoms to get even more enjoyment from this hobby. Bob5 points
-
not sure if it was mentioned on the forum but there is new small company from Ukraine doing several wheels sets in 1/32 one difference is that they consist from resin and rubber tires. jan http://scalemodels.ru/news/13798-Halberd-Models.html4 points
-
 Its hard NOT to get excited about stuff we've been waiting for decades!4 points
 -
HGW big riveting set (masks, positive rivets, stencils, seatbelts), CMK gearbays, Quickboost gun barrels + exhausts, Yahu IP, Eduard wheels + exterior/interior Brengun - those are perfect.3 points
-
I am glad to announce that we started selling our La-9 at 1:32. Available on my website and Ebay. http://lemkits.com/product/1-32-la-9-fritz-limited-edition-resin-kit/ https://www.ebay.com/itm/113715620241?ssPageName=STRK:MESELX:IT&_trksid=p3984.m1555.l2649 also for those who know and want to buy a little cheaper, an auction is available. https://www.ebay.com/itm/113715621349?ssPageName=STRK:MESELX:IT&_trksid=p3984.m1555.l26493 points
-
Howdy folks, Brian has just reviewed some new Phantom decals from AOA: AOA Decals 32-030 / 32-032 / 32-033 / 32-034 - USN/USMC F-4 Phantoms in Vietnam Thanks, Brian! And thanks to Steve at AOA Decals for the review samples. Kev3 points
-
 True, it sounds like he has his hands very full. Hope I didn't sound like a kid before Christmas. I will behave.3 points
 -
 Patience Richard, no doubt MM will start a new thread regards the Mustang stuff, I'm displaying Olympic standard patience waiting for the observers set, and late tails before buying the Mk.X cockpit so I can saw on shipping to Blighty, not to mention the KH Jag3 points
 -

New Weathering Pencils from AK Interactive
williamj and 2 others reacted to thierry laurent for a topic
Funny to see how those Spanish guys recycle known products with some clever marketing! Such water soluble pencils are available for many years from arts stores! As we say in French, this makes me wonder if AK did not invent the wheel, hot water and the wire to cut butter...;-)3 points -

Fokker pair 2
109 and 2 others reacted to sandbagger for a topic
Hi all, The end is in sight for this engine build. I've added the decals, ignition leads, gun synchronization mechanism, oil sight glass, generator and drive, cylinder fuel primers, water pump, intake manifold with locking rings, crankcase breather pipe and additional pipes. All that's left is to add the engine mounted throttle and spark advance (ignition timing) controls - the remainder of the control runs can't be added until the engine is fitted into the fuselage (with the cockpit), Mike3 points -

LEM Mig -9 FINISHED
Rick Griewski and 2 others reacted to blackbetty for a topic
a coat of silver...3 points -
IMAM Ro43 1/32 scratch-built
Model_Monkey and 2 others reacted to baffozac for a topic
Many thanks to you !!!! Wings' construction : I used 1 mm strong metal rods to secure the wings. 1 mm is the inner diameter of the 2,4 mm Evergreen tube used as spars. Four screws are sufficient to fix it to the cockpit floor. The skin is made by vacuforming card using carved wood (balsa). And the fillets: plastic card and Milliput. Structure of the wings: ribs are 3D printed by my friend Bernard. To strengthen I added to the Evergreen tubes one stainless steel tube (1,5 mm) The skin is made by only one piece of 0,25 mm card wrapped around, glued step by step (1, 2,3,...) Then the trailing edge is cut (4) and a plastic strip is added (5) to have a sharp and solid edge. To follow3 points -
Thanks! Doing the Airscale decals tomorrow because I took too long with the painting today... D3 points
-
Hello everyone .... big update for my post I finished everything about painting the 109 and here are the pictures all the paint is made to the gunze I also painted exhaust pipes I then painted the US yellow which is very different from the one that can be seen under the front cover and finally, last week I made, for the first time, stencils to paint the big element of the decoration of the plane here I am at this hour in the painting of the kit to your keyboards to tell me what you think yves3 points
-
Engine:3 points
-

My precious place
themongoose and one other reacted to florin13 for a topic
After I changed the house, I was able to set up my showcases for models. However, I have not yet managed to arrange my work space. I hope I can do that soon. At the moment, the exposure space looks like that. The contents of the showcases will change over time, but at the moment, the whole space is busy. Florin2 points -
P47 D RAZORBACK TRUMPETER 1/32
mywifehatesmodels and one other reacted to pascal JMW for a topic
Hello just finish to day my second kit from this year P47 D trumpeter , Eduard photo etched for the cockpit , resin wheels Redux , gun's Aber , pitot Aber , pilot Ultracast , kit world decals for the noz art , marking painting with stencils , painting whit tamiya and Gunze acrylic ,wash Tamiya and watercolors pencils best regards Pascal2 points -

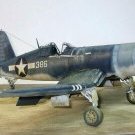
Boeing F4b4 almost naked
Memir and one other reacted to tomaszhajzler for a topic
Hi ! I never expected that this project can take me eight years. I thought about three or four years. Of course I had breakes, holidays etc., but it was about 2500 hours of work. As base I used old Hasegawa kit, but it was only excuse to start this project, the rest is scratchbuilding. My friend, Andrzej Ziober persuaded me to show this model so strongly opened. He is precursor of cutting all structure of fuselage from kit’s moldings. First step And the final Here is the link to WIP My Boeing made the first flight to Madrid on IX model contest organized by IPMS Madrid and asociation model34. It was very interesting event, very good organised with many models on high level. Boeing received three prices, thank you Jury Oro in it’s class, Best aircraft, and Special Price from IPMS Portugal for the best model of the contest. This third is especially beautifull, special thanks for members of IPMS Portugal. So now, I need to think about new project. Thank you All for watching, support and kind words. Regards Tomasz Hajzler2 points -

BIG 1/18 Fw190 *scale photo added*
Andrea Ferrari and one other reacted to Gisbod for a topic
Hi All, Here’s the rather huge Hobby Boss 1/18 Fw190. It’s a much maligned kit - not enough detail, over simplistic etc. However It’s actually excellent in lots of ways; it’s pretty cheap for the size of kit, I picked this up for £65 and yes, it is simple and lacking in detail for the size, but it makes up for that in quality of fit and the surface detail is exceptional, so it’s basically a great canvas for detailing and paint. I had fun making it. This thing is huge! Guy Build thread here:2 points -
This thing is not dead in the water yet! I have done no building in the last two weeks but I did do a bit of work in cad. The external winch was tweaked and made back into a single part to eliminate uneven shrinkage. This was reprinted yesterday and it looks perfect to my eyes with the right amount of clearance between the blades and nose underside. Onward, hopefully sooner than later!2 points
-
yup couldn't agree more i am so bored of all this now we have reached - probably long since passed - 'peak pigment' in modelling! same with paints too...everyone trying to re-invent the wheel afaic the only people to actually release a game changing paint are MRP all the rest is just noise2 points
-
Thanks for the reviews. Some corrections/clarifications though to hopefully prevent misleading anyone considering purchasing the VF-154 sheet: The write-up for the 32-030 VF-154 sheet and overall conclusion have several mentions of the data sheet and its qualities and specifically says it's included in the VF-154 release. The VF-154 release does not include the airframe data sheet 32-031. None of the four options on the sheet had the full data, they all had bare minimal stenciling, so the full data sheet is not included as it's not applicable, nor would the Zotz or Cam data/stencils either for that matter. Yes the three USMC releases do include the data sheet, as all those schemes chosen for inclusion, except WT-12, had that specific type of airframe data. Those by that point were overhauled and had been repainted other than WT-12 that was still "new" and still had the original MD factory style of data (as covered by the earlier Zotz sheet). The airframe data sheet 32-030, as well as all the USMC decals, were all printed by Microscale. Only the two VF-154 sheets were printed by Cartograf. There's some camera perspective/distortion going on in the photos of the national insignias, just to be clear they are in fact round, not elongated like some appear! (P/C Coggburn's last name though in the close-up on the -323 sheet does actually slope upward, as it should.)2 points
-
I was trying to say that I was speaking from first-hand experience and I was not just regurgitating stuff googled five minutes ago. Radu2 points
-

Spitfire on ground: ailerons always in neutral?
D.B. Andrus and one other reacted to DonH for a topic
"Last time I sat in a spitfire..." That has to be my favourite phrase of all time on this forum With Spitfires, you need to take into account that, generally, we are talking RAF. In this case, everything will be lined up, polished and correct.2 points -

Spitfire on ground: ailerons always in neutral?
D.B. Andrus and one other reacted to Radub for a topic
Before we get lost on side tracks, let me reiterate that it is possible for the control surfaces to be in other positions than "neutral". There is always a "scenario" where that is possible. Yes, the controls can be locked, yes one can wrap the seatbelts around the control stick, whatever, but movable surfaces can be moved. Trying to find a "rule" about the position of various controls by looking at photos is like trying to create a "rule" by looking at photos of houses and concluding that doors never open because they are always shut in photos. Things move. As for how easy it is to move control surfaces on a Spitfire I can tell you that I was fortunate enough to spend some time in or around Spitfires and the control surfaces can be moved very smoothly and easily by hand. Some of the Spitfires I saw were flyable and had gust locks and a variety of FOD covers for the exhausted and intakes. I can tell you that the Mustang and the Bf 109 have in-built control locks that secure the control column and rudder pedals in the neutral position with a simple "flick" - I handled these locks while seated in these cockpits and I can tell you where they are. The Spitfire does not have such an in-built device. A special bar-shaped device needs to be jammed between the seat backrest and control column in order to lock the Spitfire controls. Radu2 points -
LEM Mig -9 FINISHED
Martinnfb and one other reacted to blackbetty for a topic
this is gunze metallizer silver2 points -
I ripped the box of after my post and it'll be thinned down 1-2mm. The overly thick cockpit walls will for sure lead to more problems with the auxillary Units for the camera. Especially the Motor which is located on the floor between the camera and the sidewall.2 points
-
Probably camera to scale, problem is over thick cockpit walls do to molding constraints. Maybe make the box thinner?2 points
-
This should be the seat.2 points
-

Saab Gripen E (NG) fully scratchbuild 1/25
Marcel111 and one other reacted to HerculesPA_2 for a topic
Lets try again.... kkkk2 points -
Nice work but hey... where did the rivets go??2 points
-
2 points
-

Heavy Mod - 1/18 21st Century Toys P-47D Razorback
A-10LOADER and one other reacted to JayW for a topic
I have an "interim" report on the bomb pylons, or "wing tank adapters". Here is a repeat photo of this item: That way you can look at some of the details I am attempting to replicate and compare. This is difficult work to get right. My first effort was (is) to create the forward portion of the pylon box. It involves two side skins, a forward frame, a mid frame, and a bottom "floor" of sorts. The framework provides the shape the side skins must take, and also provides the mounting surface for the bomb shackle, and later the sway braces. It also provides the attachment surfaces for the aft end of the pylon which I have not started yet. Here is the basic forward box (both of them): The shackles are very similar to the centerline one I showed a couple of posts ago. You also see the side skins - notice the aft ends where contour transition begins. A very pesky thin bent-up "bulkhead" holds the local contour and forces it to taper to a sharp edge. This will be much more evident when I produce the aft portion of the pylon. A couple more shots: I have included the Dzus fasteners similar to what was done on the wing and fuselage, only smaller diameter. Note also the elliptical nose formers I have included in which to attach the nose skin shown here: Man - that little curved skin part is pressure packed. It is the most visible part of the pylon and it has to be good. This includes properly matching up to the wing contour. I fail on this part, and I have to start over. The part you see has excess on all four sides and is trimmed to shape after being glued to the nose formers. Like this: Here is a test fit: So far , so good. It was just a matter of filing and sanding a little at a time til it fit up OK. There is much to go. Complicated little suckers these are!2 points -

P-51D-5-NA Maj. George E.Preddy Jr. 1/32 Tamiya
Paramedic and one other reacted to Miloslav1956 for a topic
Hi all, here is my another Mustang. EagleCals decals set for Preddy HGW wet transfers & seat belts Barracuda cockpit, battery, wheels, pilot seat, cockpit decals. Colours MRP, Gunze, Alclad II, Eduard PE set - exterior, Look instrument panel.2 points -

Revell 1/32 Ju88
Rick Griewski reacted to Vynce804 for a topic
Hi it’s the Eduard bf109 engine.1 point -
Make the others jealous
Out2gtcha reacted to thierry laurent for a topic
Thanks Rick. The nightfighter rear canopy had a bulge in front of its rear edge (to make room for the head of the radar operator). My question was related to the presence or absence of that bulge.1 point -
I just got my F-16 transfers yesterday, looks like im ordering some more now! Thank you for these sets! They are more work than decals, but give far superior results.1 point
-
A little more work. Fit of the center wing to fuselage is nice, just a little clean up needed. Outer wings are drying, so far so good.1 point
-
WNW is nowhere near the end of its run...!
thierry laurent reacted to Radub for a topic
Yeah, whatever it is that you are waiting for, someone is guaranteed to say "we don't need another that, we need more of the other". Why those Gothas? The agony never ends. :-) Radu1 point -
This time the A-4M Sky Hawk model. Model from Trumpeter scale 1:32, made as always straight from the box. The model is easy to fold and fits on every shelf.1 point
-

A Tale of two Cobras: FINISHED
Model_Monkey reacted to Dukie99 for a topic
I finally painted the MFDs with transparent blue, I think it looks OK. I have now masked and glued the canopy of the Viper. The fit of the fixed parts is absolutely stupendous. The central portion was glued with 2 minutes epoxy for stength and the side walls with bondic. I glued the doors which you can pose open in the closed position and the fit is great with minimal sanding. I also glued the vac form canopy on the Whiskey with epoxy and bondic. The fit is a lot more approximative than for the Viper but that was to be expected. The clarity of the vac is great and I am pretty happy with the result. Now I need to mask it. Cheers, David1 point -

Jedha city
BloorwestSiR reacted to spacewolf for a topic
Nods !! Having the back story bring in Tarkin and Leia... the way we see Vader in his prime... the perfect lead in to 'A New Hope'... plus the darker grittier story that shows the desperation of the rebels and the brutality of the Empire... It's the only Disney era SW film I like.1 point -

Iranian F-4D 3-6712, 71st TFS, '' DONE''.......
Daniel Leduc reacted to Fvdm for a topic
Great job!1 point -
Always very interesting topics about tamiya. As their new models are always something very special for all kind of modelers. I hope for 109 family. F6f P38. P47 Who knows1 point
-

WNW is nowhere near the end of its run...!
whiskytngofxtrt reacted to Sabre F-86 for a topic
I wouldn't be surprised to find them moving on past WWI into the 20s and 30s. Can you imagine the quality of a WNW Boeing P-26? There's a pretty good list of USN aircraft from that period which might draw significant interest.1 point

.thumb.jpg.cd22b958c9e88a898a21e18b862c523e.jpg)