Leaderboard


Popular Content
Showing content with the highest reputation on 03/17/2019 in all areas
-

1/48th Boeing B-52H Stratofortress
daveculp and 8 others reacted to tomprobert for a topic
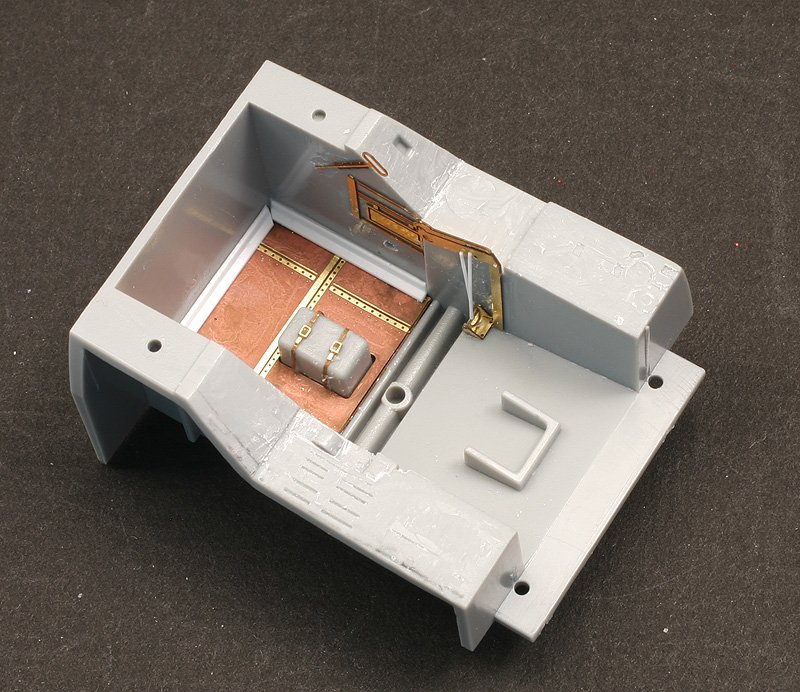
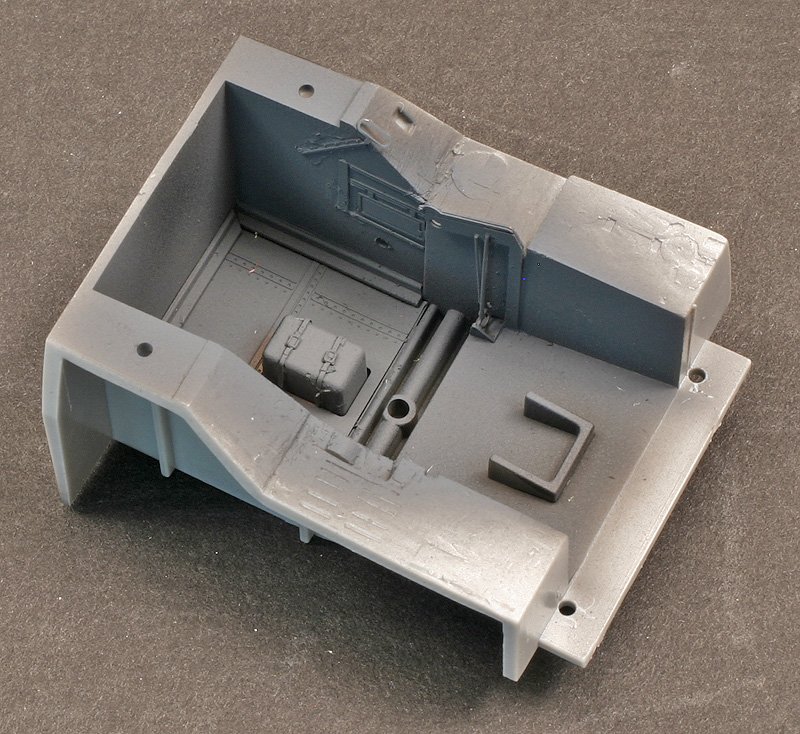
It's been a while since I've done any work on the big BUFF but thought it deserved a stint back on the bench... Since the last update and completion of the internal bulkheads, the next logical step has been to have a play with the landing gear bays. It took a lot of head-scratching to get the legs themselves correctly positioned and therefore the internal bay roof structure, and as is often the case with these types of builds, you sometimes have to sacrifice accuracy for structural integrity. Therefore the bays I've made are an approximation of the real thing but close enough for a cursory glance when it's placed on the model show table - especially when the big doors and legs are in place to hide the majority of my work! I had a good delve into the bays of the B-52 at Duxford for some much-needed reference as well as a few books, and armed with plenty of plastic card and Evergreen strip, I set about building up the basic interior structure. The front bay: IMG_0865 by Thomas Probert, on Flickr IMG_0862 by Thomas Probert, on Flickr IMG_0855 by Thomas Probert, on Flickr And the rear bay: IMG_0863 by Thomas Probert, on Flickr IMG_0859 by Thomas Probert, on Flickr IMG_0856 by Thomas Probert, on Flickr And both bays together: IMG_0861 by Thomas Probert, on Flickr Still lots of further detailing to be done, but the basic structure is now there... Until next time, Tom9 points -
The exhausts are a hybrid of the HAD etched parts and the kit's outer shells. The chaff/flare dispensers got some attention, particularly the fairings. Cockpits are the focal point of many models, and this one is no exception! The MiG-29 is an iconic fighter, with many unique design features. I have really enjoyed building this!7 points
-
well hello folks can't believe a month has passed since I last posted an update... I have not been idle though - I have done a lot of 3D modelling for the tailwheel, main wheels (for which I am getting help!) and the spinner (of which more later..), in between I have also released an airscale instrument panel set for the Hobbyboss 1/32 B24 Liberator and also worked with Airfix to master this airscale cockpit set for the new and mind blowing Airfix 1/24 F6F Hellcat - the decals for all the instruments & placards are in production, but the PE is done.. ..as for the P51, when I had the Hellcat PE test shot done, I also added a load of extra P51 stuff to the fret so I make the most of one-shot production, Part of that was the stainless steel side panels that surround the exhaust ports, and I also made a fold up box structure that is the structure that surrrounds and supports the exhausts themselves.. ..Also seen here are the 3D printed exhausts from Model Monkey - huge shout out for these as they are exceptional quality and amazingly are hollow so are ultra realistic.. ..these were folded and the details added before the boxes were added to the outer panels - the exhausts are not yet fitted so they can be painted & added at the end.. ..and so onto the spinner - this is one of those things that has sat in the back of my mind as a niggle since I started this build - it is unfortunately unpainted on the real aircraft so had to be made in metal - a bit like skinning a tennis ball in sheet aluminium - very tricky.. ..I actually bought the HpH 1/18 Merlin engine model hoping to cheat and get a good basis for the prop & spinner from that, but it is very crude - the spinner is a solid with four peg holes in it to take the blades - there is no reference to the cutouts on the real thing, so that was a 70 euro write off (though I think I can use the blades so may not be dead money...) I restarted my Rhino 3D programme trial and got to work modelling the Spinner... ..when I went to get it printed at Shapeways, I noticed you could choose polished Aluminium so I thought well that would be brilliant as it would save lots of messing around with skinning as I could just polish the part - so at great expense (150 euros) I ordered it with the hub done in plastic.. ..two disappointments... one - it's not polished at all, it is more like a carbide burr in texture, and two, somehow I got the hole cutouts wrong as two were in the right pitch for the blades and two were in the opposite pitch.. ..that said - it is aluminium, and after filing & polishing is just like a cast part - don't know how they do it, but it's bloody clever.. ..as the cutouts were wrong, I knew I had to skin it, so I made a tape mask and started with the lower section... ..with this skin added, I taped it to the top part to mark another tape template with where the cut-out holes were on the next bit of skinning (there are 3 - bottom, lower of the top cone, and the tip) ..this skin needed rows of 3 rivets adding so I made up a jig I could do this accurately with.. ..I was hoping after adding this I could get away with the spinner tip being the base aluminium part, but there is a lip that can just be seen.. ..in doing the tip, I nearly gave up as turning one sheet into a fully compound curve sheath without a visible seam proved very difficult - I don't have any in progress pics, but at this point the bulk of the shaping has been done and the skin runs up over the lower part - I was hoping I could just sand & file this away for a nice close fit (I should have started with the tip & made the lower panel fit it, not the other way around..) ..once it was all sanded away, I was really happy with the result.. ..the prop hub was painted and added to the base.. ..and it is a perfect fit.. ..it feels great having got that done - everything else is easy by comparison I also have the right sheet aluminium that Brian (Out2gtcha) kindly shipped from the US on my behalf so can now start skinning the airframe.. ..a milestone I think, and hopefully the start of more regular updates.. TTFN Peter6 points
-
Kagemusha and Alain, Thank you for your kind words. I am almost finished with the pit and I am pretty happy with the result even though the macro is unforgiving. it looks better IRL I need to finish the bangseat and add bits and bobs and I can then close up the fuselage. Cheers, David6 points
-
Trumpeter's MiG-29A is a great model to build, and I'm sure the C will be too. Unfortunately it suffers from some shape issues, and in this build I set out to correct them. It took a while. Here is the build thread should you be interested: This is MiG-29G 29+04 in NATO colours, serving with "Erprobungsgeschwader MiG 29". I was drawn to the subject by the wonderful conflict of ideals it represents. The aircraft is a symbol of how the re-unification must have been in a way, wearing a cloak of Norm 90 J grey, but peeking out from underneath, the original radome colours, the green wheel hubs, and the uniquely Soviet shapes of the antennae. Some things can't be changed overnight. Most of the work went into correcting the shape of the forward LERX, and the bulges above the engines as well as the spine. The nose cone was slightly modified, as were the top and sides of the intakes. A lot of effort went into capturing the feel of panels and fasteners, which appear to make up a lot of this fighter. Some of the kit detail is superb as is. Although the underside is well represented in the kit, the wheel wells, gear legs and weapons pylons benefitted from a bit of extra detail, as did the airbrake/dragchute housing.5 points
-

75 Sqn RNZAF Mosquito Detailed Build
Greg W and 4 others reacted to Anthony in NZ for a topic
Setting up the correct location (this isnt the correct location, just placed in the gap for test fitting etc)for the oil tank and made new lower tank mounts and added some Eduard etch. Progress is painfully slow I know....5 points -

Scratchbuilt Grumman Tiger, 1/20
Starfighter and 4 others reacted to John Everett for a topic
With the Cessna finally finished I've been able to turn more attention back to the long languishing Grumman Tiger (1/20). I've been making good use of the Silhouette Cameo cutter for wings and control surfaces. .015" styrene in the Cameo Repeating shapes are laminated into a solid whole.5 points -
Bit more progress on the Car Door Typhoon. The basic weathering is done...I still need to finish the exhausts and decide if i want to tackle any fuselage exhaust staining, though i can't find any reference picture which showed this was pronounced like other types of the period? Cheers Matt5 points
-

MiG-29A in Luftwaffe Service
blackbetty and 4 others reacted to Madmax for a topic
Thanks dashotgun. Amazing what a powerful self-critique tool posting photographs on a forum can be. Looking at the last photo I posted, I realised that the panel lines were totally uniform and overstated. Some panels get removed often as I mentioned, but others don't, and shouldn't have the same treatment. I decided to use a grey wash some on of the panels to soften the overall look, and here you can compare the top of the photo to the bottom (left side) to see what I mean. Accentuated panel lines are a contentious issue as it is, and I think some variation helps. Apart from that , and some work on the radome to get rid of the black primer that came trough on my slightly heavy handed chipping scrub, the model is finally done. Here is a little foretaste of how she looks... Many thanks to all who have shared this little journey - it has been good fun! Detail photographs to follow on RFI tomorrow... Sean5 points -

Tamiya 1/32 F-16CJ
Mel and 3 others reacted to miketippingmodels for a topic
Hi Guys let me introduce you to the Tamiya F-16 CJ, the kit was dream to build no issues what so ever, this was also my first Time using MRP paints, and I have to say they are a dream to use, just brilliant. the kit has the Aires cockpit and undercarriage, and I used a reed oak fire along with a PG productions figure, the decals are from fox 1 vipers on guard. enjoy Mike4 points -

BF 109 G6 in italian service
tucohoward and 3 others reacted to red baron for a topic
my last built, enjoy :4 points -

A-7 Corsair II Trumpeter 1:32
Squizzy 78 and 3 others reacted to Koralik for a topic
The model which I received to finish. The model that was started and lay in the box for several years. The model is A-7E Trumpeter which was to be made in painting from version D - it was the decision of the person for whom I finished this model. So we have an E version that pretends version D. In my opinion, the Trumpeter model itself is not very demanding and it will be easy to fold. However, you need to pay attention to the dividing lines that are too shallow and need improvement.4 points -
Mine landed a week or two back, been too busy to do a review for it. Here are two quick pix. Resin is solid and rather heavy, all pour stubs have been removed. Surface detail is... well, see the photo. Blob will need to be removed from nose gear well too. Canopy is extremely thick but strangely distortion free considering. Decals are laser printed, not great resolution but they’ll be passable if not looking closely at stencils which have no discernible text. Shapes look good, I think many folks will want to fill and redo all the panels. Maybe not everyone’s cup of tea for a kit that will need work to bring it up to their standard but hey - it’s probably the only chance we’ll ever get a Tucano in 32nd4 points
-

1/32 Intruder A
Alain Gadbois and 3 others reacted to Mr b for a topic
Pics my work room is like a oven, today ....so it’s too hot to do long sessions....managed a bit....so...here it is all ready for weathering..... decals worked very well...... also put together the gear....looks pretty....might dress them up with some wires.... around a month before the group build event, and around a month and a half before I move overseas....for a few years.... gives me me a few weeks to finish it off and pack n store all my modelling stuff......and I think it goes without saying I got lot of junk.... rgds4 points -
 A few more days of work is needed, a week at most, pending any "life happens" events. Not sure of the price point yet. Once we have a successful final design print in hand, I'll be able to calculate a price. Please be advised that due to the research and design effort required, its size, and the time necessary to print it, it is likely to be expensive. I'll do my best to keep the price reasonable and attractive. Thanks, everyone, for your patience and encouragement!4 points
 -
Hello, friends! My hat is in the ring. The kit of the choice is Special Hobby's T-2C Buckeye, camouflaged version. I've earmarked this some time ago for the Venezuelanian livery. Not so much because there is a crisis in Venezuela, but because I like multicolor camouflage. There is not a lot of AM parts around. You see the full selection on top of the box - canopy masks. That's it. The kit itself holds all the resin and PE needed for a decent build. On the other hand the kit has a few problems of it's own. Overall fit is good, shape is OK, but the floor of the rear cockpit is located too deep inside the fuselage. The rear IP has an antiglare cover like the front IP, but Special Hobby missed that; and there are lacking some other more or less visible cockpit details. The Buckeye also featured a good number of raised rivets in different locations, which the kit is lacking too. We are talking about boiler sized riveds here! Maybe North American accidentally invented there the vortex generators? Who nows... Before cutting styrene I have to to check the references. There are two or three detailed online builds at hand, that tell you how to fix the kits problems, and some walkarounds. I will read them carefully. Also want to try to get a copy of WWPs In detail book about the Buckeye at the Euro Model Expo two weeks ahead. It is sold out, but maybe I am lucky to get a second hand one. Thats the plan for now. Stay tuned. Regards - dutik3 points
-
Scratchbuilt Grumman Tiger, 1/20
mgbooyv8 and 2 others reacted to John Everett for a topic
Greetings LSP, About a week ago I posted a completed Cessna in 1/20 over on the Ready For Inspection forum. I enjoyed building that model so well that I decided to have a go in the same scale with the Grumman Tiger, AA-5B. This is actually a really great topic for scratchbuilding due to it's boxy design which minimizes compound curves and the fact that the airplane was glued together and doesn't require any rivet surface detail. I began work on this back about four months ago and have now decided to pick up the model again. The first few tests in vacuuforming. I knew these would be rejects. But it let me know what I needed to change on the form (buck). And where it stands as of this evening:3 points -
Neo, Shelby, thanks for leaving a note. I finished the pit (minus the bangseat), I needed to add the throttle and the rudder pedals. I am happy with the result. The Aires cockpit set is really a great addition to this kit: awesome detail, easy to assemble, almost no pour plug to remove, and a good fit, definitely one of their better offerings. Before closing the fuselage, I wanted to ensure that I will not get a tailsitter so I poured a mix of steel grain and PVA for a bit more nose weight. i did a rough balance test she should be firmly planted on her feet. and here is the fuselage closed. The cockpit is epoxied on the left side. I plan to glue the engine nacelles before closing the fuselage to ensure a good fit between the nacelle and the fuselage but before doing that I need to clean up the nacelle seams. So far the fit of the fuselage is close to perfect. Cheers, David3 points
-

1/32 Me 262 A-1a/U4 Kanonenvogel Conversion
daHeld and 2 others reacted to alaninaustria for a topic
Short update of sorts - not really sure how I managed to squeeze two Me-262 builds into one thread - but, the good news is that the Me-262 nightfighter is now almost done. Just the aerial wire and the canopy sway cables to go... I will now be able to concentrate on the U4 conversion. Cheers Alan3 points -
Hello everyone ... update the subject, I started painting the 109 ... I spent a black primer, I then made a speckled white and then, to change the colors yellow, white, red and rlm 02 That's what happens... I will let it dry for two to three days, then masking parts to protect and finally, I will begin the final painting ... see you soon for more yves3 points
-
Next up, the IP! I was going to use the Yahu panel, until I realized it is for the 335A model and is slightly different. Luckily, the Eduard one is pretty darn nice itself. Here is the two panels: The Eduard one is on the right. It is a little more pixelated, but isn't that bad at all when viewed without magnification. This will be my last update for a while as I am headed to AZ for some business, but I will be back!
 3 points
 -
Here is the rear wall: I added a pair of Airscale warning placards as I figured they would have some info for the field service personnel about the bang seat... And here is said seat: I adjusted one armrest, added some padding, and instead of the Eduard parts, added some lead foil on top of the box behind the headrest. Apparently, that held a drogue chute and the flaps were canvas or thin leather flaps. I also added foil over the armored headrest as it was covered in leather. It probably should be grey, as well as the seat pad but I wanted a little more color. Of course, the HGW belts covered up 90% of my work on the pad.

 3 points
 -

Tamiya F-16C conversion to F-16A
florin13 and 2 others reacted to Durangokid for a topic
Here is some detail I added to the gear bays. I finished these a few years ago and I don't really detail the bays that much anymore, either that or I just buy aftermarket. For me, it's just not worth all the extra effort when they are rarely seen. I will be adding more details once I'm done with most of the painting. Here is the finished tail along with a few little details I used Mr. Metal Color Iron to paint the fan. I really like the way this line of paints looks for certain parts.3 points -

Hobby boss F-14D VF-101
John1 and one other reacted to Hawkwrench for a topic
A friend at work used to work on Tomcats with VF-101 and approached me to build him a model to display on his desk at work. Not being a jet guy, but helicopters, I reluctantly agreed. He pretty much said that it doesn't have to be contest quality (though I'll still try). This is my progress so far. That's all for now. Comments and critiques welcome!2 points -

F4U-1 Birdcage, Lt.J.A. Adam Halford 1/32 Tamiya
Eenyweeny and one other reacted to Miloslav1956 for a topic
9th Hog finished. HGW wet transfers & seat belts Barracuda wheels Maketar mask All colours Mr.Paint/MRP2 points -

First test shot's of DACO's new Fouga Magister.
David66 and one other reacted to One-Oh-Four for a topic
Cheers, Erik.2 points -

"The Star of Africa" - Hans-Joachim Marseille's Do-335 A-2/Trop - Yellow 14 - FINISHED!
Paul in Napier and one other reacted to Out2gtcha for a topic
Thanks boys! To tell you the truth, my original plan was to put larger more symmetrical splotches on the fuse, and have smaller and larger more random splotches with more random shapes on the wings.......but I initially forgot about the elevators in that plan, so they ended up with the same effect as the fuselage had. Iv actually remedied that, as I think you are right, they should be alike....... I thought I'd like the larger more symmetrical splotching, but in the end I liked the more varied sized camo on the wings and elevators with the larger camo on the fuselage and vertical stab, so I fixed the elevators to match the wings. At the same time, I utilized the Maketar Do-335 mask set along with my own designs to get the white down. This includes Marseille's "200" and the crossed swords in his oak leaf & crossed swords victory crest: I'm off to let the white harden off and eat some corned beef and cabbage w/potatoes. Cheers, and happy St. Patrick's day!2 points -
What is in the box? Two fuselage halves, 6 sprues with different parts, two resin seats, some more resin details, two clear sprues (very clear) with the canopy parts and position lights, decals and an instruction booklet. There are rivats at the surfaces, but we will loose some of them during sanding along the seams. They are also a bit tiny in places were the real airframe features very large ans prominent rivets. There are some printed AM rivets available, Archer dry transfers, HGW and Mikro Mark. HGWs are too small. Archers decal film is stiff and does not adhere well. I guess I will give Mikro Mark a try. Regards - dutik2 points
-
PCM 1/32 Tempest Build
Seversky and one other reacted to alaninaustria for a topic
Well, made some headway today - gear and gear doors attached, plus droptanks. The wheels are all mounted as well. Getting there - slowly but surely! Had some fogging of sorts on the inside of the main windscreen - not really sure how that all happened, but it did. I’ll be leaving it as is. Cheers Alan2 points -

SWMBO demands hexagons. WNW AEG G.IV Early because the wife says so
Anthony in NZ and one other reacted to seiran01 for a topic
Ooooh, colours! With decals this large, a hair dryer is pretty much a necessity to get everything to settle down in place. The decal on the top wing was cut in half to ease application. Special thanks to TimW for donating his hex decals to replace the misprinted sheet in my kit.2 points -

Revell 1/32 F4U Corsair - DONE!
Out2gtcha and one other reacted to themongoose for a topic
Getting the office organized. No PE was lost in the making of this cockpit. I know you are all concerned LOL I made the frame to hang the seat on from some 0.8mm rod. The Revell seat and headrest were molded on so they got cut off with the trusty razor knife. Got everything primed by lunch. Off to do some work at the parents now. I leave you with this thought...Is Pappy a Russian Nesting Doll?2 points -
Want--------------------------Tamiya release-----------------------verdict Griffon Spitfire............Bf 109 G-6...............................pass Mosquito NF.XIX.........Mosquito B.IV..........................yes, if PR parts Beaufighter VI.f...........nada........................................oh well F-14A new tool............not before death.....................scheiße! Tony2 points
-
As said, the torpedo had to be replaced. First I had to make new proppellorblades. I found a nice picture on the web, and made a dxf file of it. I loaded this in the software of the millingmachine and then i had this little propellorblad. They where very small so i made quite a few off them. I made some smaller and shorter grooves in the torpedo and assembled everything. Eventually I got this. Much better then the first one if I may say so. Then I assembled the landinggear to the plane and the motor. Here are some pics. Now i can give it a wash and a final coat of matt. This week I got a reply from Trumpeter on my mail for a replacementsprue. They have the replacementsprue I need and with shipping it will cost me 10 USD. I think this is quite a lot of money but better expensive then not available. I decided to order the sprue and now I will see how long I have to wait. I will use the brackets for the torpedo so i hope the delivery is fast Thanks for watching Ferry2 points
-
Saw a Magister for the first time a couple of years ago at the Leeuwarden airshow, what an agile and yet impressive little airplane she is ! I did enjoy a fantastic display (including low level). Lothar (Posted this to figure out how to post pictures2 points
-
Frickking awesome paint, Joe!!2 points
-

First test shot's of DACO's new Fouga Magister.
David66 and one other reacted to thierry laurent for a topic
BTW I took pictures of all the sprues is somebody is interested.2 points -

HMH Publications Aircraft in detail #005: Panavia Tornado
scvrobeson and one other reacted to LSP_Kevin for a topic
Howdy folks, Kevin Williams takes a look at a new book covering the Tornado: HMH Publications Aircraft in detail #005: Panavia Tornado Thanks, Kevin! And thanks to HMH Publications for the review sample. Kev2 points -

AMT 1991 Silverado 454 SS-Completed-03/21
mustang1989 and one other reacted to LSP_K2 for a topic
I hear ya' there. I've only tried black twice so far. The first time looked fabulous, the second time, not so much, but I'll keep playing with it until it looks the way I want it to.2 points -
IMHO, If you look at prices for full resin cockpits, by reputable companies, they are not cheap items. Personally, if it's well done I don't mind paying for quality.2 points
-

AMT 1991 Silverado 454 SS-Completed-03/21
Gazzas and one other reacted to mustang1989 for a topic
Well guys...………...I had more done on this thing than I thought. the only real setback was that the exhaust tailpipes hung down too low. I had to break out the mini torch and carefully shield all the surrounding chassis and apply a little heat to it to tuck it back up where it belonged. The ending steps are a bit finicky with the front bumper being sandwiched between the body and the chassis but I've now got that done. I still need to re-paint the tail gate and install the upper radiator hose, side rear view mirrors and do some last minute clean up, polishing and a couple of other things but this one's almost there....2 points -
Hiya Folks, I`ve been building this one on and off for a year or so now but I`m finally calling it finished I`ve always had a soft spot for the South African`s in the East African campaign, especially as I served in the area myself in the 80`s,...... and the FLY kit is very good, if a little fiddly in parts,....... but I can definitely recommend it. As usual the model was brush painted. I modified an Xtradecal MSG code letter as the kit ones were not accurate and neither were the unit insignia on the nose, only one of which is supplied....... which were replaced by a pair of decals included with a marking masking set. Here is the subject aircraft, flown by South African ace Major Jack Frost DFC & bar; Here is Frost climbing into a Hurricane, note the 3 Sqn SAAF wasp insignia on the nose with the motto which reads ""Semper Pugnans" or "Always Fighting",; And to provide some mood for the campaign location,......3 Sqn SAAF Hurricane Mk.I`s hiding under what we referred to as `sweetheart bushes' when I served there,......the thorns are huge and very, very painful,......hence the name!!; And here is the model; Cheers, Tony2 points
-
PCM 1/32 Tempest Build
Kagemusha and one other reacted to alaninaustria for a topic
Well, it doesn’t look like much - but she has a canopy! Cheers Alan2 points -
Thanks Brian, Ray and er.. the mongoose I’m on a roll at the moment and can’t leave the kit alone. It’s just too much fun! Airfix does give the option of showing off the gun bays and I’m doing just that on one side. I’ve added a little detail and I’ve used a Master Barrel MG as a 21st century twist. It really is a huge leap over the kit part. Cheers, Guy2 points
-
Thanks Brian I realize it's not the most popular subject or medium. (resin) It sure bears a familial resemblance to the ATR 42's I see every day at work. That makes it interesting to me...I've ordered the ATR kits too. nose and flight deck cleaning up. although a (possibly newer?) cleaner and sharper casting than the Casa 235 I built previously it too shares the sloped roof above the wing which should be flat, I'm contemplating methods of getting the roof flattened out... this kit also has (the 235 didn't) some cargo deck details. Thanks for looking in.2 points
-
75 Sqn RNZAF Mosquito Detailed Build
Greg W and one other reacted to Anthony in NZ for a topic
Starting to look a little more cohesive under a layer of primer. Now for the rivets and detailing the oil tanks Thanks for looking in Anthony2 points -
Finally! Another step done! You probably thought I shelved it... Anyway, next up for me was the cockpit. Here is the pit: First, here is the kit part, cleaned of details in prep for the Eduard parts, with the Eduard PE floor in place. I added some plastic angle around the forward perimeter as it didn't want to stay flat: And here it is painted RLM66: PE rudder pedals added. The pedal supports were a beeyatch, I added a plastic rod inside the brackets and drilled a hole into the sidewalls for the rod to pass through. It made gluing them easier and much stronger support. I also added a small, but larger PE piece where the pedals attach to the support as I didn't thin 1 x .5 mm was enough!: Finally, with the Eduard panels and joystick added: An oxygen hose was added. I spent about an hour searching for some ribbed hose, found it, then when I looked at the ref's again, finally noted the ribbed hose in the pictures was added by the USAF when testing the Do 335. D'oh! The Germans just had smooth hose. So I used some car detail coolant hosing, with fine beads as fittings. From other direction:

 2 points
 -
MiG-29A in Luftwaffe Service
scvrobeson and one other reacted to Madmax for a topic
Thanks Marcel, Brian and Alain! Alain, I really enjoyed the Scotch Brite technique you suggested. The point of all these techniques including salt, and Marmite, and whatever tickles ones fancy - is to achieve a certain randomness that nature provides, but the brain-guided hand can't. Modellers like Fancherello use the sponged on masking fluid followed by the Scotch Brite to really heighten the effect. I thought I would just highlight two further weathering aspects I have incorporated on the Fulcrum. The first is fluid leaks on the underside. I used to use thinned oil paint for this, but found that it dried matt and didn't give the impression of oil or other lubricants. This time round I used Tamiya clear enamels with a drop of black as required, and I am quite pleased with the gloss translucency it achieves. Then the issue of scratches. The MiG-29 is full of panels that appear to be regularly removed to access the systems underneath. The fasteners are loosened or secured with a large screwdriver, and many scratches adorn the panels (much to the crew chief's disgust). This is a real challenge, and I eventually decided to only add the odd scratch here and there so that it didn't look too contrived. They have to be even thinner than I managed in order to be really convincing. The next post may well be in "Ready for Inspection"... Cheers, Sean2 points -
Thank you1 point
-
Gehard, I moved the topic and will re-title it to show it is a Mosquito build.1 point
-
75 Sqn RNZAF Mosquito Detailed Build
CJP reacted to Anthony in NZ for a topic
Thanks Chris! I primed it with Mr Surfacer last night ready for Archer rivets..... Feels like it is coming together ready to work on the upper wells in the wings where all the plumbing is. But I have to get back to the stbd nacelle so I don't get tooo far behind and forget how I did stuff as I am making it up as I go LOL1 point