Leaderboard

Popular Content
Showing content with the highest reputation on 03/01/2019 in Posts
-
thanks for looking jan9 points
-
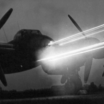
Hi guys, let me present my recently finished Toryu. I didn't go any extra mile with it and having build it mostly OOB. Except some parts from sprue N (missing in my package) which I have scratchbuild and insignia painting masks. Overall it's superb kit and pure joy and fun to build it! When I compare it to Do-335 and Ho-229 kits, I think it's better and more friendly to build, just because they have included grey plastic together with the clear one. The undercarriage doen't need any replacmenet because the way how the main legs are moulded together with spars provides enough strength. Fit was generally great, there were some minor issues with fit of wind shield, front part of fuselage and engine covers, but this could be caused by myself What I didn't like was that there are no masks for inner side of canopy and that top center fuselage piece has small windows molded separately which makes no sense to me. Im already looking forward to next releases of Toryu, I will build another one in future for sure And hopefully we will get some AM for it soon. Resin wheels, instrument panel and fabric seatbelts should be enough IMHO Works in progress thread here Thanks for looking jan7 points
-

"Willie the Whale", FINISHED
Jan_G and 6 others reacted to blackbetty for a topic
up on its legs, some parts of the MLG still missing. i decided to not use the tanks, they are not pointy enough and i made the fins too small . on top of that, the drawings i used seem to render them not long enough. besides there are a lot of wartime pics with planes without tanks.... 98 by karl holubar, auf Flickr 99 by karl holubar, auf Flickr looks like i´m on the home stretch7 points -
And some overall photos with parts dry fitted...I can say that the cockpit is done!!! Hope you like it.... John6 points
-

HKM Lancaster
cib2265 and 5 others reacted to JamesHatch for a topic
Undercarriage more than holding up my Lanc.6 points -

Cessna 172, Nichimo, 1/20
williamj and 5 others reacted to John Everett for a topic
Painted the Skyhawk logo using a mask from the Silhouette Cameo cutter as well as added the MRP light blue to the trim stripes. Cowling removable via magnets.6 points -

Dragon BF 110 C-7
Rick Griewski and 5 others reacted to BloorwestSiR for a topic
Well, she's a bit big for my photo booth so I've done the best I can with the RFI pics. Carl6 points -

AV-8B Harrier II Trumpeter 1:32
Loach Driver and 4 others reacted to Koralik for a topic
AV-8B Harrier II Model quite easy to build, made as always straight from the box.5 points -
Decalling is done and they are setteling right now so pics probably sunday. I also had to make the torpedo. I've nothing heard of the LHS or Trumpeter so I went on making my one. I started with a piece of PVC roughly cut to lenght. Then I took this to the lathe , rounded the front and tapered the end. After that was done I had to make the fins. Looking at the instructions and various pics I made the following. This must be refined but at least it's a start. See you next time. Ferry5 points
-

Gulf War Tornado
Alain Gadbois and 4 others reacted to Cheetah11 for a topic
A bit more progress. The wheels and undercarriage on. I was fortunate the shortening of the nose gear turned out perfect. The model sits correctly with a small amount of nose down attitude. Now all the detail bits need to be added. Fortunately the look of the model is great. Not always possible wit a lot of cutting and splicing. thanks for looking Nick5 points -
Toryu is finished! thank's a lot for following this build thread and thanks for all your comments. I really appreciate it! final pics in RFI HERE some last WIP photos props done engine covers are a little tricky to align antenna MRP exhaust soot added thanks for looking jan5 points
-
On another forum someone thought the tapered end was rough. I can tell you that it isn't. I took a sandingstick, a 100mm macro on the camera en made the following photo. Here you can see the sanding marks over the whole surface. I think some primer will do wonders. Thanks for watching. Ferry4 points
-
 Thank you all! Closer.... Let's call the Beau cockpit upgrade design 90% complete. Some of what you see here will change.4 points
 -
Started from the cockpit... The seat....4 points
-

CF-18 color bird
guitarlute101 and 3 others reacted to chrish for a topic
Thanks again for looking! and the kind comments! I've been working fairly consistently a couple of hours a night all week putting on decals and touching up paint goofs. I lowered my arm at one point and hit a steel ruler that was sticking out over the edge of the desk that I was using as a guide for my blade to cut out decals , the ruler snapped down on the one end, up on the other and snapped a tail fin right off the model, the fin broke off the tail, flew straight up and I caught it...I got lucky that time! I did break the rudder off but it was just the glue that let go. A couple of shots tonight of where it sits at the end of the day. Another goof, I painted the stripe wrong way round. It's back in primer now masking the arrestor hook for the black decalling in progress Thanks for looking4 points -
Apologies for the lack of updates on this one! The rear fuselage has now been closed up with the resin intakes firmly in place. As evidenced by the multiple clamps, this whole assembly has been fighting me every step of the way. This is the third Academy f-18 I've build, and I've never had issues with the top, bottom, and sides lining up like I have with this one. All three have used the same set of intakes so I have to imagine that anything with those is ruled out. Oh well, just a speed bump... onwards! I'm considering repainting blue areas with blue angel blue, the MRP oxford blue seems too dark when I look more closely at photos. Anyone have thoughts on the current blue being too dark or about right? The Avionix resin -A/B tails are gorgeous! Just a bit of prep work still needed before shooting a proper coat of primer on them. One tail has been sprayed with leftover airframe gray to see how the details would show up.4 points
-

Italeri F-35A RNethAF
The Madhatter and 3 others reacted to mgbooyv8 for a topic
Hi guys, A short update. The masking was removed: There was no overspray in cockpit and bays! I'm happy to report that the MRP Have Glass matt laquer gives a very subtle metal sheen to the model. The doors also unmasked fairly good: On a few doors, a bit of overspray was visible or some paint torn away. And.... the pieces of masking tape with part numbers scribbled on them left their trace on the white paint. The numbers are faintly readable. So permanent marker ink also bleeds through tape over time. A bit of patch up will be needed. But that will be done after all the hinges are installed. Attention now turned to the cockpit. I bought the Eduard interior set to enhance the cockpit a little bit. Although now it is much too late to use all the goodies of the set, the cockpit tub can still be enhanced with some etch and there is some nice metal for ejection seat and canopy available Here are all the etched metal parts added into the tub. it is a mix of Italeri and Eduard: The next step will be painting of the tub. Then, I can turn the model around to add doors, stores and undercarriage. To be continued... Cheers, Peter4 points -
I'm back at bench after one week and slowly finishing Toryu have used several AMMO washes to get best effect out of it. I have combined darker panel lines with light rivets added pigments - light dust and airfield dust stuff used for weathering canopy parts attached wheels weathered and attached and few more overall pics and dry fit of engine covers thanks for looking jan4 points
-
The instrument panel....3 points
-

RP Models -1/10th Douglas Bader and Spitfire Cockpit
Greg W and 2 others reacted to Brodiebear for a topic
Calling the cockpit finished, all items painted from reference photos found on the web, main source was 'Anatomy of a spitfire' website. Next up the great man himself. Dry Fitted his lower torso, with parachute pack to make sure everything lines up - which it does so thats a testament to the model with all those pieces of resin.I think (after the photos were taken i knocked off the left rudder pedal stem) i will also remove the right pedal and set at a more vertical angle;3 points -
Thanks for the great pics Chek. I will try to make a torpedo on the lathe. But first the paintjob. After the duck egg green i masked everything ans sprayed the dark green. I sprayed this fridaymorning and this morning i wanted to spray the dark seagrey. For masking I used a method wich i saw here on the forum and that was masking with wet paper. The only thing about this is that the paper must stay wet or it wil move around. There was no time to detup the photoboot so a quick pic was taken. Then I sprayed the dark seagrey and this afternoon I unpacked the whole thing. I must say that I'm happy with the result. There is some touching up to do but that is ok. Next thing to do is the touching up and then some clear gloss for the decals. After the decals another clear Gloss and than some shadowing. But first I let this paint dry. Thanks for watching and until the next time Ferry3 points
-
Started this kit back in November 2018, thought it was going to be an easy OOB build....boy was I wrong. Anyone who has built this kit knows the intakes are the worst...and the wing to fuselage join is just a PITA. I struggled with this build all Winter, messing up some of the painting (hurried my masking and made the red a little too red). Overall it's a 3 footer for the display case it will go in. Honestly I don't recommend this kit.2 points
-
New release Mig-31BM for this year perhaps unless I'm mistaken. http://www.trumpeter-china.com/index.php?g=home&m=article&a=show&id=151&l=en2 points
-

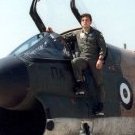
RF-4E Phantom II, AG 51 "Immelmann", 1:32
Model_Monkey and one other reacted to Sammy for a topic
Hello everybody! Today I want to show you a RF-4E Phantom, which I made from the 32er Revell kit. 35 + 49, AG 51 "Immelmann" Seats: Quickboost (modified) Intake covers: AMS Resin Travelpods: wing tanks of a F-5E Decals: Airdoc, Revell and homemade The kit has some flaws, but see and decide for yourself ..... Colours : Gunze This scheme is called "Norm 83 A"2 points -

MWP Project: Mirage IIIC "Ça va sans dire!"
Uncarina and one other reacted to aquatarkus10 for a topic
Hi, Thank you all for your attention and interest on this work. the first update concerns the coating with aluminum tape of the lower part of the fuselage. Application of Eduard details, finishing and test to fit. MWP (Metal Work Panels) procedure start: aluminum tape self adhesive (w/protection film): Eduard pe set: removing extractors: painting parts: washing parts ( mix oil/resin ): Iosso cream to polish: MWP procedure: rescribing & detailing panels - weathering: Mirage IIIc cockpit w/ air intakes & Snecma Atar 9c mockup: test to fit For more info & pics: http://www.adventurephotomodels.com Thanks for the attention George2 points -
The 1/24 Hellcat is now available for pre-order from Free Time Hobbies for $139.99. Might be a good idea to jump on the bandwagon ASAP. I suspect this is going to be a big seller.2 points
-

Fokker pair
Sepp and one other reacted to sandbagger for a topic
Hi all, Well the engine is done. There are details I've not added as this model will have the engine fully enclosed. The second Fokker D.VII will have more detail as its engine will be fully exposed, Mike2 points -
Something no one would guess... kite string!2 points
-

HB B24 discussion: AM and fixes
Harold and one other reacted to Dennis7423 for a topic
Thanks Ron! I wasn't sure... was just thumbing through my HK B-25H last night, and saw that super nice Brassin wheel/tire looking back at me, and I thought, "Boy, that sure looks like it could be the right size..." but alas, it is not. Those True Details wheels are absolutely atrocious. They look more like off-road vehicle tires than aircraft tires, and the distance between the wheel hub and the brake assembly is gigantic. Guess I'll be patient and wait for Brassin to (hopefully) release a set dedicated to the HobbyBoss B-24 kits. Perhaps they are waiting for the D to come out so they can get all of us in one fell swoop. - Dennis S. Thornton, CO USA2 points -

RF-8G Trumpeter & Fisher Model
Coneheadff and one other reacted to EricF for a topic
As rightfully pointed out by David Hansen, the wing upper surface is flat at the wing fold hinge point. The kit as it is here below And now after correction. The depth is enough to able to sand the bulge without affecting the hinge. Eric2 points -
I cant see the pics either, and from my home connection. Maybe post on postimage.io or something. Also if i copy image address it needs login details.2 points
-

HB B24 discussion: AM and fixes
Dennis7423 and one other reacted to RonGUSA for a topic
Hey Dennis No the B-24's took an S36 tire the same as the main tires on the P-38. You can use the Aires ones for the P-38 but you will have to remove the brake detail off of the back of the wheel. True details make aset for the Hobbyboss B-24 but they are the type with a hub cap. Ron G2 points -
That is actually a damn good price for what it appears you get in the kit.2 points
-

1:18 Hobbyboss AV-8B Harrier
Greg W and one other reacted to patricksparks for a topic
I used these 2 sets, anything that looked appropriate was used.2 points -
Good morning lads, after a very long time i managed to start with this project again and it is time to ''wake up'' this thread also. A lot of things kept me out, but hey, this is the ''SLUF'' i used to fly with, no way i wouldn't start it again!!! First of all, i glued the avionics panels in place and the resin wheel wells. For some reason in my case, the wells are about 2 mm shorter so some plastic needed to cover the gaps. There is more work to be done here but later and after i close the fuselage. I also glued the panel where the turbine section is going to be placed and i also added the chaff and flares boxes. not much to be seen when it is done but....they were there!!!! After that i started dealling with the cockpit tube. As you can see from the previous pages, i have changed some things on the resin one in order to be as close as it coulb be with the real thing. I added all the small things inside and i also glued the tiny things on the survival kit. Time to put some color....2 points
-
Ahh didn’t realise that Brian.. thank you. Thanks! Glad to hear confirmation of that and thanks for looking in Thunnus I’ve been looking through your builds and lots of inspiration there! Your Latest 190 is excellent! Guy2 points
-
Here is a link to the 428th BS history/war diary.2 points
-

DONE AT LAST! 1:48 Mauve P-40N "Lope's Hope"
Model_Monkey and one other reacted to KUROK for a topic
Boy do I get tired of masking... I had a 35 year old bottle of Model Master Medium Green but did not trust it. I used Vallejo US Dark Green instead thus staying acrylic. The strange thing is it seems to match my old medium green so I wonder about Vallejo just a little.. Check it out:2 points -
Sir Peter Jackson's microwave-sized auto rigging machine. Ping! Rigged! Tony2 points
-
RF-8G Trumpeter & Fisher Model
Starfighter and one other reacted to EricF for a topic
I've painted the three new exhausts. They are now correct for a P&W J57 P20 On the left the P4 that we found on the f-8A/B and on the right the P20 on the next versions Below the P20 Compared to the P4 Et voilà Thanks for watching Eric2 points -
I mean just LOOK at it, its crazy ugly, blocky, Russian cool. Especially those MLG.2 points
-
Bf 110E-3/trop 2.(H)/14 North Africa - almost done
florin13 and one other reacted to BloorwestSiR for a topic
Here's some that I used on my Arado from a couple years back. It comes in different diameters. You can carefully pull on it to stretch it out a bit like I did here.2 points -
Painting. I’ve got the basic colours down now. I’m using MRP paints. I love these. They spray like silk and they have a degree of transparency. Some might call that a failing, but if you’ve pre shaded they allow you to finely control the finish. They just need a few coats, but they touch dry very quickly so it’s all done in one painting session. The only drawback being it takes more paint and, on this hunk of plastic, I used the WHOLE bottle of RLM 76 (light blue) literally every drop from new. I’ll have to order another one now having only bought one last week. I started the process with the standard procedure of silver (Alclad aluminium) at the wing root to be followed by hairspray, then chipping but then realised I’m not using acrylics . I went for just leaving the root areas bare and using acrylic just for that area, you can just see the slight colour mismatch but looks like weathering! I brushed on AK chipping medium. Although I’m beginning to think that standard hairspray works better (think I may go back to that on future builds. It chipped ok, but not as well as I’d hoped). Everything was sprayed freehand - a little rough but I think that probably matches the aircraft. As my painting mask set was totally useless, I’ve ordered a new set from Maketar Masks. Alek there was super helpful and they are knocking up a 1/18th version of their Fw190 set ST21. This happens to match one of the versions supplied in the kit, so I’m going for that one as I can use the kit decals for the small staffel/ personal insignia. It’s the Hans Dortenmann Red ‘1’ version. So I’m now waiting on those coming through then many processes of weathering to come - although I’m planning on keeping this subtle. Stay tuned. Guy2 points
-
That white thing was STUCK between the windscreen and the armored glass. I tried to dislodge it but was not successful in moving it. I couldn't let it sit there so I decided to go in and manually get rid of it. But removal of the clear parts would be very dicey. Which part COULD I remove without damage. The windscreen? Probably not since I made sure I glued this piece in pretty solidly. Rear canopy... too far away. That left the middle canopy. I grabbed the middle clear piece between my thumb and forefinger and tried to move it but I couldn't feel it move at all. I started trying to rock it back and forth when suddenly... SNAP. It popped off with a loud noise that I thought for sure I had cracked the canopy and this build would've been over. But when I looked... it appeared to be in one piece! A big sight of relief. With the canopy off, it was simple to remove that piece of whatever from the front windscreen. I think it was a long paint chip. I glued everything back together and it looks alright. Disaster averted! I fashioned a mounting post from a piece of aluminum can to serve as a mount for the aerial radio antenna. A tension spring was spun from fine electrical wire and the isolators were cut from brass tubing. This time I rounded off the edges of the tubing to better replicate the shape of the isolators. EZ Line Fine was used for the aerial. I will paint aerial with a brush and... Yellow 3 will be complete! Finished photos this weekend!2 points
-
Dragon BF 110 C-7
Tommy Osvald sorensen and one other reacted to BloorwestSiR for a topic
Time to finish it off. Here are the remaining canopy bits. Dragon gives you alternative parts for open or closed gunner's canopy so I used the open ones. Likewise there's hinges for the upper pilot's one if you pose it open. One problem I had was that I had to hold the plane upside down while the glue set. With the lower fuselage antenna in place, everything was finished. It'll be a day or two before I can get some proper RFI shots, so here's a couple for now. Carl2 points -

Because there’s no such thing as too many Phantoms
Daniel Leduc and one other reacted to TimHepplestone for a topic
Finally got back to the beast. After several disasters with decals, finally got some markings on. The aftermarket decals would shatter when they hit water. Eventually I got most of them on and they are incredibly thin. Lots of touch ups with a fine brush and steady hand needed though. Also did a PLW with some oils, and added some streaks and leaks on the underside. The stencils are Tamiya. I would have loved some aftermarket ones as these have very thick carrier film and are US and not RAF.2 points -
RF-4E Phantom II, AG 51 "Immelmann", 1:32
Sir Spendalot and one other reacted to Sammy for a topic
7 That`s enough for an "easy kit". Greetings, Dieter2 points -

HB B24 discussion: AM and fixes
Harold and one other reacted to Wackyracer for a topic
Thanks Peter. Just ordered! First again after lanc purchase at Telford?2 points -
Last 2 weeks i spent time building but forgot to take pictures. I rigged the wings, made the landing gear and the the tail wheel. The landing gear got some PE. The wheels are from Mastercasters and i think they look real nice. The tail wheel however is not so nice. The axel looks crooked. This was not acceptable so i drilled a hole through the wheel and the bracket. Then I took some 0.6mm brass tube and made an axel When assembled itlooks much better. ( For such a small part) Then I sprayed everything in mr surfacer grey. I'm looking forward to spray some color. Some small parts Some bigger parts And a dryfit I will try to make some more in progress pics Thanks for looking Ferry2 points
-
Thanks guys for all your comments! really apreciate it! I din't have much time during the week but at least the cockpit area is almost done and everything glued together thanks for looking jan2 points