Leaderboard

Popular Content
Showing content with the highest reputation on 12/16/2018 in all areas
-
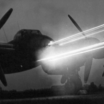
This is my take on the plane flown by Herbert Maxis on the fateful mission which was his last. This 109 is well documented and was even rebuilt and is located in a museum. The kit is Hasegawa, the markings are all sprayed on using Montex masks except for the swastikas on the tail. The figure is from masterbox and the snow was made using marble powder and microballoons. Hope you like it.12 points
-
For years we waited for a large scale Liberator. This is it! Warts and all, good or bad, this is all we have. We have three choices: don't buy it, buy it and fix it or buy it and live with it. I am going for the third option. Radu10 points
-

Hobby Boss 1/32 B-24J - Initial Observations
Alain Gadbois and 8 others reacted to LSP_Kevin for a topic
OK, we seem to have gone a little bit off the rails here. If we could just refrain from personal jibes, that'd be great. I was going to suggest that we stick to discussing the kit, but I really don't see what else there is to talk about until someone actually has one in their hands. So perhaps we should all just walk away from this one until that happens, as we're just going around in circles now. Kev9 points -

Trumpeter 1/32 P-40F Soon to be Released??
Rick Griewski and 7 others reacted to 1to1scale for a topic
I have an P-40F in my possession, I am happy to announce that NOTHING is a carryover from the P-40B kit. This is 100% new. The good... 1. All new cockpit, appears to be the same dimensions as the Hasegawa for depth, and it appears to have better detail! 2. Options for flaps up or down, in the down position, they included a beautiful set of PE to replicate the internal structure ribbing, with slots in the wing for the ribs, alignment appears to be guaranteed. 3. No fiddly fictional joints all over the fuselage to fill and sand. The bad... 4. The decals, apparently trumpeter still can’t get stars right!?!? 5. Rubber tires, seriously? I don’t understand why they persist with this. Maybe they own a miniature rubber tire factory? 6. Here is the controversy, yes, the top curve of the nose is off, it is not as flat as it needs to be, it has a distinct hump, as it gains altitude as it leaves the windshield then curves back down. It is my initial assessment that if this bothers you, there is enough plastic on top to sand this flatter, which should get you pretty close. The bottom cowl appears to be correct profile. My comparison to the the Grey Matter conversion I did, the top is better on the Grey Matter, and the bottom is better on the trumpeter. So I’m going to call it a toss up. I’m going to start the build on this ASAP, I will then take some side by sides of the two for people to compare.8 points -

Trumpeter F4F-4 of the Cactus Air Force
Alain Gadbois and 5 others reacted to ChuckD for a topic
Good evening, everyone. Ready for inspection is my effort at a 1/32 Trumpeter F4F-4 as based on Guadalcanal. The build is OOB except for a seatbelt I added from the spares box and speaker wire ignition harnesses. The high point of this kit is the engine. It is extremely well-engineered, goes together well, and paints up to a very nice piece. The only thing really lacking is a wiring harness, but that's easy enough to do. I left the cockpit closed as virtually nothing is visible from the outside once you put the two fuselage halves together. The low point of the kit are the wings and their fit. The simple fact is that they just don't fit. Not together as in upper/lower, nor do they fit well with respect to the the wing/fuselage join. I say this even after foregoing all of the wing swing mechanisms and instead gluing the inner & outer wing sections together before joining the upper & lower halves. Oh well. Despite this, the stubby little fighter that stood toe to toe with Japan's best for the first 18 months or so of the war turned out pretty well.6 points -
camo finally done my first attempt to make RLM75 mottling based on HPH pattern I was not satisfied, so I gave it another try this time I was trying to follow the pattern which was used on TE-FK airframe this is the outcome RLM 75 toned down with overall coat of thinned RLM 76 and subtle shading added with MRP smoke Now it's ready for gloss coat and wet transfers thanks for looking jan6 points
-
How about another update on the Hasegawa 1/32 P-40E. First up here are the last pictures of the interior prior to closing the fuselage. With that ready I can begin the reconstruction of the wing. Starting with the framework. I did do a bit of work on the wing armament. Here is my rendition of the M-2 fifty cal. And not forgetting. A picture of the fuselage closed. All comments, critiques, and criticism are encouraged. Joe6 points
-

EUROCOPTER EC-135 LUFTRETTUNG Revell 1:32
Loach Driver and 4 others reacted to Martin Kubis for a topic
I am happy that I found time to finish model in my favourite scale 1:32. This is old tool Revell EC-135 in very nice orange Luftettung livery. The kit need a lot of scratch building to make it closer to original and old tooling with fit issues deserves level 5. It has beautiful decals which worked excellent on every rivet just with water. Airbrushed with Revell enamels. Martin 20181214_073238 by Martin Kubis, on Flickr 20181214_073224 by Martin Kubis, on Flickr 20181214_073153 by Martin Kubis, on Flickr5 points -
Don't be so ridiculous and you know that is not what I meant. It was a genuine question as to why this only seems to happen on modelling forums and not other types of forums. I guess people can be very sensitive about a box full of plastic and I'm not surprised I got a "bite" to my question as I thought it might be taken the wrong way by some. But whilst on the subject seeing as you brought it up. Criticism of a kit should be constructive and based on fact. Fact is when the actual kit can be compared to accurate plans. If it is then found to be wrong then by all means rip it up and toss it to one side. No problem with that at all but the tiresome flaming of kits by a couple of manufacturers in particular before they are released is ridiculous. It's not just me saying this. Have a look back through this topic and see the number of times this has been mentioned. Have a look at the number of likes/positive comments for posts saying to wait until the kit has been issued before throwing rocks. I think most on here are getting fed up with all the negativity which keeps being trolled out.5 points
-

PZL P11 III “Cleveland” 1932 from scratch scale 1/32
R Palimaka and 4 others reacted to Marcin_Matejko for a topic
Struts ready for painting. I also made an air intake to the engine.5 points -
Well, I am in deep of the deepest pooh. I managed to get a 1/200 HMS Hood for a very very good price. Wife phoned and said there is a parcel waiting for me at the local post office, and she offered to collect because I was at work. Oops.... The damn box wouldnt fit in her car, she had to fold the seats down. Did I get lip service.5 points
-

Eduard Bf109G-4/Trop - ready for inspection
mustang1989 and 3 others reacted to Fanes for a topic
Hey there folks, this will be my firs WiP on this forum and my first build in the last six years. Since I want to join the multi engine group build with a german desert bird, I decided to practice on the RLM78/79 camo with a quick build in 1/48. The eduard weekend box fell into my hands for a very low price and I plan to this buiild quick out of the box. The depicted plane will be Franz Schiess' bird from Tunis in february 1943. It features a quite interesting camo with a high damarcation line (air intake in light blue) and overpainted markings. (source. bundesarchiv.de - if there's a copyright violation, feel free to take the image down.) This build will start like 99% of all builds: ...construction started with the cockpit. It's looking good for my eye. What's there is nicely detailed. Here's a quick mockup of the tub and to be honest I expected a little bit more. The oxygen hose is just blank and any other wires, tubes ect. are absent. - same for the left side. The seatbelts are provided as decals - meeh. Maybe I will not resist the urge to put "just a little more" details in the cockpit. Comments, critics and any other input are highly welcome. So long Joachim4 points -
This is my spitfire floatplane project. The spit is the old hasegawa, reworked with stressed metal effect and riveted. It is mated to the warbirds conversion set which includes the floats, nose, tail and prop. Some other extras used. Figures are from mastercasters and masterbox. The rest is of course home made with the groundwork made from polifiller, microballoons to create the sand, tree bark to create the rocks and balsa stones. Seaweed was made from rope hemp and aluminium foil. some other materials might have been used but its been a year since this one was completed. No decals were used, all markings are sprayed on. The diorama is based on the photo of one of the planes which was based in Egypt. I have also included some in-progress pics if that is allowed in this part of the forum. The photo below in black and white was the inspiration for this diorama.4 points
-
With the HK Lancaster landing as we speak on people's doorsteps I'll donate this special edition book produced a few years ago which covers many aspects of the Lancaster including internal detail shots: I'd rather not be entered into the draw thank you.4 points
-

Trumpeter Swordfish 1:32
Alain Gadbois and 3 others reacted to Fvdm for a topic
@Torben, Mark and Mike, thank you. First plastic is cut, first glue and PE is applied so it's time for the first update. I started with the cockpit. There is much PE to be applied so there are three kinds of instructions open on the bench. One thing that had to be done was the seat for the gunner. This is the one out of the box. And this is what it looks when it's done. Quite an improvement I think. The sidepanels in the pic below aren't glued yet. First I want to paint everything before assembling the cockpitframe. On the lefthandside you can see some cilinders. I can't find out what these are or what color these cilinders are so if you have an idea.... The upperplate Fianlly some pics whit the upperplate loosly on the frame. Thanks for watching and until the next update4 points -
The nose gear and doors of the F3 is quite different from the srtike version. This is to accommodate the recesses for the missiles. I modified the front gear doors by sanding them to shape. The rear door on the GR1 is tapered but not on the F3. To preserve some detail I cut a V-section from it and re-glued it together with a thin plastic card backing. The nose gear was modified from the kit parts by removing the rear torque-link and making a new one in the front, using the photo as reference. A piece of plastic card was glued in the bay to facilitate the fitting later on. Completed and painted. Comments welcome Nick4 points
-
yes that's for sure. but for the time being we will make those planes that actually existed in the metal, either full-size mock-ups, or based on parts of the archival documentation of projects3 points
-

Hobby Boss 1/32 B-24J - Initial Observations
Padraic Conway and 2 others reacted to mgunns for a topic
I can certainly live with the engine faces, ala Monogram very well. Yes, Hobby Boss could have provided more detailed engines along with a lot of other items that would have driven the price of the kit up considerably. Obviously price point was a consideration when they decided to do this model. The turrets, well, that's another story, that is a mystery considering the state of the art of injection molding in todays modern world of technology. As the wing root, is it really going to be that noticeable once the model is completed? I remember the hue and cry over the Monogram 1/48 PBY and the arm chair "modelers" that slammed it because the tail section was too thick. I built one, brought it to a meeting of the local model club and the only comments were that it wasn't noticeable. We seem to get wrapped around the axle over some detail that isn't quite perfect when in fact just put it out on the bench and build it. I have a feeling the sheer size of the model will impress the most astute B-24 officianado more so than if the wing root is at the right angle of incidence, turrets notwithstanding.3 points -

Hobby Boss 1/32 B-24J - Initial Observations
Padraic Conway and 2 others reacted to Out2gtcha for a topic
Guys, does anyone who has said that the wing root is "definitively" off actually HAVE the kit??? If not, then we really need to wait until someone does, then I'd say we could conclude if it's worth purchasing or not. I just CANNOT see how people can so co conclusively down a kit that really just got released a few days ago, that no one really even has yet.3 points -

Bf110G4 NJG4 1944/45 FINISHED!!!!! YIPPEE.
blackbetty and 2 others reacted to mozart for a topic
Probably so Shawn, but it's rather tedious work isn't it, especially on the Bf110 greenhouse! There's no doubting now who's plane this is:3 points -
Well it's looking decidedly possible that I may finish this build before the end GB date! Just about to start my least favourite part, masking canopies.....3 points
-
On Kevin's advice, I will be merging the build of the Aviattic Marienfelde in 1/32 to this thread in order to keep everything in context and not have to have split thread in two forum sections. I will add the description of the Marienfelde build below the Wingnut wings Junkers text. Enjoy everyone PART 1 Hey guys... Been super busy lately and didn't really get a chance to post anything, or to build as much as i would have liked, to be honest. Let me present to you Wingnut Wings's lovely all metal monoplane. I built this as a side project with two great friends, Lebanese master modellers Bernard Bassous and Imad Bou Antoun, both regular contributors to international magazines and recognized top tier gentlemen. The Junkers will eventually be placed in a diorama we are working on collaboratively. In addition to the kit's contents i have extensively scratch built engine components such as the spark advance and throttle/throttle body, the propeller hub retainer, used Barracudacast intake manifold, the Rexx albatros metal exhaust (at the time of the build, Rexx hadn't started selling the Junkers D.I specific exhaust), Taurus valves and rockers, Taurus spark plugs, Albion alloy tubing, Gaspatch turnbuckles and Master brass barrels amongst others. The tubing is from Bob's Buckles as always. Custom masks are courtesy of my silhouette plotter. All paints are Alclad II and MRP for general paint, and Tamiya and Gunze for detail painting. Uschi leather decals were also used on the build along with their metallic pigments. Weathering was done using mainly pigments, colored pencils and products from Ammo Mig. This is only part one of the diorama and coming up soon should be the Aviattic 1/32 Marienfelde truck to complete my contribution to the planned diorama. Of note, this is the first model i have photographed with my new photo setup rig so i am hoping the photo quality has improved! I would like to thank Sukerumodera for their kind support providing me with the required Ammo Mig products during the build phase! As always, stay safe and happy modeling! Karim PART 2 One of the rare times i have ventured into building a vehicle rather than building my usual preference of aircraft. The Marienfelde and the figures are the second and final part of my contribution to the collaborative diorama i am building in cooperation with Lebanese master modellers Bernard Bassous and Imad Bou Antoun. I present you the Aviattic Daimler Marienfelde in 1/32 scale. The kit is multimedia composed of resin parts, brass and acetate sheeting. I will not be reviewing the kit itself but i can tell you the parts are a mixed bag in terms of quality of the castings, and i can only recommend this kit to the advanced modeller. My kit came with 3 missing parts, the drum brakes were nowhere to be found, as well as one of the stowage boxes. The kit required a substantial amount of cleanup before assembly specially on the chassis and the wheels which had deep mold marks from the resin casting process. I scratchbuilt the drum brakes with styrene and scratchbuilt alot of other small details in order to enhance the overall look of the finished flatbed. I modified the flatbed as an infield modification carried out during the late stages of the Great War in order to add visual interest and also in order to be able to place the tail of the Junkers D1 in a position that would be suitable for the diorama and for the setting in relation to the figures. Woodgraining was done using oils on the inside of the cab, RB templates on the truck bed. All detail painting was done with tamiya and gunze paints, the outside of the truck was painted with tamiya paints and i tried representing the blotched appearance by using multiple layers and mixes of variations of the field gray colors. The metallics were all painted using alclad paints and MRP metallics. Weathering was achieved with AMMO mig products and oil paints kindly provided by Sukerumodera. Further weathering was done using pigments and prismacolor color pencils. The wheels and the chassis haven't been weathered as to give Bernard and Imad the chance to weather them in a way that will allow the truck and Junkers to be better integrated to the diorama base. The figures are from Czech company Black Dog and are resin, except for the truck driver which came with the Aviattic kit. This was also my first time painting figures and it took me three days until i settled with a technique for painting faces which i found worked for me, being a mixed of airbrushing, brush painting and oil transitions. The resin duck next to the driver is from a producer which i can't recall the name of now, and it is a throwback to one of my nicknames which adds a bit of a personal touch to the build. The leaves on the flatbed are from PlusModels of Czech Republic. The wood planks that cover the trailer chassis end are cut pieces of wood veneer and the chains are 1/35 armor chains from different producers, which have been burnished. Stay tuned for the final reveal of the diorama once we bring the whole project under way. All photos have been taken with my new EOS Rebel T3i and the studio light setup. PART 1 PHOTOS PART 2 PHOTOS2 points
-
Hello guys, apparently there is a Cessana L-19 / O-1 on floats being released by Roden. Seen it on Britmodeller, Info on Hobbyterra.com, great news, cant wait.2 points
-
Hi All, Progress is slow at the moment, but I'm still making progress! Gun bays are painted and weathered as are the wheel wells. All the wing internal structure is in (boy was it fiddly!) and I've finally managed to get the wings together! fuselage is also joined and that should go on in the next few days. Im starting to see light at the end of the construction tunnel! cheers Matt2 points
-

Hobby Boss 1/32 B-24J - Initial Observations
PhilB and one other reacted to Dennis7423 for a topic
Mine should be in my hot little hands in a few days. I'd be happy to post some pictures once I have it. Stay tuned. - Dennis S. Thornton, CO USA2 points -
Gosh - nearly missed this one. Season’s greetings/happy holidays to all etc. etc. Please pop this into the raffle and add my name into the draw. The wings and fuselage have been removed from the sprue otherwise untouched and intact. I think there’s a resin seat in there too. Best Torben2 points
-
Hobby Boss 1/32 B-24J - Initial Observations
The Dude and one other reacted to CATCplSlade for a topic
Not to be rude, although I don't care if you take it that way, but quite frankly the opinion of people who have no intention of buying a certain item is meaningless to me. I have been watching your posts and they are predominately a pile of negativity. We get it; you don't like the kit. And yet you spend so much time and energy on it that to some it may seem baffling. Not to me, though. I run in to this type of behavior quite a lot at the behavioral health facility I work at.2 points -
no not yet...I wish I had some time for modelling.... my major BIG project still waiting (TF-104G 1:18)....and the MiG too.... I hope I can do something during the christmas days... stay tuned... M2 points
-
+1 on this, more negative comments on this forum on plastic that's not been viewed or held by those making them than on any other forum (modelling or otherwise) that I read. I've not been on here for a month or so because I raised this issue (I think on this post) previously and got told not to read the comments. I'm happy to know where kits are not accurate but to be constantly told by a handful of people that something is rubbish when we haven't even had them in our hands starts to seem like it's being done deliberately to stop sales. I just don't understand why people do this unless there is a commercial benefit to do so ??2 points
-
Will keep a sharp lookout for this, it is on my 'to do' list and in the near future too. Cheers2 points
-
LSP Christmas Raffle 2018
LSP_K2 and one other reacted to CATCplSlade for a topic
I would also like to be a entrant.2 points -
I think it's to let potential buyser know that there are "issues" with the kit. If we would have had forums in the '50's, Aurora and Lindberg would have sold no kits and quickly would have gone out of business with Revell soon to follow. Haply, in the '50's we were happy to buy the models, accuracy not even an issue, build them, play with them and enjoy them. I also understand that for 79 cents accuracy wasn't an issue whereas at over $250.00 a kit, it is.2 points
-
Had a busy day or so, not a great deal of bench time but managed to get the masking complete, and it's now been primed. I'm hoping to get a top coat on it this evening:2 points
-
Trumpeter 1/32 P-40F Soon to be Released??
Rick Griewski and one other reacted to 1to1scale for a topic
I’ll take it out of the box later today and take some pictures.2 points -

MiG-15bis (early) 1:18
Harold and one other reacted to ShelbyGT500 for a topic
Hi my friend, do you have any progress at this sweet cold war birdy?2 points -

Real Colors of WWII Aircraft book
Wackyracer and one other reacted to barkhorn for a topic
My latest completion - please check the link below for description and sample pages: https://ak-interactive.com/product/real-colors-of-wwii-aircraft/2 points -

Real Colors of WWII Aircraft book
barkhorn and one other reacted to Kahunaminor for a topic
Ordered...Merry Xmas to me! Regards,2 points -
Mini update: Been working on "the bomb". Most of the pics available show the Corsairs on the Block Island with a mixed weapons load of HVAR's, a single drop tank (more on these later) and a 500 lb general purpose bomb. Only issue is that the Tamiya kit comes with 1,000 pounders. Thankfully, Jennings was gracious enough to donate a Brassin resin 500 lb bomb to assist me. Thank you Jennings! The Brassin bomb is really nice. Perfectly cast in resin, it also comes with the various decals needed and PE arming propellers for the front and rear fuzes. Nice stuff and highly recommended. One issue I've always had is seeing WW2 (and later) model aircraft loaded with immaculate, glossy bombs. It just didn't happen. The bomb bodies were stored outdoors in bomb dumps for extended periods. They got scratched, faded and generally banged up. Often they were rolled through dirt and mud prior to being mounted on the aircraft. Even bombs being hung on carrier aircraft would still be weathered (not quite as heavily as ones on land-based aircraft). I tried to replicate this by shooting the body overall OD, then dusting on a browner coat, followed by a lighter coating of diluted sand, sprayed very finely. I then glossed the bomb, added the decals (they go on quite nicely) and sprayed the body with dullcoate. I left the fins pretty much immaculate. They were kept separate from the bombs themselves and since they needed to be in good shape to avoid the bomb going astray, they were only mounted to the bomb's body just prior to being loaded on the aircraft. Once the dullcoate was on, I dry brushed the bomb using a couple of lighter shades of tan. I also used to toothpick to gently replicate some scratches and dings. One other thing I noted was that the bomb bodies were fitted with wooden rings around them. These rings were used to protect the suspension lugs and also to allow the bombs to be rolled on hard surfaces. Here's a good example of a typical outdoor bomb dump. Note the wooden rings and how banged up these bombs are looking (although I've seen much worse in other pictures). Once these wooden rings were removed, there was often a darker color underneath. I tried to replicate this as well. Here are some pics. Note that because it was a pretty horrible day, weather-wise, I couldn't get outside to take some pics in natural light. These pics came out pretty bad, including being a bit out of focus. I took these under a fluorescent light and as a result, the colors look darker and glossier than they are in real life. If the weather improves before I install the bomb on my Corsair, I'll take some better pics. Note - some bombs seemed to have all the markings in line with the suspension lugs, other bombs have the markings offset to one side. I opted for the latter. Good view of the arming propeller on the tail fuze. That's it. Thanks for looking.2 points
-

LEMKITS in 2019 - La-9, La-11 & new Luft '46 project announced
KiwiZac and one other reacted to kalashnikov-47 for a topic
La-9 and -11. You have my complete attention!2 points -
Another vote for MRP. Having the thinning mixture bang on every time is a great thing. The MRP paints dry near bulletproof, to a nice semi gloss sheen. To me, they are some of the easiest, nicest flowing AB paints you can shoot. I used MRP on my little Extra 330, and was astounded at how smooth the paint ended up being, with it seemingly near impossible to get it to run or pool2 points
-
Still working on this....it's been 3.75 years....tell you what, never to attempt anything this ambitious again! But have not yet given up. Missiles and pylons essentially done. All Zacto stuff. Beautiful pieces of resin. I'll put the final missile doo-dads on just before mounting them to the model. Decals basically done, Begemot, Linden Hill, Trumpeter, and my printer all contributed. I have spent way too much time repairing self-inflicted damage...broken stabs, lifted paint, a knocked-off radome....the list goes on. The canards are just temporarily attached, and I'll re-attach the missing vertical stab after the flat coat. Easier to lay it down with that stab missing anyhow. That's my story, anyway. It's difficult getting a good picture of the whole thing, but this will give you an idea of progress. Thanks for stopping by, jp2 points
-
Well, today is a good day This two books are great, really happy to have them!!! This is a must for every 109 fan. And finally..to round up ..2 points
-
Thanks man! Yeah health issues been a chore but slowly getting better. Not done a ton of modelling because of that this year but starting to get back into it. Regarding the windshield, my modifications to the trumpeter fuselage to thin it down was also done in front of the pit as it looks too wide as-is (IMHO). I think I have a pic of that in the thread - I cut a long narrow wedge off each fuselage side at the top in front of the pit. Doing that made the Trump clear front windscreen too wide and forcing it to fit seemed really risky (also distorts it at the top) so I went with the clear vac part that is sized to fit the Hasegawa kit (and with my mods my Trump fuselage shape is extremely close to the Hasegawa now) Not 100% sure that is going to work out - the last thing I did on the kit early this year was to fit that vac windscreen but I didnt glue it yet. It looks decent to me so far though....2 points
-

Lancaster today, Liberator Monday!
Uncarina and one other reacted to BloorwestSiR for a topic
Cutting it close there! A few years ago, my wife decided to randomly take the day off. Of course, that's the day the Xbox One arrives. She's not impressed but lets it go. Maybe a week or two later same thing but this time it's a PlayStation 4. Instead of the expected reaming out when I get home and saw what was waiting for me. she merely pointed at them and said two words : "Pick one!" I kept the Xbox. My brother in law bought the PS4 from me. Carl2 points -
Much happier with them now Dennis! Working on fitting the Eberspachers, a right royal pain they are too. I filed a flat on each one where the mating face is with the stubs to get the best fit that I could. I'm pleased that my method of "glazing" the triangular holes for the gauges worked again after forgetting to mask them:2 points
-
Painted the walkway lines today and refitted the engine bearers on the port engine. Since it's the Geschwader Kommodore's aircraft the fitters have draped a tarp across the wing root to avoid unsightly scratches! I've re-done the swastikas, still not 100% happy with them, nor if I'm honest am I really satisfied with the fuselage markings, I know that I'll be redoing them because my eye goes straight to them every time I look at the model. Ah well.2 points
-

"Willie the Whale", FINISHED
Hetstaine and one other reacted to blackbetty for a topic
some detail in the main wheelwell. again, i have no idea of the interior of the outer well, all the pics of the museum birds show the outer geardoor closed (wired shut), but all wartime shots show them open, i dont even know where the actuator for the outer door is, so some articstic license is in order here. since the shot i have rerouted the outer hydraulic lines, the actuator must be in the rear of the well 70 by karl holubar, auf Flickr2 points -
Still plugging away with my G4, the main insignia are completed: but the swastika is slightly off-register and will have to be re-done:2 points
-
The Exhausts assembled, holes drilled out in the cylinders and a mass of small strings of lead cut. Here we go…. A very fiddly job, but after a few hours of work you can lean back and admire your work. The inside of the cowl got a good wash of my usual mix of oilpaint (Lamp Black and Burnt Sienna) and white spirit. The cockpit got a good wash too…. Well, now the cockpit is beginning to feel done. The fuselage sides were also washed; More to come soon! Stefan2 points


.thumb.jpg.cd22b958c9e88a898a21e18b862c523e.jpg)