Leaderboard


Popular Content
Showing content with the highest reputation on 12/15/2018 in all areas
-

Lancaster today, Liberator Monday!
Phartycr0c and 8 others reacted to ScottsGT for a topic
Lancaster just arrived. Close call too! UPS was running late and wife got off work early. Managed to meet the driver out in the road while she was in the bathroom.9 points -
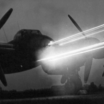
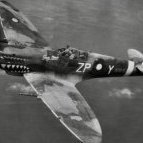
This is my spitfire floatplane project. The spit is the old hasegawa, reworked with stressed metal effect and riveted. It is mated to the warbirds conversion set which includes the floats, nose, tail and prop. Some other extras used. Figures are from mastercasters and masterbox. The rest is of course home made with the groundwork made from polifiller, microballoons to create the sand, tree bark to create the rocks and balsa stones. Seaweed was made from rope hemp and aluminium foil. some other materials might have been used but its been a year since this one was completed. No decals were used, all markings are sprayed on. The diorama is based on the photo of one of the planes which was based in Egypt. I have also included some in-progress pics if that is allowed in this part of the forum. The photo below in black and white was the inspiration for this diorama.8 points
-
Hi Everyone Here is the subject. A Gulf War Tornado F3. This project has been lingering on the shelf of doom since 2003 and I decided it is time to finish it. I had an extra Revell 1/32 Tornado (long story) and after reading Desert Fist by Ian Black, I decided a Tornado F3 would look good in 1/32. Ian was a F3 pilot in the first gulf war and the majority of the photos in the book was F3 photos. This looked like an easy conversion at the time , but as each stage progressed, the problems to solve became a little more difficult. I used photos from the book to measure the plugs to be inserted and then proceeded to cut and paste the model. When I later got the proper measurements from another publication, I had to revise the plugs slightly. I also lend the book to someone, and then could not remember whom it was. Eventually about a year ago I decided it is now time to finish the beast. The idea was to do all the changes applicable to the F3 and keep the detail of the rest of the kit OOB. These are the basic changes to the kit. The nose was cut from a plastic card block turned in a power drill . Here it is primed and next to the GR1 nose. More to follow soon. Nick5 points
-
Lancaster today, Liberator Monday!
Phartycr0c and 4 others reacted to ScottsGT for a topic
Just got my updates. Lancaster is finally moving again from the weather delay and will be here today. The Liberator is scheduled for Monday. Great. My wife off Monday. I'm gonna get busted!5 points -
On Kevin's advice, I will be merging the build of the Aviattic Marienfelde in 1/32 to this thread in order to keep everything in context and not have to have split thread in two forum sections. I will add the description of the Marienfelde build below the Wingnut wings Junkers text. Enjoy everyone PART 1 Hey guys... Been super busy lately and didn't really get a chance to post anything, or to build as much as i would have liked, to be honest. Let me present to you Wingnut Wings's lovely all metal monoplane. I built this as a side project with two great friends, Lebanese master modellers Bernard Bassous and Imad Bou Antoun, both regular contributors to international magazines and recognized top tier gentlemen. The Junkers will eventually be placed in a diorama we are working on collaboratively. In addition to the kit's contents i have extensively scratch built engine components such as the spark advance and throttle/throttle body, the propeller hub retainer, used Barracudacast intake manifold, the Rexx albatros metal exhaust (at the time of the build, Rexx hadn't started selling the Junkers D.I specific exhaust), Taurus valves and rockers, Taurus spark plugs, Albion alloy tubing, Gaspatch turnbuckles and Master brass barrels amongst others. The tubing is from Bob's Buckles as always. Custom masks are courtesy of my silhouette plotter. All paints are Alclad II and MRP for general paint, and Tamiya and Gunze for detail painting. Uschi leather decals were also used on the build along with their metallic pigments. Weathering was done using mainly pigments, colored pencils and products from Ammo Mig. This is only part one of the diorama and coming up soon should be the Aviattic 1/32 Marienfelde truck to complete my contribution to the planned diorama. Of note, this is the first model i have photographed with my new photo setup rig so i am hoping the photo quality has improved! I would like to thank Sukerumodera for their kind support providing me with the required Ammo Mig products during the build phase! As always, stay safe and happy modeling! Karim PART 2 One of the rare times i have ventured into building a vehicle rather than building my usual preference of aircraft. The Marienfelde and the figures are the second and final part of my contribution to the collaborative diorama i am building in cooperation with Lebanese master modellers Bernard Bassous and Imad Bou Antoun. I present you the Aviattic Daimler Marienfelde in 1/32 scale. The kit is multimedia composed of resin parts, brass and acetate sheeting. I will not be reviewing the kit itself but i can tell you the parts are a mixed bag in terms of quality of the castings, and i can only recommend this kit to the advanced modeller. My kit came with 3 missing parts, the drum brakes were nowhere to be found, as well as one of the stowage boxes. The kit required a substantial amount of cleanup before assembly specially on the chassis and the wheels which had deep mold marks from the resin casting process. I scratchbuilt the drum brakes with styrene and scratchbuilt alot of other small details in order to enhance the overall look of the finished flatbed. I modified the flatbed as an infield modification carried out during the late stages of the Great War in order to add visual interest and also in order to be able to place the tail of the Junkers D1 in a position that would be suitable for the diorama and for the setting in relation to the figures. Woodgraining was done using oils on the inside of the cab, RB templates on the truck bed. All detail painting was done with tamiya and gunze paints, the outside of the truck was painted with tamiya paints and i tried representing the blotched appearance by using multiple layers and mixes of variations of the field gray colors. The metallics were all painted using alclad paints and MRP metallics. Weathering was achieved with AMMO mig products and oil paints kindly provided by Sukerumodera. Further weathering was done using pigments and prismacolor color pencils. The wheels and the chassis haven't been weathered as to give Bernard and Imad the chance to weather them in a way that will allow the truck and Junkers to be better integrated to the diorama base. The figures are from Czech company Black Dog and are resin, except for the truck driver which came with the Aviattic kit. This was also my first time painting figures and it took me three days until i settled with a technique for painting faces which i found worked for me, being a mixed of airbrushing, brush painting and oil transitions. The resin duck next to the driver is from a producer which i can't recall the name of now, and it is a throwback to one of my nicknames which adds a bit of a personal touch to the build. The leaves on the flatbed are from PlusModels of Czech Republic. The wood planks that cover the trailer chassis end are cut pieces of wood veneer and the chains are 1/35 armor chains from different producers, which have been burnished. Stay tuned for the final reveal of the diorama once we bring the whole project under way. All photos have been taken with my new EOS Rebel T3i and the studio light setup. PART 1 PHOTOS PART 2 PHOTOS4 points
-

EUROCOPTER EC-135 LUFTRETTUNG Revell 1:32
Loach Driver and 3 others reacted to Martin Kubis for a topic
I am happy that I found time to finish model in my favourite scale 1:32. This is old tool Revell EC-135 in very nice orange Luftettung livery. The kit need a lot of scratch building to make it closer to original and old tooling with fit issues deserves level 5. It has beautiful decals which worked excellent on every rivet just with water. Airbrushed with Revell enamels. Martin 20181214_073238 by Martin Kubis, on Flickr 20181214_073224 by Martin Kubis, on Flickr 20181214_073153 by Martin Kubis, on Flickr4 points -
Still working on this....it's been 3.75 years....tell you what, never to attempt anything this ambitious again! But have not yet given up. Missiles and pylons essentially done. All Zacto stuff. Beautiful pieces of resin. I'll put the final missile doo-dads on just before mounting them to the model. Decals basically done, Begemot, Linden Hill, Trumpeter, and my printer all contributed. I have spent way too much time repairing self-inflicted damage...broken stabs, lifted paint, a knocked-off radome....the list goes on. The canards are just temporarily attached, and I'll re-attach the missing vertical stab after the flat coat. Easier to lay it down with that stab missing anyhow. That's my story, anyway. It's difficult getting a good picture of the whole thing, but this will give you an idea of progress. Thanks for stopping by, jp4 points
-
I got this yesterday:4 points
-

Finished !!.... 1/32 Hasegawa P-40K WARHAWK
Anthony in NZ and 3 others reacted to Tolga ULGUR for a topic
Seems that this is ready for painting...4 points -

LEMKITS in 2019 - La-9, La-11 & new Luft '46 project announced
Alburymodeler and 2 others reacted to Jan_G for a topic
posted on britmodeller, no word on lemkits website so far https://www.britmodeller.com/forums/index.php?/topic/235047982-132-new-project-luft46-resin-kit-by-lemkits-release-in-2019/ https://www.britmodeller.com/forums/index.php?/topic/235047981-132-lavochkin-la-9-fritz-la-11-fang-resin-kits-by-lemkits-release-in-2019/ jan3 points -

Hobby Boss 1/32 B-24J - Initial Observations
PhilB and 2 others reacted to Troy Molitor for a topic
I’m really looking forward to someone actually tackling this bird on the bench. Front engine replacements, a turret or two replacement and i’d Really like to see the actual wing root area on a real wing to fuselage hook up to make up my own mind. This is simply too big a model for my space restraints we’re I live in Singapore. Someday however, I’d love to hang one of these up in my model room with a couple bandits going after it. Im really looking forward to someone having this on their bench and giving it their all best efforts. Hopefully, they will plug in some aftermarket that will be coming out along with this monster. All the best gents. I really excited to see this one and the Lanc. Whats in the details inside The box when it’s finally opened for all of us to see. I’d also like to see one skinned in aluminum foil. Too cool for school. Carry on and don’t glue your finger together over this one. Troy3 points -
Dang it - I keep finding reasons NOT to glue the wing halves together! Could be I am psychosomatically paranoid of it. At any rate it's real good that I positioned and plumbed the gear door actuation cylinder prior to wing half join - it was pretty easy with access both above and below the area; it would have been much harder with access only in one direction. So I had to fabricate the gear door actuation cylinder with the help of another really nice engineering drawing 89C38180 (thanks Aircorps Library!): Installed - it is supposed to look like this (from wing hydraulics drawing 93C38604) Note the 45 deg hydraulic fittings on either end of the cylinder, and flex hoses that end on ribs in the wheel bay. My goal of course is to replicate that even though it is seldom seen (would have to turn this model upside down to see it). My actuator is made from aluminum tube (.093 inch diameter body with .125 inch diameter heads), which is a pretty accurate scaling: The white (.035 inch dia) plastic rod is of course the drive rod, which will be finished later when I fab and install the gear doors. The 45 deg elbow fittings were the toughest simply because of their itty-bitty size. Again I made use of Meng nuts and bolt heads. I highly recommend this product. Here is the installation of the cylinder in the wheel well: You can see the previously installed thin hydraulic lines from a couple months ago, and the bulkhead fittings that allow them to be joined to the newly installed black flex hoses (which are made from .032 inch dia solder). It should make sense why the 45 deg elbow fittings were used - makes for a nice clean routing of the flex hoses. Also you can see that the attaching end of the cylinder mates with a bar of sorts that spans the front spar and a dedicated intercostal that in turn attaches to a stringer on the upper surface. Note also the large oblong penetration hole in the station 40 rib. All that boring wheel well work a couple months ago has paid off as I hoped it would. Don't know why I was so jazzed about this little feature - but it probably has to do with the notion that this detail is seldom seen in walk-arounds, and I always wondered how that cylinder was attached in the wheel well. Hope you like it.3 points
-
Well, today is a good day This two books are great, really happy to have them!!! This is a must for every 109 fan. And finally..to round up ..3 points
-
Thanks for the comments guys. I purchased both of the available reference books from Viceroy books, a Queensland based online book seller. They have a very good range of books and are well worth a visit. https://viceroybooks.com.au/ . They arrived just minutes before I left home to go to work, so I packed them in my nav bag in case I got bored on the trip! I painted the instrument panel Mr Paint Tyre Black. You can see the difference that the small mod has made to the depth of the holes that the instruments will placed compared to the earlier photo. It fits into the cockpit very nicely. The ejection seat parts. Built up, it pushes onto a peg on the cockpit floor. Once again, a lot of thought has gone into the ease of assembly of this kit. The wheels are a simple two part affair, and fit together very well using minimal glue. There is the slightest evidence of 3D printing in most of the parts as can be seen here but they will clean up easily. I wicked Mr Surfacer into the join between hub and tire and wiped the excess of with Mr Thinner to tidy things up a bit.3 points
-

Bf110G4 NJG4 1944/45 FINISHED!!!!! YIPPEE.
blackbetty and 2 others reacted to mozart for a topic
Probably so Shawn, but it's rather tedious work isn't it, especially on the Bf110 greenhouse! There's no doubting now who's plane this is:3 points -
The tail feathers of modern jets get a lot of attention from modellers nowadays. This is probably because they are so distinctive, and so darn difficult to reproduce in miniature. There are at least two resin options available for this kit (both of which look lovely), but at the time I ordered my extra bits from the UK, there was only the HAD photo-etch available. So, I decided what the hell... The MiG-29's jet exhausts are super distinctive. The outer shells are interlocking plates with a slight bulge at the forward 3rd and tapering toward the back - the outer layer has strengthening plates riveted to its sides. The inner portion has a very distinctive taper from the engine to the narrowing at the variable nozzle, and then the splayed interlocking "turkey feathers" that look all tatty under the influence of gravity. I glued the Klimov RD-33's together as an opening move, to see how to attach the exhausts that weren't meant for this kit. Trumpy always adds just enough detail to make it tempting to put at least one engine in a trolley and detail it to the hilt! Photo etched parts have one distinctive problem, they are flat. Fortunately some of the parts of the exhaust would have been made from flat metal parts, so now it is just a case of working out what to do with all of this lovely brass. After tinkering for a while, I figured it would be best to preserve as much of the kit parts as possible as the shapes are fairly accurate, dimensions are good, and most importantly - they fit on the model. The resin tubes you see here are made to shape the exhaust around, but the dimensions don't tie in with the Trumpeter bits. I did however have to shape the inner exhaust inside the resin tube, and I then glued flat sprue around it to hold the tube in shape. You will notice that I soldered the triangular tabs onto the inner plates, and the "other" shaped tabs to the outer plates. Little styrene triangles completed the outer plates. This is quite a production if I may say so. The outer shell would be a flat affair if it were done with the brass only, so I sanded the detail off the kit exhaust, and carefully spaced and glued the etched outer portions to the plastic. Compared to the kit part, I think it is worth the insanity of soldering (pronounced soddering I have recently discovered) and glueing so many tiny brass bits. The final mounting into the kit parts and the placement of the afterburner ring are still to be sorted out, but this all seems doable now. Phew!3 points
-

1/20 Nichimo Cessna-172 Skyhawk
Belugawhaleman and one other reacted to John Everett for a topic
Hello LSP, I finished the Cessna a few months ago and have posted it in a couple of places. But I thought it might make a nice introduction to my first post here on LSP. There was a lot added to the engine and a little bit done with the interior. But in general the 40 year old kit includes just about everything you see here. Back in August a member was asking if he should build his copy or just collect it. I would answer his question by pointing out that unbuilt models are sad and lonely and if you were going to have a "bucket list" finished model, this would be one.2 points -
After seeing the outstanding build of a Fw190 A8/R2 done by Brian and his usage of the G-Factor main legs i was trying to find a supplier of said items. All i can find is Hobbylinc in the US. Does anyone know of a place that sells them in Europe (preferably UK)?2 points
-

Real Colors of WWII Aircraft book
Wackyracer and one other reacted to barkhorn for a topic
My latest completion - please check the link below for description and sample pages: https://ak-interactive.com/product/real-colors-of-wwii-aircraft/2 points -

Hobby Boss 1/32 B-24J - Initial Observations
Padraic Conway and one other reacted to mgunns for a topic
I can certainly live with the engine faces, ala Monogram very well. Yes, Hobby Boss could have provided more detailed engines along with a lot of other items that would have driven the price of the kit up considerably. Obviously price point was a consideration when they decided to do this model. The turrets, well, that's another story, that is a mystery considering the state of the art of injection molding in todays modern world of technology. As the wing root, is it really going to be that noticeable once the model is completed? I remember the hue and cry over the Monogram 1/48 PBY and the arm chair "modelers" that slammed it because the tail section was too thick. I built one, brought it to a meeting of the local model club and the only comments were that it wasn't noticeable. We seem to get wrapped around the axle over some detail that isn't quite perfect when in fact just put it out on the bench and build it. I have a feeling the sheer size of the model will impress the most astute B-24 officianado more so than if the wing root is at the right angle of incidence, turrets notwithstanding.2 points -

Hobby Boss 1/32 B-24J - Initial Observations
CATCplSlade and one other reacted to LSP_K2 for a topic
I agree; it's certainly not a deal breaker by any means, just seems like a poor approach for them to take.2 points -

Hobby Boss 1/32 B-24J - Initial Observations
Padraic Conway and one other reacted to Out2gtcha for a topic
Guys, does anyone who has said that the wing root is "definitively" off actually HAVE the kit??? If not, then we really need to wait until someone does, then I'd say we could conclude if it's worth purchasing or not. I just CANNOT see how people can so co conclusively down a kit that really just got released a few days ago, that no one really even has yet.2 points -

Kit Bash Stinger
MikeC and one other reacted to themongoose for a topic
Here’s a teaser for today! I’m chained to the bench today on a mad dash to finish her up...2 points -

WNW kits sold out - what’s next?
BlackMikeModels and one other reacted to vince14 for a topic
I don't know why people get their underwear in a twist when it comes to WNW kits going OOP - all kits are limited runs, because it's simply not economically viable for a manufacturer to keep a kit in continuous production. These kits then come back into production when the management feel the time is right, and a profit can be made. Whether that production run is 50 kits or 500,000, it's still limited. Tamiya, Hasegawa, Airfix, Italeri etc. all have kits that go in and out of production.2 points -
Having an abysmal track record om 0% completion for groupbuilds, I may still be tempted to join this one. Not quite decided yet... Candidates are Tamiya Mosquito, Tamiya Tomcat, KH F-5E or Hasegawa F-18.2 points
-
Thinking about the lack of fuselage internals, I came up with a possible solution. Not to say I will go with it but it might work. The Mig-17 had a Russian copy of a Nene, the Trumpeter Mig-17 has a reasonable depiction of one and it would be better than nothing. Here it is test fitted into the fuselage roughly aligned according to my references. The jet pipe is considerably longer than the Mig-17 so I have found some thin brass tube that is the correct diameter and length to suit. At least there will be something to see up the rear end! Whilst the kit instrument decals are OK, I felt the Airscale stuff just makes the panel pop. I used various decals from the RAF WW2 and early allied jets sheets. I will put on some placards and also clear instrument faces but I am pretty happy with how this part is progressing.2 points
-
Tamiya A6M2-N Rufe
Alain Gadbois and one other reacted to LSP_K2 for a topic
Front of main float now loaded with B-B's, all super glued into place.2 points -

Lancaster today, Liberator Monday!
Uncarina and one other reacted to BloorwestSiR for a topic
Cutting it close there! A few years ago, my wife decided to randomly take the day off. Of course, that's the day the Xbox One arrives. She's not impressed but lets it go. Maybe a week or two later same thing but this time it's a PlayStation 4. Instead of the expected reaming out when I get home and saw what was waiting for me. she merely pointed at them and said two words : "Pick one!" I kept the Xbox. My brother in law bought the PS4 from me. Carl2 points -
I would like to participate as an entrant in the raffle. Thanks! H.2 points
-
The flap cove is the area just ahead of the flap that it retracts into when closed. Here's one with a bulkhead. Apparently the Corsair doesn't have one.2 points
-

Trumpeter 1/32 P-40F Soon to be Released??
Out2gtcha and one other reacted to ringleheim for a topic
2 points -

Trumpeter 1/32 RNZAF A-4K "Kahu Upgrade"
R Palimaka and one other reacted to Anthony in NZ for a topic
Ok weld beads replaced and everything is now ready to be sanded/blended and primed. Pylon just placed in situ for now Thanks for looking Anthony edit: cant seem to rotate the image....2 points -

New! Vought SBU-1, Command Aircraft, 1:32 scale kit
BlackMikeModels and one other reacted to LukGraph for a topic
Vought SBU-1 Command aircraft is ready We present few pics from the set below in the post. Thanks Lukasz More.. http://www.lukgraph.pl/?p=10852 points -
So I have a couple of projects on the go at the moment so another wont hurt right? I wanted this kit from the time it was announced a few years back. I decided to fund the purchase of the kit with the proceeds of my resin Boomerang panels, just to make the hobby cost neutral (yeah right!). I like obscure types and of course this fits the bill nicely. I also enjoy the uniqueness of building a resin kit and not having seen an Iconicair kit before, my curiosity kicked in so I got stuck into it whilst there was a bit of downtime in the Boomerang build. There have been a few in box previews of the kit here and on my Facebook page (Manscale Models), as well as others. The kit is quite exceptional right from the get go, being very nicely boxed and thoughtfully packed. Lots of zip lock bags, a stapled instruction sheet, photo etch seatbelts and nicely printed decals. I will try and keep this as out of the box as possible, with the exception of doing something about the lack of any internal structure, meaning there is no jetpipe, turbine face etc. On initial examination, it appears one may be able to see right through the model from intake to exhaust, a less than desirable feature of any jet model. A quick `on the workbench' pic. I got stuck into the cockpit parts. it is quite simple parts count wise, but very nicely detailed. All of the parts required minimal effort to cut from the casting block and glue in place. I have built up most of the small parts on the cockpit side walls. The throttle quadrant and side panels are very nicely detailed and will look great once painted. The instrument panel calls for a decal (provided in the kit) sandwiched between the main structure and the panel faces. I prefer to use Airscale instruments, so some additional work was going to be required. The faces of the panel are quite deep and would easily swallow up the instruments so I assemble the parts and then punched out some thin plastic card and inserted it into each hole to bring the instrument faces closer to the front of the panel. If you have the RP Tools punches, I used the 1.9, 2 and 2.4mm punches to achieve this. This part will look great painted and with Airscale decals. Parts fit is great. The wings come with some sturdy resin spars which almost snap into place. Alot of thought from Iconicair has gone into how this kit assembles, sometimes lacking in alot of resin manufactures. It is quite good. Glued into place with gel superglue, they make very strong structures.1 point
-

Hobby Boss 1/32 B-24J - Initial Observations
Out2gtcha reacted to pzcreations for a topic
I do, and yes it is off as stated. and the split turrets will be alot harder to fix than even the Minicraft ones were. very thick with connect pin tunnels IN the clear area as well.1 point -
As far as the price is concerned. I believe what the gentleman told me and I will wait for the price to go down. Mike1 point
-

Lone Star Models/Cobra Company news
LSP_Kevin reacted to Lone Star Models for a topic
Troy and others, Yes I plan to address the Revell OH6 kit. Also I am now casting the parts for the 1/35 UH-1B so after the holidays it will be listed at www.lonestarmodels.com Merry Christmas Mike1 point -
Thanks man! Yeah health issues been a chore but slowly getting better. Not done a ton of modelling because of that this year but starting to get back into it. Regarding the windshield, my modifications to the trumpeter fuselage to thin it down was also done in front of the pit as it looks too wide as-is (IMHO). I think I have a pic of that in the thread - I cut a long narrow wedge off each fuselage side at the top in front of the pit. Doing that made the Trump clear front windscreen too wide and forcing it to fit seemed really risky (also distorts it at the top) so I went with the clear vac part that is sized to fit the Hasegawa kit (and with my mods my Trump fuselage shape is extremely close to the Hasegawa now) Not 100% sure that is going to work out - the last thing I did on the kit early this year was to fit that vac windscreen but I didnt glue it yet. It looks decent to me so far though....1 point
-
Thanks for looking and commenting. I used a 2 part resin for the water. It was locally available and worked excellently. No shrinkage and no heat generation whilst drying. Since it dried dead flat I applied some pva glue on the surface to make the ripples and finally sprayed on a coat of future to obtain the gloss finish. hope that answers your question. Exhausts were finished using testors metallizers and some ak rust pigment.1 point
-
I wonder if the kit lines will sell out quicker because they are selling through retail. Do they order more to be produced or just have a set amount? The W.29 and green tail trilogy early sell outs seem to indicate one run only...?1 point
-

EUROCOPTER EC-135 LUFTRETTUNG Revell 1:32
Martin Kubis reacted to Dany Boy for a topic
Perfect and clean LSP work! Really like it1 point -
EUROCOPTER EC-135 LUFTRETTUNG Revell 1:32
Loach Driver reacted to Anthony in NZ for a topic
Oooooh I love these Revell Helicopters! Beautiful work indeed on the build! Makes me want to finish off my BK-1171 point -
could you not over paint them? the Germans often did http://falkeeins.blogspot.com/2011/06/ivjg-3-fw-190-d-9-blue-2-prenzlau.html1 point
-
Hi now we go close to 50 years back : here is a mirage III pilot from the 69s to the 72s era, maybe 66s to 74s. I made a colourized render this time, as they are hard to find on the net and here with my last century Heller kit A+ Norbert1 point
-
Kit Bash Stinger
MikeC reacted to themongoose for a topic
It’s a model fest weekend!! heres the gark ghost grey and lighter dark ghost grey mottle coat. After the kids christmas carol concert tonight the darker dark ghost grey will go on mist likely [:P] I also redid the stabilators. Used bondo glazing putty instead of perfect plastic putty.it looks much better. Pics later once i get them repainted.1 point -
Kit Bash Stinger
johncrow reacted to themongoose for a topic
Thanks Dragon. Stay tuned this weekend, should be mottling by tonight for sure. So I took a day off work for this. Originally this was supposed to be for a Marine tribute at our local IPMS club meeting in September. Since the water dripping into the family room from the upstairs bathroom took over my late summer lol, it has become a December meeting goal...So I took a day off work for this because it still felt too far from done to make the meeting on the 17th. Here is the overall state of things today (did some weapons too but no pics of those till they're done). Does anyone have experience with how the filler looks once you start putting color on the aircraft? The black primer shows it way too well. When I use grey primer it seems to blend in pretty good. Will end up testing things out on the stabilator before I do the main plane so any advice ahead of time would be great.1 point -
I can understand why some of their kits would be limited run, however there are some that should be unlimited. The Fokker D VII, the Sopwith Camels, the SE5a, the Albatros DV, the Fokker EI, Pfalz DIII and maybe a few others. These are models that have long term demand and limiting the run limits these kits to modelers in the window of time when the model is available. If there is a long term plan and a long term commitment certain kits need to be available indefinitely. New people join our world now and then and by limiting the run for example if they take the D VII and quit offering new boxings or extended runs, eventually it becomes a collectors item. So the would be modeler that comes into the market in 2025 may not be able to afford one. For the long term health of the hobby WNW needs to continue to periodically issue their major subjects. If they really want to keep this era alive in our minds they need to make a long term commitment to our hobby with plans to issue these kits in the future as the market demands.1 point
-
My plan with this build is to just go the way it takes me. First up is I do actually plan to use some after market. Some initial images. And then I let the voices guide me. Even a little off the wing. Overall there are some things I am not happy with and some I am. Happy with the work in the cockpit so far. The detail seems to resemble the pictures I have. I am however still not sold on the frames. The kit is the Grey. All comments, critique, and criticism are encouraged. Joe1 point
-

Black 4 Bf 109E4 10.NJG 1 1940-41 *Complete*
Panzerwomble reacted to Gazzas for a topic
Hey everyone, I'm calling this one done. Complete... or as complete as it's gonna get. Not sure about the stance. Looks a little pugilistic to me. This is probably the dirtiest I've ever made the belly of a 109. Another educational build. I learned a lot. Thank you for looking! Gaz1 point -

1/200 USS Arizona, with the works
AlbertD reacted to Squizzy 78 for a topic
For my first update, I was hoping to have a bit more done, but I'm trying to get it right, so it'll take as long as it does. With the top half of the hull, I've done all I'm going to until the two hull sections are joined, which was styrene strips ran through the hull, as you can't see through the drilled out portholes. The lower hull is what's been keeping me busy. I'm not up will all of the correct terminology, but the section on the hull where the prop shafts come out, are very 'toyish', and I was happy with them, so out with the dremal. After the clean up, and repair of the resulting holes in the hull, I discovered several different ways to not scratch build the prop shift outlets. I ended up using my battery drill and creating even larger holes in the hull than what I started with, and using styrene tubes, I managed to build the section and pieces required, and the use of perfect plastic putty, I'm happy with the results. Theres still plenty of work required in this area, shaping around the rudder, and then I'll be onto the docking keels. Thanks for looking.1 point