Leaderboard


Popular Content
Showing content with the highest reputation on 11/22/2018 in all areas
-

Revell Fw 190 A-8 Rammjäger inbound
Padraic Conway and 7 others reacted to Out2gtcha for a topic
I thought it was excellent. I was and am no expert on the the R8, but did quite a but of research to see what was essential. The bullet resistant glass was pretty clear and well molded, and I thought their PE armor plating looked good under paint. The krebs-gerat WGr 2 is scratched w/a Lior Roar WGr 21, and some EagleParts resin Mk 108 canon fairings with MDC resin smooth main wheels to complete the R8 main changes I wanted. I was very happy with how mine turned out, but I'd still probably pick an OOB R8 up:8 points -

HE-219 Revell 1/32
Loach Driver and 6 others reacted to Shawn M for a topic
last batch thanks for all the support along the way gang! Looking forward to the next GB where I tackle Dragons 110 with the AIMS G4 conversion!7 points -
Kit manufacturer: Tamiya Scale: 1/32 Type: F-4J Extras used: Aires cockpit, added several wires to the wheel bays Paints and colors used: Gunze Mr.Hobby, Tamiya6 points
-

PZL P11 III “Cleveland” 1932 from scratch scale 1/32
Tnarg and 4 others reacted to Marcin_Matejko for a topic
Thanks The wheels I made for the model contained a factual error. The inscription "Polska Opona Lotnicza Stomil" was inconsistent with the fact, it should be "Palmer Cord Aero Tyre". I decided to correct this error and I drew the correct wheel in 3D Then I ordered the printout. The wheels came out very nice. I also did a tail skid And I finished building the interior of the hull. Now I have to paint it all.5 points -
So, I've had some days to digest Telford and I finally made it back to the 'workstation'. I'd better try to finish this Arado. all that inspiration, accumulated at Telford, really has made my head 'buzz' with new idea's and plans. What still needs to be done, is to finish the Luftwaffe 'Portalkran'... I do not know what this part is called in English, it was used to attach the engine to the hook of the crane. The winch with wire and chain. Attaching the winch to the crane... I did a temporary base used for display at Telford. I think it maybe needs to be bigger now? Cheers: Kent5 points
-
Well, gents, Hubert has returned the master parts to me and I now have a small repair to do then will get the potential new owner up here for a good look once I have checked everything. So, it's moving along as planned. Martin4 points
-

Fw 190D-11
Hartmann52 and 2 others reacted to Miloslav1956 for a topic
Fw 190D-11 W.Nr.220014 WFS of G.d.J. Fhr Otto Leisner 1945 Hasegawa model 1/32 Real Model conversion set HGW seat belts Barracuda cockpit & wheels All painting mask hand made All colours MRP3 points -

"Willie the Whale", FINISHED
sandokan and 2 others reacted to blackbetty for a topic
i will protect the pit with the dummy canopy and turn to the joining of the main parts (wings/tail). the final canopy will be mounted during the painting stage 59 by karl holubar, auf Flickr3 points -
Some drawings of the hatch... Looks like it's hinged... Cheers: Kent3 points
-

Supermarine Attacker 1:32 Available
Alburymodeler and 2 others reacted to Iain for a topic
Mine arrived this morning - very, very happy - a subject I've wanted to do for a long time and the kit looks brilliant in the box. Look out for a review soon... Iain3 points -

Undersize Trump. MiG-21 MF Fuselage?
Landrotten Highlander and 2 others reacted to Alain Gadbois for a topic
Hi all! A bit more progress on the airbrakes I can show. After cutting out the kit plastic, the right hand part is put in place. Apoxie Sculpt is added to fill the gaps and sanded. Also the radius of the aux. air intake is corrected with a bit of epoxy paste in each corner and shaped with a suitable section of round brass tubing. There is no detail inside the airbrake bays yet, but it will added at a later step. You can see how much closer the airbrake is to the centerline after modifications. At this point, the other airbrake bay is already in place and some initial sanding around it is done. I must check both fuselage sections to be sure the surface is smooth and regular. Thanks for watching! Alain3 points -
Hello modellers, I've done a bit more work on the Hawk pit, the Eduard side wall detail give everything a boost. The canopy hinges look very fiddly, complicated and challenging but I'll give it a go Thanks for looking, seats next3 points
-
still more!3 points
-
here are the rest more to come3 points
-
I have just checked everything over and it's all there in the original packing I sent to Hubert. Has my handwriting labelling everything. Thankfully, as I wouldn't recall what they were otherwise! I just have both fuselage halves to repair with a small extreme tail replacement. Seems to be lost, but that's nothing really. Cheers, Martin2 points
-
Some more fiddling in the cockpit…. A drybrush and some buttons picked out…. The Instrumentpanel from Eduard are just marvelous! I sanded down the frames to a more correct shape, they should be almost straight, not slightly rounded as Trumpeter have done them. More to come! I will not be done with this one either, I´m afraid, I tought we had one month left on this GB! Bummer…. Cheers! Stefan2 points
-
Hi there, I though about the engine nacelles, especially the lower parts. The original (grey) parts needed cut-outs after printing for the landing gear, and some scribing at the rear for the doors, which apparently are closed on most of the period photos I'm aware of. But I HATE scribing! So much that can go wrong Therefore, I modified the existing 3d-model, so they now already have the cut-out, and some recessed lines for the rear doors. The new printed (green) parts will benefit from some sanding, for sure, but the recessed lines are looking promising. Cheers Alex2 points
-
That means the fire was moving incredibly fast. The wind drives it forward so quickly it doesn't have time to consume all the fuel. The good part about that can be that some of the tougher trees will survive and turn green again next year. Unfortunately, there will be enough dead brush and trees left standing to make the next fire even worse, just like the conditions on the Carr fire earlier this year. Not to mention the erosion potential. Not a safe place to rebuild for a while. Heres hoping Paul and Suzy set up shop somewhere else....2 points
-
That pic really brings the devastation home. I'm SO glad Paul Susy and the dogs got out ok. I'm also amazed looking at that pic of how many trees are still standing that have their leaves/needles still attached.2 points
-

Dark Blue Killer - Tamiya F4U-1D Corsair
ShotMagnet and one other reacted to John1 for a topic
I just received a replacement landing gear part to replace the one that I broke. Thanks again 1To1Scale, your generosity is greatly appreciated. Completed the landing gear. The main landing gear in this kit are pretty much models themselves. Each one is approx 12 pieces and for such a complex assembly, they all just click into place. All parts are wonderfully detailed. The Tamiya instructions specify painting the LG overall silver. In reality, per Dana Bell's book, the LG on the -1D was actually an unknown spec light grey lacquer. Later in life, the landing gear was painted GSB when these planes went through overhauls. Some pics below. Just note that I still need to do some detail painting and touchup work. Note the maintenance placard on the upper LG strut. Nice attention to detail Tamiya! Only modifications I did was to hollow out the mounting bracket for the retraction cylinder (you can kinda see this, it's right above the maintenance placard) and open up the lightening holes on the oleo scissor fittings (can't really see it in these pics but trust me on it). The inner wheel hubs are typically pretty grimy. I used a dilute brownish black wash and then topped with ground up dark grey pastels to replicate brake dust. Tail gear Again, note that I've got some touch-up to do and will probably hit these parts with a dilute wash to bring out some of the details. Next up are the wheels. One failing of the kit is that Tamiya provides vinyl tires. No idea why manufacturers do this. It's next to impossible to remove the seam down the middle of the tire and you really can't paint vinyl very well. I opted for Barracuda's wonderful resin wheels. Even if Tamiya offered the tires in plastic, I would still do this. Barracuda's wheels are amazing. Even the minuscule casting numbers on the wheel hubs are fully replicated. In addition, the provide full interior details of the wheel hub. All this and a very reasonable price. Check 'em out here: http://barracudacals.com/proddetail.php?prod=BR32119 They also offer early and late version wheels as well. From the Barracuda website: My wheels are still a work in progress. Need to finish painting / weathering. I left off the outer hub cover in this pic just so you can see the interior detail. It will (barely) be visible when the wheels are fully assembled and in place. That's it folks, thanks for looking.2 points -
I've seen the coverage of the fires on the news here in the Uk, but until you personalize it like this , it doesn't really sink in .. My heart goes out to Paul , his family and all the others caught in this fire.. thank goodness his family survived unlike so many others , I've built a fair few of his kits and conversions , and they've brought me nothing by joy over the years , Colin Ritchie2 points
-
Gawd.... Good luck trying to bail out of a Mosquito in an emergency. Unbuckle harness, crouch down in narrow cockpit, whilst aircraft is gyrating all over the place. Turn latch for sub-floor, open subfloor and secure in vertical position, jettison exterior hatch, struggle through narrow opening whilst encumber with parachute. All the while, try to ignore pilot who is screaming at you to move faster! Only guy who had it worse than the NAV was the pilot. Nice pics KKarlsen, thanks very much for posting.2 points
-
"Willie the Whale", FINISHED
sandokan and one other reacted to blackbetty for a topic
i have now finished the pit, at least i will call it a day 57 by karl holubar, auf Flickr the assembly had its share of WTF-moments, so it took me a while to find out there is a strut running from the bottom of the ip to the the upper windshield frame... and can someone tell me what the thing is that looks like three horns in a bag behind the radar operators seat? 58 by karl holubar, auf Flickr2 points -
We do (see Brian's post above), but don't add your own, Shawn. Brad will come along and download your photos in due course, and upload them directly to the server. This way, the gallery entries persist, long after the hosted photos have met their demise. Kev2 points
-
Nice work Shawn! I quite like the finish, and the little touches like exhaust staining on the werknummer. Bravo! This would be a cool thing to see and hear fly. Sad there's just one left.2 points
-

WNW Christmas Surprise
Rick Griewski and one other reacted to kalashnikov-47 for a topic
When buying these, be careful. I ordered one from the original Bristol F2B Fighter kit and all they did was put it into a bubble pack and ship it. by the time it had traveled halfway around the planet to my place, it was pretty mangled up. Best to request a hardened package when ordering these decal sheets.2 points -
A little work with oils: I start by putting the base colors on a piece of coarse cardboard to leach out the linseed oil. Next to the paints is my turpenoid of choice. I've done one roadwheel to highlight the difference in appearance made by a few brush strokes with a brush dipped in the lighter brown color. The darker brown-black color is for the center of each roadwheel. At the center is a depression where a grease nipple nests. After doing the whole side and letting it sit for a bit, I dipped a flat brush in white spirits then removed as much of the spirits as possible into a paper towel. Then I used the brush to remove the oils from raised areas on the roadwheels, idlers, drive sprocket, and return rollers. The zimmerit is brought out by the oils. Very uneven application! I shall have to talk to the foreman. My phone doesn't like close-ups. But you can see how the gray browns have settled into the corners of the rack details. I have chosen a light gray-brown after googling an intended location for Sturmpanzer Abteilung 216. Pictures of dried mud around the Adige River show it to be a light grey with a very small brown component. Thanks for looking! Gaz2 points
-

WNW Christmas Surprise
Rick Griewski and one other reacted to ringleheim for a topic
The Re.8 is probably the coolest British 2 seater they make, not counting the Fe.2b which is its own animal. I missed out first time around, so I'll be buying this. Of note: the original Re.8 decal sheet is still available directly from WNW so you can greatly expand your options with the Duelist kit and the older decal sheet. I'm totally finished buying discontinued kits on Ebay; be patient! Eventually you will see them again in re-releases and you can buy them at normal prices then.2 points -

Some Speculation about Revell
alaninaustria and one other reacted to MikeMaben for a topic
Being owned by an international conglomerate helps on the investment side.2 points -

1/24 Airfix RCAF Mustang IV…finally done
Martinnfb and one other reacted to R Palimaka for a topic
Here is the starboard side. It's pretty much all scratch-built, with modified kit parts, Waldron placards, plastic card and structural shapes, bits of wire and wine-bottle foil. The worst part was attaching all those friggin' toggle switches to the control panels...tiny bits of wire a couple of mm. long with superglue. I lost so many that didn't attach properly, there must be a couple of hundred under my desk that went flying off. Anyway, it's done and ready to be closed up. I think my favourite part of this side is the small power outlet beside the canvas flap/cover, and that flap itself. THe rectangular panel under the radio control box looks skewed but it's not, I think it's the camera lens in my phone distorting things. The oxygen hose is a Waldron part, and is finely ribbed and lovely. It's attached at either end, but free in the middle so that I can drape it on the floor when the fuselage is closed up.2 points -
1/24 Airfix RCAF Mustang IV…finally done
Martinnfb and one other reacted to R Palimaka for a topic
So I'm finally at the point of no return for the fuselage! All the interior bits are done, and I'm ready to close things up. The tailwheel and gear are done, the cockpit and radio rack, fuel tank, and radiators. Here are some final shots of the interior of the cockpit. Some of the detail will never be seen again once it's put together, but I know it's there, haha! It's as accurate as I could make it, some of the dimensions were off in the end but nothing critical and I think it's convincing. A couple of small things will be added once the final painting and assembly is done. So this is the port side of the cockpit with instrument panel and rudder pedals added, some more wiring and tubing inserted and everything glued into place. Overview with everything in:2 points -
More progress with the SM, all's going quite well so far so I'm..... cautiously optimistic I plan to assemble this a s a complete unit, paint and detail it and then fit it in position. I've dry fitted the cannon and the angle looks about right though I won't know for sure until the canopy is on of course. There's a little wriggle room but not much: As some light relief I've made a start with the wheels. The kit ones are fine but I already had these Airwaves ones from when I was intending to build the Revell G4, so they are now cleaned up and have a coat of black primer on them:2 points
-
Undersize Trump. MiG-21 MF Fuselage?
Landrotten Highlander and one other reacted to Alain Gadbois for a topic
Hi all! Here is an update on the progress of the corrections to the MiG-21 fuselage. The length is now correct and the cuts filed with Apoxie Sculpt. Most important, the front has been deepened and widened to get the correct shape. Careful study of MANY photos was essential for this, in addition the the measurements. The spine has been removed completely, in order to correct the height for this part, which is off quite a bit. As a bonus, it will be easy to make more variants, such as the PFM, BIS and SMT. Here is a close up of the nose section, with intake ring in place. You can see how the part fits in place precisely with the fuselage. The auxilliary intake doors have the correct shape, but the radius of the curve is too small, so it will be modified. All scribed detail will be completely removed and the whole fuselage will be redone correctly. Studying the plans, measures and photos, I noticed the front airbrakes are inaccurate in shape, length and actual position on the fuselage. After thinking about the problem, I figured it will be easier to just replace the bays completely, still using the corrected kit airbrakes. This is a lot of work, but I think it is worth it as the resulting parts will be much more accurate and I am sure it will be quite noticeable on the finished kit. Regards, Alain My thoughts with you and your family André.2 points -
Hi Mates, Thank you very much for your kind comments Some small progress on the Red Roaring Beauty! Test fit of the rear structure and tank. Battery and coils prepaired, masked and primed. Starting to connecting brakes and fuel pipes. Engine pan scratched. Alfa Rosso On the coils: ... And white (Titanium White GC) for the battery I hope you enjoy the WIP. More soon! Pascal2 points
-

Paul Fisher Fire Relief - GoFundMe
David66 and one other reacted to paul fisher for a topic
You guys are awesome....So far quite a few of the model car guys have volunteered kits for re-casting also, but it will be a while before i can do any of that.The model has to be cut up strategically and enlarged a wee bit so it returns to scale via shrinkage but it can be done. A few of my guitar clients have also offered me the loan of their instruments so I can ,make new drawings, and the very first one I ever built is right here at my son's house, I gave it to him a while back as a birthday gift. Once again, I just have a to express my thanks for this amazing bunch of people, the weight you have lifted from our shoulders is a huge relief, and will speed us on our way back to normalcy. Susy is just speechless.One of her favorite jokes when someone asks her what her job is was to say " I make men all over the world happy" with just the right tone of voice.....She's pretty happy to know just how true that is. Thanks again Paul2 points -
After the glass parts were applied, there was really not much left to do but attach the solar panel sections, and then put them on their bases. As to the bases.....................this was/is really the only complaint so far I have had with any of the new gen Bandai kits; in this case I broke both mounts that attach the Tie Fighters to the top of the base arm. This area is extremely weak, if the wrong pressure is put on it I found, it will break with ease, and in my case, let one of the Tie Fighters tumble to the ground, fortunately with ZERO adverse effects. I ended up having to permanently glue the top of the base section to the base arm. After that things were all wrapped up with these two Ties: Thanks to one and all for the positive comments and encouragement along the way. If you like Star Wars at ALL, do yourself a favor and get some of these Bandai kits! They will make you wonder why our aircraft manufacturers cant get get fit this good. All in all (realizing they are much smaller though) I've now reached my output of completed models PLUS another 1/3rd from ALL of last year in just under 3 months. REALLY a lot of fun to build and paint. THIS is the kind of thing that got me into modeling in the first place!2 points
-
It occurred to me while looking at a photo today that I'd meant to tell you folks about an idea I had years ago, and have been using that idea ever since. I was adding some tiny pre-painted parts to a model using tweezers, but kept scratching/marring the paint. My solution was to plunge the tweezer ends into hot candle wax, let cool, then use the waxed tips to grab the small bits. This also had/has the side benefit of allowing the soft wax to grab the part easier, as the wax is ever so tacky, but not so much as to mar the surface of the part being handled. Once finished, I just slip the wax tips off, and throw them back in with the candle wax that's already melted, for reuse on another day.1 point
-
Revell is adding a Fw 190 A-8 Rammjäger to its 1/32 scale lineup. The kit is scheduled for release next spring, and will hopefully include the external armor for the fuselage and canopy.1 point
-
Yay! and YAY! with a side order of YAY! Cannot wait.1 point
-

Airfix News Just in from Telford: 1/24 Hellcat!
Out2gtcha reacted to Dpgsbody55 for a topic
It seems to me that if you have a spare 1/24 pilot hanging about in your spare parts box, you can make sufficient "adjustments" to that figure to make him fit. After all, you only need to see head, torso and upper arms. All this talk of pilot figures and spinning props has me thinking that I might build mine with gear down and flaps partially lowered and dangling from the ceiling as if on approach. This means that I can also display it without the pilot on the shelf. Definitely looking forward to building this kit!! Cheers, Michael1 point -
Really impressive work.1 point
-
Kitlinx has them now! They bought out Roll Models who had bought out the original Waldron owner. I did not see and Mustang stuff but hopefully that is coming out later.1 point
-

S-3B Viking - scratchbuilt
Starfighter reacted to Jack for a topic
Ben, due to "serious-real-life-issues", i haven't been able to check on your fantastic Viking from time to time, and i'm sorry to say i almost forgot about it, but was triggered again in the "sideline" opening the LSP site, and there it was: I'm really flabbergasted by this enormous inspiring project (just as your recce crusader was) and i'm anxious to see this great model of yours in real-time. best regards, Jack1 point -
Thanks guys. I cast up some copies today and will be selling these for $15 each plus post. My first batch has sold out already and will do another batch tomorrow for those interested. I painted my own panel with MRP `Tyre Rubber' and then used the excellent Airscale WW2 British instruments to fill the holes. I filled the hole with future (YES I USED FUTURE!!) to silumate glass faces of the instruments. [/quote]1 point
-
this one didn't turn out too bad from last night1 point
-

Zukei Mura: a jet in 1/32???
D.B. Andrus reacted to Radub for a topic
Choice is never a bad thing. I would rather have to choose from a number of good/bad models than be stuck with one good/bad model. I will never understand the "anger" of those people who say "I do not want this, I do not need this". If you do not need something and you know it, you should feel "serene". Radu1 point -
Hi Mike - I have them made when I get batches of stock made by Fantasy Printshop for my airscale lines - trouble with that is I end up with 25-50 sets... So, evening all Its been a while, so now Telford is out of the way I start to get my mojo back. It was great to meet up with everyone and I still can't believe we sold out of our show stock for the new HK Lancaster cockpit set ..next up for Lopes Hope is the sidewall completion so I can prime & paint the main structures before fetailing them.. seen here left to right - the low shelf down by the side of the seat holds the signal flares, the star shaped thing sticking into the fuselage ay the mid point is the mounting plate for the signal pistol (I think the pilot shot through it, but don't recall seeing big holes on the outside of the airframe?), and on the far lower right is a sort of triangular curved lever housing which is the bomb control selector... (with a red handle top..) ..these were the next bits up onto the bench.. ..the low shelf was created from plan drawings put together in different colours so I knew where the folds were - these were then stuck to litho to be cut out.. ..folded, finished & with the metal parts of the holder added.. ..same process for the flare gun holder - the part was drawn & scaled - some dents were made around the inner hole with a screwdriver and the part cut out.. ..I forgot to take pics of the finished part, but you can see it mounted here on the sidewall along with the shelf.. ..and test fitted with the completed pedestal... ..the bomb selector lever housing was made by using a PE template to make a plug I can vacform over.. ..lots of plastic to get one little part... ..trimmed & with details added this will be primed & painted before adding metal internals and the lever itself.. ..I also made the panel the housing sits on - this side is nearly ready for painting.. ..good to be back at it TTFN Peter1 point
-
I modified the opening when I built mine. Flatened the area just aft of it.1 point
-
Undersize Trump. MiG-21 MF Fuselage?
Greg W reacted to Alain Gadbois for a topic
Hi all! Here's the top of the front fuselage. I will replace the panel with a new one that will be longer and will also feature the correct concave area where the oval is scribed at the front of the part. The inner detail in the kit still fits correctly if you move it back a bit . So if you have a resin replacement, it will fit also. I don't plan to do all the structural detail on the inside though. André, while looking in the box, I remembered I have the black box set!!! So here it is in place and it fits well when enough resin is removed from the bottom. The only thing is the back part is too vertical. I don't know if it is bent or what, so check yours to be sure. See how it sticks out ... Bye for now! Alain1 point -
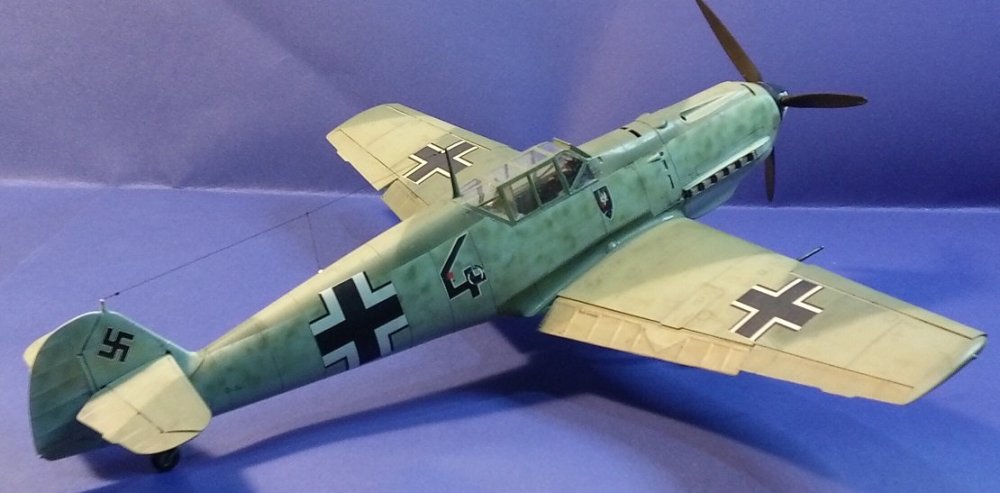
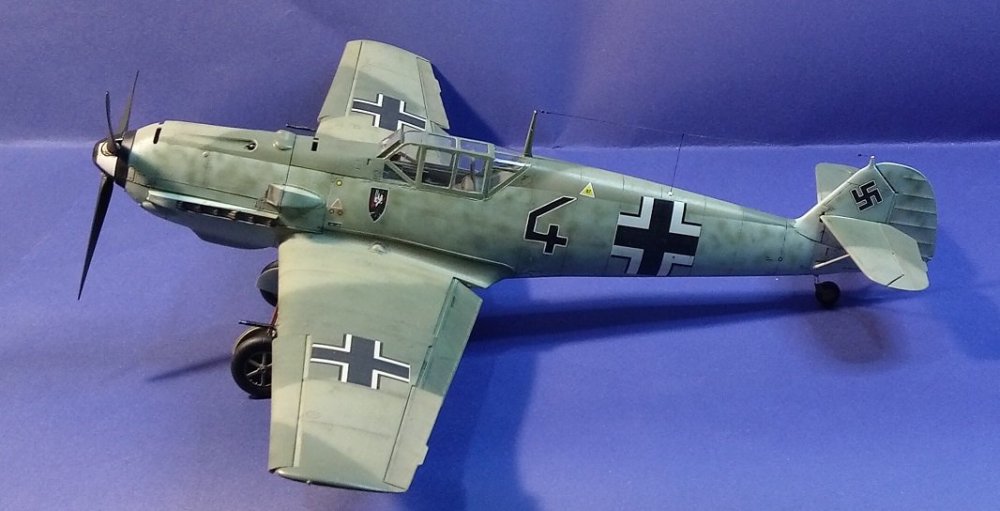
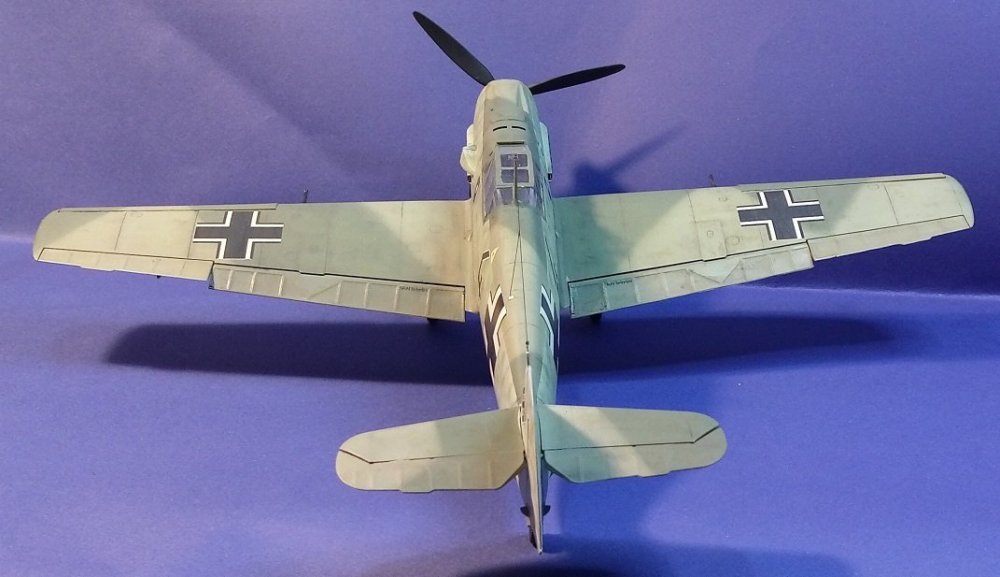
Gazzas is up next with another single seat night fighter, this time a Bf 109E-4 from NJG 1. Great work mate. Link to build thread;

 1 point