Leaderboard

Popular Content
Showing content with the highest reputation on 11/02/2018 in all areas
-
Finale14 points
-
Hi-Tech edition, Begemot decals, Yahu IP, HGW seatbelts, Eduard masks & PE, MR.Paint colors11 points
-

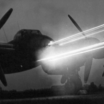
F-117 Trumpeter 1:32
Loach Driver and 6 others reacted to Koralik for a topic
This time the model F-117, the model is very simple to fold and very difficult to paint. I tried to make this model many times I took it off the shelf and put it back. Reason? One question: How to make a black model wouldn't just be black? I build models straight from the box and so I always try to focus on painting. I often make models that are a bit too heavily damaged, dirty but in my opinion is the only way to give them a bit of life. F-117 Trumpeter 1:32 the model is very easy to fold and you will not have any problems. At the begining few photos 1:1 At the begining few photos 1: 1 F-117 Trumpeter 1:327 points -
Next7 points
-

Meng's Me-410 B2/U2/R4 Complete! 2/Nov/18
mustang1989 and 4 others reacted to Gazzas for a topic
Hi Everyone, Time to call this one completed. I enjoyed building the kit as it was a completely new airframe to my clumsy hands, and most of the details were adequate enough to feel that I could go without buying AM parts. The too-short spinners are a well known flaw, but easily fixed. The tires are overly large and much of the surface detail is a little trench-like. Other than that, the only things I would change if I were on the kit's production team would be to add a second, simplified canopy in two parts, and correct placement of the foremost pins on the Wf.Gr 21 rocket launchers. I didn't notice they were wrong until too late. I had my own quest for surface detail, and I have to admit this is probably the heaviest weathering I've ever applied to an aircraft model. If anybody has any helpful critique, I'd appreciate it. Thanks for looking! Gaz5 points -
Well, being a "two seater" fan, i received this one today: I'm too busy with "real life issues" at this time, but i'll try to get a review out, but don't hold it against me if it's not within a couple of weeks..... Jack.4 points
-

1/32 Marauder
Model_Monkey and 3 others reacted to AlexM for a topic
With all the weight in the engine cowlings/nacelles to prevent tail sitting, this tourns out pretty heavy. The first printed main landing gear parts are definitely not strong enough, especially since those were mounted in a scary angle on the real plane. I'll try another approach, this time, the straight part of the leg is hollow with a 2 mm strong hardened stell rod inside, which sits deep (but not accurate) inside the wheel well. But the bent part (wheel fork or however this is called) is still critical Here is the experimental construction (the green one on the left is the original but too weak leg):4 points -

1:32 Sopwith Camel of Barker
Model_Monkey and 3 others reacted to sandbagger for a topic
Hi all, The propeller is done now along with the engine, Mike4 points -
I'm back in the hobby room, upper wing halves stripped clean and repainted...Good old Tamiya paint pulled through and did the job once again. I masked and painted the upper wing markings and feeling creative, I used a method previously proven to paint the shark mouth on another kit I ruined the decals on early in the build...but we wont go into that here. I marked out the shape I needed on note paper, cut it out, placed it on the model, wet it down with a eye dropper and paintbrush till it lay flat and snug on the model and shot my paint over it. Basically a wet paper mask. So, I can laugh... though carefully, at the MM paint still in place on the fuselage. I'll use the same method for the fuselage ID lettering and under wing markings, the rest will be decals. But happily, this way, I get the satisfaction of my painted on markings.4 points
-

New HpH DC-3 Pics up!!
brahman104 and 3 others reacted to ericg for a topic
I really hope that HPH have spent some time building this model that they plan to sell so that they can experience what the customer has to deal with. Having completed a HPH kit (which BTW is one of my favourites in my collection) and having relegated their mega expensive Concorde to the Shelf of Doom, they are complex kits which require a little too much resolve to build for the price paid. Whilst I am comfortable modeling my way out of most problems, I found myself scratching my head at most stages of the builds thinking ‘WTF are these guys thinking!’.... you really feel as though the test build of the model is left to the customer. So I hope the DC3 is buildable. Will hold off and let someone else go first in this instance.4 points -
HGW big riveting set (masks, positive rivets, stencils, seatbelts), CMK gearbays, Quickboost gun barrels + exhausts, Yahu IP, Eduard wheels + exterior/interior Brengun - those are perfect.3 points
-

New! Live Resin helicopter figures
D.B. Andrus and 2 others reacted to Live-Resin for a topic
Live Resin released a helicopter crew figures Seven figures - two pilots, two door gunners, three SOF soldiers and one accessorie - helicopter fast rope frame with ropes set. Aircrew are wearing AIR WARRIOR SYSTEM (PSGC), HGU-56/P helmets, and contain cyclic and collective grips Improved, high realistic sculpt, natural poses, true equipment, very delicate cast Tested on all basic plastic helicopter models, including HH60G by Kittyhawk model Available for order -https://models-hobby.com/ Low cost of worldwide shipping and hot discount is active Please, support our work3 points -
Dambusters HKM conversion kit2 by Graham French, on Flickr Dambusters HKM conversion kit3 by Graham French, on Flickr Dambusters HKM conversion kit1 by Graham French, on FlickrDambusters HKM conversion kit 5 by Graham French, on Flickr3 points
-
Thanks Brian, this is the part I've been looking forward to and dreading at the same time3 points
-
I have the Bandai 1/24th kit with interior as a cushion. They also did the king Kitty, and panther, so I;m good for a bit.3 points
-

Kitty Hawk's new Black Hawk!!!
scvrobeson and 2 others reacted to Robthepom for a topic
I had a really enjoyable few sessions with archer rivits to my revell lynx and can highly recommend them, yes maybe the should be moulded but I actually love adding detail so rivits or not, i'll buy one3 points -
Me too. But now that I know what to look for, I will have to make the mod! Cheers, Tom3 points
-
Thanks, Kev! I haven't forgotten my older started but still unfinished projects. With my new printer (Anycubic Photon), I thought it was time to print some "raining iron", which was the motto of the group build. I made some "100 kg Z wz.31 destructive bombs" (according to my reference). The PZL.37 could carry 16 of those within the wing bomb bays (and aditional bombs in the center fuselage bomb bay, which is closed on my model) - pretty impressive for such a comparatively compact bomber of 1939. I also continued with the actual bomb bays (old school: cut and drilled styrene plates and profiles). Cheers Alex3 points
-

CONTINUATION OF MY 1:20 SCALE SCRATCH BUILT B17G (RADIO ROOM)
Ol' Scrapiron and 2 others reacted to fozzy for a topic
Hi Guys Back again with another installment!...have had more distractions than you can shake a stick at but found some spare time again to try and continue with this build! I managed to complete both port and starboard Oxygen and Glycol tank bays which are under the floor of the radio room.A bit difficult finding photos of said area but I found a diagram giving the positions of the tanks and decided to roll with that! So here we have the areas prepared for the tank installation....both port and starboard.......... Starting with the port side ..here are the 2 oxygen tanks installed with all the connecting air lines... ....and here is the starboard side that houses one oxygen bottle and the Prop anti icing Glycol tank So now the next section will be the camera bay under the floor of the radio room...again not many photos and diagrams of that area but I will have to do my best with what I have! So until the next post ...cheers for looking in ! Fozzy3 points -

WNW kits sold out - what’s next?
BiggTim and 2 others reacted to Cees Broere for a topic
The Lancaster obviously judging by the 40 pages on LSP. Cees3 points -

HKM Lancaster invoice from Free Times is here!
Rick Griewski and one other reacted to ScottsGT for a topic
Just paid my pre-order invoice. That only means one thing, we should be seeing them in our stashes real soon!!2 points -
Sporting a new cammo scheme, looks pretty cool: Several J-20A Mighty Dragons arrived ahead of the Zhuhai Airshow with brand new paint schemes. (Photo: Hunter Chen Photos via Twitter and Facebook.)2 points
-
Decals, Iconicair 1-32 Dambuster Lancaster Decals by Graham French, on Flickr2 points
-
Hmmm....maybe I don't need to model it? Check this out...https://sketchfab.com/models/d7739216abbf4196afb26a96799a332d Tim2 points
-
A state-of-the-art Tiger Moth, Miles Magister and Stearman. (Don't want much, do I? )2 points
-
Hey Dan! Step drill. Heck yes! Thank you thank you. Now, cannot wait to show you guys the new landing light! The tip lights on the other hand.....the material must be at least .3 x .3 inch section. I have to go find a bigger toothbrush! Or it end up being a lathe turning.2 points
-

NEWS IN HpH !!!
scvrobeson and one other reacted to Mirek O for a topic
Yes canopy is new and I hope is correct, Yes you ca buy just the canopy.2 points -
Truer words never spoken IMHO. I do like HpH kits a lot.....but sometimes they can really sap your modeling will because of certain aspects of the way the kit has been chosen to be engineered.2 points
-
I am happy to say the machine gun work is finished, both wings. The LH wing turned out as good as the RH wing. That's a relief. No pics; would be repetitive. So the goal here of course is to complete whatever is required such that the upper and lower wing halves can be joined. All the work either creates something that is missing, or modifies something that is inadequate. For nearly all the wing sub-projects, they can be divided into work done prior to wing half join, and work done post wing half join. So far, most of the work I have done on the wings is needed prior to wing half join. Here is a list of sub-projects with status: Done: LG bays LH, RH Guns & LE penetrations for guns plus inside supports LH, RH LE penetration for pitot mast plus inside support LH only LE penetration for gun camera RH only LE penetration for air duct RH only Partly done: Flap supports LH, RH Dzus fasteners gun bay and ammo bay LH, RH To do: Finish above partly done items Landing light relocation LH only Tip lights LH, RH ID lights (red, green, amber) RH only Aileron supports LH, RH Bomb pylon internal supports LH, RH (may not need anything here - just holes) Install landing gear LH, RH So alot of work left to do prior to buttoning up the wings. Then, after wing half join, there is more work to do, including paint of course. I have a plan for all the remaining work, but am worried about two items: landing light, and tip lights. I seek guidance from the masters. So on the -30 variant (and on), and I am modelling a -30RE, the wing landing light (LH side) was moved from behind the landing gear bay to closer to the tip. No doubt, it was to make room for dive flaps, which were introduced on that variant, and which this model will get later. Of course, my LH wing has the light in the wrong place for a -30. Here is a picture of the landing light area vigorusly sanded on to remove the landing light doubler, and the "made in china 21st century toys" raised lettering: Yup, the lettering is gone. So now I do not have to see snide comments on it anymore. I will add a cover for the landing light hole, a bit of putty, sand smooth, and it's gone. BTW - the light was a good bit too small. So what's my problem with the landing light? Well, it requires a .50 inch hole drilled in the lower wing skin near the tip: I have drilled a small pilot hole at the location it needs to be (the small black dot - not to be confused with the big screw hole above it, which will be covered up). That is going to be a big hole. I'll do it with the end mill but there will be alot of power behind the drill, and I think it puts the wing panel at risk for severe damage if the bit digs in and it gets away from me. What I need is a clean .50 inch hole. Any ideas? The tip lights - here is what is provided on the toy: If one knew nothing about P-47's it might be OK with you. But I know it's wrong. The real light is larger (see the pencil lines in the picture), and it is clear plexiglas, not colored. Here is a shot of Dottie Mae's wing tip: Let's unpack that a bit: The glass is clear, it's larger than what is on the model presently, and the bulb is colored (not the glass). The structure inside the plexiglas is painted with ZC primer. And, the flanges the plexiglas is attached to have neoprene black tape serving as a gasket of sorts. I can model that convincingly in theory, and to be sure, I could probably delay the work until after the wing halves are joined. And I might. But the big challenge is to provide a clear properly shaped part to fit in there. Wow. Well, I think I can make the glass out of 2-inch diameter clear acrylic (2.5+ inch dia would fit better, but I don't have any, and it would be too big for my lathe). I would machine a big ring with the right cross section, or close), and then cut the two flats. After installation, I can file and hone to final shape. That is a pretty bold plan. I worry the acrylic is hard enough to resist final filing. So I read once where a guy used a clear portion of a tooth brush to make a clear part. Maybe softer plastic.... Any comments on that? Anyone have better ideas? FYI, the flooring on half my house gets done in the next few days, including the modelling office, which will be a big fat interruption to say the least. Stick with me; it will be worth it!2 points
-
Nope... you're not the only one. I've seen the same Panzer III footage invading Poland, Invading France, Invading Russia, and hastening to the defence of the Normandy coast in one WWII documentary series. I've seen the same footage on other docos, too. That's one busy, and long-lived little Pz III. Gaz2 points
-
Thanks Alain, I do like my models to have a "lived in" look about them! Talking of which: Getting there on the front cockpit.2 points
-
Like so?2 points
-

ICM 2018 1/32 Release
Alain Gadbois and one other reacted to esarmstrong for a topic
I love the stubby little Rata; and the Seagull (I-153) is fine, too. I'm just glad we are finally beginning to see GPW Soviet subjects in 1/32 scale.2 points -
I had nightmares trying to fit my Corsair wheel bays! Kev2 points
-
B version of Bu-131 should be released soon, nice boxart and figures as well http://www.icm.com.ua/news/ jan2 points
-
Meng's Me-410 B2/U2/R4 Complete! 2/Nov/18
private_hell and one other reacted to Gazzas for a topic
Got the clear coat on and decals. The decals are Cartograph and perfectly in-register. I just picked the nicest looking option from the kit decals as I have scant knowledge of the men who flew these. Got a birthday party today. Hopefully I can squeeze in some work with the oils. Thanks for looking! Gaz2 points -

"Willie the Whale", FINISHED
sandokan and one other reacted to blackbetty for a topic
working on the pit i realized i´d better scribe the fuselage next to avoid braking off details later 41 by karl holubar, auf Flickr i am also not really satisfied with the canopy-fuselage transition, my version is too rounded, so i have to do it again 42 by karl holubar, auf Flickr have i mentioned that i neither like nor do a good job at scribing? 43 by karl holubar, auf Flickr2 points -
"Willie the Whale", FINISHED
sandokan and one other reacted to blackbetty for a topic
some more work on the ip and instrument shroud: 39 by karl holubar, auf Flickr 40 by karl holubar, auf Flickr2 points -
Always thought that was a really nice kit Kevin - built one as a teenager and recall it being a very nice build... Iain1 point
-
Sorry Jennings. export not import. I haven't found a US source that has a normal retail supply. Those few that have them are scamming them (IMHO).1 point
-

"Willie the Whale", FINISHED
blackbetty reacted to Troy Molitor for a topic
I really don’t know why, but I really like this post. I’m not really a jet guy but i’ll admit this whale is really growning on me. I love the unwavering attach and attention to detail which go into every post. Amazing build going on here Blackbetty. I’d like to see some color over the white plastic just to get the Moby dick out of my mind! Ha. Well done mate, please show more. Love what’s going on here. Troy1 point -

1/32 HS293?
BiggTim reacted to Rick Griewski for a topic
Tim, I found one diagram on the WWW. Google 'Luftwaffe flying and or guided bombs'. Many other museum samples too. HTH, Rick1 point -
Those decals could be on their way from elsewhere in due course, watch this space!1 point
-

MiniArt 41003: 1/35 Flettner Fl 282 Kolibri V-21
Rick Griewski reacted to LSP_Kevin for a topic
Howdy folks, Mitko Nikitov has review the V-21 Kolibri from MiniArt: MiniArt 41003: 1/35 Flettner Fl 282 Kolibri V-21 Thanks, Mitko! Kev1 point -
Well...looks like Airfix has answered this question. In the Car Door kit you will see both the late (top) and early (bottom) wheels: Since I have the Eduard wheel set with the late hubs, I will see about surgically removing the kit early hubs and transferring them to the Eduard set. I will keep you posted! Cheers, Tom1 point
-
Revell Hasegawa Spitfire
LSP_K2 reacted to Troy Molitor for a topic
Inspiration. I dug out my Mk-1 kit last night and started fitting an Aires cockpit in it. I had a mid night conference call and had some time to kill before the call happens last night. I have the awesome the Fundecals set for this kit as well. William did a cracking job on his build. One of my favorite Spit builds. The kit is nice and slender. The wing looks great too. Hope me we can find the pictures too! Sorry. Back to the Tamiya acknowledgement! We need a Mk-1 Spitfire please! Troy1 point -

1/18TH JSI F-14B Tomcat conversion
Squizzy 78 reacted to A-10LOADER for a topic
Greetings everyone, I'm thinking this will be my last update until the jet is completed. I want my final reveal to be a surprise for everyone and, because she's so close, I don't want to give anything away until she's completed. I was able to get the entire jet weathered and gloss coated again, to lock in all the weathering and to also help darken up the colors so that when I flat coat her, the colors won't fade away. I need to fix one slime light decal, flat coat her, do the metal colored areas and then I can unmask her ( I'm really looking forward to that part, hopefully no over-spray found it's way inside the cockpit ) and get all the pieces added to her. I'm hoping with in the next two weeks, at the very latest, to have a finished product to show all of you. Thanks to everyone who stayed on this ride until the end, I appreciate it very much. Steve "TOMCATS FOREVER, BABY...!"1 point -

ICM 2018 1/32 Release
Rick Griewski reacted to mozart for a topic
Figures and another Bucker version, what more could you hope for? (rhetorical question! )1 point -

1/32 Hasegawa Messerschmitt Bf 109G-2
Rocat reacted to Tolga ULGUR for a topic
1 point -
Thank you for the wonderful compliment, Kevin. It is a privilege for me to be so well received. Thank you, Alan. 'I don’t know if this is modeling or engineering!!' A little bit of both, it seems. Thank you, Kevin. This build has for me required a diversion at times. I do a lot of scratch building, which has become second nature, but this is the first airplane conversion I've ever attempted. Lots of new ground challenging the brain cells. Thank you, Brian. Superficially this didn't seem very much. Especially since I had the Horizon vac. I put a lot of faith in the vac being accurate. But once I started to study everything it became clear it isn't as accurate as it seems. I am doing tasks that I really don't want to do but need to be done. Onward thu the fog. Not perfectly perfect, but perfect enough for me for now. Where to begin? Located the propeller on it's own base so it could be slipped onto the brass drive shaft. Made the cone separate. Sunny side Shady side. Notches for the prop. Rough dig-out for prop base. Spinner base. Notches for prop. Decided to use Sculpy as a filler instead of clay. Removed the circle and did some sanding. The leading edge is not razer sharp. The leading edge has a return. Still working on evening that up. Prop on spinner base. All together now. Gotta match this. Well, I don't GOTTA, but it would be better than not if I did. Almost there. Thank you for your wonderful comments, looking, and liking. Sincerely, Mark1 point