Leaderboard

Popular Content
Showing content with the highest reputation on 09/09/2018 in all areas
-
Little progress. I've been busy on the bomb bay(s). The bomb bay walls are not very clean, with some scratches here and there. But most areas will be pretty invisible at the end, so no problem for me Bombs come from the spare box. Left ones are from the Revell P-51. I think the four ones on the right were from some Trumpy kit. I enlarged the fins a bit so they will match with the other ones. Don't know where the two partly painted ones in the midle came from. Cheers Alex11 points
-
Alrighty, more progress today worth sharing Decals completed on one side, also walkways and aluminum LEs masked and painted. Cowl and cowl flaps taped on for photo still, I'm procrastinating on attaching the front end for some reason. I noticed that the fluoro on the outer wings hasn't come out fluoro at all, rather a flat orange. I'll make it simple and strip/repaint the outer wings completely. The insignia are a bit see-through and the demarcation between the gray and red underneath is noticeable. Conveniently there are additional insignia (insignias?) on the decal sheet, enough to double-up on all the stars-n-bars on this ship to kill any see-through effect -thanks for doing that, Paul! There's are some great photos of Fluoro AD5's over on Cloud9 photography including what I believe is another Sand Point aircraft. Photos are copyrighted so I won't direct post it here, but you can see it at this link. I think I'm going to ignore the aluminum LE of the tail... https://www.cloud9photography.us/Military-Aviation-Photography/DAYGLOW-Pictures-of-US-and-Non/US-Navy-Douglas-A1-Skyraider-D/ And here's where we're at now!9 points
-
Thank you for the comments guys! Sorry about the glacial progress - lots of very fiddly jobs now. All of the decals are on, except for the red X and red flash on either side of the rudder, which I have to learn how to create. I did strike a glitch along the way when the fuselage seam next to the slot for the strake underneath the fuselage gave way toward the end of the foiling. In the first photo you can see the resultant line in the foil. Plan A was cutting away a slither of foil, shown in the second photo, which will be hidden by the strake when fitted. The errant seam was superglued. This appears to have worked and the two fuselage halves no longer flex alarmingly! The Canuck Symmetrical Markings decals are beautiful to use, although they do need to be handled with care. The long thin ones did cause me some grief, but got there in the end. I just used water and Microset on them. The only annoying thing is that the flag markings on the rudder are slightly translucent and should have been placed on white decal rectangles - which I did not have available. That aside, they gave me the best result I have had from decals yet - almost perfect. You can only barely make out the remaining decal film on a couple of the smaller stencils by looking carefully under oblique light. For the rest, the film is all but invisible. Good enough for me. The bang seat is now in place although not fixed: it slides up and down the rails, although whether it will when the open canopy is in place remains unknown. It would be nice to not have all of the details behind and beneath the seat completely lost from view forever more. Now it's on to teaching myself how to make decals. It could be a while ......... The seat in its rightful place. The open weapons bay is represented by matt black paint on which the central pylon will sit, leaving a fine black border along the sides where the pylon should appear to be sitting inside the bay. Cheers, Mike7 points
-
Thanks for the kind comments, its a great kit with so much detail. I have finished the skeleton of the aircraft, i must now decide what to do with the skin and how much detail i want on show, i might close one side of the wing I'm very happy with how the HGW seatbelts came out just need to tidy some of the weathering, then crack on with the skin7 points
-

Eduard Bf 109E-4 1/32 Profipack
Shawn M and 4 others reacted to TimHepplestone for a topic
Couple of therapeutic hours with airbrush in hand. Firsy attempt at adding mottling. According to my references there was fairly heavy mottling on the port fuselage but more restrained on the starboard. Also finally forced to decied on airframe. I've gone with Galland's aircraft, circa BOB. Think I'll mull this one over a galss of red. I may revise some of the mottle. Note the patches on the rudder that remained RLM 65 for Galland's kill markings5 points -

TU-134 A BG Air Force A-Model 1/72
mpk and 4 others reacted to ShelbyGT500 for a topic
Well , the interior is done and ready for painting : And start the "rivet counting" over the fuselage: She has more rivets than any other plane from that period Cheers guys5 points -

Dragon/ AIMS 1/32 Messerschmitt BF110 G-4 2Z+GB Stab 1./NJG6..........Finished!!
kuya and 4 others reacted to monthebiff for a topic
Thank you all for your comments so far on the pre-shade stage of the paint scheme for my G-4. Managed to get the RLM 76 on today using a custom mix of Tamiya colours heavily thinned and applied in many many thin layers. Next up I will concentrate on getting the RLM 75 mottle on, need to study some more pictures before before I go for it though as I want to get the pattern and coverage just right and try and keep it quite subtle. As always thanks for you comments and support on this build. Regards. Andy5 points -
Thanks folks & thanks Troy - that is exactly how I like to see it - one bolt at a time I have made what is listed as the 'Right Switch Box' - it's this bit here.. ..one of the advantages of making your own PE is that you can pre-think how to render shapes. In this case, the actual switch box is a simple rectangle with holes & details, but the circuit breaker cover plate is a structure i decomposed and 'folded flat' so I could try and fold it up in PE.. ..with some folds & bends, I have a scale reproduction with all the angles juts right as they are from the drawing of just this part... ..made a base shape from thick card and assembled the laminate of the switch panel itself. It has a small dial so I added the decal and a sheet of glass to the back structure.. ..then other components were folded or added and the switch handle made from bits.. ..all sprayed with semi gloss black.. ..and with the addition of the custom decals the component is complete.. ..and this is where it will sit.. ..more boxes & bobbins to come to carry on with the sidewall.. TTFN Peter5 points
-
Ok ill let the cat out of the bag, based off my dealings with the many, many inner circle and vast contacts deep within tamiya... the next two 1/32 kits are a razorback p-47 and a hellcat.4 points
-
Yes, I do tend to be quite bashful in person. The conversation that you, Shawn and myself had with Izzet (Lots of Models), was quite the eye opener. All in all, a great day, at least as far as I'm concerned. Helping to figure out the Death Star dilemma (or at least pointing you in the right direction), was quite cool too. It was great meeting you and your other half as well, Daniel; I'm mighty glad you enjoyed the event. Any word on how Shawn did with his Typhoon and other items? I left before the awards presentation. (I'll spring for a bag of chips the next time, for sure.)4 points
-
thanks chaps little bit more done this weekend, but the little bit was actually quite important (& time consuming) in terms of dictating the success of the cockpit structure.. ..I need to not only get the side walls right, but becuse I want to build up parts like sidewalls, floors etc seperately, I need to make sure I have sub-assemblies that can slot together when it comes to actually completing the cockpit 'pod' one part of this will be the floor where the fuel tank sits and where the 'A' frame and seat will be mounted - this was a laminate of the detail layer, a full thickness PE strengthener and a thick card sub-floor.. ..one thing that soon became obvious was I got the bulkhead positions wrong (the slots in the floor..) - I took them from where they would be not allowing for the slant of the 'A' frame, but given the 'A' frame is at an angle, it moves where these slots should be I used a template to set the angle of the 'A' frame... the upper plastic card bit has an angle at the front... ,,and taped up before adding lots of CA and strengthening bits where they can't be seen under the floor.. ..I had to partially destroy the jig to get the sides out last week, but I figured a way to re-use it and spent hours fettling the parts so the floor sat correctly with the A frame in position and the slots for the bulkheads.. ..the trickiest part is the bulkhead that goes where the big slots are - this is in bits in the real one and bolted together - I made it one piece so need to thread it onto the floor like cotton into a needle and twist it into postion.. ..this means I have some tidying up to do around where the floor & bulkheads meet.. .. this is all now correctly positioned and I can use this when it comes to assembling the second bulkhead permanently to make the floor sub-structure unit.. ..coming together.. ..next I need to think about the fuel tank that sits here - I meant to design it in 3D but didn't get round to it and now my free trial has run out - I might try balsa and tissue or something as it's quite an organic shape & covered in rough self sealing rubber.. until next time.. TTFN Peter4 points
-
New technique tryout I have been wondering how to replicate the typical weathering on the KA-6D Like this and this: (the white one ) and this More specifically the nose with the clearly visible effect of dirtying, cleaning, dirtying again... Though the best way to try this would be to get the MIG scratching effect sprayed on the area, then tamiya smoke on it. Once dry activating the Mig product with water then either brushing the area with a bery old short brush or even a sponge for more effect First try on the stabs, where it's easily corrected in case of screw up: Subtle or heavier, easy enough. I'm glad with that. Let's go on the nose area: The contrast is emphasized int he picture, so the effect on the model is less visible (say more subtle ) I'm happy with it, as always it will be toned down the coming corrosion control (fresh white in some area on top of that weathering) and with the gloss coat that's needed now before decalling The underside and the reel have received the same treatment That's my concept of a good Sunday at the bench4 points
-
I seem to be in a modelling slowdown, I have a half completed Hayate on the shelf and no interest in finishing it. Having had an extension to the house built I also have a brand new study to work in but the mojo has gone. So I decided to build something completely out of my comfort zone, something expendable, our local Home Bargains had these Revell 1/48 Ventura's on their shelves at £9.99 a pop so I thought why not and bought one. Will see how my sausage like fingers get on with it. Cheers Dennis4 points
-
My "gatherings" from today's show here. No kits at all today, but I'm always up for some more books.4 points
-
my last built , enjoy : voila voila3 points
-

German F-104 Camo Colors
Bill Cross and 2 others reacted to Ivan Ivanovich for a topic
Bundesluftwaffe F-104G "Norm 63" camouflage colours: RAL 7012 Basaltgrau/Basalt Grey -> appr. FS 26152 RAL 6014 Gelboliv/Yellow Olive -> appr. FS 24064 RAL 9006 Weißaluminium/White Aluminium (metallic/aluminised topcoat) -> appr. FS 17178 Silver/International Aluminum Radome: RAL 9002 Grauweiß/Grey White (appr. FS 17875 INsignia White) with FS 34079 anti-glare shield RAL 2005 Leuchtorange/"Lumninous Orange" (RAL) tip tank conspicuity markings -> appr. FS 38903 Fluorescent Orange Marineflieger F-104G "Norm 76" camouflage colours: RAL 7012 Basaltgrau/Basalt Grey -> appr. FS 26152 RAL 9006 Weißaluminium/White Aluminium (metallic/aluminised topcoat) -> appr. FS 17178 Silver/International Aluminum Important: Dead sharp camouflage colour transitions.3 points -
Had an amazing time yesterday with everyone! I was honored to receive the following awards: Typhoon- 2nd in class Cobra- 1st in class (amazed by this, our chapter is TOUGH when it come to cars) SAS Jeep, 3rd in class Vanship, 2nd in class Had a ball, learned a lot and remotivated to kick some butt on my UHU build3 points
-
Hi a second intruder pilot is on the way, but have to test-print the MS-22001 oxygen mask now3 points
-

Hobbycraft 1/32 Nieuport 17 and Sopwith Camel
Model_Monkey and 2 others reacted to CANicoll for a topic
Making progress, slowly. I did finish rigging that WNW DH 9a, which was a beast. Not sure I will ever do that again - rig a plane that has been completely built. I did learn some new techniques - like using UV-reactive glue and using those tiny Glue Loopers I bought in Telford last year - really handy for getting just bit of thin CA just where I need it. On the rigging side, getting more done: A And got the engine installed, but not a lot of weathering. Have a lot of touch up painting on the struts to do. Top View: Planning on using one of the Barracuda resin seats in the cockpit. Red chevron is painted, not the decal. Cockpit is VERY simple. Bottom view. Landing gear struts are a little skewed, not sure what to do about that. It is pretty flexible so have it on a flat surface in the right position. We'll see if it stays that way. HUGE seam to fix at the base of the wing. Actually have not painted the bottom of the fuselage yet. Had to do a lot of carving to get the horizontal stabilizer to fit, right now it is a very tight fit, but it is just pressed in there. Will see what I get done tomorrow, then off on a business trip so won't get anything done next week.3 points -
TU-134 A BG Air Force A-Model 1/72
Martinnfb and 2 others reacted to ShelbyGT500 for a topic
Hi Jennings and Thanks ;), well for the vertical fin it is different with the different modifications of the plane, but yep there is something true in your words, not only for the fins Here I re-worked the all front gear, because the manual is some insane and crazy thing . . . also continue with detailing the cockpit: The resin wheels from Armory fits perfectly: Detailing the pilots seats: Cheers guys3 points -

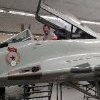
1/32 Marauder
Starfighter and 2 others reacted to AlexM for a topic
I printed some parts for the interior structure. These are just my interpretation (therefore no guarantee for accuracy) from various cutaway drawings I found, and the 360-degree views found here: http://www.nmusafvirtualtour.com/cockpits/WWII_tour/WWII-10.html They still need lots of clean-up and sanding for a better fit, but they'll add much stability to the large fuselage. Cheers Alex3 points -

HE 219 REVELL
mywifehatesmodels and 2 others reacted to red baron for a topic
voila voila3 points -
3 points
-
Soviet fighter, the Chinese production, the Pakistani Air Force. WIP here: http://forum.largescaleplanes.com/index.php?showtopic=706642 points
-
I know there are a few He-111 builds happening out there and I just came across this photo taken from another He-111 flying close above. I'm really amazed how bright the stencils are and the fuel streaks near the wing roots.2 points
-
not to sound like a sore loser, but I have my thoughts on why the fort won. I will keep them to myself though2 points
-
I figured your Typhoon would do well, Shawn, as it really looked quite nice to me. Just out of curiosity, what won best 1:32 prop?2 points
-

Gateway IPMS Show and Swap this weekend! 9/8/18
Daniel460 and one other reacted to Troy Molitor for a topic
Well done gents. Thanks for the pictures. Love the yellow winged F3F. Troy2 points -

Tamiya's release schedule next 5 years (suggestion)
Southern Bandit and one other reacted to cbk57 for a topic
Agree, it is longs said they do whatever they feel like. What too many I think fail to appreciate is that Tamiya is interested in the big picture of scale modeling not just one subject or scale and that they will focus on major projects and the choice of major project will effect everything else. So if they choose to do a 1/350 ship like the Yamato a few years ago, we may not see a /132 plane coming at the same time. They have done a bunch of 1/48 planes lately, a lot of 1/35 armor, 1/24 cars, and a 1/12 bike. For a while they were doing almost no new 1/48 planes. i just think their focus swings across different modeling subjects and scales, they seem to try to keep some diversity at the same time. I don't think they want to get pinned down in to just one thing. I think as a result the next 1/32 plane if any is completely unpredictable and it is not a given that we will see one in the next year or three.2 points -
Congrats Shawn! Glad you guys is fun.2 points
-
http://www.arcforums.com/forums/air/index.php?/topic/157600-correct-underside-color-for-luftwaffe-f-104g/2 points
-
Quick update. I've completed the cockpit decals. Quite the project but I really feel that they add immensely to the finished look of the cockpit. Wish Barracuda had these sets for many more aircraft besides just the P-51 (which I just ordered for my upcoming F-51 Mustang build) and the Corsair. I'm spoiled and from here on, any other cockpit is going to look barren without these. One thing I really liked about the these decals is that (with a bit of Microsol), they conform over the various switches, knobs, etc present in the cockpit. Anyway, just a few pics to show the latest work. I've still got a few small parts to add to the cockpit, and then I'll start adding all the electrical connectors, etc. I also just got the Eduard fabric harness set. Once I get that added, I'll be able to install the seat and button this assembly up. Note - I still need to complete the weathering of the cockpit. I'll be adding some washes, etc to make it look a bit more used.2 points
-
Any news as to the 1/32 HKM F-4K Spey Phantom? A follow-on FGR.2 excepted, it might well be the most definitive version of the series. But another very expensive set of tools no doubt. Another CAD teaser is the Tan Model Su-33 Sea Flanker. Another perfect subject wrapped up in lines of code on a hard drive. I'd gladly pay for a plain brown box containing test shots of either. Tony2 points
-

Zvezda Star Destroyer - a new detailing project
Greif8 and one other reacted to The Madhatter for a topic
hi all Work continues with the completion of the roof. I'll have the big X thingy standing up I think. I need to start detailing that part and then add it to the roof. The shield generators have been added since these pictures but I need to fix up a few things before I can show you. That's it for now. Thanks for looking Si2 points -
While i am waiting for my paint, i thought i show you my 1/18 collection.2 points
-
Are looking at pics of the full size restoration again??? Amazing, Peter! Damn, I just realized I typed that on the Spit build, too! I should just cut and paste from now on...2 points
-
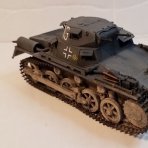
Trumpeter King Tiger 1/16
dora9 and one other reacted to CATCplSlade for a topic
Yes, the official designation was simply Panzerkampfwagen VI Ausf B; the inventory listing was Sonderkraftfahrzeug 182. We Americans gave it the King title. Some sources claim none of the tanks had their front armor penetrated in combat due to the armor thickness/slope.2 points -
Sorry for the very long delay. Finally made a bit of progress on the rigging, yay! Love the bright colors but have not even started with weathering, etc. Landing strut is a bit misaligned but is flexible so trying to straighten it out. Love the bright colors, I wonder if during the war if they were really this bright? Rudder is just a press fit for now. Slowly getting there! Chris2 points
-

Make the others jealous
Rick Griewski and one other reacted to Out2gtcha for a topic
Nice, I like the Valkyrie book2 points -
I just watched a documentary on the king tiger (apparently king tiger was not what the Germans called it) these things had a 12:1 kill ratio! That’s a scary by anybody’s definition!2 points
-
So when does the sale start Stephen ??2 points
-

Gateway IPMS Show and Swap this weekend! 9/8/18
scvrobeson and one other reacted to LSP_K2 for a topic
WNW Camel (damaged in transit, I guess) Z-M Skyraider2 points -
https://www.timesofisrael.com/air-force-marks-planes-to-commemorate-bombing-syria-reactor-in-2007/2 points
-
1/32 Marauder
Out2gtcha and one other reacted to Troy Molitor for a topic
Just amazing to see this come together. Well done ALEX. Troy2 points -
Thanks guys. So whilst looking for a particular paint colour for another project, I found that the same manufacturer made `Italian red', just the colour I was chasing for this project. There has been alot of talk here in Australia about a new manufacturer called SMS, or The Scale Modellers Supply so I thought I would give it a go. I normally would have used a Tamiya spray can for this job as it has worked well in the past with the DH-88 Comet but felt it was time for a change. SMS is an Australian based manufacturer and the paint is made here, so I was keen to give it a go. I painted the model with my Iwata HP-BH set at 15 PSI straight from the bottle and achieved this result with two thin coats. I am extremely impressed with this paint and it has settled onto the model with a very smooth satin finish. I would highly recommend it.2 points
-
I never noticed smoke stains on and He-111 from the vents on the forward upper nacelles. Probably wouldn't for the whitewash:2 points
-

1/18 P51C Mustang "Lopes Hope the 3rd"
Landrotten Highlander and one other reacted to airscale for a topic
well thanks again rtwpsom2 - very useful guidance :) I have tried to interpret what I see in photo's and the drawings and have now mounted it - hopefully this is near the mark? got a main switchpanel up near the IP to start on next... TTFN Peter2 points -
So, just to prove I have been sitting on my ass, working on planes... Oops, wrong picture. The assembly line method actually works pretty well, but I did have to modify the method a bit. I have been building the planes in pairs because the different versions, so build by type (E, K, N) made the most sense. I also decided that the two Trumpy P-40’s will have to wait for another time since I still have not received one of them yet, and the P-40F conversion will be on its own since that is still on its way over the Atlantic. I won’t lie, the cockpits were a bit confusing building the N’s and a K, because they were all different, plus I used PE on both N’s. I have some resin seats coming for the K’s and one E, and I also plan on using a pilot with one of the planes. Building this way definitely saves time, my first cockpit took me nearly an hour, the last two planes I did everything in about an hour. of course, Buster could care less about the progress....2 points
-
Maru, thank you so much for your comments!! I'm really only assembling for the most part, and taking a damn long time at that. I am pleased with the foiling despite there being ample room for improvement from my first time at it. I've pretty much finished the cockpit now and have started on the canopies, which need a fair bit of work. These photos just show the final touches around the cockpit sill. I ended up cutting the Eduard part apart that fits around the electronic boxes. It had the latch bases, the hatch hinge line and the seal, or sill or whatever it is, all on the one piece. In fact they sit at different levels. The Eduard sill part around the cockpit only provided the right hand side, so I used some whisky bottle foil to make the other side. These were attached using the foil adhesive backed up after fitting with some white glue. A very fiddly job! The canopy knife holder is a kit part supplied in heavy brass which requires delicate folding. The piece must be heated up in a gas flame to soften it sufficiently to allow the required folding. This next photo shows the seal around the electronic bay and the latches to the left and the hinge line to the right all cut apart. Off to catch a local blues muso now. Thanks for looking Cheers, Mike2 points
-
What happened to the missing radar antennas? Outstanding paintwork and weathering, you really nailed it!1 point