Leaderboard
Popular Content
Showing content with the highest reputation on 08/15/2018 in all areas
-
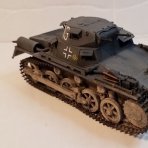
Hello there. Maybe you know this phenomenon. I have several more or less unfinished models lying around. And then, something completely new comes to mind. Some months ago, I was thrilled by the idea of a 1/32 Marauder, and despite my other builds, I started to work on a 3d-model. I already printed some major parts. I now have some days of leave of absence, and hope to make some progress (as well with my other unfinished projects). But who knows when I get distracted with something completely new again Propellers and engines are lent from a free 3d-model for visual demonstration only. Here is a picture of an early stage, where you can see how the wings are made of several segments: The main fuselage is divided into three sections due to the maximum build-volume of my 3d-printer (about 20 cm). The left and right halves are 0,5 mm apart, with a recessed line in the middle. The three sections are first glued together. This approach helps to keep alignment. Otherwise, gluing six separately printed fuselage parts together while keeping alignment would be a nightmare. On the fuselage, I already scribed the panel-lines, with the drawing in the Warpaint book as a reference. The fuselage is now more or less ready to be sawed apart into left and right halves to get access into the interior. The most important "tool" when doing this kind of modelling: Cheers Alex12 points
-
This is my A-4E skyhawk that is from Trumpeter .For the cockpit and wheel well i used Aires I also did use Eduards PE for the exterior as well .The marking are of my own creation that i made using a masking material7 points
-

Libyan Mig-23MF, 0200 Tripoli August 2005
mc65 and 6 others reacted to Daniel Leduc for a topic
Since I don't like being down bottom here's a quick update.... first, did repaired my heavy shaving, there's nothing a little styrene can't fix..... will seal all gap with putty later. The Trumpy Mig-29 nose fit like a charm ..... '' The Florin 13 way ''.. Most propbably going to put some weight in that nose, just in case.... And move on the Aires main wheel bay, very easy to fit. But can't say the same for the nose bay...... oh boy again, more styrene..... Some work on the intake, '' The Zacto way '' , was done in 30 min. and it looks way better. With some Tamiya putty, it'll be just perfect. Sometime I can put together or dismental 6 to 10 times before gluing parts, but on this piece of the fuselage, dang I'm amaze by the fit of that tongue and groove. Always a perfect fit. Hope you like it and see you soon for more, thanks for watching. Dan.7 points -
a superb plane, a rather complicated kit:6 points
-

1/32 Tamiya F-4J Diamond Backs
Cicciuzzo and 5 others reacted to miketippingmodels for a topic
Hi Guys 1/32 Tamiya F-4J Diamond Backs this is straight out the box, apart from some Eduard cockpit plaques enjoy Mike6 points -

Revell Spitfire Vb - Finished!
R Palimaka and 5 others reacted to BloorwestSiR for a topic
Got the gear legs on. It went a bit better than expected which is usually a good thing as far as landing gear goes. Next up I finished painting the prop Which meant I was done! This is a new one for me. Less than two weeks from start to finish. Which is good as I'm going on vacation to Scotland tomorrow.6 points -
1/32 TAMIYA F-16 block 60 UAE
Model_Monkey and 4 others reacted to miketippingmodels for a topic
Hi Guys This is the TAMIYA F-16 block 60 with the Wolfpack conversion added and Aires under carriage bays, along with after market decals, not sure on the make. enjoy5 points -
Thanks Don and Karimb I continued work on the under carriage, i found that a aluminium pop rivit is the perfect size for the axle. The rear wheels are a pleasure to paint and fit, I've found that if the fit isnt perfect you've done something wrong. I couldnt help but put the frame on the wheels, and i honestly smiled when i looked at the assembly, the cockpit must be 8foot off the ground, amazing aircraft for its day, amazing Sorry for the bad photos need better light tomorrow I,m really not confident in my dry brushing skills to highlight the Oontinental, I had a try on some of the sprue numbers and looked terrible, so I'll leave them not highlighted *i just edited this post. I must apologise to my old English teachers for my terrible grammer and spelling........Note to self, dont post after drinking beer*5 points
-
And a final HUGE thank you to our own Hubert, K1 and all others who helped along the way, contributed and/or just laughed at my misery. Thanks to one and all for following along, and contributing in such a positive way! I could have never made the 2018 US NATs without your help. And just a final two self-horn-tooting pics from the US Nationals in the 1/48 & 1/32nd Civilian, Air Racer Air Taxi Class where it took a second in class with some very nice models in competition: Cheers!5 points
-
All in 1/72 T50 (zvezda) Su-34 Fullback (Italier) Su-33 Navy Flanker (Hasegawa) Mig 23 (Hasegawa) Su 24 (zvezda)4 points
-
Well, folks, I'm starting one more GB. I hope you can finish this one. I have already chosen a simple kit, so that I can finish it on time. I'll try not to invent much. The kit chosen is this: This is the Spitfire MkII new tool from Revell, which will be modified to an MkV LF from the end of the war, already under French flag. the parts needed for modification will be donated from the Tamiya MkIX kit, plus some afters. This is the subject: And this is the kit: Here the afters, a Yahu panel, a aires resin cockpit, exhausts, a resin door, Eduard flaps PE, metal gun barrels and the parts donated by Tamiya kit. Here the original decals and the french, from Tamiya kit. I forgot to buy a Rotol propeller, required on this plane, but later I solve this. Soon the first pics of the job.4 points
-

48th scale Wyvern S.4 - Westland's Bedeviled Dragon
Bravo52 and 3 others reacted to Ivan Ivanovich for a topic
When it comes to carrier-based aircraft, the Wyvern is most definitely among those types that intrigued me the most - brutish British turboprop eleganza. And yes, I'd really love to see an all-new 32nd scale injection-moulded kit of this "brutie". Dreams are ten a penny.... 1/48th scale Trumpeter Wyvern S.4, 831 Naval Air Squadron, HMS Ark Royal Except for a resin NeOmega Martin Baker Mk.2B ejection seat built straight out of the box. Paints used: Gunze Aqueous Hobby Color, satin topcoat: 60/40 mix of Floquil Polly Scale Flat and Pledge/Future. Thanks for looking!4 points -

1/48 Horten 229
mustang1989 and 3 others reacted to cnq for a topic
Both kits are from Dragon. I built them oob. I also have the new ZM 1/48 Horten 229 and plan to build it some time this year. Hope you like the pics4 points -

JG300 Red 12 Bf 109 G-6/R-6 Bonn-Hangelar 1943 (Now Complete)
Dany Boy and 3 others reacted to Wackyracer for a topic
Pit is pretty much there now Added the pe belts. Was going with fabric ones from HGW but decided upon a bit more speedy method. Dry fitted the engine Had to remove the top part of the first exhaust stubs to accommodate my scratch build acoustic pipes Instrument panel in place And finally installed the Barracuda cannons Need to add some plumbing to the engine next but worked out I need it fitted to get a good fit and locations for the various tubes and wires.4 points -
Revell Spitfire Vb - Finished!
Daniel Leduc and 3 others reacted to BloorwestSiR for a topic
Here's the RFI shots. The radio mast is missing so I'll have to hunt for it when I get back from Scotland in two weeks. See you all then! Carl4 points -

Fisher AD-5W test build pics and tips
MikeC and 2 others reacted to paul fisher for a topic
OK.....I have (hopefully) re-sized these pics to work with the LSP image thing...I have been building up and painting my AD-5W for the instruction manual while awaiting the decals. I'decided to try some simple pre-shading on the cabin bits to add a bit of depth and a lived in look. First off, you get the belly plate attached and faired in. I use thick CA glue and Zip Kicker as filler as it won't shrink or react to paint, and is easy to scribe after curing. Once the seam is cleaned up I use vinyl tape as a guide for my scribing tool to cut the panel line.The CA glue cuts much like the surrounding resin. The vertical panel detail on the fuselage is then gently scribed to meet the new line. To paint the cabin, I decided to try a bit of pre-shading with matte black to add some depth.It worked out better than I had hoped, so i also did some on the electronics and rubbed off the paint from the knobs and switches. I removed the gray paint from the two transformer domes for some contrast as these were fiberglass. The black paint was removed from the radar scope face with a cotton bud and some acetone to make it easier to paint later on. The pre-shading came out quite well on the main bulkhead, giving it a more substantial look.Cicuit breakers were picked out in black and silver . The fwd radar operator's circuit breaker panel sits on the floor in front of his seat. Adding the platforms for the electronic bits, and some of the black boxes. The stick and rudder pedals for the pilot Instruments are printed on high gloss photo stock, the resin dash is fixed to this with thin CA glue and then trimmed out. The faces of the APS-20 radar scopes are painted with Testor's Stop light amber, the bulk of the cabin is now done but for the seats. The dash and coaming are glues into the upper fuselage with a stout tab. Next I built up the belly radome from the two halves and cleaned up the join. The two small holes you can see above and below the seam are for locating the cleats that hold the radome with cables to prevent swaying . They will be added later so the paint doesn't get too thick on them. Since the Guppy carried no weapons, there are no holes under the outboard wings for pylons. I used .030" plastic rod and CA glue to fill the holes. The wheel well inserts are put into place, and the shell ejection chutes and catapult lugs are filled. Since the trumpeter Spad is molded with too much dihedral in the wings, I simply cut some shims of .040" plastic to slide into the wing roots before gluing to the fuselage.this gently reduces the dihedral to the correct 6 degrees. Some .030" strip stock was cut into lengths of .700 ' to fab up the stall strips unique to the Guppy.These are filed to a gentle triangular section and glued onto the wing leading edges just outboard of the fold lines Now we start painting! Undersides and rudder in semi-gloss white. I shot a wee bit of matte black into the rudder hinge line before applying any color, wiped away the excess. You can see how by carefully shooting the paint over the masked off rudder the pre-shading leaves a pleasant 3D effect in the hinge line. The antenna fairing on the fin is shot dark gray, and then a thin strip of Coroguard silver goes on all the leading edges. More Coroguard on the tail planes and main pylons Most of the paint work is done, this was taken before i got the Coroguard sprayed. More pics and BS to come , it's going to make a fascinating model of a much overlooked variant of the Skyraider. Stay tuned! Paul3 points -

Aratech Repulsor 74-Z Military Speeder Bike - FINISHED!
EvilCarrot and 2 others reacted to Out2gtcha for a topic
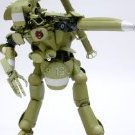
Well gents, After working with pretty much all short run resin kits lately, and my last resin kit being one I had to prep for the US Nationals, I really needed something that would go together well and that was a fun IM kit to build that I wouldn't have to take too seriously. I also wanted something different to maybe help get the modeling juices flowing well before diving back into my HpH Tigercat and/or another aircraft side build. I was initially thinking starting my Revell P-51, but that too has some AM additions I wanted to add, and was probably going to be taken a bit more logically and seriously than I wanted. Having just got finished with my little Extra 330 SC, I wanted something on the complete opposite side of the spectrum, and I was also hunting around for something in my stash that ticked all of these boxes: - an IM kit - one that assembles/builds well with no complications - no AM really needed - nothing for competiion - something small that I could just have fun with - something different/unusual After scouring my stash, the GF suggested taking a look at the several Bandai Star Wars kits I have in the stash, including an AT-ST, a Snow Speeder, and this little guy, a Military Speeder bike + Scout Trooper in 1/12th scale. Perfect! It really fit the bill.................something different, easy to assemble, and something I could have some fun with in re: to paint and detailing that I wouldn't have to think too hard on. Most all of these Bandai kits have a stellar reputation for excellent detail, and super duper buildability. \ I really dig this kit, and the trooper they give you has a lot of cool features to him, including the ability to pose him standing beside the bike, or on the bike posed with a blaster in hand. Bandai also gives you two separate stands, one for a standing trooper, and a base with a partial tree on it, for an "in flight" mode display. Lets get into the kit shall we? It really is a neat little kit, and should be a refreshing break from the norm............. The box is decently sized and top opening with great box art on the cover, and a multitude of pics on the side of the various options to display the kit, including a couple pics from Episode VI: The Bandai instructions are really nice, and have exploded views of all the assembly steps, as wel as options to pose the bike and trooper when finished: The way Bandai has molded things is also very interesting.......................some sprue trees have multiple colors molded on the same sprue. A good example of this is the all white sprue for the trooper, that also contains a small section of tinted sprue with the troopers eye piece/goggle section. VERY professionally molded IMHO: These mulit-colored sprues are kinda strange looking, but all the sprue trees are very well molded with no flash, and really smooth texture. Some parts are more plastic like, and some are more rubber like, mostly the black joining parts where the trooper has to move/flex. These are suplemented by the white sprue that has most of the trooper exterior armor on it, and a 2nd smaller tan sprue section on the white sprue tree that contains the troopers souls for his boots: The base I intend to use is the "in flight" display with a mossy/forest style base with a partial tree section that gives the impression that the bike is in repulsor mode hovering. Its simple, but quite well done, and will give me an opportunity to play around with some diorama base scenery stuff, and really weather it up good with some moss, weeds and dirt and some vines: I have also thought about having some real fun with this kit...............I thought about the Empires Scout Troopers armor, and how Wookipidia (lol!) says that generally any of the "Clone" Scout Troopers that were sent to forested planets or the like were issued camo style armor instead of the all white issued armor the normal Empire Scout Troopers had. Something like this: I got to thinking about how easy/hard it may be to reproduce a really neat/well done camo on my Trooper, so I invested in some 1/16th scale "Digital Camo" decals from CrossDelta. Ive heard people swear by these, and then heard people not be able to use them to save their soul. So Im going to invest in some Mr Mark softner/setter and probably engage Bill Cross who has had experience using these types of decals. I thought the camo was pretty cool looking and would add a lot of visual interest to the Trooper (and make a LOT more sense to me as a camouflage in a forested area like on Endor). I plan on painting the white parts of the troopers armor a light OD color, then apply a gloss (if needed) and then the decals per some vids IVe seen, and/or any tips Bill can give me : Ive also picked out a nice selection of appropriate colors in my MRP range that would accent the decals well, and that I could use oils with to highlight some of the areas that are supposed to be flexible or fabric areas on the trooper as well: \ Bandai has done a really nice job with these kits, and if you ever want to try something off the beaten path, they might be just the thing to kick start some modelling MoJo! Ive already made a small start on the trooper by coloring his goggle area with some Tamiya clear green, and tonight Ill probably move onto attempting to smooth out some of the seams on the trooper himeself, and work toward getting some OD color on him till my camo decals arrive. Cheers till later!3 points -
thanks maxim and yes it is some work but im loving the kit i have also the trumpeter kit but i dondt know iff im going to build here small update for now thanks for stopping by Mark3 points
-
I am busy with one I picked up for a very good price. It might be a 1973 mold but it fits way better than the 2015 Italeri Mirage. It has separate flaps and slats. With a little re-scribing and resin cockpit it can still be the basis for a nice model. Nick3 points
-

1/32 Marauder
KUROK and 2 others reacted to Nick_Karatzides for a topic
@ AlexM, I am already following you on your 1/32 Marauder and your 1/32 PZL.37 3D printed projects too. The result of your 3D design & scale modeling skills are remarkable considering you are using not-professional software and low cost plastic. I am impressed and looking forward to see more. Congratulations.3 points -
I suspect that it's quite difficult to get the face of a known personality absolutely correct, but Good absolutely nailed it with his Werner Voss figure. There is more than one Voss figure on the market, but this, in my opinion, is the absolute best of the lot, no question about it.3 points
-
Libyan Mig-23MF, 0200 Tripoli August 2005
mark31 and 2 others reacted to Daniel Leduc for a topic
Dang it's hard to keep secret these day's.... was going for another Russian plane for sure and didn't made up my mind yet between a Sukhoi and a Mig-29A An Agolian Sukhoi..... Or maybe that one..... in basic colors But would had prefer that beast, Su-30 603, too bad I only have the UB kit.... don't know if the only noticable difference between both are the center sight and the IP...? And for the Mig-29, this nice Slovakian Tiger meet.... Yeah, there's always tuff choice in a modellers life.... Dan.3 points -
Libyan Mig-23MF, 0200 Tripoli August 2005
themongoose and 2 others reacted to Daniel Leduc for a topic
Hey everyone, Here's my startup and my frist "Bou Bou"...... First, I'd like to thank's FlorinM, blackbetty and Madmax to ease my built..... I'm going true your WIP constantly to help me make my next move, avoiding problems..... not that I make a lot . but your comments and suggestion are always welcome, just keep in mind that my mojo is always"Quick and Easy". And the first mod I did with my Buddy André(Dora) based on FlorinM's built, was to make a copy of the Trumpy Mig-29 nose cone... To found out a few days later that Quickboost was offering a correct one for the Trumpy kit... ........ Oh boy. Anyway, then move on the pit, painting was straight forward, detailling and wash, will do some dry brushing later... tried a little dry fit..... And BANG! went too heavy on the shaving the fuselage ..... my first gap to fill. Will try not to duplicate hey...? next will finish the IP, final touch on the pit and will do the nose wheel bay. Hope you like it and have fun. Dan.3 points -
1/32 Trumpeter A6 intruder
RandyB and one other reacted to miketippingmodels for a topic
Grumman A-6 Intruder The Grumman A-6 Intruder was an American, twin jet-engine, mid-wing all-weather attack aircraft built by Grumman Aerospace. In service with the United States Navy and Marine Corps between 1963 and 1997, the Intruder was designed as an all-weather medium attack aircraft to replace the piston-engined Douglas A-1 Skyraider. As the A-6E was slated for retirement, its precision strike mission was taken over by the Grumman F-14 Tomcat equipped with a LANTIRN pod. From the A-6, a specialized electronic warfare derivative, the EA-6, was developed. Following the good showing of the propeller-driven Skyraider in the Korean War, the United States Navy issued preliminary requirements in 1955 for an all-weather carrier-based attack aircraft. The U.S. Navy published an operational requirement document for it in October 1956. It released a request for proposals (RFP) in February 1957.Proposals were submitted by Bell, Boeing, Douglas, Grumman, Lockheed, Martin, North American, and Vought.Following evaluation of the bids, the U.S. Navy announced the selection of Grumman on 2 January 1958. The company was awarded a contract for the development of the A2F-1 in February 1958.The A-6's design team was led by Lawrence Mead, Jr. He later played a lead role in the design of the Grumman F-14 Tomcat and the Lunar Excursion Module. The first prototype YA2F-1, lacking radar and the navigational and attack avionics, made the Intruder's first flight on 19 April 1960, with the second prototype flying on 28 July 1960. In general, development flying went well,[with the major problem encountered being handling problems associated with the aircraft's air brakes mounted on the rear fuselage. In an attempt to solve this, the third prototype had its horizontal tailplane moved rearwards by 16 inches (41 cm), but this did not completely solve the handling problems, which were resolved by fitting split-hinged speed-brakes on the aircraft's wing-tips. Early production aircraft were fitted with both the fuselage and wingtip air brakes, although the fuselage-mounted items were soon bolted shut, and were removed from later aircraft. This is the trumpeter 1/32 sauce kit, and apart from a few issues a dream to build, the cockpit had the Eduard PE added, with a few other bits of Eduard to enhance the other bland items. All the figures are from Reedoak ( amazing figures) and the base is scratch built, using flight path tie downs. all painted using a combination of Mr Hobby, Tamiyia, and Vallejo air2 points -
After a few months shy of 3 years work I finally got this little kit done. This little thing fought me ALL the way tooth and nail. That is not to say its a bad kit, I just made a few blunders along the way, and the build seemed to be cursed. The manufacture of this little kit was very nice, and although hard to get in touch with at times, served me very well, even going so far as to get me a new engine for a separate display (I will finish that one day too) I started work on it in November of 2015, and for anyone interested in getting a kick out of my misery, you an observe here: Icaerodesign Extra 330-SC This is the Icerodesign Exta 330 SC aerobatic aircraft. The little extra is designed for extreme maneuverability, and in the class the pilot competes in with N73KG some of the abilities of the aircraft are utterly amazing. Here is Jeff Boerboon, and N73KG performing at the IAC (International Acrobatic Club sponsored by the EAA; Experimental Aircraft Association) US Nationals back in 2014: It took everything I had to finish this little kit. I mean everything...............every ounce of modeling courage I could summon, and ever single drop of modeling knowledge I had, and some I didn't even have until this model came along. It came about a hairs breath from getting subjugated under my boot, many times, and only a suggestion by our own K1 saved the model. Without any further junk about me destroying this little thing, Here is the little guy, finally finished after all these years, hope you like (bear with me, its pretty pic heavy ): STILL MORE.............. (I know right??)2 points
-
hello to all model aircraft builders, this is not exactly a large scale plane, but judging by the time it took to complete it, I might as well have built it in 1:32. Anyway this project started as a flight deck diorama which is nowhere near finished, but at least I managed to complete my E-2C Hawkeye on the catapult of the USS Dwight D Eisenhower of 2009. The model is from Revell in 1:144, modifications are 3D printed propellers and crew, dropped flaps and custom made decals. I will not bore you with all the in progress pics (which used to be on photo bucket, you know what happened with those...), here is the result of more than 2 years on and off work. Hope you enjoy it!2 points
-
On her feet....2 points
-
Thanks guys! Some great tips in there for sure. I have indeed found so far, that Tamiya extra thin cement works really well on almost all the types of plastic in the kit, and the seams just sort of disappear. Ive also been experimenting with primer and no primer and have found that normal acrylics dont seem to stick too well without primer, but the acrylic lacquer stuff seems to bite into the Bandai plastic pretty well as long as its clean and even finished sanded a bit. Im looking forward to getting the decals, and hopefully will even have something pic worthy to show soon............. Cheers,2 points
-
Thank you all for your kind words #MeToo I use a Ultimaker 3. Most parts are printed with HIPS (styrene). Some parts of the wings around the nacelles are printed with PLA, as otherwise I got problems with some warping of the material while cooling down. Thanks Troy, the flaps/cowling/nacelles-area was pretty diffcult, and is probably not fully accurat. Especially the end of the nacelles was problematic, and I didn't manage to create this area satisfactorily as 3d-model. I ended up printing a simple flat upper side, and sculpting the lower fairing between nacelle and wing with putty. Here is a comparison between a early test print (left) with the final wing I'll be using:2 points
-

Fiat G.91 R3 - Dayglo Models
Harold and one other reacted to Coneheadff for a topic
Great work Reimund and thanks for all the great reference photos Tiberio!!!! Alex2 points -

1/32 Marauder
Daniel Leduc and one other reacted to richdlc for a topic
I WANT ONE!!!! More tahn anything though I want to make a B-26K Counter Invader, the Vietnam version2 points -
I had read that Mr. Softner and Mr. Setter were formulated for the thicker style decals of Hasegawa and Tamiya. I, too, have been too chicken to try them out on a model, typically using aftermarket. Maybe I will have to throw them on a test mule someday. Of course, been going towards masks or dry transfers where possible.2 points
-

1/32 Marauder
sandokan and one other reacted to Troy Molitor for a topic
Oh my. I want one! That is spectacular. Please post more pictures if possible? So cool to see this one come alive. . Troy2 points -
LF period ventral views of 109s with oil stains
Troy Molitor and one other reacted to CATCplSlade for a topic
Like air-cooled Volkswagens; there's no way you aren't going to have drip from the oil drain plug or the valve covers unless you just never put any in in the first place. And even then, oil spontaneously generates within the sump. On a related note: I recently picked up Tamiya's 1/35 Kubelwagen repair set which is basically a guy doing a tune-up so now I have an oil-changing diorama to do once I get another Type 82. Having spent a lot of time staring at the back (and bottom) of a 1600 dual port, I think I can off something pretty cool. But like with the planes, you don't find many good pics because few people thought to take pics of the dirty bottoms. I don't think the Germans spent a lot of time crawling on their backs compiling reference pics on oil stains, as I don't see many people on their backs at vintage auto show'n'shines looking for seepage around the CV boots.2 points -
Aratech Repulsor 74-Z Military Speeder Bike - FINISHED!
ringleheim and one other reacted to Nessus for a topic
Have fun. There is sooooo much you can do with this kit. This is mine............2 points -

1/32 ZM Ta-152 H-O
D.B. Andrus reacted to Ryan for a topic
OK I have a very poor showing with completed WIP's, but this kit is very good, I wanted to share some info and pics as I build it. Here are some shots of the engine mid stream in construction. TA-152 Engine by The 3rd Placer, on Flickr TA-152 Engine by The 3rd Placer, on Flickr TA-152 Engine by The 3rd Placer, on Flickr1 point -

Sopwith Dolphin WnW
TimW reacted to scvrobeson for a topic
Well, I'm back. I've been out of the LSP loop for while, mostly because of work, and also because I didn't really have any sort of setup to take and share pictures. But I've been working on the absolutely brilliant WnW Dolphin for the last 6 months or so, and it's finally finished. It's mostly OOB, with a Barracuda resin seat, HGW seatbelts, and Gaspatch turnbuckles and eyelets.1 point -
Its NASA's 747 3-D model of SOFIA, the Stratospheric Observatory for Infrared Astronomy. And all other fun NASA stuff.1 point
-
Aratech Repulsor 74-Z Military Speeder Bike - FINISHED!
Out2gtcha reacted to BloorwestSiR for a topic
You should be fine with lacquer. I've used Mr Color on my builds and the color call outs Bandai lists are Mr Color numbers. Although they're not Star Wars kits, Mr Color makes specific paint sets for other Bandai kits such as Space Battleship Yamato and of course, Gundam. So I think you'll be safe. Here's my Vehicle Collection Star Destroyer painted with Gunze Gundam white. I used Mig Dark Wash on it. To give you an idea of its size next to the paint I used . Carl1 point -

1/32 Marauder
Starfighter reacted to AlexM for a topic
Thank you, Shawn! It just happended: Since both bomb bays remain closed, they won't get much attention. The rear bay with the bottom windows will get some frames (recessed lines for the frames are already on the printed part). Here is a great reference for the interior: http://www.nmusafvirtualtour.com/cockpits/WWII_tour/WWII-10.html I just wonder (as always) about the interior color. Was everything green like on the museum aircraft? According to this site, the rear fuselage was aluminium http://www.ipmsstockholm.se/home/interior-colours-of-us-aircraft-1941-45-part-ii/ Evertything is done with Sketchup (with some plugins installed to make it more capable) Cheers Alex1 point -

Tamiya 60325: F4U-1A Corsair
Out2gtcha reacted to Dave Williams for a topic
I don’t have an issue with Tamiya decals. Just use Solvaset on them. To expand, it’s a matter of just having a second type of decal setting solution on hand for the thick decals (Tamiya, Hasegawa, Cartograf). I don’t think it’s a hassle or expensive to have more than one brand of decal setting solution around for different decals. I have a large bottle of Solvaset that I bought years ago and has many more years of life left, plus the expense is a drop in the bucket compared to the money I spend on kits, decals, and resin. I think of it as just a different tool for different uses, like using different brushes, or glues, or knives.1 point -
both look great! love the paint work on the night fighter1 point
-

Decal sizes
Phartycr0c reacted to haveblue for a topic
Are you looking for what percentage to increase the decals by? This might help http://www.finescale.com/~/media/import/files/pdf/9/c/0/tips_for_scales.pdf1 point -

Fisher AD-5W test build pics and tips
paul fisher reacted to LSP_Ron for a topic
Looking great!1 point -
Revell Spitfire Vb - Finished!
MikeC reacted to BloorwestSiR for a topic
Thanks to some self inflicted challenges, namely losing one of the gear legs I'm fitting a spare set of Tamiya ones to the plane. This involves loping the top off the Tamiya leg and grafting on the top of the Revell one. Since the Tamiya leg has a metal rod for support, I drilled a hole in the Revell bit and they were glued and pinned together. While those dried, I painted on the wing walkways lines using Tamiya Rubber Black.1 point -
 So after getting myself pretty bogged down trying to replicate the outer framing on the rear vac canopy I lost my inteerst in the build for a little while. I then saw John was offering a resin canopy and so then I had to ponder a little more on what to do. I the end I stuck with my original vac part I cut out very early in the build and which I have added internal frame work in to and after some careful masking I had this. Next up I painted the MG 81 ready for installation. Andthen finally fitted the rear vac canopy. Also pretty happy with how the internal framing is looking now the rear canopy is fitted and well worth the effort. Time for some very careful masking now but I prefer to build this way instead of trying to add lots of parts at the end and risking spoiling a paint finish with spilt glue! Really happy to be back to this build and can see light at the end of the tunnel now and looking foward to getting some paint out. Regards. Andy1 point
 -

1/18TH JSI F-14B Tomcat conversion
TenSeven reacted to A-10LOADER for a topic
Since I'm waiting on some replacement decals for the Big Cat, I decided to turn my attention to the GBU-16's. JSI did a very nice job representing them but, they can be " kicked up a notch." There is a small hexagon shaped area on the CCG, (Computer Control Group). This area is the electrical hookup spot for the bomb dump guys (AMMO) to connect their equipment to do their tests on the CCG to make sure everything works as advertised before delivering the munitions to the flightline loaders. This hexagon shape should be on the topside of the CCG because right next to it is the BFD (Battery Firing Device) and, right behind that is the arming wire guide all which run right in line with the bombs lugs. I had to fill in the old holes and drill new ones. I'm also sanding away the seam that runs thru the bomb body and will use BIC "Wite Out" to replace the bombs coating ( just like I did on the MK-83's ). I'll also need to scratch build a BFD for the arming wire to connect to. I would like to get rid of the seam on the CCG but, the fins cover up some of that and I think I should just leave well enough alone. With these two GBU-16's and my four MK-83's, I'll be able to change up the loadout on the Big Cat from time to time. Thanks to all who are still continuing to follow along, I do appreciate it very much. Steve "TOMCATS FOREVER, BABY...!"1 point -

Fiat G.91 R3 - Dayglo Models
Derek B reacted to Isar 30/07 for a topic
The cockpit tub http:// http:// The IP hood http:// and the updated cockpit sides http:// http://1 point -
Fiat G.91 R3 - Dayglo Models
Derek B reacted to Isar 30/07 for a topic
Gentlemen, a little update today. As I forgot last time some wiring on the forward wheel well, here are some more wirings and rods. The nearly "naked" one http:// and the updated one http://1 point


