Leaderboard


Popular Content
Showing content with the highest reputation on 07/08/2018 in all areas
-
Cheers Jerry hope to see yours done up soon. now that the kolibiri is done got some progress. some fine tuning required, as some gauges not there...and I am waiting for belts to arrive to finalize the cockpit. Rgds to all brian6 points
-

USS Missouri Trumpeter 1:200
D.B. Andrus and 4 others reacted to Koralik for a topic
This time the model is very unusual for me. Over one meter to build and paint, model made with one addition: Deck from Pontos, the rest is a model straight from the box. After building this model, I understood that folding ship models is a real big challenge. USS Missouri Trumpeter 1: 200 From spray booth: Final:5 points -
Revell Lynx cross kitted HAS.3 & Mk.88 to produce an HMA.8. Pitot has since been moved under the nose to its correct location. Revell Red Arrows Hawk T.1a. Pilot form an F-4 Phantom, metal pitot probe and Airfix 1/24 stand, otherwise OOB.4 points
-

Arado Ar 196 A3 BG Air Force 2 Revell 1/32
MikeC and 3 others reacted to ShelbyGT500 for a topic
Hi guys :) Lets start the paint job :) First tamyia grey primer, after that flat aluminium over the metal parts of fuselage, floats and engine covers. With red brawn paint some parts to imitate the primer over the metal parts. With black and white did some pre-shade/light over the canvas parts: Cheers friends :)4 points -

1/32 BN-2 3D print scratch build. Is this too much for me?
Anthony in NZ and 2 others reacted to Cap'n Wannabe for a topic
So today I mucked about with the 3D printer and made the first nose pieces. As this was an experiment, I wasn't too fussed about the quality, because there is a bit of a learning curve to getting this right, and we (me and my son) still need to upgrade some parts of the printer. Anyhow, there is a bit of splitting between the layers, and they're warped (which is a by-product of using tape on the print bed...one of the upgrades we're doing..), but they've shown me areas where I need to improve the shape. So kind of a success.. Unfortunately, they're not good enough for me to glue together, sand and paint - the warping leaves a massive gap!3 points -

TF-104G and (R)F-104G Italeri 1/32 on their way...
Paul in Napier and 2 others reacted to dmthamade for a topic
The Himomaru are simple enough, and the majority of stencilling is english on the JASDF birds. Intake warning, some of the emergency stencilling around the cockpit are in japanese. tail airframe numbers can be stencils or even other USAF generic decals. Nose numbers are an odd size, and Squadron markings can be done with stencils, some are fairly simple. The Tamiya F-15J can give a sample of squadron insignia (panda bear) that you may be able to use as ref to scan, resize and print your own. As for 1/32 JASDF decals, hasegawa did a set in a very early release, though they were pretty plain. A later limited release had the markings for 203(?) squadron with the Panda and one other squadron that was pretty plain. I got a set from LSP Ron and built a bird using the Italeri kit. As stated, Jennings was thinking about a set, haven't heard anything for a while... Don3 points -
Arado Ar 196 A3 BG Air Force 2 Revell 1/32
Dany Boy and 2 others reacted to ShelbyGT500 for a topic
Hi friends, it is time for the next update The BMW 132 engine is done: Also add more details to the fuselage: Oh and the most important part of our scene is also ready Cheers guys3 points -
Hi everybody, Really happy to show you my last building, the DH88 Comet from Aerotech. No easy to built, i follow the fantastic building of Eric Galliers to do mine. Hope you enjoyed it ! X152 points
-

1/35 Kolibiri v-21
Loach Driver and one other reacted to Mr b for a topic
Hi folks First off the new look on the forum looks and feels great. I managed to finalize my Kolibiri with figures. The final photo shoot Next will focus on the Mustang.....and hope to get an update on that soon. Kit is OOB and the figures are 1/32 master box.....painted with gunze all around.... rgds brian2 points -
https://www.britmodeller.com/forums/index.php?/topic/234928285-a-4-ku-af-1-marinha-do-brasil-finished/ I think this modeler did an exceptional paint job on this 1/48 Brazilian Skyhawk. Worth seeing.2 points
-
Update! I got the last bits glued on this week and laid down the Testors Model Master Oliver Drab and Glosscote right out of the rattle cans. I had to scratchbuild the small round light and brace for it under the nose as my kit was missing it (or I lost it somehow). Now to begin the decals. Crossed fingers as I am using two sets of Revell decals for most of the markings! Later, Lee Odd little light setup. Found the round light in the spares and used styrene for the mount. Masking!2 points
-

1/18TH JSI F-14B Tomcat conversion
Menelaos and one other reacted to A-10LOADER for a topic
I do Anthony but, she is also posed in flight because I didn't want to risk the main gears from breaking, they are known to do this over time. Thanks very much for the kind words Peter. Thanks, we'll see. Steve "TOMCATS FOREVER, BABY...!"2 points -

TF-104G and (R)F-104G Italeri 1/32 on their way...
dmthamade and one other reacted to mgbgtv8steve for a topic
Hi Don - very nice '104!! Your hints and tips ref sources of decals is right on the money, but being a self confessed "lazy modeller" I'd very much like my markings delivered on a plate by a specialist decal manufacturer - are you listening 'Two Bobs'? JASDF '104s' enjoyed a great many 'special' marking schemes (broad bands of red, yellow, blue and orange e.g. TF-104DJ 46-5008 207 FS, 83 FW based at Naha in a light grey finish with 2 large orange bands fore and aft with orange wing tip tanks.) for exercises and DACT and it's these I'd like to put on my 2 seater - simple but quite striking. I'm a patient man and I just know that as soon as I go to masks for what I want, a specialist will bring the exact sheet out, but hey that's life!! Steve - living in hope for the TF104 but never forgetting the 'Mighty UK 'Toom'2 points -

Anyone for an RNZAF Skyhawk 'Kahu' panel and HUD?
Grant_T and one other reacted to KitmodellerNZ for a topic
As mentioned previously; In early 2018, I began searching tirelessly for a set of Royal New Zealand Airforce A-4K decals in 1/32 scale to represent an aircraft in the overall green scheme . Disappointingly, the only decent options were out of production and it was rarer than hen's teeth to find a set for sale. So, there was only one thing left to do, and that was to create my own. After many months of research and many days and late nights in front of the computer drawing up, sizing, resizing and editing the artwork, I am now proud to be able to offer individual decal sets for all of the RNZAF A-4K single seat aircraft (excluding airframes that were written off. RIP to those pilots who lost their lives) – that's 13 aircraft to choose from! There are discrepencies between the different airframes, even down to some of the typefaces that were used by the RNZAF. I have also captured these in my artwork, whereas other decal manufacturers seem to have taken the generic 'one font fits all' approach. Each of the decals in my sets are reproduced using photo references and also visiting an actual RNZAF A-4K on display. Although minute, most of the decals in my sets are readable once placed on your model. The decals are laser printed on ultra thin clear decal paper. When applied to a properly glossed model, the carrier film is almost undetectable. Although the decals conform well to surface detail, I would recommend the use of a decal setting solution to assist with adhesion. The outer wing decals are a little fiddly to apply, so each set includes spares. This decal set that you will receive includes the serial numbers, squadron emblems, pilot names (where applicable) and the BU number specific to the aircraft you requested. Decal sets available for the following aircraft; NZ6201, NZ6202, NZ6204, NZ6205, NZ6206, NZ6209, NZ6212, NZ6213, NZ6214, NZ6215, NZ6216, NZ6217 & NZ6218 LIMITED DECAL SETS AVAILABLE2 points -
Arado Ar 196 A3 BG Air Force 2 Revell 1/32
Dany Boy reacted to ShelbyGT500 for a topic
Hi my friends In this thopic I will try to create one Bulgarian, military national treasure - Arado Ar 196 A3 - the only well preserved plane at the world The model is 1/32 revell kit with a lot of after-market of course BigEd, metal machine-gun barrels from Master and resin parts from Quickboost The plane will be post-war, from 1945, reg num:2, with one-color green camo and "ОФ" identification markings: The final scene will be something like this: Of course I will start with the trolley and the tractor You can find the resin trolley in the net, but it's over-sized at 1/32 scale, so I will use my scratch skills to create the accurate one for my project. The wrecker is German Deutz F3M317 tractor or some sort of it, and I will also scratch it. And here is the start of this build: Cheers my friends and let see how far this project will go1 point -

My little Spatz!
mustang1989 reacted to Adam for a topic
Almost finished my little He-162 Spatz. This is the Tamiya kit which I think is excellent and more accurate than the 1/32 Revell offering - there's something about the Revell 162's nose that looks wrong to me - anyhoo, on with my build. Tamiya I think get it just right in regard to detail. What they do, they do well leaving plenty of scope for scratch building and AM stuff to jazz up the build. I've chosen to reproduce "Red 1" flown by Lt. Gerhard Hanf of 2.JG1 at Leck. This 162 had "Nervenklau" painted on the LHS by ground crews meaning nerve claw. So the story goes, Hanf used to roar off to the airfield early in the morning on his motorbike rattling the nerves of the still sleeping ground crews. Red 1 ended up in USA and was flown by the legendary Bob Hoover and a major reason for building this particular bird. Some plumbing in the wheel bay. DSC_1608 by Adam Dormer, on Flickr DSC_1619 by Adam Dormer, on Flickr Some extra details and plumbing added to the cockpit. DSC_1621 by Adam Dormer, on Flickr DSC_1620 by Adam Dormer, on Flickr Slowly and painstakingly adding plumbing to the BMW engine. 20180620_170844 by Adam Dormer, on Flickr Painted & grimed/oiled.I don't believe I went overboard here in reference to photos. They were not flown that much, but they would have leaked like sieves and were largely kept outdoors - fuel + oil + dust = grim. 20180620_170806_resized[3741] by Adam Dormer, on Flickr 20180620_170719_resized[3740] by Adam Dormer, on Flickr 20180613_160708_resized by Adam Dormer, on Flickr Plenty of jobs left to do. Finishing up scratch building the canopy lock - 7 separate parts to far! Master Models gun barrels and nose wheel position indicator added with pitot tube, loop radio antennae plus Revi gun sight to follow at end. Final matt "dust" coat to come. A few more wires and tubes to add to the engine as well.1 point -
Revell Mustang - Finished
Phartycr0c reacted to Mr b for a topic
Hi Folks, Just started today.....wanted to give it ago....after seeing so many nicely done......online....all over the place....thanks to Jerry on this wonderful forum I can build it as Passion Wagon...... Not seen one built in Malaysia yet....simply because the kit is hard to come by.....so maybe (unconfirmed)...I might be the first one building one here in Malaysia..... Snipped off some parts.....next will be some painting......so far I like the new style Revell instruction sheets... Rgds n Happy Modelling Folks Brian1 point -
Lim-2R 1:32
Bill Cross reacted to jniewiad for a topic
Hi, my last model LIM-2R 1:32 based on Trumpeter 02204 MIG 15 with Eduard 33008 MiG-15 dashboard1 point -

Another WnW Junkers D.1
109 reacted to monthebiff for a topic
Here is my take on the wonderful WnW Junkers D.1, built out of the box apart from Master Spandau barrels and HGW textile belts. All in all pretty happy with the results but by no means perfect but an extremely fun and enjoyable build none the less. Regards. Andy1 point -

New Revell P-51D Early kit canopy
Rick Griewski reacted to phasephantomphixer for a topic
So my two kits arrived (Yay!) but how can I tell if they have the original or revised clear? THX1 point -
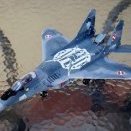
I'm putting up some photos of my old builds pre-LSP membership. This is a Revell kit purchased for a few £s'. I absolutely love MiG-29s' since the arrived at Farnborough many years ago. I wanted to build something different so this is taken from the Yefim Gordon book and it's representing a testing squadron akin to Boscombe Down or Edwards. The book was a great reference aid and a few changes were made but you can spend a fortune on AM. The intake covers are scratch built and the canopy cover is paper mache. IMG_0598 by Stephen Priestley-Dean, on Flickr IMG_0599 by Stephen Priestley-Dean, on Flickr IMG_0597 by Stephen Priestley-Dean, on Flickr IMG_0596 by Stephen Priestley-Dean, on Flickr IMG_0595 by Stephen Priestley-Dean, on Flickr IMG_0594 by Stephen Priestley-Dean, on Flickr Any comments appreciated. Steve.1 point
-

Brazilian AF-1
Anthony in NZ reacted to Kagemusha for a topic
Ah, I didn't realise there were three types of grey to the camouflage, the paler grey upper is Gunze 73 & 69 50/50, but if you take a look at page two of the Britmodeller model he gives the colour mixes he used.1 point -
Anyone for an RNZAF Skyhawk 'Kahu' panel and HUD?
Anthony in NZ reacted to KitmodellerNZ for a topic
No probs mate. Just flick an email to KMNZdecals@gmail.com when you're ready. I am also happy to announce that I can now offer these sets to Australian, UK and USA buyers (payment via PayPal).1 point -

Brazilian AF-1
Anthony in NZ reacted to Greg W for a topic
I'm fortunate that there are no markings painted over the vortex generators. Eric had to deal with that on his build. I've got it easy with this one. Although I think the Eduard set gives one the option of laying a decal down (or airbrushing some markings) and then simply painting the tabs and gluing them on top. I would do that on a U.S. Navy Skyhawk where the stars and bars go right over the vortex generators. The Eduard set is a real Godsend to Skyhawk modelers! I'd rather fold a bunch of simple right angle bends and glue, than try to make them out of plastic strip for sure.1 point -
1/18TH JSI F-14B Tomcat conversion
Menelaos reacted to A-10LOADER for a topic
One gloss coated Tomcat, decals up next. Steve "TOMCATS FOREVER, BABY...!"1 point -
Excellent build and history lesson iang!! PE and me have an agreement, I won't try and use it, and it won't make my life a miserable soul sucking exsistence. Did try the kit PE, wish I had vid so you all could have a good laff. May have started out straight, but at the end, looked like shiny pretzels or abstract art. Can't say this enough times, I WILL NOT USE THE PE ON THIS BUILD!!! I'll build it riggingless before I go down that dark path again. In the Pacific, they didn't last long, think they were all land based, but they did indeed serve. Don1 point
-
The Swordfish was never used on carriers in the Pacific, so there are no "Pacific Schemes" for it. As far as front-line squadrons are concerned, pre-war deliveries were factory finished in aluminium dope on the fabric surfaces and Cerrux Grey on metal surfaces with a variety of service applied colourful carrier identification markings. All Fairey produced Swordfish were delivered to units in this scheme. This was replaced with a service applied war-time camouflage scheme relating to its Torpedo-Spotter-Reconnaissance role based upon a five colour disruptive scheme of Extra Dark Sea Grey and Dark Slate Grey over Sky Grey undersurfaces with Dark Sea Grey and Light Slate Grey counter shading (from roughly May 1939 until August 1940). This was followed by a similar three colour camouflage scheme with the same upper surface colours but with Sky undersurfaces rather than Sky Grey and with no counter-shading. This scheme applied to all new deliveries from the Blackburn factory commencing in early 1941 and was suppose to apply to in service Fairey built aircraft also. The final scheme applied to Blackburn build Swordfish was a so-called "Atlantic Scheme", where the undersurfaces were white, for use in a rocket equipped anti-submarine role (and some of these had black undersurfaces to the centre of the upper main plane). National markings varied in accordance with time and place of service. At various points, tactical markings were service applied over these camouflage schemes (such as D-Day recognition markings). Finally, there are some Swordfish in second-line training squadrons that adopted the relevant scheme for the time and place associated with this role. As for the rigging, Trumpeter supply flat steel rigging wire of the correct length (inspired no doubt by Tamiya's and MDC's 1/48th scale kits). I've built two Trumpeter Swordfish (plus one MDC and four Tamiya Swordfish) and I found Trumpeter's rigging wires worked fine. One of these was a scratch built floatplane conversion and I used RB productions flat wire for the floats. A bit fiddly, but the end result is quite convincing to my eye and better that the round profile you would get from EZ line or stretched sprue. Here's a couple of photos of the 1/32 float plane conversion in the pre-war scheme from HMS Eagle:1 point
-

USS Missouri Trumpeter 1:200
Koralik reacted to Hubert Boillot for a topic
Very nice build, in the only true scale for large ships, the equivalent of 1/32 for aircrafts Hubert1 point -
You should be able to put some text/print under the canopy and see it visibly distorted.1 point
-

ZM A-1J on a stick
Jan_G reacted to Pete Fleischmann for a topic
Hello All- Built this A-1J from the ZM kit. It is gear-up on a stick with a motorized prop. Great kit! This Spad carries the personal markings of a friend of mine; Randy "Bert" Bertrand. Bert and I flew together at United, and we were crashpad room mates in ORD. Bert would keep me up into the wee hours telling me incredible stories about flying the A-1 as a young Lieutenant in Vietnam. He went on to fly the A-7 and F-15. Awesome dude! He lives in Tampa now and is retired- Maybe someday I'll take it to him. I'll take better pictures of this someday...but for now: The base isn't finished in these pics..but you get the idea Thanks for stopping by. Bring beer next time! Cheers Pete1 point -

Arado Ar 196 A3 BG Air Force 2 Revell 1/32
ShelbyGT500 reacted to Dany Boy for a topic
Very interesting and unusual build in 1:32! I will follow it with interest!1 point -
Less hot today, so I could actually get stuff done. All micro cracks filled. Sky corrected. Shot a nice coat. I'm thinking of sealing it in with varnish before starting with the topside.1 point
-
Yes, as my luck would have it, I ordered one from Lone Star Models this morning, then only a few hours later, I got the email. Oh well, I ordered them both, now I have a spare. Good news is, I now have everything I need to build it including brass cannon and machine gun barrels. Hopefully I will have everything in a couple weeks!1 point
-
great mig. painting is awesome1 point
-
Definitely after. Paint. Drill holes... attach eyelets if you're using any... add wings...1 point
-

Sky Type S Question
Ivan Ivanovich reacted to RBrown for a topic
Duck Egg Blue, Duck Egg Green, Pale Green and Pale Blue are descriptive terms for Sky Type S and were frequently found in period magazines, books, and even official documents. In an attempt at clarification the Admiralty published a supplemental document specifically noting "that duck egg blue and Sky Type S are one and the same colour." The Type S designation was given to all surface color paints at this time but for some reason the suffix was, with the exception of Sky, not generally referenced in publications and documents. The 'Type S' term indicated Smooth, in reference to the type of finish.1 point -
Yup, after1 point
-
I like the look of the JASDF 104s. Waiting for the TF for a final scheme.1 point
-
More work on the wing.No engines.1 point
-
Mirage III S seat .....?
alain11 reacted to Ivan Ivanovich for a topic
Alain, Swiss Mirages used a version of the MB Mk.6 seat, locally dubbed SRM6. AMS Resin did one, but I'm afraid it's been out of production for a while. Anyway, a German scale modelling shop still has one for sale. Great dealer (and extremely nice gentleman) by the way: https://www.aero-spezial-modellbauversand.de/Zuruest-/Umbausaetze/AMS-Resin/AMS32041-Martin-Baker-Mk-4-SRM-6-Schleudersitz-fuer-Mirage-III-spaete-Versionen::14214.html1 point -
I had the same issue with both my builds. The first one I kept cracking the lower fuse half joint but I eventually managed to get it together. The second one I trimmed the lower wing joint until the wings fit perfectly at the right angle. It make absolutely no sense why the kit would be designed to put soooo much stress on the struts and lower fuse joint to achieve proper dihedral.1 point
-

Franz Von Werra Bf-109 E-4
MusAlp reacted to David Mooney for a topic
Good spot MusAlp, I did but only realised after I took the pictures. Luckily I got the masks off before handing it over ðŸ˜1 point -

Mirage IIIS Swiss Air Force
F`s are my favs reacted to MatterOne for a topic
Almost a month since my last update. I must admit, that I was a bid baffled by learning, that the Swiss Mirages have a strengthened wing and fuselage, but by no means surprised. But it took me some time to come up with the facts - and now it seems logic. The reason for my absence is the summer – I offered myself a vacation – a great one. A bike tour from the Netherlands, back home along the river Rhine. Who needs soccer? The other welcome news is, that during my vacation, the minions fixed the errors Italeri built into the kit. length of the air intakes – done increased rudder height – done rudder actuator fairing – done brake chute housing extension - done this said – I can continue with the required modifications that make the difference between E & S While working on the tail section, I removed the two drain masts on each side of the fuselage that was easy - filled from the inside with some Milliput A study of the wing and fuselage from below I will continue with the wings... best regards, Robert1 point -
Shot some Humbrol 90 today - fresh jar. It looked waaaaay too green to me. Like "almost hurting my eyes" kind of green. So I mixed in some 64 light grey. Should have put some 34 white in as well I reckon, as the color is looking rather funny at the moment. No matter. The paintjob revealed another couple of tiny spots in need of refilling. So the second coat will have some white in it as well.1 point
-
Brazilian AF-1
Alain Gadbois reacted to Greg W for a topic
Normally I start with the cockpit but in this case, the Avionix set had not arrived in the mail yet. Therefore, since the Eduard exterior photoetch set was in my possession, I decided to tackle the job of cutting and folding the tiny vortex generators on the wings first. These delicate tabs are going to be left off the wings until just before paint. Evident in the above photo is the recess Trumpeter engineered into the front of the wing to accommodate the leading edge slats, in the closed position. There is not a step on the wing like that on the real aircraft. Since the slats will be deployed on my model, this area is exposed.1 point -
Arado Ar 196 A3 BG Air Force 2 Revell 1/32
Coneheadff reacted to ShelbyGT500 for a topic
We will see that Brian, I hope so But now - paint the engine parts first: Cheers guys1 point -
1/32 BN-2 3D print scratch build. Is this too much for me?
TorbenD reacted to Cap'n Wannabe for a topic
After a bit more faffing around, I've got to the point where I kind of know what I'm doing... The [incomplete] front section of the BN-2 (It's 1/32 scale, but you can't really tell..)1 point -
My little Spatz!
mustang1989 reacted to Adam for a topic
Some work fitting the canopy lock and adding the little "loops" to the canopy frame as part of the canopy locking system - micro-surgeons eat your heart out! Canopy by Adam Dormer, on Flickr Spatz with canopy by Adam Dormer, on Flickr1 point -
Arado Ar 196 A3 BG Air Force 2 Revell 1/32
Dany Boy reacted to ShelbyGT500 for a topic
Thanks friends Now it is time for painting tractor and trolley with tamiya acrylics and some weathering with oils: Cheers guys1 point -

1/32 Cavalier Turbo Mustang conversion
Martinnfb reacted to oppenheimer for a topic
main paint stage done, mayor alclad job is done, after 3 hole days fighting with it finally is done, next step will be paneling and tail number on the side of the fuselage.1 point


